How to quickly tie your shoelaces. Quick ways to tie shoelaces
From early childhood, a person is associated with the need to tie laces on his shoes. A child, lacing his shoes, tying a knot in his laces, is faced with an interesting, but also quite difficult task. In adults, on the contrary, this process does not cause much difficulty and becomes a daily and routine necessity.
However, by applying a little creativity to this event, you can create real “masterpieces”, and not just a simple crisscross of laces. Learn how to quickly tie your shoelaces in a beautiful pattern, making this activity fun.
Quick lacing of sneakers
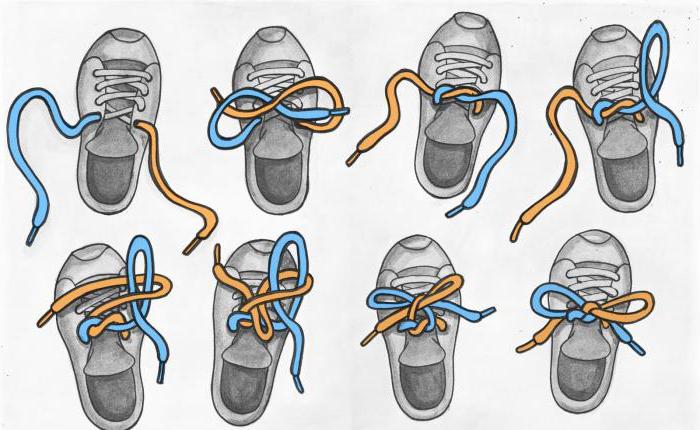
A fairly quick way of lacing sneakers is the “reverse loop.” It looks especially beautiful and stylish with multi-colored laces. This option can be used without tying a bow.

Reverse loop lacing
Another quick option for lacing up sports shoes is lacing with a hidden knot. At the end of the process, a simple knot is knitted and hidden, creating a finished design.

Lace-up with hidden knot
One of the fastest is the so-called “quick lacing”. It can be done even with one hand. It is knitted with only one end of the lace, threaded through all the holes, the other remains untouched.
Quick lacing at one end
At the end, a knot is simply tied to secure it.
Here are four options for fairly simple sneaker lacing to suit different foot types:
- Wide foot with narrow heel.
- High rise.
- The leg is quite thin.
- Narrow foot.

All that remains is to tie the desired bow.
How to tie a bow on shoelaces?
After finishing lacing, you need to tie a bow. There are many different options to do this.
A few quick ways to tie your shoelaces:
The result is a durable, symmetrical and beautiful bow.
"Standard":
"Two-step" knot:
| First, the “standard” version is made. |  |
| In the second option, a loop is made from it and tied to the second end. |  |
| Here you get a strong, although not very beautiful, asymmetrical bow. |  |
More complex options for Jana Fieggena bows:
The Mega Knot is much stronger than the previous ones. It is obtained by creating “spiral” loops at the ends of the lace. After which the ends are pulled through the opposite loops.
 |
 |
Classic bow
The classic version is one of the most famous and common ways of tying bows. Knitted as follows:
- The ends are aligned.
- They are applied to each other and intersect, forming a knot.
- On each of them. A loop is made.
- The rings are connected, then (one of them) is turned half a turn (after crossing).
- It is launched into the resulting hole.
- The bow is tightened.

A correctly and well-tightened bow will not come undone and will not interfere with walking.
How to teach a child to tie shoelaces?
Usually, already at 5-6 years old, a child can easily master the skill of tying his own shoelaces. This requires several conditions:
- the child's desire to learn;
- well-developed motor skills (fine) of the fingers.
In some cases, training can begin as early as 4 years of age. The main thing is not to put too much pressure on the child during the first unsuccessful attempts, but to postpone training until a later time.
You can develop good motor skills with:
- Modeling;
- Folding mosaics;
- Lessons with a designer.
When starting classes, you should use game teaching methods. Buy or make visual aids for your child (for example, a picture with shoes and holes for laces).

Play different games with him using laces. Knit knots at speed or more, string toys, making beads.
Such game exercises will help the child better absorb information and arouse greater interest in the activities.
- motivate the child (by giving new shoes not with Velcro, but with laces);
- show the baby how to tie it by personal example;
- first use thicker ropes and ribbons for tying, not laces;
- when training, monitor the correct, comfortable position (position) of the baby;
- It is better to place the child in front of you (not mirrored), helping him with your hands;
- calculate the class time, both yours and your child’s (without overloading him);
- conduct lessons regularly;
- perform all actions sequentially (no need to learn several methods at once), accompanying them with rhymes, fairy tales or rhymes about shoelaces;
- You can start learning with the simplest knot - “bunny ears” (“grandmother’s knot”);
- do not use too long (short) laces;
- praise the child, even with unsuccessful attempts.
You can start learning with the simplest knot - “bunny ears”
This video will help you learn how to teach your child how to tie his shoelaces correctly and quickly.
Most men are accustomed to the fact that the boots or dress shoes they buy are already laced by the manufacturer. As a rule, this is a simple Criss-to-Cross method. Meanwhile, there are many lacing methods that will allow you to somewhat diversify your men's style.
We have selected the 6 best methods for lacing shoes and drawn diagrams that will help you learn in detail how to tie your shoelaces.
6 ways to tie your shoelaces
As I already mentioned, the most popular way of lacing shoes is the classic Criss Cross. Its popularity lies in the simplicity and simplicity of the weave of the laces. I think this method will “rule the roost” for a long time. Well, let’s try to learn something new and find out how to tie your shoelaces beautifully. For example, lacing shoes using the Direct Method or the Over-Under Cross. Both methods are quite simple and only slightly more complex than the classic Criss-to-Cross method.
Next, we will learn how to tie shoelaces using the diagonal method. This method allows you to lace the shoes either identically or mirror-like on both shoes. Do you like minimalism? Then you can lace your shoes using the Reverse method (also called Military lacing), where the laces are almost invisible. And the most difficult way to tie shoelaces is with a lattice.
They say shoes make the man. In this case, interesting lacing will say a little more about you.
Method 1. Criss-to-cross lacing
Every child knows the traditional way of lacing shoes Criss-to-Cross. It is simple, functional and quite versatile. If you are a practical person, this is the best choice for you. The method is time-tested and will fit any men's classic shoes.
How to tie shoelaces using the Criss-Cross method:
- The lace is passed through the bottom holes of the shoe from the inside and out on both sides. It is important that the laces are the same length at this stage.
- Take one end of the lace and pass it through the next empty opposite hole.
- Repeat the operation with the second lace. You should now have a crosshair of laces.
- Continue this simple operation to the very top holes.
Method 2. Diagonal lacing
The diagonal lacing method for men's shoes looks fresh and attractive. Once both boots are laced, it creates a rather interesting diagonal pattern. It can be either the same or mirrored on a pair of shoes. 
How to tie shoelaces using the diagonal method:
- Pass the lace through the bottom holes on one side from the inside and the other from the outside. The side that came through from the inside will be visible on your shoe, but the other will not. It is important that the laces are the same length at this stage.
- Next, take the end that will be visible and thread it into the next, opposite direction so that the end enters from the outside, not the inside.
- Pass the other end (which will not be visible) through the next opposite hole from the inside. Please note that in this step, the side that was not visible will be on the outside of the boot.
- Continue the operation to the upper holes, alternating between the visible and invisible sides of the lace.
Method 3. Lacing Cross over and under
As the name suggests, after lacing your boots, you will have an alternating cross ABOVE your boots and UNDER your boots. This method looks best on boots with 5 or 6 holes on each side. Quite an interesting way of lacing, especially if you have classic Oxfords.

How to tie shoelaces using the over-under cross method:
The first thing you need to determine is how many crosses OVER you will get. If you have up to 4 holes, you will only get one full cross. If you have 5 or more holes, then you will get 2 or more crosses OVER the boots.
If you have 3 holes:
If you have 4 holes:
- Next, cross the laces and thread them through opposite holes on the inside to form an invisible cross.
- Next, do the same as in the previous step, only this time you will have a visible cross ABOVE the ankle boots.
- The next cross will be invisible, after lacing both ends will come out from the inside to the outside.
If you have 5 or more holes:
- Thread the lace from the inside so that both ends come out from the inside. It is important that the laces are the same length at this stage.
- Next, cross the laces and thread them through opposite holes on the outside to form a visible cross.
- Next, do the same as in the previous step, only this time you will have an invisible cross UNDER your boots.
- Repeat both previous steps and you should have 2 visible and 2 invisible crosses (if there are 5 holes).
Method 4. Straight lacing
Straight lacing allows you to lace your shoes with parallel lines, which look quite unusual on any classic shoe. On the one hand, laced shoes look “easy”, on the other hand they look attractive. The direct method is interesting with any number of holes for laces. The only inconvenience is the difficulty of tightening the laces, especially if the shoes fit tightly on the foot.

How to tie shoelaces using the direct method:
- Thread the lace from the outside so that both ends go inside. It is important that the laces are the same length at this stage.
- Take the left lace in your hand and thread it from the inside out into the next hole on the same side of the row of holes.
- Take the right lace in your hand and thread it through 1 hole from the inside to the outside on the same row.
- Next, take the left lace in your hand and thread it from top to bottom into a strictly parallel hole on the adjacent row.
- Take the right lace and repeat the same action as in the previous step. You should end up with 3 parallel lines formed by the laces.
- All other holes must be laced exactly in the order stated until you reach the last row.
Method 5. Reverse or Military lacing
If you love minimalism in all its manifestations, then I can recommend you to lace your shoes using the Reverse or Military method. This lacing method received its last name due to its practical use in many armies of the European Union countries.

How to tie shoelaces using the Reverse or Military method:
- Thread the lace from the outside so that both ends go inside. It is important that the laces are the same length at this stage.
- Cross both ends of the lace and thread them from the inside out into the next empty holes. You should get an invisible cross.
- Next, take the left end and thread it through the next hole in the same row from top to inside.
- Do the same operation with the other end.
- Next, cross the laces and thread them into the next opposite empty holes to create an invisible cross.
- Repeat steps No. 3 and 4.
Continue lacing your shoes until you reach the top eyelets.
Method 6. Lattice
The last method that we will consider is the most difficult. However, if you have enough patience, you will get a very unusual design that will appeal to many. Please note that lattice lacing looks best on shoes with 6 holes.

How to tie shoelaces using the Lattice method:
If you have 4 holes:
- Thread the lace from the inside so that both ends come out from the inside. It is important that the laces are the same length at this stage.
- The final step is to thread both ends from the inside out through the last holes, after crossing the ends.
If you have 5 holes:
- Thread the lace from the inside so that both ends come out from the inside. It is important that the laces are the same length at this stage.
- Cross both ends of the lace and thread it inward from the top through one empty hole.
- Next, take one of the laces and thread the hole missed in step 2 from the inside and pull it out.
- Repeat step #3 with the second lace hole.
- Pass the ends from the outside in.
- Take the left end and thread it through the next hole in the same row from the inside out.
When lacing, try to intertwine the ends in a “lattice” pattern, using the principle: once on top, once on bottom….once on top, once on bottom.
- Thread the lace from the inside so that both ends come out from the inside. It is important that the laces are the same length at this stage.
- Cross both ends of the lace and thread it inward from the top through the two empty holes.
- Take the left end and thread it through the next hole in the same row from the inside out.
- Repeat the previous step with the second end.
- Take the left end and thread it through the second (empty) opposite hole that was missed in step 2.
- Repeat the previous step with the second end in a mirror image.
- Take the left end and thread it through the next hole (third from the bottom) in the same row from the inside out.
- Repeat the previous step with the second end.
- Thread both ends from the inside out through the last top holes.
One of the most common types of everyday shoes is sneakers. In the modern world, they are used not only for jogging, but also for off-road walking and wearing to work.
And the main detail of the sneakers – the lacing – will help make your appearance more original and unusual. In order to tie the laces on your sneakers beautifully, you don’t need to pay a lot of attention to this, but simply study photo diagrams of how to tie your laces without much effort.
An easy and quick method to lace your sneakers in a special way. It will look good on summer shoes.

We thread the holes of the bottom row with a cord. We take it out of the hole and lift it outward in the next row. We cross the cords and insert them into the next opposite row.

We thread it through, skip one section and cross it again. We continue in the same spirit until we reach the top.

Lacing "Hidden"
The name speaks for itself, namely that its main feature is the masking of unnecessary parts and components. On the front part only harmonious lines are visible.

We insert one end of the lace into the hole and the other end into a parallel hole. We pass a row along the inside of the sneaker, then thread the lace through the hole again.
We repeat these manipulations until the holes are finished. All flaws will be from the inside.

Lacing "Lightning"
This lacing method will make you sweat a lot. To achieve an effective result, you need to do everything according to the instructions.

Such a beautiful lacing will attract the attention of others. It is well suited for shoes that require good foot support (skates).

We begin lacing by inserting the lace into the hole from the inside out. We make a cross loop. Having made one row in this way, we continue the manipulations. We finish with a loop on the inside.

Lacing "Lattice"
It looks very impressive and unusual on sports shoes. But it can only be done on shoes with six holes. We thread the lace through each hole, then twist it and thread it through the holes on the other side.

The pattern should resemble a lattice. Can be used with multi-colored laces. This is not the easiest type of lacing.

Lacing "Ladder"
This type is used in lacing shoes of the American military. The laces are intertwined in it both vertically and horizontally, so that a staircase pattern emerges, as shown in the photo.

Lacing "Rhombus"
Gives flight to imagination, depending on where the edges of the laces intersect, you can get a completely different pattern. Lacing allows you to make both a hidden and a classic knot - whatever your heart desires.

Lacing "Spider Web"
Suitable for shoes with a large tongue and made with wide laces.


There are two ways to do this lacing:

Insert the laces into the bottom row from the inside out. We insert the edges of the laces into opposite holes, skipping 2 rows. We insert the edges into the holes of the adjacent row and skip the row. When tying the laces, we thread them through the formed lines.

We also thread the laces in the bottom row from the inside to the outside. We cross the laces and insert them into the holes, making a pass in 2 rows. Insert the edges of the laces into the eyelets in the same row. Cross the laces and insert them into the holes of the other row. Then insert the lace into the hole in the row above. For detailed information on how to tie your shoelaces beautifully, consider the photo.

Looks harmonious on sneakers with six holes.

Lacing with just one hand
If you think that tying your shoelaces with a bow is no longer relevant, then this type of lacing is for you. For it you should make only one knot at the end. All attention should be focused on the top of the lacing; the lacing should be looser at the bottom.


We begin to thread the lace into each hole, when you reach the end, tie a knot, and repeat the same manipulations on the other side. This lacing will look beautiful on shoes with a large number of holes, but a small size.

Lacing is the opposite
This lacing is suitable for very long laces to shorten them and make them more comfortable for everyday wear.

Pull the lace through the top and make zigzag movements into the three holes. At the moment when the lace is threaded into the penultimate hole, we pull them into the last hole and pull them from the adjacent side.

Summarizing the above, we can conclude that lacing does not occupy the last place in the decoration of shoes. It also solves the problem of long laces and secures the foot well in the shoe.

Lacing makes the shoes unusual, bright and original.


Which type of lacing to choose depends on you and your character, but it’s better to study and try everything. After all, new creative lacing will update your shoes and image.


It is probably difficult to find a person who has not laced his shoes at least once in his life.
It turns out that, according to mathematical calculations, the methods of tying are sufficient to satisfy a wide variety of needs and desires. Based on six pairs of holes per shoe, there are almost two trillion ways. This is a number with twelve zeros!
If we assume that you need to use laced shoes, and not go through the “sea” knots when trying to quickly tighten them, then there are almost 43,000 options!
Methods for tying shoelaces
Let's look at the most popular ways to lace shoes.
- Traditional or cross. This is the "classic" way, which is usually taught in childhood. It is uncomplicated, comfortable and lightweight. With its help you can quickly tighten sneakers, sneakers, shoes. Suitable for plain, dim laces. The cord is wound from the top side through the bottom holes. The ends of the cord are passed diagonally through the following holes. Both ends from bottom to top. Then from top to bottom. The knot is tied after passing the last holes.
 Lattice. It looks beautiful, reminiscent of a tic-tac-toe field. One of the most popular methods. But only for those who are not in a hurry. Tightening this ligature is a labor-intensive task. The laces intertwine at an acute angle, creating a braided feel. To make work easier, it is usually laced at one end, and the other finishes the job. The lacing grid is suitable for shoes with at least six holes.
- Economical grille (lattice). The method is similar in appearance to lattice lacing. It is distinguished by internal winding of cords for holes. More economical because shorter cords can be used.
- Cross. A simple lacing option that extends the life of the laces. So beautiful, so simple. There is one subtlety when lacing: if the number of holes on the shoe is even, then lacing should start from the top, and if it is odd, then from the bottom. The figure shows an example with an even number of holes.
- Straight lacing. The lacing is very neat, but it is difficult to get the ponytails on top to be the same length. Laces up at one end. The number of pairs of holes on shoes should be even.
- For cycling or running in the forest. Practical lace-up with a knot on the side. The appearance is not for everyone, but the practical benefits for the athlete are great. The side knot does not interfere, does not catch, and will not get stuck anywhere.
- Shop lacing. It is laced with one end, which is immediately passed diagonally from top to bottom. It is difficult to get the remaining laces at the top to be the same length.
- World Wide Web. Very original lacing, which is suitable for high shoes and boots. It looks decorative and elegant if the cords are of different colors. It's easy to get confused when you first start. You must carefully and carefully follow the diagram. It is most correct to start lacing from the horizontal section at the bottom, near the last holes.
- Double reverse web. The clouded way of the World Wide Web. This option uses shorter ropes.
- Butterfly. It's like a bow tie, but on shoes. A butterfly, that is, a cross, can be made where a tight screed is required. Skips are made in areas where the lacing can be loosened. A straight stitch can be done from the top or bottom. It is carried out on top if the shoes have an odd number of pairs of holes. This option is shown in the diagram.
 Military. Looks simple. Very practical to use. Short laces can be used. This lacing method is used by soldiers of some foreign armies. In particular, British and French.
- Railway. It resembles military lacing, but only in appearance. This is a very strong lacing method that requires a lot of time to tighten. The cords need to be thin because they pass through the same hole twice.
- Double helix. Fast and attractive lacing with minimal friction. Therefore, it retains its presentable appearance and lasts longer than using clever methods. Lacing can be mirrored on the left and right sneakers.
- Zip-zip. Lacing got its name because of its similarity to a zipper. Ideal for skaters or roller skaters. It is very difficult to tighten it tightly. But this is one of the most durable and strong types of lacing.
- For one hand. The method is suitable for thick laces. Can be tied with one hand. There is no need to make a bow. A knot is tied at the top. The lacing at the top is easy to tighten, while at the bottom it is usually more relaxed.
- Tying with a straight knot. For those who like to play it safe, you can separately adjust the lacing tightness of the upper and lower parts. It is difficult to put on the boots because, due to the knot in the middle, people with high insteps can have their feet caught in it.
- Hidden knot. A method that allows you to hide a knot inside your shoes. For lovers of minimalism.
- Two-color stripe. The lacing looks very nice on the sneakers. The only drawback is the presence of an internal node. Suitable for thin laces.
- Double two-color check. Solves the internal node problem. It simply doesn't exist. A beautiful way to tie shoelaces. If the sneakers have an odd number of pairs of holes, then you need to shorten one lace so that they are of different lengths.
- Reverse loop. Looks elegant on sneakers, but the laces wear out quickly. This type of lacing requires constant attention. When used for a long time, the knot loops move in different directions.
- Nodal. Very tight and strong lacing. Great for physical education. Ski boots and roller skates will not move or dangle. Each knot increases the tightening strength of the laces.
- Twisted method. The lacing is also tight and holds the boots well. It looks especially impressive if the shoes and laces are black and white, respectively. Suitable for thick laces.
- Roman numerals. There is a wide choice between lacing options, especially if there are a large number of holes on the shoes.
 Lacing for playing footbag. The shape of the shoes, at first glance, becomes incorrect. But it is very convenient to control the game ball, which confidently fits into the recess.
- The second way to play footbag. This lacing is similar to the previous one. Various variations are possible, which are best selected individually for sneakers or sneakers.
- Chess. If the shoes have a wide brim, then the Chess method is perfect. The laces should be flat and preferably tighter. Two laces are used. You can choose plain ones, you can use different colors. The method is quite labor-intensive, but beautiful. You need to be prepared that you will often have to bandage it. Every time you take off your shoes, it wrinkles and the squares slide off. The first lace is threaded in the usual straight way. The second one is laced vertically. It needs to be inserted in a checkerboard pattern between the rows of the first lace, threaded first from above, sometimes from below.
Boots with loops
 On boots that have loops instead of the usual holes, it is best to use round laces. In this case, they will last much longer. The loops themselves have a load limit, so it is necessary to select a pattern for tying the laces to ensure an even load. Cross lacing works best.
In this case, you need to tie the laces correctly from the bottom up, initially distributing the length so that the left and right parts are the same.
Choosing a shoe lacing pattern should be done as if choosing an outfit. Reliable and fast lacing is suitable for sports shoes, elegant style is suitable for festive shoes, simple lacing that does not cause discomfort is best suited for casual shoes.
Children's secrets
For children's feet, comfort and proper wearing of simple shoes are most important.
Choosing shoes and laces to match them, there are some points to consider:

How to prevent unraveling
It often happens that shoelaces come undone at the most inopportune moment. Sometimes there is no time or opportunity to tie them.
In addition to the traditional bow, there are several reliable nodes, which can be used when tying shoelaces - then the knot will be strong and will not let you down at the most inopportune moment.
 The simplest and one of the most reliable. Easy to tie, quickly untied by hand, even if the laces are wet, but does not unravel on its own.
To tie it, you first need to make a regular knot. And then another one. The main thing is that when tying the second knot, the knot is not twisted, but flat.
Surgical method
It can be called an improved version of the straight knot. It was originally invented for medical use. This unit can withstand heavy loads. He cannot untie himself, but he easily gives in to his hands.
Of course, there are many different units, but these have proven to be the most reliable and versatile.
Classic bow
 An ordinary bow, which everyone knows how to tie since childhood, can be strengthened and tied in such a way that it practically does not relax on its own. The figure shows a diagram of such a node.
In general, all lacing methods can be conditionally divided into three global groups:
- Sports lacing. Ideal for sneakers, sneakers.
- Straight. Looks good on men's shoes, serious shoes.
- Cross. The most versatile type of tying.
Shoes are an integral part of the image. Therefore, when choosing an outfit, you need to take care that beautifully tie laces on boots, shoes, sneakers. Then everything will be harmonious and comfortable, and, you see, good mood and health depend on this.
Attention, TODAY only!
Laces are the most important part of a sneaker, affecting the safety and comfort of an athlete’s foot during competitions or training. Therefore, the ability to tie shoelaces on sneakers is correctly considered a necessary skill that should be brought to automaticity.
The physiological characteristics of the legs of each person can differ significantly. For example, the width or instep of the foot. Thus, you need to choose the most suitable method of tying shoelaces so that your feet are as comfortable as possible. In addition, distribute the pressure and degree of fixation evenly.
If a person uses different types of sports shoes in everyday life, then he is most often interested in the question of how to tie the laces on sneakers beautifully, originally and fashionably. In fact, the criss-cross pattern with a bow, familiar to everyone from childhood, is a classic, but it is far from the only lacing method and you can easily master several other techniques.
Next, we’ll look step by step at how to tie shoelaces on sneakers and highlight the most interesting and popular lacing methods, both with and without a bow. In addition, we will learn how to make sure that the laces on your sneakers never come undone.
Recommendation. Look carefully at the photo diagram and read the step-by-step instructions.
HOW TO TIE SHOES ON SNEAKERS WITH A BOW - STEP BY STEP 12 WAYS
Ladder

Then pass each part through the hole opposite from the outside.
Pass both parts through the hole opposite from the outside again and intertwine as indicated in the previous step, only now part A should be over part B.
Proceed in the same way to the top holes on the shoe.
Zipper

After this, pull both parts under the loop and intertwine them together so that part B is above part A.
Repeat steps 2 and 3 until the last holes on the top of the shoe.
Double back

Pass the lace from the outside down through the second holes from the top, forming two equal parts - A (orange) and B (red).
Pass each piece through the fourth hole from the top from the outside.
Then weave both parts again. Now part B should be above part A.
Pass both pieces through the last bottom holes on the outside, and then into the second holes from the bottom on the inside.
In the last step, thread each piece into the empty top holes. First the third ones, and then the first ones.
Loop back

Pass the lace through the bottom holes on the inside and pull both ends up to create two equal parts - A (orange) and B (red).
Intertwine both parts as indicated in the photo diagram. As you can see, in the future, each part of the lace will be located only on one side of the sneaker.
Work your way to the top of the shoe, threading each hole from the inside and weaving both sides of the lace at the same time (step 2).
Bush walk (forest walk)

First, thread the lace through the bottom holes from the inside, forming two equal parts - A (orange) and B (red).
After this, from the outside, pass part B through the third hole from the bottom, and part A through the fourth.
Then pull both parts from the inside through the holes opposite.
At the last stage, repeat steps similar to steps 3 and 4 (see photo).
Saw tooth (saw teeth)

Thread the lace through the bottom holes from the outside and line up the two parts - A (orange) and B (red).
Pull part A through the inner side of the second hole from the bottom, and then through the outer side of the second hole opposite.
Pull part B under part A diagonally and thread it through the third hole from the bottom on the inside, and then through the third hole from the bottom on the outside opposite.
Work your way to the top of the shoe, using the same steps as step 3 for part A and step 2 for part B.
Foot bag (suitcase for feet)

Pull the lace through the third holes from the bottom on the inside and form two equal parts - A (orange) and B (red).
Pass both parts through the second holes from the bottom from the outside.
Thread both pieces through the bottom holes on the inside, and then through the third holes from the top on the outside.
Pass part A through the second and first (diagonally) hole from the top from the inside.
Do the same with part B as in step 5.
Hash (mash)

Pass the lace through the bottom holes on the inside and pull both ends up to create two equal parts - A (orange) and B (red).
Intertwine the lace so that part B is over part A.
Pass both pieces through the fourth holes from the bottom on the outside, and then through the third holes from the bottom on the inside.
Repeat steps 2 and 3 to the top of the shoe.
Twistie

Pass the lace through the bottom holes on the inside and pull both ends up to create two equal parts - A (orange) and B (red).
Intertwine both parts together (full turn).
Pass each piece through the second hole from the bottom on the inside.
Continue with steps 2 and 3 until you reach the top of the shoe.
Riding bow

Place the lace diagonally inside the shoe and pull part A (orange) through the bottom hole on the left and part B through the top hole on the right.
Repeat step 2 until you reach exactly the middle of the shoe.
Starting at the bottom of the shoe, perform steps 2 and 3 on part A.
Lattice (mesh)

Pull the lace through the bottom holes on the inside and pull both ends up to get two equal parts - A (orange) and B (red).
Then weave the lace so that part A is over part B and thread each of them through the fourth holes from the bottom on the outside.
Now pass both parts of the lace through the fifth holes from the bottom opposite from the inside.
Then pass both parts into the third hole from the bottom opposite on the inside.
Weave both parts again, following the structure of the previous weave (see photo), and thread the ends of the lace through the upper holes on the inside.
Bi-colour (two-color)

Prepare two different colored and slightly elongated laces. For example, orange (part A) and red (part B). In this case, part B should be about 25-30% longer.
Tie both parts tightly together and carefully trim the tails.
Starting from the bottom right side, pull part B up to the top of the shoe through the holes as indicated in the photo.
Starting from the second hole from the bottom on the right side, proceed with part A in the same way as step 3.
HOW TO TIE SHOES ON SNEAKERS WITHOUT A BOW - STEP BY STEP 3 WAYS
Checkboard (chess board)

Prepare two laces of different colors. For example, orange (part A) and red (part B). It is desirable that the laces are long and wide.
Starting at the bottom left, pull part A through each hole of the shoe to the top (see photo).
Intertwine part B with part A (see photo).
In the last step, carefully tuck the ends of each part of the lace inside the sneakers.
Display

Pass the lace through the bottom holes on the outside and pull both ends up to get two equal parts - A (orange) and B (red).
Hidden Knot (hidden knot)

Pass the lace through the bottom holes on the outside and pull both ends up to create two equal parts - A (orange) and B (red).
Pass part A through the second hole from the bottom on the inside, and then through the second hole opposite on the outside.
Pass part B through the third hole from the bottom on the inside, and then through the third hole opposite on the outside.
By analogy with step 3, and on the two outermost holes with step 2, stretch both parts of the lace to the top of the sneaker.
HOW TO TIE THE SHOES ON SNEAKERS SO THAT THEY DON'T UNTIE
What to do if the laces on your sneakers constantly come undone, and even at the most inopportune moment, and no knot helps? In the early 90s of the last century, especially for professional athletes, Salomon developed and patented the QuickLace system, which makes it very easy and quick to adjust the lacing on shoes. The device is designed in such a way that the laces on the sneakers are guaranteed not to come undone.

In general, there are incredibly many options for tying shoelaces. For example, the collection of the famous Australian “lace specialist” Ian Figen today includes 50 different techniques. If desired, anyone can come up with some new way and give sports shoes a unique look. In a word, wear the best men's sneakers, play sports and learn to tie your shoelaces correctly and beautifully.