How to make an angel out of paper with your own hands. Paper angels, white (description and stencils)
Today we are bringing back good old traditions into our everyday life - making Christmas tree toys with our own hands. And new technologies and the availability of beautiful, bright materials for sale will make this process easy and enjoyable, and the result – beautiful and pleasing to the soul.
If your children love to decorate your home with their own hands for Christmas, you can make a simple paper Angel with them. To make it you will need the most common office supplies.
We advise you not to skimp and purchase beautiful golden, patterned or embossed paper for this toy. In this case, at the end of the Christmas holidays, the paper angels can be carefully packaged and stored until Christmas time next year.Thus, this simple toy, which is easy to make with your own hands, will delight you and your children for a long time.
How to make an angel out of paper - option 1
To make two Christmas angels you will need:- a printer to print the drawing;
- a sheet of beautiful thick paper, preferably different colors on both sides (A-4 format for 2 angels);
- scissors;
- hole punch to make a hole for the thread;
- a small piece of beautiful thread (20-25 cm) to hang toys.
If your printer does not accept thick paper for crafts, you can make a drawing on plain paper and use tracing paper to transfer the image onto a colored sheet.

- Cut out the future angel templates according to the gray lines.
- Fold the paper blanks as shown in the photo and form your Christmas angels.
- Using a hole punch, punch a small, neat hole in the angel's head and thread a piece of thread through it. Tie the edges of the thread to make a loop - use it to hang the handmade toy on the Christmas tree. (Also, angels can be hung on a long thread from the ceiling or in the doorway).
Option 2 - Christmas Angel with wings

Using the instructions below, you will turn gold wrapping paper into a beautiful paper diffuser - Angel with Wings. Quick, easy and fun, you can make one, two or even many angels to decorate your home for Christmas in no time.
To make a paper diffuser you will need:
- gold or silver wrapping paper (or other color of your choice);
- a piece of cardboard for stabilizer;
- glue;
- scissors;
- an awl or thick needle for perforating paper.

- Print out the paper diffuser template Angel with wings.
- Tape the template to the back of the wrapping paper. Make sure the glue covers the entire design sheet. It is better to use “dry” glue or a glue stick, since liquid glue leaves wrinkles on the paper.
- Cut out the Angel according to the template shape.
- Make slits along the dotted lines.
- Cut a rectangular piece of cardboard, which you need to stick on the back of the template to add rigidity to the Angel figurine.
- Glue this piece of cardboard using a glue stick.
- Using an awl or thick needle, poke holes in the template at the perforation points.
- First, make a perforation according to the pattern on the back side of the template, then carefully repeat it on the front side.
- Roll the template as shown in the photo to form a cone and seal the edges with a glue stick.
Simple yet elegant, these angels would look great on your dining room table or office table. They will cheer you up and make you smile.
How to make a 3D paper Christmas angel

This cute decoration is quite easy to make. It can become either a New Year's tree decoration or used for festive interior decoration.
To make a three-dimensional Angel you will need:
- a sheet of beautiful colored paper;
- yarn or colored thread;
- liquid glue or glue stick;
- ruler;
- pencil;
- scissors.

- Print out the Angel template.
- Cut out the template and, placing it on colored paper, trace it three times with a pencil.
- Using scissors, cut out all three angel templates.
- Using a ruler, bend all three templates along the center vertical line.
- Using a ruler, measure approximately 12 cm of thread.
- Take two templates and glue them in halves (to the fold).
- Fold the thread in half and insert its edges into the fold of the templates.
- Lubricate the halves of the first two templates with glue and place the third template on top, securing the edges of the thread at the same time.
- All! Our Angel Diffuser is ready! You can hang it from the ceiling on a long thread, and it will beautifully rotate with the movement of air, remaining visible from any point.
You can also make not only a three-dimensional, but a four- and even five-dimensional Angel, using the appropriate number of templates.
Ideas for inspiration
Good luck with decorating your home for the holidays and Merry Christmas!A paper angel is a wonderful craft for Christmas. I'll tell you how to make a wonderful angel from a piece of paper. This is a very simple craft. Even a preschooler can cope with such creativity.
The paper angel is cut out according to a template from one sheet, but it looks three-dimensional and very cute. These angels can be hung like a mobile and they will bring happiness to your home. In addition, a child can give paper angels to grandparents. They will be very glad that their grandchildren made such a beautiful craft with their own hands.
A little history. It turns out that the paper angel, of which there are so many templates, was invented by our Russian artist - Vladimir Andreevich Favorsky. It would seem that there is nothing complicated - fold the piece of paper, cut it out according to the template, bend the handles with the pipe and behold, the beautiful Christmas angel is ready. Simple ideas are brilliant!
How to make a paper angel. Cutting templates
The angel needs to be cut out of paper. Choose one of the proposed templates. Print it out or redraw it (maybe you can come up with your own details).

Fold the sheet in half and cut with scissors. Carefully bend the arms of the angel with the pipe down.

All that remains is to curl the wings with the edge of scissors or a pencil and your Christmas angel is ready.

You can fold the Christmas angels a little differently. On the presented templates, you need to cut out the angel figurine and connect the wings, sliding them into the slot.


Let the paper angel bring happiness to your home!
Get creative and give paper angels to your loved ones!
Master class “Magic in the home - with your own hands.”
Let's do it together angel
from paper.
Maria Georgievna Plesnevich, physical education teacher, School No. 2115, structural unit No. 5, Moscow.
Subject: DIY interior decoration for the New Year.
Description: It’s easy to create comfort and beauty in your home on New Year’s holidays with your own hands, if only you have time, desire and attitude. The technique for making such an angel is quite simple, so you can safely start making it together with a child already about five years old.
Target: This master class aims to clearly show that using available materials and without complex step-by-step instructions, you can also create a New Year’s mood in the form of such cute paper angel figurines.
Tasks:
- creating a festive mood and comfort in the home;
- education and development of accuracy and attentiveness in preschoolers (when working with a template, paper, pencil and scissors, it is extremely important to be extremely careful and carefully draw and cut lines);
- development of the eye;
- developing skills in working with paper;
- development of spatial imagination (even before creating a figure with his own hands, the child tries to imagine, imagine what it will be like);
- developing the ability to listen to oral instructions given to children, correlating them with visual pictures;
- stimulation of memory development (the home interior can be decorated with a whole regiment of such angels; by making more and more new angels, the child voluntarily remembers the course of action necessary to create it).
Purpose: With such figures you can decorate the whole house - shelves, bedside tables, window sills, branches of the New Year's tree and even the New Year's table!
Materials needed to make an angel:
- 2 sheets of paper (any color);
- a simple pencil;
- black handle;
- scissors.

Working with scissors You need to remember that this is a rather dangerous item if used incorrectly. Therefore, before starting work, the child should learn that:
- scissors are not a toy, so don’t play with them;
- do not run your fingers over the blades of the scissors, they can cut you off;
- when you work with scissors, one hand cuts, and the other holds the paper (and you need to keep this hand that helps hold the paper away from the blade);
- under no circumstances place scissors on the edge of the table, as they may fall and injure you;
- scissors should be placed with the rings towards you, and passed with the rings towards the person to whom you are passing them;
- you need to close the scissors if you don’t cut anything else with them.
The child, if he doesn’t know yet, will certainly ask - And who is this Angel? And we will answer him:
"Baby, angel is the one who helps a person when he needs it most, he protects a person from everything bad that happens on Earth.” Therefore, let there be more such kind helpers in the house!
So, having put a new word in your trunk, armed with the necessary material and, having believed in your strengths and skills, you can start making an angel!
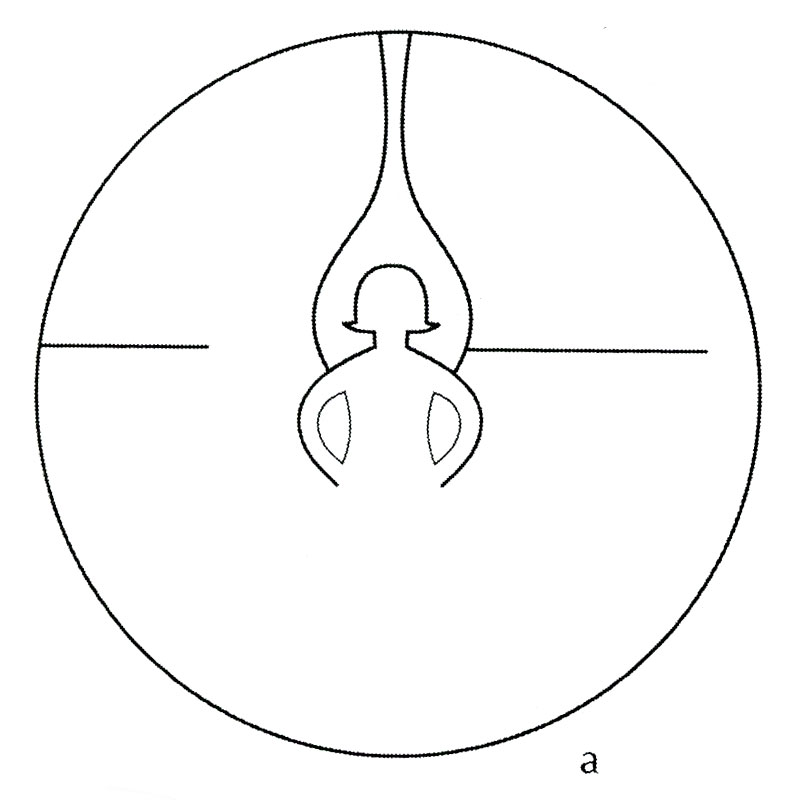
Step 1. Draw a template with a pencil and trace it with a black pen or marker.

Step 2. Take a blank sheet of paper, place it on top of the template and trace it with a pencil.


Step 3. Along the pencil lines (outside) we cut out the drawn figure.

Step 4. Fold the resulting figure in half. Lay it out, make a cut along the drawn pencil lines - on the right and top.

Step 5. Put the figure back. On the resulting half we cut out a “crescent” figure (it is already depicted on your workpiece with a pencil) and make an incision along the pencil line above this crescent.

Step 6. We unfold the figure. We make the remaining cut on the left side along the pencil line.

Step 7 In order to make an angel figurine, we connect the right and left cuts, inserting one wing into the other (putting one cut on the other). We get this rear view.

Step 8 The angel is almost ready, all that remains is to lower the arms down.

The angel is ready! Let it please you and give a wonderful atmosphere of magic and comfort to your home.
It's time to make him friends (yellow, pink, blue, green, with different hairstyles or wing shapes - whatever your imagination allows!) and place them around the apartment.
Paper angels can be hung on the New Year tree, or they can be given to guests at a children's party. Making a figurine out of paper is so simple that you can safely involve even small children in the creative process.
Lesson #1
You will need:
- colored paper (it is advisable to use thick cardboard);
- template (you can use the template we offer or draw your own);
- scissors and stationery knife;
- thin awl, needle or pin.
1: Print the template and cut out the blank along the contour.

2: Mark the piercing pattern on the back side with a pencil.
3: Using a thin awl, needle or pin, punch holes. It is best to pierce them from the front side. Make sure the holes are the same size and spaced the same distance from each other.

4: Turn the piece over and draw a pattern on the wings, then punch holes. It is best to pierce the holes on the wings from the wrong side.


5: Fold the angel as shown in the picture. The wings can be fastened together using a stapler.

6: If you want to hang the figurine, secure the thread by gluing it on the back side.


Master class No. 2
Another simple step by step tutorial that will help you make an angel out of a paper plate. You will need:

1: Cut a paper plate in half and fold one half to form a cone. Secure it with tape or a stapler.
2: Cut out arms and wings from the other half of the plate, then glue them to the body.
3: Cut out the face, palms and hair from colored paper. Draw the eyes, nose and mouth, then glue the pieces to the figure.
4: To make a halo, take a strip of aluminum film measuring 12.5 x 9 cm and twist it into a rope. Roll it into a ring and then secure it to the angel's head.
Lesson #3
Another simple master class. You will need:
- colored paper;
- bead with a through hole;
- decorative brush.
1: Take two square sheets of colored paper (13 x 13 cm). Fold the first sheet like an accordion (the width of each fold is approximately 1 cm). Fold the second sheet like an accordion, but make the folds narrower, about 0.5 cm.
2: Take the first piece (angel body) and pinch the top.

3: Take a bead and place it on a decorative pipe cleaner, wrap it around the bead and twist it into a rope. Sew the end of the pipe cleaner to the angel's body.
4: Take the second piece of paper and fold it in half, straightening out the folds slightly. After this, sew them to the body.

5: To make the halo, take another piece of pipe cleaner, wrap it around the angel's head and glue it in place.

Now you can hang the angel by a thread from a wooden stick.

In ancient Greek there is a word "angelos". The concept of “angel” is derived from it. The Greek term means "messenger". That is, the winged spirit is the one who conveys the will of the Gods. So, in the story of the Nativity, the angels told the wise men not to return to Herod.
The priestesses knew where the baby Jesus was, and they prophesied to the king that the end of his reign would come with the birth of the Savior. Therefore, the Magi, as well as Joseph, Mary and the baby, went to Egypt. Since then, Christians have worshiped angels.
One way to give thanks is to place winged figures on Christmas trees. The holiday is already around the corner. It's time to find out exactly how to make Christmas angels. If you take it as a material, the process will be quick and simple.
How to make an angel out of paper
How to make an angel out of paper - video, which can be divided into several categories. The first includes samples that require scissors to make. These are the simplest and fastest options for making angels. You can create separate ones, or tie them into garlands. Let's start with the chain of winged creatures. They seem to be holding hands, symbolizing the unity of the forces of good.
This is just a preparation. There is room for imagination. The garland can also be cut out of thin cardboard or colored paper. It doesn't have to be left untouched. How about covering it with paint, or spraying glitter? The atmosphere of a fairy tale and purity will be supported by glued rhinestones. The outline of the angels can also be different.

Individual figures of God's messengers can be flat or three-dimensional. A middle option is also possible. It requires corrugated paper. Sheets from stores are usually thin and have a small zigzag. For Christmas crafts you need thick paper with large folds. So, we take ordinary sheets and create the corrugation ourselves. The nuances of the process will be explained in the following video “ How to make a Christmas angel out of paper»:
Now let's figure it out how to make a three-dimensional angel out of paper in the full sense of the word. A pattern will be required. Even a child can draw it. To make the figurine better hold its shape, use thick paper. A sheet of A-4 format is enough. Scissors, as always, are the main thing in the process. So let's get started.
If you don’t have time to draw the outline of a winged creature, you can use a ready-made template. It is not difficult to find on the Internet. All you need is a printer to print the sample. Next, we trace along the contour, and the issue is resolved, how to make an angel out of paper. Templates The popular ones are given below:


In question, how to make an angel out of paper with your own hands Origami lessons stand out. The technique cannot be called simple, and it takes a lot of time to create one figurine. Therefore, we will pay special attention to Japanese technology.
How to make an angel from origami paper
To create origami, you need precision, patience, and spatial thinking. All this relates to the sphere of the mind that controls the angels. This is the opinion of Evagrius. This ascetic monk lived in the 4th century. It is the concept of Evagrius that is recognized as fundamental by Christianity. The man said that the human essence is threefold.
The lower part causes a thirst for carnal pleasures, hunger. The medial substance is responsible for emotions, promoting pride and anger. The third part is rational. It is she who brings a person closer to God and the world of angels. So origami, where you need to turn off your emotions and forget about hunger, delving into creativity, perfectly matches the spirit of Christmas.

The photos are inspiring. The time has come make a paper angel for the New Year or Christmas. In Russia the first holiday is celebrated on a grand scale. In Europe and America, Christmas is considered the main holiday, honoring the traditions of Christianity. In Japan, as a rule, Buddhism is practiced. But this does not prevent you from taking advantage of the work of the masters of the country of the Ascendant and creating origami angels. Training video below.
Origami figures are stable, dense, and voluminous. Such angels can decorate not only the Christmas tree, but also the festive table, fireplace, in general. Wings are also used in the decoration of premises as the main attribute of heavenly spirits. The accessory can be hung on the wall, or worn on yourself. The last option is good in the case of a themed, costume party.
How to make angel wings from paper
Make your own angel wings from paper easier than it seems. Firstly, the object is quite large. There is no need to painstakingly cut and fold the smallest parts. Secondly, you only need paper, glue or tape, a pencil and scissors. Everyone has this toolkit. How to apply it? Watch the training video:
Sonya Star shared her method of making angel wings. But, there are plenty of other options. A certain Max Lenova refrains from commenting and offers a rather dark video. But the young man’s creation is so beautiful that it is worth attention even in this form.
Paper can only be the basis for the wings. Feathers, for example, are also made from fabric. It is also possible to use non-standard sheets. Wings made from newspapers or tracing paper look unusual and elegant. In order not to be unfounded, below are examples of works with a “zest”.


Now, it remains not to forget about the Christmas stars and images of Jesus. During early Christianity, by the way, he was considered one of the angels. Christ lost this status only in the year 325. Then the Council of Nicea was held, convened by the Emperor of Rome, Constantine 1st.
At the meeting it was established that Jesus has the same nature as God, which means he cannot be an angel. However, this does not demean the role of heavenly spirits, but only changes the public's view of Christ. He is considered the savior of humanity. This means that Christmas is a holiday of salvation, kindness and purity of thoughts.