Beautiful headdress for the snow maiden. Master class for making a kokoshnik for a snow maiden
The Snow Maiden costume is one of the most sought-after outfits on New Year's celebration. Many girls dream of trying on the image of the granddaughter of Santa Claus. The main attribute of such an outfit is a beautiful kokoshnik. Making it with your own hands is not as difficult as it might seem at first glance.
What is required for a kokoshnik 
Kokoshnik can be made different ways. Therefore, the list of necessary materials is diverse. In most cases, you will need the following materials and tools:
- Paper and cardboard. Useful as paper for creating a layout and ordinary newspaper. Cardboard is selected depending on the type of jewelry with which the product will be decorated;
- piece of fabric blue color. Guipure with New Year's patterns is well suited;
- Hoop. You can use a regular wide plastic hoop;
- Pencil, eraser and scissors;
- Metal strips or wire different lengths. She can be given necessary form in addition, it keeps its shape well;
- Satin ribbons of various widths;
- Glue or glue gun(PVA, Moment and others);
- Decorative elements (rhinestones, beads, sequins, beads, etc.;
- Candle or lighter;
- Foam rubber.
Important! Cardboard must be prepared and straightened in advance, because. some types of cardboard are stored rolled up. We must give him time to lie down under the influence of the load.
General recommendations for making the snow maiden's kokoshnik
First you need to decide on the shape, size and design features of the future product. To do this, you need to look at the outfit of the Snow Maiden in specialized literature or on thematic sites. The kokoshnik can take the form of a classic dome, a flower and the edge of a snowflake. In the end, much is determined by the imagination of the author and his personal preferences. Even if there is finished pattern the kokoshnik will still have to be adjusted in size to your head or the head of a child so that it sits perfectly and keeps well on the hoop. Therefore, the most important point is the process of making a pattern and fitting the resulting workpiece.
Attention! Carefully consider the size of the future kokoshnik, because. first of all, it should be comfortable, light and not create discomfort during the event.
How to make a snow maiden's kokoshnik with a hoop 
When everything is ready necessary materials you can start making clothes. Consider the step-by-step process of manufacturing one of the popular types of kokoshnik with a hoop:
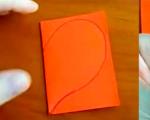
- First you need to model the shape of the future product. For it to be symmetrical paper should be folded in half and draw the outline of the kokoshnik. You can make several options and choose the most suitable;
- The resulting workpiece must be unfolded and a rim attached to it. It should be noted with a dotted line the contour of the rim;
- We cut a hole for the head and adjust it to the required parameters by trying on. It should be cut a little more, because. the product in this case will be attached to the hoop. You can also measure the workpiece on an already dressed hoop;
- The strip where the bezel will be attached is cut into equal segments 2 cm long;
- The resulting pattern should be translated into thick cardboard white color;
- Cardboard can be wrapped in a smart blue cloth or painted with paint;
- When gluing with a cloth, it is necessary to cut out two parts according to the shape of the template. One of the elements should be 1 cm larger. After gluing, the fabric should dry thoroughly. We also glue the allowance on the back side. Further decorative trim disguise it;
- We are preparing a hoop. To do this, wrap it narrow ribbon and lubricate with glue in places;
- Bending the left teeth on the kokoshnik, glue it with inside hoop;
- The headdress is ready and you can start decorating it.
Reference! Instead of a hoop, you can use a strip of foam rubber. It is glued from the front and back of the product. In this way, the kokoshnik will be securely fixed and not cause unpleasant and pain. They should be beautifully decorated.
We create various options for the snow maiden's kokoshnik with our own hands 
There are other ways to make kokoshnik. Consider the features of making a kokoshnik with an artificial scythe. You will also need a white satin, an elastic band and a false braid. To sew the product, follow the step-by-step instructions:
- After the manufacture of the main part, it is necessary to start making a cap on the forehead. It is necessary to measure the distance from the base of the product to the middle of the forehead, as well as the length of the rim;
- A tuck should be considered so that the part sits better on the forehead;
- The outer part of the product is decorated in various ways;
- The resulting part is connected to the kokoshnik and the hoop;
- Next, prepare the braid. It is better to sew it on a cut of exactly the same material as the headdress and fasten it to the back of the product;
- We cut out back crafts. To do this, we cut out a semi-oval, having previously measured the distance between the ears and from the beginning of the kokoshnik to the shoulders;
- The edge of the back cap is folded over and an elastic band is inserted into it for ease of dressing and a better fit of the product on the head;
- Further, back detail attached to the kokoshnik;
- You should make blanks for bows. To do this, cut out a rectangle about 60x40 cm in size and a strip of 60x10 cm, bending the edges with it. A bow is made from these details. It can be made in any other convenient way;
- The bow is attached to the base of the braid;
- The headdress is ready. It remains to decorate it, if possible, hiding the seams from connecting parts.
You can also make a headdress without a hoop. For this, it is necessary to prepare beautiful ribbon two or more centimeters wide. The wider the tape, the better. It is sewn to the kokoshnik and tied at the back of the head. This method is universal and the product is suitable for any head. Also, in addition, the kokoshnik can be attached to the head with invisibility.
How to decorate the snow maiden's kokoshnik 
In the matter of decorating a product, a craftswoman may have full freedom. Suitable for various decorative elements. Many of them can be taken from old or unnecessary things and jewelry. Most often in museum collections there are kokoshniks, richly decorated with pearl mesh. At the same time, strands of pearls descend on the cheeks of a snowy beauty. This pattern can be repeated independently, dissolving the usual ones with white pebbles. Consider one of simple ways decorating a kokoshnik blank with a cloth. Do the following:
- A piece of cardboard can be wrapped with a piece of tulle. To do this, cut out the kokoshnik from paper or thin plastic. Next, wrap it with a cloth;
- We start sewing on a typewriter. The first line is done without affecting the workpiece. The second line is laid along the outer contour, shifting the workpiece to the first line;
- Next, cut out the resulting part along the edge, leaving allowances of 1 cm on each side of the contour;
- Patterns must be applied to the resulting part. If used transparent plastic, then you can first draw patterns on a paper blank. Then put it under the plastic and simply circle the patterns with gold glue according to the finished markings. If a sheet of paper is covered with tulle, then patterns can be applied using stencils or arbitrarily;
- Next, add more embellishments.
Reference! The kokoshnik should be beautifully decorated both on the outside and on the inside.
To upper edge crafts looked spectacular to him sew a thread of beads. Beads, beads and bugles are best sewn on, rather than using glue. On the bottom, you can glue the fringe with a special thermal gun. The attachment points of parts are decorated with white tinsel or other elements. You can make spectacular petals using the kanzashi technique. To do this, you will need to do the following:
- For their manufacture, you need to take two ribbons of white and silver. From a silvery material we cut out squares with a side of 2.5 cm, and from a white one with a side of 5 cm;
- We bend each square first diagonally, and then in half and again in half;
- We hold the resulting element with tongs, cut off a couple of millimeters from the tip and scorch it until completely glued with a candle or lighter;
- We also cut off the lower part of the petal and cauterize, thereby protecting the fabric from possible singing in the future;
- Thus, they act with all the cut out squares. In the future, silver petals are glued inside the white ones;
- You can leave white petals separately and glue beads to them;
- Next, we begin to decorate the kokoshnik with the resulting elements. In the central part, you can place big flower, and on the sides two small ones. You can come up with a composition yourself;
- In the middle of the resulting flowers, it is better to place large noticeable beads.
Important! Petals using the kanzashi technique are best placed on the product in a checkerboard pattern. In this way, a peculiar effect of drowning each next row between the petals of the previous one will be obtained.
For jewelry fit foil, pieces of brocade and other showy fabrics, Christmas tree rain and other decorative elements. You can use lace stripes. Of course, snowflakes cut out of fabric or paper will look spectacular. Can buy ready-made snowflakes in the store and also draw them acrylic paints. Often a beautiful addition to the kokoshnik of the granddaughter of Santa Claus is a light gossamer shawl or silk ribbons.
You can make an exclusive kokoshnik for the Snow Maiden with your own hands. Do not forget about the manufacturing standards of this headgear so that it is as close as possible to models from fairy-tale illustrations and films. Observing simple recommendations it can be done by hand in one evening.
I happened to this New Year play the role of the Snow Maiden. Scenario, contests, prizes... and even make a costume. As it turned out, the outfit for the Snow Maiden is not an easy task. You can, of course, rent it, but this is if one can be rented in your city, and if not all the costumes have been taken apart yet + if there is a financial opportunity.
So we decided to make our own costume. Today we will talk on the site about the headdress of the Snow Maiden and offer you our own version of making a wire crown. By the way, such a crown is suitable for both the Snowflake and the Snow Queen.
You will need:
- wire with a length of at least 1 - 1.5 meters, preferably aluminum, it is lighter in weight and bends easier. However, we didn’t have one at hand, so we took out copper wire from a wire for electrical wiring and twisted it,
- tinsel of silver or any other color to match your dress with a length of at least 2 meters. Under my blue suit, royal blue tinsel came in handy.
So, the first step is to make the base. To do this, we involve dad and ask him to bend the wire into something like this composition. By the way, in our case, the back of the crown turned out to be scalable, it can be adjusted to fit any head. And after that - wrap with tinsel.


Next is creativity. You need to wrap the tinsel and you need to do it so that all the elements are covered with tinsel. I started wrapping from above, inserted one end of the tinsel into the place indicated by the red dot, wrapped the “spire” and then went to the first side, then the back, then the second side, and finally the front. There I wound the tinsel so as to close the gap and fixed the second end in the same place. I did not have to use any improvised means for fastening (no adhesive tape, no glue, no stapler).
This is how the crown turned out. In the last photo, I tried to schematically depict the tinsel winding scheme.


Kokoshnik is a festive headdress worn in Russia since the 16th century. married women. This decoration consisted of a high crown and a fabric hairpiece attached to it at the back, under which braids were hidden. The times of the kokoshnik have passed, but this attribute folk costume still adorns the heads of artists of all ages at matinees, theatrical performances, mass celebrations and New Year's performances.
Let's figure out how to make a kokoshnik with your own hands, starting from easy option and ending with complex.
How to make a do-it-yourself kokoshnik from paper
Such a kokoshnik is made simply, it is functional and firmly held on the head. You will need: thick paper, fabric, scissors, glue, accessories, centimeter tape.
- Measure your head from ear to ear along the line of your forehead and draw a crescent moon on the paper according to the measurement. Step back from the inner line down 2 cm and draw a second semicircle - you get a support hoop.
- Push the line just drawn with scissors and bend the workpiece along the basting.

- Cut out two pieces of fabric according to the template with 1.5 cm seam allowances. Apply glue along the edge of the cardboard base, without affecting the share adjacent to the head and attach the material to a stretch. Fold the edges over and secure them to the back of the stencil.

- Fasten a ribbon from the inside of the workpiece that will support the kokoshnik. Glue a second fabric piece on top to hide all the errors.


- Trim the kokoshnik with lace, braid, rhinestones or whatever is at hand. Both the child and the adult will gladly put on the resulting headdress, and the daughter's favorite doll will not refuse such a gift.


How to make a do-it-yourself kokoshnik from cardboard
This type of kokoshnik is sewn with a back-hat, so you need to take measurements from the head of the person under whom the dress is being prepared. Prepare: paper, pencil, scissors, glue, a piece of shiny thick fabric and organza, ribbon, thread with a needle, beads.
- Take measurements from the head, focusing on the red lines of the picture (the red mark is the approximate top of the head).

- Draw a template and cut it out.

- Make a base out of fabric, glue it with front side cardboard, sew the edges of the workpiece with threads.


- Embroider the front of the crown with glass beads.

- Cut the back of the organza and baste it from the inside of the base. Bend the bottom of the product, sew, insert an elastic band.


- Sew to the sides wide ribbons, tie fluffy bow, and the job is done.


How to make a do-it-yourself kokoshnik for the Snow Maiden
A difficult way to make a headdress is costly in time and materials. Needed: cardboard, thick wire, glue gun, brocade fabric, a piece of tulle, ringing small things for decoration.
- Decide on appearance kokoshnik and bend wire frame products made to measure.

- Cut out a rim from cardboard to the size of the wire blank, then glue it to it and sew over the edge with threads for reliability.


- Attach the wireframe to the paper, trace and cut out upper part crown, then attach it to the wire.


- Open the fabric for the heel (3 cm allowance), and glue it around the perimeter to reverse side products, including the bezel.


- Make a brocade blank for the face of the dress (without allowances) and attach with glue to the product. Decorate the kokoshnik with sequins, large beads or colored pebbles.


- Sew tulle on the back of the crown and a kokoshnik for the Snow Maiden or Princess Mary is ready.

Making a kokoshnik with your own hands is not as difficult as it seems at first glance: all you need is desire, and a couple of hours of free time, and a good needlewoman will always have the necessary materials in stock.
Elena Kutenkova
Kutenkova Elena
Making a crown for the Snow Maiden in 15 minutes.
To make a crown you will need:
1. 5 liter water bottle
3. Snowflakes on a pecking basis
4. Scissors
5. Marker or marker
7. Hole punch
8. Elastic band 5-10 cm.


Cut off the top of a plastic 5-liter bottle.
Draw on the bottle with a marker or a dark felt-tip pen desired shape crowns and cut out along the outlined outline.


Now we begin to decorate the crown. We glue snowflakes on the crown according to our desire and taste.
If you don't have pecking snowflakes, you can use any and stick them with a glue gun.

When the main snowflakes are pasted, proceed to sticking rhinestones

Perhaps the crown will not fit your child in size, then you should cut it at the back, make 2 holes with hole punchers (one on each side) and thread the elastic band tying its ends into a knot. Can be threaded through holes beautiful ribbon and tie a bow according to the size of the child's head.

Related publications:
The children of the whole country are looking forward to Santa Claus, because this beloved new year character definitely comes with gifts. On the eve of the holiday.
Well, finally I decided to make the Crown Russian Empire, I went to this for a long time, I was afraid everything would work out or not, even the master did it.
Creation didactic toys"Caterpillar Lace" is available to anyone, even a child (with the help of an adult! The purpose of the master class: creating a didactic.
Joint work with children It is not a secret for any of the teachers that the benefits and attributes for the holidays, made together with the children, are always.
Origami "Modules for autumn leaves"Step 1. We take colored paper, in this case of red color. Cut out the square to all sides.
For the "Autumn Festival" it was necessary to make a crown, for the princess of each season (spring, summer, very, winter). Which should.
With Grandfather Frost I live in the wilderness of the forest, Behind a distant birch Our house is icy. All forest animals have been my friends for a long time. Sweet Snow Maiden.
Children are looking forward to the New Year - a long-awaited and joyful holiday, cheerful and magical ... Everyone is happy to meet Grandfather Frost and him.