DIY angel wings: a symbolic decoration for a photo shoot. How to make angel wings at home
To be the center of attention at a costume party and catch admiring glances, you need a chic suit. An excellent option would be the image of an angel with large beautiful wings. These wings are often used for photo shoots. You can also dress up your child in a little angel costume for a festive party in kindergarten. This article contains templates for angel wings and several master classes on how to make angel wings with your own hands.
Templates and materials
Such a beautiful detail of the image of an angel can be made from all kinds of available materials. The base for them is most often made of cardboard. The cardboard is then decorated with materials that look like feathers. Elastic bands are attached to the back of the wings to make it easy to put on the shoulders.
Another base option is a rigid wire frame. It is bent into the desired shape and covered with elastic fabric. Then the base is also decorated.
By using your imagination, you can come up with an original decor for the base. The main thing is that the weight of such wings is not too heavy.
Templates can be simple in shape. The main emphasis is on the feathers themselves.

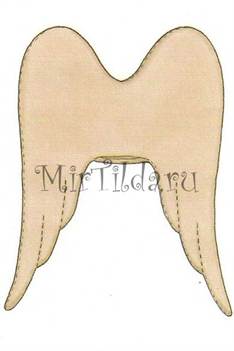
Or a multilayer openwork template is cut out, the shape of which looks like almost finished wings.


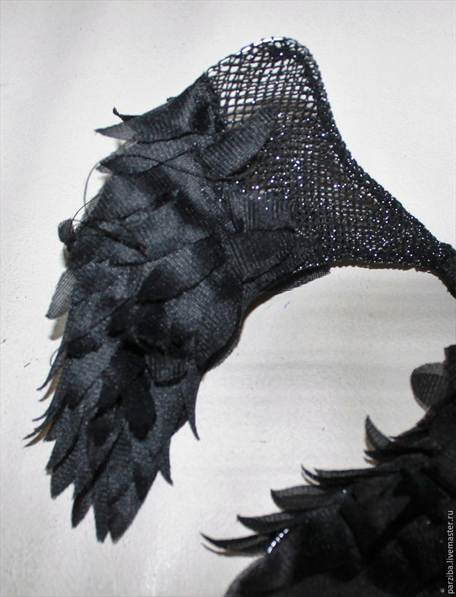
The most natural decoration is, of course, feathers. You can buy a boa and glue feathers from it to the template.

In feather pillows, you can choose light feathers, grease the template with glue and pour feathers onto it. They will stick well and quickly.

You can also ask people who keep pigeons, but they are unlikely to have the required number.

Therefore, they make imitation feathers from satin fabric, paper, tracing paper, cardboard, fabric ruffles, napkins and other available materials.


Feather wings
Let's create a classic version of feather wings for an angel costume. These wings are perfect for a small child.
To make wings, you need to prepare plastic, a piece of chintz, transparent glue, feathers, and elastic bands.
Cut out a wing template from plastic binders. We glue chintz, also cut according to the template, onto the plastic. You can make a frame from wire and glue chintz parts onto it. The effect will be the same. We make two holes at the base and insert elastic bands. Before making holes, you need to attach the wings to the back and mark the location of the holes.

We cover the edges of the wings with feathers so that the wire frame is not visible.

We sort the feathers by length and glue them in rows from bottom to top, from long to short.


We cover the edges at the top with down feathers.

The results are very realistic wings.

Making from fabric
Wonderful wings are made from fabric ruffles.
Let's prepare cardboard, paper for gluing the back side of the wings, elastic bands for fastening, glue and circles of fabric, tape for connecting the wings.
Cut out a template from cardboard.

Using the template, we cut out the parts from paper with a margin around the edge.

Cover the cardboard with paper. We make holes and insert elastic bands.

We take circles of fabric in the center to form soft, uniform folds.

Starting from the bottom, glue the fabric to the cardboard base.


The result is fluffy wings.

We fasten them with ribbon, and the fabric angel wings are ready.

Another master class on fabric wings. Light and airy wings are made from organza.

To make them you will need rigid wire, nylon or tulle, organza, scissors, thread, and a needle.
The frame is made from wire.

The frame is covered with tulle or nylon mesh. We fasten the parts with wire, which we also glue. We put wide elastic bands on the connection that will be worn on the shoulders.
Strips are cut from organza, and fringe is cut from one edge. The strip is folded and sewn to the frame, starting from the bottom.

The result is delicate airy wings.
Paper product
Huge angel wings can be decorated with paper feathers.


To work, we need to prepare simple cardboard for the base, paper, nightlights, glue and elastic bands.
The template is cut out to the desired size and transferred to thick cardboard.

The diagram shows the principle of gluing feathers of different sizes.

We cut out a lot of feathers and bend them lengthwise.

Glue the feathers in rows.


We make two holes on each wing. We insert an elastic band into them. We mask the holes with feathers.

We fasten the wings. We also mask the junction.

When finished they will look like this.

Napkin wings
Angel wings decorated with napkins are tender and airy.

To create them you need ceiling tiles. It can be replaced with cardboard covered with paper. We will also prepare white napkins, scissors, an awl, elastic bands, and glue.
We cut out the wings according to the template. We make holes in them for attaching rubber bands.
Angel wings are an indispensable attribute for an angel costume if you want to make it for your child for a New Year's party or school theater, or for yourself for the purpose of a photo shoot.
There are a huge number of video master classes on the Internet on how to make large or small angel wings for a girl out of paper, cardboard and other improvised things.
Naturally, there are a lot of such master classes, and we will share only a few of them.
With your own hands These wings are so easy to make. The materials for their manufacture may be different. The frame for them can be made on the basis of wire, between which fabric will be stretched or cardboard (paper) glued.
In the simplest version, they are cut out of paper or cardboard. Next we proceed like this:

Finally, to attach the paper wings to the angel costume, glue Velcro to the wire. You can try it on.
In other master classes on making angel wings from cardboard or paper, they are suggested to be fastened with a wide elastic band. You also need to make straps for the arms. A hole is made in the base, then the elastic band is secured on both sides, and the fastening site is masked with feathers from filters or napkins. When you make the straps, do not forget to first calculate their width and height.
Gallery: DIY angel wings (25 photos)


How to make wings for a costume with your own hands: master class No. 2
Naturally, you can make wings for an angel costume with your own hands in different ways, and doing it from paper and cardboard is the easiest way. But for a morning party in the garden this will be enough. But for a theater or a professional photo shoot you will need something more serious, and you may need the help of a professional.
But now we will get acquainted with one more master class on making angel wings made of paper and cardboard.
For this option, prepare:

Let's get started:
- think over the layout, what shape and size the wings will be. Don't overdo it so you don't end up with butterfly wings instead of angel wings. Cut them out of cardboard and cover them with white paper. Let dry under pressure;
- We try on the wings on a child or ourselves to find out the location of the elastic bands. The distance between them should correspond to the width of the back. We sew elastic bands onto the wings like on a backpack. You can attach it with a stapler. Cover the places of fastening or sewing with white paper;
- decorate the wings. We have discussed the option of decorating with napkins below. Another option is a decoration made of padding polyester. It can be purchased inexpensively at a fabric store. We cover the wings with padding polyester, preferably in two layers. If you want the wings to be fluffy and stylish, then the padding polyester needs to be cut with an allowance at the edges of about 5 centimeters. Glue it onto cardboard and only then cut it out.
Another decoration option is to use a white boa. This will make the angel's wings look more original. First we cover them with paper, then with synthetic padding, and sew boa feathers along the edge of the wings.
Third master class on making angel wings with your own hands
This master class will show you how to do it yourself make big angel wings for a suit. The rest of it can be a long T-shirt or nightgown. But the wings will need to be made from scrap materials.
To work you will need the following:

Now we propose an algorithm of actions for making wings according to this master class:

Down feathers can be replaced with goose feathers, if possible. But they will cost more.
Gather everything you need. First of all, you will need four knitting needles. From these you will make the outer frame of the wings. You will have to visit a craft store and buy a bag of feathers and wire with a diameter of 1–1.5 millimeters. In addition, you will need the following:
- unnecessary white T-shirts;
- hot glue gun;
- ribbon;
- sheet of cardboard;
- scissors;
- craft glue.
Connect the knitting needles. To get a frame for one wing, you need to connect two knitting needles. Using a glue gun, join the ends of the two knitting needles so that they form an angle slightly greater than 90 degrees. Do the same with the other two spokes to create the frame for the second wing.
- Wait about 10 minutes for the glue to dry.
- Make sure both frames are symmetrical before proceeding.
Wrap the wing frames with wire. Wind the wire around both frames. At the same time, make small loops from the wire. These loops should have a diameter of about 2-3 centimeters. Using wire and loops you will secure the wing frames to the back. Use hot glue to properly attach the wire to the knitting needles.
- If you find it difficult to attach the initial section of wire to the frame, glue it. The wire will stick to the frame and you can unwind it.
- There should be about eight stitches on each needle. Thus, there will be approximately 16 loops per wing.
Cut out pieces of cardboard. For each wing you will need 4 cardboard triangles. These triangles do not have to be the same size. It's okay if there are gaps between the knitting needles and the cardboard, as you will cover them with the T-shirt and feathers. Try to ensure that the triangles have an obtuse angle and are isosceles - in this case they will fit better with the frames.
- Make sure that the four triangles for one wing are roughly the same shape and size as the four triangles for the other wing.
Attach the cardboard. Before connecting the cardboard triangles with the wire, arrange them so that you get the shape of the wings you want. Then use the remaining wire to attach the triangles to each other and to the knitting needles. It is normal for the cardboard triangles to wobble slightly.
- An eagle wing shape works well, especially in the half-extended position.
- You can also search the internet for images of angels and choose a wing design that suits you.
- Cardboard triangles don't have to look perfect and even. You'll still cover them with feathers!
Cover the frames. Use old T-shirts for this. Cut off the sleeves and pull one t-shirt over each wing. Attach the t-shirts using hot glue so that they follow the outline of the frames.
- It is possible that you will have to cut the T-shirts.
Attach the feathers. Glue the feathers to the t-shirts using hot glue or another fairly strong glue. At the same time, make sure that the ends of the feathers protrude outward. Place the feathers parallel to each other - in this case the wings will have a neater appearance.
To be the center of attention at a costume party and catch admiring glances, you need a chic suit. An excellent option would be the image of an angel with large beautiful wings. These wings are often used for photo shoots. You can also dress up your child in a little angel costume for a festive party in kindergarten. This article contains templates for angel wings and several master classes on how to make angel wings with your own hands.
Templates and materials
Such a beautiful detail of the image of an angel can be made from all kinds of available materials. The base for them is most often made of cardboard. The cardboard is then decorated with materials that look like feathers. Elastic bands are attached to the back of the wings to make it easy to put on the shoulders.
Another base option is a rigid wire frame. It is bent into the desired shape and covered with elastic fabric. Then the base is also decorated.

By using your imagination, you can come up with an original decor for the base. The main thing is that the weight of such wings is not too heavy.
Templates can be simple in shape. The main emphasis is on the feathers themselves.


Or a multilayer openwork template is cut out, the shape of which looks like almost finished wings.


The most natural decoration is, of course, feathers. You can buy a boa and glue feathers from it to the template.

In feather pillows, you can choose light feathers, grease the template with glue and pour feathers onto it. They will stick well and quickly.

You can also ask people who keep pigeons, but they are unlikely to have the required number.

Therefore, they make imitation feathers from satin fabric, paper, tracing paper, cardboard, fabric ruffles, napkins and other available materials.


Feather wings
Let's create a classic version of feather wings for an angel costume. These wings are perfect for a small child.
To make wings, you need to prepare plastic, a piece of chintz, transparent glue, feathers, and elastic bands.
Cut out a wing template from plastic binders. We glue chintz, also cut according to the template, onto the plastic. You can make a frame from wire and glue chintz parts onto it. The effect will be the same. We make two holes at the base and insert elastic bands. Before making holes, you need to attach the wings to the back and mark the location of the holes.

We cover the edges of the wings with feathers so that the wire frame is not visible.

We sort the feathers by length and glue them in rows from bottom to top, from long to short.


We cover the edges at the top with down feathers.

The results are very realistic wings.

Making from fabric
Wonderful wings are made from fabric ruffles.
Let's prepare cardboard, paper for gluing the back side of the wings, elastic bands for fastening, glue and circles of fabric, tape for connecting the wings.
Cut out a template from cardboard.

Using the template, we cut out the parts from paper with a margin around the edge.

Cover the cardboard with paper. We make holes and insert elastic bands.

We take circles of fabric in the center to form soft, uniform folds.

Starting from the bottom, glue the fabric to the cardboard base.


The result is fluffy wings.

We fasten them with ribbon, and the fabric angel wings are ready.

Another master class on fabric wings. Light and airy wings are made from organza.

To make them you will need rigid wire, nylon or tulle, organza, scissors, thread, and a needle.
The frame is made from wire.

The frame is covered with tulle or nylon mesh. We fasten the parts with wire, which we also glue. We put wide elastic bands on the connection that will be worn on the shoulders.
Strips are cut from organza, and fringe is cut from one edge. The strip is folded and sewn to the frame, starting from the bottom.

The result is delicate airy wings.
Paper product
Huge angel wings can be decorated with paper feathers.


To work, we need to prepare simple cardboard for the base, paper, nightlights, glue and elastic bands.
The template is cut out to the desired size and transferred to thick cardboard.

The diagram shows the principle of gluing feathers of different sizes.

We cut out a lot of feathers and bend them lengthwise.

Glue the feathers in rows.


We make two holes on each wing. We insert an elastic band into them. We mask the holes with feathers.

We fasten the wings. We also mask the junction.

When finished they will look like this.

Napkin wings
Angel wings decorated with napkins are tender and airy.

To create them you need ceiling tiles. It can be replaced with cardboard covered with paper. We will also prepare white napkins, scissors, an awl, elastic bands, and glue.
We cut out the wings according to the template. We make holes in them for attaching rubber bands.

We thread elastic bands through the holes.

Fold white napkins like an accordion. Cut out the feather.

We unfold the napkin and get several feathers.

Glue the feathers from bottom to top, overlapping the top row with the bottom.


After all the feathers are glued, the tips of the feathers are slightly deformed. We do it carefully so as not to damage them. This will give the wings a natural look.
You get such wonderful fluffy angel wings.

Video on the topic of the article
In this selection of videos you can get inspiration and learn how to make angel wings in different ways.
Not only kids, but also older children love costume parties. Are you planning a children's party or a school party? Then you should take care of making a beautiful and unusual masquerade outfit for a child in advance. How to make an angel costume with your own hands? Here are a few options that do not require large financial outlays or special professional skills.
Clothing for an "angel"
The traditional color for an angel fancy dress is white. But any light shades are suitable for a children's outfit - blue, beige, pink, silver.
If you need to create an angel costume for a girl with your own hands, a tulle tutu skirt and a light (white) top would be an excellent option. A festive ready-to-wear dress in the appropriate shade would also be suitable. You can complement this outfit with light (white) tights without patterns and shoes of the same color - wicker sandals or simple shoes. The basis of the suit can be a white shirt and trousers.
If you don’t have suitable clothes in your children’s wardrobe, you can make a classic “Angel” masquerade outfit with your own hands. A suit in the form of a straight, elongated shirt is quite easy to sew:
- For the “shirt” you will need a piece of white (light) colored fabric. It can be regular cotton, linen, satin or any smooth silky fabric.
- It is necessary to take measurements from the child: hip volume + 10-15 cm for a loose fit, the expected length of the future suit and sleeve length (if a shirt with sleeves is planned).
- In accordance with the obtained dimensions, a pattern is made from thick paper. You can use a ready-made template (example below).

- The fabric must be carefully folded in half (wrong side out). A paper pattern is applied to the fold; using a piece of soap or chalk, the pattern drawing is transferred to the fabric, taking into account a 2-3 centimeter allowance (seams).
- All that remains is to cut the shirt and sew it in the usual way.
- A lazier option for cutting a shirt is to make the pattern directly from a piece of fabric. You should draw and cut out a fabric rectangle, the length of which corresponds to two lengths of the shirt. Width of the rectangle: half the resulting hip volume. The resulting blank is folded in half lengthwise and stitched on the sides. A cutout is made for the head, about 20 cm is left unsewn for the arms on both sides. The edges of the product can be processed for reliability, and a belt can be made or selected for the resulting “chiton”.
“Angel”, a costume for a baby, is ready. All that remains is to make wings for him. This angel costume is suitable for both a boy and a girl.
Headdress and hairstyle
The traditional masquerade headdress for the image of an angel is a halo. The basis for it will be a regular hair hoop. The blank for it is a small wire ring. You need to attach the halo to the hoop on two small pieces of rigid wire inserted into the hoop or on the springs of a finished carnival hoop in the form of horns. You can decorate the tiara by pasting the halo ring with silver paper or white fluff, wrapping it in Christmas tree tinsel or “grass” yarn.

Instead of a halo tiara, an angel costume for a girl can be complemented with a wig of light curly curls, or this hairstyle can be done if the length of the hair allows.
Wings: cardboard or thick paper
And, of course, wings are the main element of the “Angel” masquerade image. The easiest way to complete the costume is to cut out wings from thick paper or white cardboard according to a template. This option is the simplest and fastest. You can secure the paper wings on the child’s back with Velcro clothing, on straps made of narrow elastic band, or simply sew them directly to the clothes with thread. The big disadvantage of this option is that paper (cardboard) wings do not hold their shape well and are very short-lived.

Original cardboard wings can be made from food paper plates (pictured). To do this, you will need to cut feathers from them for future wings in the form of arcs with grooved edges. The feather blanks are glued to the base, the whole plate. Another paper plate is carefully glued on top of the glued arcs. Finally, straps or Velcro clothing are attached to the bottom plate of the base.
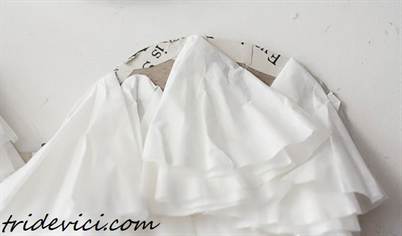
Wings made of fabric (tulle)
These angel wings look gentle and very airy. In addition, they can be decorated with shiny beads, sequins, and embroidery to suit your taste. Frame fabric wings are made in this way:

- A template for the future wire frame of the wings is drawn on paper.
- Along the contour of the wire pattern, you need to bend the frame, connecting the ends of the wire workpiece to each other.
- The frame must be covered with translucent fabric of any light or white color. The most popular material used in such products is tulle, which looks impressive and has excellent stretch. But any translucent fabric will do, even ordinary pharmacy gauze.
- Straps or Velcro clothing are attached to the center of the wings.
- If desired, the wings can be decorated around the edges with Christmas tree tinsel, fluff, etc. You can draw feathers on the surface with a clothing marker or acrylic paints.

Angel wings with paper feathers
A more complicated version of cardboard wings is decoration with paper feathers. The fastest way to make these feathers is from ordinary paper napkins. To do this, the napkin is folded in half and fringe cuts are made on the fold side. Next, the blanks are glued to the base, cardboard wings, starting from the bottom edge with an overlap (when gluing, the upper feathers slightly cover the lower ones). The top of the wings is decorated with round Christmas tree tinsel, down or fur.
Wings with feathers cut not from napkins, but from white paper, will require more time and effort, but the result of such painstaking work looks very impressive. Such wings are made as follows:
- For the base, wings from thick cardboard, right and left, are cut out and fastened together.
- Three types of feathers are cut out from smooth white paper or thin soft white cardboard: long, medium-long and top round small feathers.
- Paper feathers are glued to the cardboard base overlapping, from bottom to top. The order of decoration is the same as for a real bird wing: the lower edge is the longest blanks, then in descending order of length. To enhance the effect, the bottom of each feather can not be glued, but, on the contrary, slightly bent upward.
- Before the glue dries completely, press a line down the center of each feather with the blunt end of scissors or a knife. Allow the wings to dry, attach the elastic straps.

Wings with fabric feathers
The wings will look very unusual and beautiful if, instead of feathers from napkins, slightly gathered ruffles - fabric stripes of white or any light color - are glued onto a cardboard base. It is better if the fabric “crumbles” a little at the cut site - the uneven edges will look more like feathers.
Foam wings
Another fairly inexpensive option for creating angel wings is foam rubber. This material is good because it retains its shape perfectly and, if desired, can be easily painted, for example, in gold or silver.
You will need two types of white foam rubber: dense (thick) at least 1.5-2 cm wide and the thinnest - 0.3 or 0.5 cm, as well as a wide elastic band for the fastening straps.
A base is cut out of dense foam rubber according to a template - one blank in the form of two connected wings. Two elastic straps are attached to the middle of the base. For reliability, it is better not to fasten the straps, but to secure them with a backpack around the central part of the base.
Narrow ribbons are cut from thin foam rubber - feathers, with which the base or only the bottom of the workpiece is decorated. Foam feathers are glued in the same way as paper feathers - starting from the bottom of the wings, overlapping.
You can add color to the wings either by painting it with a paint composition from a spray can, or using a bronze (silver) dye and a brush, painting the product along the direction. It is important to choose the right paint so as not to damage the foam: the composition should not contain acetone. You cannot use different varnishes either.
Natural feather wings
The most realistic wings can be created by using natural bird fluff and feathers for decoration. How to make an angel costume with wings from bird feathers?
- First of all, you need to remember that natural feathers are a heavier material than fabric or paper. Therefore, it is important to correctly determine the size of the wings that the “angel” will wear: the costume should not only look beautiful, but also be comfortable and light. For a child's outfit, it is better to stay at waist length or even shorter.
- As a basis, you can take the same cardboard blank or a wire frame covered with white fabric. In the first case, the feather and down are simply glued to the cardboard, and it will be more reliable to sew the feather to the fabric blank with thread or fishing line.

- Natural feathers can be purchased in specialized departments for needlework, including online services. But a clean poultry feather or feathers from an unwanted boa will do.
- Feathers are sewn on (glued) according to the principle described above: starting from the bottom of the base, the longest feathers are attached overlapping first, then in descending order of length. The top is decorated with light bird down.
- Straps are attached to the center of the wings - like a backpack. Simply sewing to clothing or using Velcro is not advisable due to the weight of the feather wings.