Wall calendar as decoration in the house. Original ideas for a calendar
We never have to think that such a thing as a calendar can be made with our own hands. After all, we can buy it in any store or use it from our tablet. But if you try at least once to use a calendar made with love by your hands, then every time you take it out, you will feel the warmth of human hands.
From scrap materials you can create a whole work of art that will never compare with a purchased item. Think about what kind of calendar you would like to have and make it, taking inspiration from one of the ideas. Before you start making a calendar, you should think about what form it will be in: wall, desk, etc. Let's look at how to make a calendar with your own hands.
Desk calendar
A handmade paper calendar will help brighten up your office routine and will therefore be an excellent gift for your colleague or you. Let's learn how to make a calendar with your own hands from paper.
You will need to get a few pages of thick paper. Each page is dedicated to one month. The pages will need to be cut out with scissors and shaped into a rectangle.

Next, apply a calendar grid to each page; this can be done using a template or manually. You can find the template on the Internet and print it out, or arm yourself with pencils, felt-tip pens and do everything by hand. You can decorate the pages as you wish, you will need a color palette, glitter, colored pencils, markers, stickers and other things.
Place each month in order, stack the sheets together, and use a hole punch to poke a hole in the middle of the sheet. Insert the ring there. You can make your calendar in any shape - round, oval, square, heart-shaped. Your imagination is not limited by anything.

So that you can always see the calendar in front of you, attach it to the base. To make the base you will need several sheets, preferably cardboard. Cut out three rectangles from paper, two of them should be the same in length and width. And one needs to be made half the width - this will be the bottom of the base. Next, you need to glue all these pieces together to create a base on which you will attach your desk calendar.
Postcard calendar
This idea is exciting and will bring a lot of pleasure to your household. Throughout the year, you can record on the calendar the events that happened to you and your family. In 10 years, such a calendar will become a family heirloom, which will be interesting to read.
To make such a calendar, prepare the following things: postcards for each month, a box, scissors, notebook sheets with a wide ruler, twine, stamp.
Take a wide-ruled notebook and cut out small rectangles from the notebook sheets. Stamp the date on each rectangle. But if it is not there, then you can do it manually.
Place all the leaves and cards with the months in a box. The leaves should be arranged by date, with each month highlighted by a postcard.

Calendar with photos
Select your photographs, prepare leaves, colored cardboard, fastening elements - glue, tape, colored paper, ribbon (satin ribbon is most suitable). Instead of photographs, you can take any pictures, such as images from films, landscapes, etc.
Progress:
- Photos must be the same size, this should be taken care of at the very beginning.
- Prepare sheets of paper of a suitable size on which you can glue photographs. Do this with glue or tape.
- Connect all the leaves together according to the days and months. Make a hole at the top through which you need to thread the ribbon.
If you know Photoshop, then you can print out the leaves yourself with a beautiful background and calendar grid. Print your work on a printer. Although sometimes it is impossible to print sheets in the format you need on a printer. In this case, you can resort to the services of photo studios or printing houses. After that, you can glue your photos and you will get a calendar dear to your heart.

Wall calendar - planner
If you want to make a calendar that will remind you of important things or events, then try making this option. Take a large piece of paper - whatman paper, draw 12 sectors or 31 squares there.
In each of these sectors you can enter the information you need. Label sectors by month or squares by day. Now you can add any information related to your life there - plans for the coming months, birthdays of your loved ones, vacation days, etc.

You can make a universal wall calendar from canvas that will help you not just for one year, but for several. To do this, you need to find a canvas that is the right size for you. Draw borders on it, you should have 7 columns and 5 rows. This must be done using ribbons. Attach pretty pins where the lines intersect. You can secure the ribbon on the back side with wire cutters.
You will need colored paper or cardboard, from which you need to make squares with numbers indicating the days of the week. Use double tape to attach them to each cell. The names of the month can also be prepared from colored paper and pasted on. Now you can write about any events and reminders on stickers and stick them on the date you need.
Perpetual calendar
You can make a perpetual calendar from any hard material, such as plywood or cardboard, or preferably wood. It will serve you faithfully for many years. In the base box of such a calendar there are a couple of cubes, where the days of the week and a block with months are written. A minimum set of numbers from 0 to 5 is applied to one cube.
The numbers from 0 to 9 are written on the second cube; the number 9 is not written, since its role could well be played by the number 6. The names of the months are written on the edges of three long bars.
If you want to make such a calendar from wood, then you need to prepare tools such as a saw, cutter, jigsaw to work with them on wood. We cut out cubes and bars. You need to sand your wood pieces with sandpaper.

Inscriptions on the block cubes are applied in various ways. If you are confident in your drawing abilities, you can do it by hand using a brush and paint.
If not, make a template that you can trace. You can also apply numbers using a burning machine, wood cutters, or simply stick on buttons with numbers. You can soak your wood pieces in oil to give them a more attractive appearance.
The calendar case is made from pieces of plywood. The back wall must correspond to the entire length of the structure of cubes and bars. The size of the side wall should correspond to the width of the cube and the width of the back wall, the height of the cube and the thickness of the block. All cubes and bars should fit on the bottom.

The structure can be secured with carpentry nails or glue. The body can be decorated to make it look more attractive by painting it or sticking various images on it.
Such a calendar will not gather dust somewhere in the back of a closet; it will serve people faithfully and also decorate the room.
Simple wall calendar
There is the easiest option to make a calendar with your own hands, on which you can practice first. Take a simple sheet of paper and cardboard and draw 7 columns and 5 lines on it by hand. The lines must be absolutely straight with equal intervals. Label the columns and rows with days of the week and months.
Decorate your calendar with pictures or stickers. A color palette or stickers will help you with this. You can highlight important dates in a special way by sticking some small accessory or picture on them. For example, on the New Year's date you can stick a snowflake or a Christmas tree, on a birthday - a flower. If it is your sister's birthday, then stick a small photo of her on this date. Fold the sheets, make a hole, tie with twine or ribbon and hang on the wall.

If you like to draw and do it well, then simply paint a piece of whatman paper, having first outlined it and made the necessary notes. You can hang a wall calendar on a nail or hook, which must first be placed on the wall.
Show your imagination and create different calendar options yourself. You can present your crafts to your loved ones, especially on a holiday like New Year. This will be a great sign of appreciation and they will be happy to receive such a wonderful gift from you.
Now it has become fashionable to make and give calendars. On the one hand, specialized programs have appeared that allow you to create your own calendar in literally five minutes. On the other hand, the printing base has expanded. For example, in a photo lab you can print an A3 picture for not much money. And if you add a little, you will get an A2 and even A1 size print. Such huge homemade calendars, which contain photographs of places and people close to the hero of the day, are received with great gratitude and are examined for a long time, by all the guests. And then this imprint hangs before your eyes for a whole year, reminding you of the festive event. In this article I would like to write a review about my own experience with Calendar Design program companies AMS.
Why draw calendars yourself?
First, let me explain how I, not the latest specialist in Adobe Photoshop and Adobe Lightroom, suddenly got it into my head to waste my time on some kind of “leftist” program, which has a lot of limitations compared to professional editors. How did it happen that, having a licensed subscription to Adobe products, I suddenly spent extra money to buy Calendar Design program?
To answer this question, I will have to tell, at least briefly, how a calendar is made, say, in Adobe Photoshop CC.
As an example, I’ll show you one of the latest products:

The client wanted THIS! In principle - nothing extravagant. Almost minimalism. But before the calendar appeared, we had to spend considerable time searching for an up-to-date calendar grid. Then it was necessary to recolor the names of working days (Mon., Tue., etc.). Then the grid had to be disassembled into two columns (initially it was generally a horizontal version).
In a word, all this took a lot of time and considerable effort even for me. It was then that I first thought about having some special program that would allow me to quickly and easily make calendars.
And then one day my colleague, who knew about my wishes, recommended that I look at the Calendar Design program.
Calendar Design Program
I’ll say right away that the program is paid. It comes in two versions: basic version and pro version. The cost, respectively, is 950 and 1950 rubles. True, I was lucky enough to take advantage of the discount and save 30% on the pro version.
The program can be downloaded from the official website and used completely free of charge for 10 days. Personally, this trial period was enough for me to decide to purchase.
I suggest you look at what the program can do.

Previously drawn and saved calendars can be opened and modified later. You can start a new project. Next you are asked to select the calendar type. After all, they come in different varieties - tabletop, wall-mounted, for one month or for a quarter:

Next, you should select a design template. I know that when you hear the word “pattern”, true connoisseurs of aesthetics and unique design begin to get a nervous tic. Nevertheless, you should not rush to judgment and make hasty conclusions. The fact is that during subsequent processing the calendar can be changed beyond recognition. It will really turn out to be strictly individual.
And the template as such simply allows us to have the necessary calendar grid, the search for which is usually the main problem. It becomes especially acute when creating a two-year calendar. For example, from September 2016 to August 2017. Try to find a calendar grid for next year on the Internet right now. And in good resolution, with a transparent background. I think this will not work out right away (if at all).
So I immediately liked the Calendar Design program, if only because it would forever save me from a long and painful search. Drawing the mesh manually is cheaper either to shoot yourself right away, or to get it and use Corel Draw. There is a plugin that solves the problem.

After choosing a template, we need to set the size of the future calendar. It all depends on what we are going to print it on. If we only have an A4 printer at our disposal, then we need to choose the appropriate size. You can order the calendar to be printed in a photo lab. Then the size can be made larger. In any case, it is advisable to first ask the laboratory itself what size they can print and how much it will cost.
For example, in one of my “familiar” laboratories, a canvas measuring 30x45 cm will cost 100 rubles, and a format of 60x90 centimeters costs almost 1,600 rubles. And this will be a real “wet” photo print, and not a print made on an inkjet printer or plotter.

After all the settings, we see a ready-made calendar, created automatically based on the template we selected. In principle, if no special theme is required in the design, you can immediately print the calendar.

By the way, in the free trial version you can print the received calendar on printer, But you can't save it as a file for printing, for example, on a photo machine.
For the most part, in the design of calendars that are made by hand as a gift to friends or as a way of fawning over superiors, it is usually customary to use some special images in the design that will be pleasing to the recipient.

For example, you can replace the background photo with another one. Or even use some kind of abstract drawing. You can go even further and simply fill the calendar background with some color or gradient.
This should be done if the calendar contains inscriptions and photographs in addition to months. Then the background image will no longer make sense. It will still be closed.

Of course, when working with inscriptions and additional photographs, we will not have the same flexibility as in Adobe Photoshop. For example, we won't be able to make the shadow behind the text appear lighter or more blurry. However, you can choose the size of the inscription and the background so that even this non-adjustable shadow looks normal.
The big advantage of the program compared to its analogues is the ability to take a color sample directly from the image when choosing a font color. Many calendars, including those sold in kiosks, suffer from the same drawback. The font color in them is often chosen very poorly. The inscription looks like an alien element and spoils the entire composition.
This occurs because a color is selected for the font that is not in the background image. Look at the previous picture: the font color in the word “Suzdal” corresponds to the color of the sky against which the word is located. If it weren't for the white frame and shadow, we would hardly be able to read it. The inscription would simply blend into the background.
However, as you can see, the word looks quite harmonious. Why? Simply because the main condition for choosing a color is met - a color is taken that is already present in the background image (or in the composition as a whole). If we took purple or orange here, the inscription would look like a patch.
Similarly, you can customize the font colors in the calendar grid itself. For example, red names and numbers of weekends do not look very good on a blue son. But if you make them yellow, it will be a completely different matter. Similarly, you can change the black color to white if we are dealing with a dark calendar background.

In addition to the background image, you can insert additional photos into the calendar. Their number is limited only by the free space on the total calendar area. In principle, you can completely abandon the background image and concentrate the main semantic load on individual well-chosen photographs.
You can work with each photo separately. You can change its size, rotate it, add a border or shadow.
All this, of course, can be done in Adobe Photoshop. However, there are several thoughts that speak in favor Calendar Design programs, as a highly specialized tool.
- For a user who has no idea about graphic editors at all, mastering Calendar Design will be faster than Adobe Photoshop. In other words, to get the same external result, it will take different amounts of time to initially master the programs.
- The cost of a perpetual license of the Calendar Design program in the basic version is equal to the cost of just three months of using a license for Adobe Photoshop. That is, if a person is going to constantly draw calendars (for his own needs, or to order), it is much more profitable for him to purchase Design Calendars.
- Even professional users of Adobe Photoshop from time to time need a simpler tool to quickly satisfy some client who is not particularly demanding of design delights.
As a result of understanding the pros and cons of the program for creating calendars, I came to an unexpected conclusion. Why didn’t I draw calendars as gifts for relatives and colleagues before? After all, this is such a simple and convenient sign of attention! It turned out - because there was simply no time (and sometimes too lazy) to draw a calendar layout in Adobe Photoshop.
If you have a simpler tool in your hands, then the time required to prepare the layout is reduced significantly. Let there be some restrictions - who knows about them except me! No one will notice that the shadow is too dense, and the frame of the photos is solid, not gradient. Now that there is a specialized program, it will be easier to fulfill orders from third-party clients and prepare pleasant surprises for friends and relatives.
Additional and less obvious features of Calendar Design include, for example, creating a calendar for weekly planning. It is printed on a regular printer, maybe even without a picture, and has empty cells for planning things.

For those who are constantly stressed by a heap of things to do, I think it will be useful to have such a planner on hand. As practice shows, you just have to write down all your problems on paper and it becomes clear that the snowball is not so big that you fall into despair. And if you make it a rule to solve at least one important task every day, in less than a couple of weeks you will be able to breathe a sigh of relief.
The main thing here is to plan everything properly. And this is where a weekly planning calendar comes in handy. This feature alone makes you fall in love with the Calendar Design program.
Disadvantages of the program
So as not to create the illusion of reading a custom article, I would like to tell you in a nutshell what is in the program for me did not like.
First, not so important, but what caught my eye were the inconsistencies of interface elements. There is a feeling of some blurring of the picture in certain windows. For example, this is what the window that appeared every time you started it looked like, warning you that you would soon have to pay for a license:


You know, this is, of course, not a chassis. Moreover, there are no such problems in the rest of the interface. However, already at the start I thought that “can’t our people write normal programs, without glitches.” A suspicion immediately arises that there will continue to be constant problems and ease of use will disappear. Fortunately, this assumption was not confirmed.
Second, what is somewhat disappointing is the inability to customize the calendar grid font color for each month individually (or for several selected months). Let me explain the essence of the problem.
Imagine that the background of your calendar is divided into two parts - dark and light (for example, sky and earth). If you take a dark font color, it will be readable on the light part of the background, but will be lost on the dark part. If the font color is light, then everything will be the opposite and also ugly.
It is clear that you can take a different background. But what to do if the customer insists on his own version?
It is in this case that it would be appropriate to make part of the months “white” and the second part “black”. By placing the whites on a dark background and the blacks on a light one, we would immediately solve the problem. Alas, Calendar Design does not allow us to manage each month separately. Perhaps this will appear in future versions.
Third, price. I personally don’t mind the fact that it’s not a sin to pay for a good thing. Moreover, if you get into some promotion, you can also save a lot. For example, I managed to buy the full version for 1300 rubles instead of 1900! However, for many people, the paid basis for using the program puts an end to it. Many people will simply return to searching for other, preferably free, options on the Internet, rather than paying once and forever solving the problem of creating DIY calendars.
Without in any way condemning such tactics; situations, as they say, are different for everyone, I decided that it was easier for me personally to pay. After all, you can earn money again, but lost time will never come back.
Conclusion
As you probably already understood from the text of the article, the Calendar Design program made a pleasant impression on me. While not claiming to be a global universal tool for graphics processing, it nevertheless copes with its task perfectly. Having such a program on your computer, you can easily and quickly create calendars with the desired design, the desired size and the desired start date.
The fact that I bought the program for myself says more than anything else that, in my humble opinion, it is a worthwhile thing.
I recommend: Download Calendar Design for free and try it for 10 days. You won't always have time to buy! What if you like it as much as I liked it?
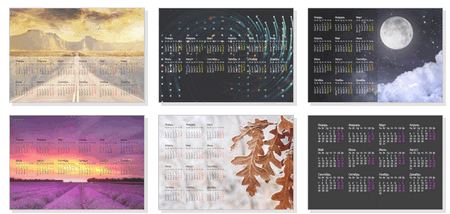
A selection of ready-made calendars for 2018


Hello needlewomen!
Today we will make a fun calendar with our own hands, which you can place in your workplace or give to a loved one, so he will constantly remember you.
For this craft you will need:
- 1 sheet of cardboard
- 2 sheets of white paper
- pieces of colored paper
- scissors and glue
For decoration, take pencils or markers.
Calendar making process:
We take a colored sheet of paper, retreat 4 centimeters from both edges of the sheet, draw a line along the ruler with a pencil, and then bend the tips of the sheet towards each other along the lines. After this, we fold the entire sheet in half.

It should turn out like this.

Now we need 3 colored rectangles measuring 12.5 x 12 centimeters. We bend each of the leaves from the bottom, measuring 3 centimeters.

We also bend each of the leaves on the sides by 3 centimeters. As a result, there should be a pocket on the “front” side.

We glue the resulting “wings” on the back side, in the end we got 3 pockets of different colors.

We cut out 3 circles from paper with a diameter approximately equal to the pockets and glue them as shown in the photo, then we trim the pockets around the circumference to get a smooth transition.

We take one of the pockets with a circle glued, from it we will make a cat. To do this, we cut out his ears and glue them behind the circle.

After both ears are ready, take a marker or pencil and draw a muzzle. The result was a pocket that looked like a cat.

Now we will make a second pocket in the shape of a dog, we will also cut out ears for it and glue them behind the circle.

We bend the ears a little as shown in the photo, it will be more beautiful. Then we arm ourselves with a marker or pencil and draw the dog’s face.

On the third pocket with a circle we simply write the year “2018”. Where the year is “2018” we write “month” on the bottom, “date” on the cat-shaped pocket, and “day” on the dog-shaped pocket.

For the month we cut out 12 rectangles measuring 5 x 6 centimeters, for days we cut out 7 rectangles measuring 5 x 6 centimeters, for numbers we make two columns (that’s 14 rectangles measuring 2.5 x 6 centimeters)

On rectangles for months we write the months on top in order, we did it in abbreviation. For numbers in the left column we write from 0 to 3 (4 rectangles), in the right column from 0 to 9 (10 rectangles). For days we also write the days of the week in abbreviation.

Greetings to all visitors!
If earlier you had to use standard calendars, then with the development of computer technology, you can make your own calendar, with your own holidays (for example, to celebrate the birthdays of relatives, anniversaries and celebrations), your own design, your own size, etc.
In general, do everything the way you need (so as not to forget anything and congratulate everyone on time!). Agree, it would be convenient to know in advance where and what holidays and plans await you?!
In general, there are quite a lot of ways to make your own calendar, and not all of them are suitable for a person who has little knowledge of a PC. In this article I will provide several step-by-step instructions (in different programs) for creating your own colorful calendar (I think that anyone who wants to can figure it out).
By the way, if you want to know the exact weather forecast, you might be interested in an article with recommendations and reviews of weather sites -
Using the Calendar Design program
![]()
The most convenient program for “cooking up” a calendar for yourself. Judge for yourself:
- There are a variety of calendar formats available to you: pocket, flip, desk. The time interval is also adjustable: for a month, for a year, for a quarter;
- The program contains dozens of a wide variety of templates: each template can be modified to suit your requirements;
- you can add any of your dates to the calendar: birthdays, vacations, important life events. Each such date can be highlighted with a special color, and even a picture;
- You can print calendars on paper of various formats (almost all types of printers are supported).
Perhaps the only negative is that the free version has a problem with saving in some formats. To summarize, in general, for solving our problem, the program is indispensable, one of the best of its kind. I’ll look in detail at how to make your own calendar in it.
- After installation from the program launch, you will see a welcome window with the option to start either a new project or open a ready-made one. In my example, I will choose new.

- Next you need to select the calendar type. In general, here are all the types you might need: wall calendars (one of the most popular), desktop, pocket, one month, 12 months, calendar from scratch. For example, I chose the option of a wall calendar.

- Then dozens of different patterns will appear before you: green, blue, light, dark, with nature, with animals, antique, etc., etc. In general, you need to choose one of the proposed options - I don’t advise here (as you know: “taste and color - there are no comrades ...").

- The next step is choosing a photo for the calendar. Here you can put a photo of your pet, family photo, nature, etc.

- Then you need to set the year of the calendar (from which date to start counting - by the way, it is not at all necessary from the new year) and set the sheet format (the default is regular A4). After installation, click the “finish” button.

- Actually, your calendar is ready! All that's left to do is set up some more points that were promised at the beginning of the article ☺.

- Select holidays. To do this, you need to open the “Holidays” section in the top menu of the program and check the boxes which holidays to show on the calendar. For example, you can show not only official holidays, but also Orthodox holidays

- Tincture of decoration. If the calendar needs improvement, you can always add the inscriptions you need, highlight any of the dates, set up, for example, the lunar calendar, add a page, etc. To do this, use the “Calendar” settings section.

- The "Add" section will help you add an inscription, logo, photo to your calendar. An example is shown in the screenshot below.

All in all, a good and relatively simple way to create colorful and vibrant calendars (in my opinion ☻).
In Microsoft Word and Excel
Word and Excel are on every second home computer, which means that this method will be relevant and in demand. In addition, a calendar can be created quickly without downloading or installing additional software. I will consider all the steps step by step using Word and Excel 2016 as an example (so that there are not so many of them ☻).
Free analogues of Word and Excel -


Online way to create a calendar
There are now dozens of different sites on the Internet for creating a wide variety of calendars. I'll give you a few examples that I've come up with myself...
A simple site for creating a calendar, business card, envelope. It is very convenient to use: everything is done step by step, everything is in Russian. The service supports images in JPG and PNG formats, there is a collection of ready-made templates, beautiful fonts, etc. In general, it’s convenient, fast, and beautiful!

This site is notable for the fact that you can choose a theme and calendar template (for example, some holiday on February 23, March 8, etc.), then upload your photo to it and download it to yourself. I note that any of the templates can be changed quite a lot: add text, change the background, change some elements.
Well, then, after printing out such a calendar, it will become an excellent and original gift.
By the way, your uploaded photo will be automatically processed with the necessary filters and neatly blended into the color scheme of the selected template.
In general, there are a lot of such sites, and I won’t dwell on them all...
DIY calendar “In a sunny meadow.” Step-by-step instructions with photos
Author: Maslienko Larisa Anatolyevna, physics teacherPlace of work: MBOU Secondary School No. 96, Barnaul, Altai Territory
Description: The master class will show how to make a beautiful and unusual gift from paper for the spring holiday - March 8th.
The master class will be useful to teachers of additional education, technology and class teachers working with middle-level children as a teaching material and for all creative people.
A characteristic feature of my product is its ease of manufacture. We will design the calendar using the quilling technique, which will allow us to transfer all the elegance and beauty of nature onto paper.
Bright, forest clearing,
Calls me from afar
Green, silky for comfort
The tall grass beckons.
Daisies nod their heads,
And the bell is blue,
He straightened his shoulders behind the violet,
In the uncut forest grass.
Bees fly over flowers
Butterflies flutter in the distance.
And the beetle quietly behind the bushes
I cleaned my mustache.
Purpose: The desk calendar will look great as an original gift for the spring holiday.
Target: make a desk calendar.
Tasks:
- introduce the method of making a calendar;
- promote the development of accuracy and perseverance.
- develop fine motor skills, imagination, creative activity;
For work you will need the following tools and materials:
Thick paper (you can take old letters), colored paper of different bright colors, a ruler, scissors and glue.
Progress:
Line the cardboard every 11 cm and bend it into a house.

Print a calendar for two semesters. Glue the first half of the calendar on one side of the house, and the second on the other side.

To decorate the calendar we will make the following elements.

Take quilling paper 3–5 mm wide; if you don’t have it, then cut strips 3–5 mm wide from colored paper along the length of the sheet.
When working with scissors, follow the safety rules:
- Carefully monitor the cutting direction of the scissors and do not cut while moving.
-Scissors must be sharp.
-Do not hold the scissors with the blade up and leave them open.
-The instrument must be passed closed and rings forward.
There is a lot of green grass in the clearing, let's make it first. To do this, take a green strip and tightly screw it onto a quilling device; you can use a match if you don’t have one. Remove the ring from the match and slightly twist the lower end in the other direction.

To make wide plant leaves, take five halves of green stripes. Cut the length of the second strip by 1 cm, the third by 2 cm, the fourth by 3 cm, and the fifth by 4 cm.
Glue the lower ends of the strips together.

Observe safety precautions when working with glue:
- Glue should not get on your hands or face while working.
-If glue gets into your eyes, rinse them with plenty of water.
-At the end of work, you need to wash your hands with soap.
Align the upper ends of the strips and glue them too. Twist the top and bottom of the sheet onto a match. In this way, make three wide leaves.

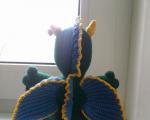
Let's make a beautiful butterfly.
Roll a light strip of paper into a tight roll. Cut a strip of black paper 4 cm long and 1.5-2 mm wide. Twist the ends of the black strip halfway towards each other into curls to create butterfly antennae. Glue them to the yellow wheel to get the head of a butterfly.
To make butterfly wings, take two halves of red and yellow stripes and glue them together. Screw it into a 30 mm wheel, press it on both sides with your fingers, sharpening on one side. The butterfly wings are ready.

To make the butterfly's body, we need a dark strip of paper 20 mm wide.
Let's roll it into a tight roll. Decorate with four light narrow stripes.
Glue the body, head and wings.

To make small flowers, take a colored strip 1.5 cm wide. Using a pencil and ruler, line the strip 0.5 cm and 1 cm from the edges. Make cuts across the strip 1 cm deep along the entire length. Roll the light strip into a tight roll and glue the free end. Without removing the match from the top, we wind a colored strip with cuts, and glue the remaining end. Remove the bud from the match and straighten the middle. We will make six colors, different colors possible.

Let's start decorating the calendar. Glue a wide sheet of paper to the lower right corner of the calendar.

In the upper corner, above the leaf, glue three blue flowers.

Place a red flower in the lower part of the wide leaf, and a blue one in the upper left corner.

Add a wide leaf to the red flower below.

Glue a green curl and a wide leaf on both sides of the blue flower.

Add a blue flower on top and a butterfly in the empty space below.

Let's decorate the second side of the spring calendar. You can use the template above or make small changes.

Let's collapse the resulting calendar. Our gift is ready.

It looks good from both sides.

This day is filled with light
Here is a bouquet of scarlet roses,
If roses are not to your taste -
Maybe a sprig of mimosas.
We don't hide our feelings,
And we give gifts.
Everyone is happy to congratulate you
Whether he is old or maybe he is small.