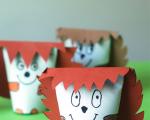
Master class “Tilda flower”. The most summery - Floral tilde angel How to sew a tilde floral angel
Flower angel tilde will help you care for your flowers, look after them when you are at work and create a very warm atmosphere in your home. Sew and enjoy your creations.
Materials
- Fabric for the body (flesh color), clothes and wings
- Tilda doll hair
- Fabric paints and blush for face decoration
- Embroidery thread for bangs
- Sandal Rubber Sheet
- Beads with a diameter of 3 mm
- Paper flowers from Tilda
How to make a flower angel
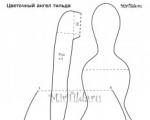
To begin work, you need to print out the tilde angel patterns or copy them from the monitor screen. 


Torso
Sew the nude fabric and the green fabric together. Press the seam open and fold the piece in half, right side inward. Translate the pattern of the angel's body. 
Cut and baste, leaving allowances. Make small cuts in the seam allowance exactly in those places where the seam will bend a lot. Sew the details. Using the same principle, sew the arms and legs. Turn the pieces right side out and iron them. So that the legs of the figurine can be bent, you need to stuff them halfway, stitch them across, and then stuff them all the way through. 
Insert the legs into the hole at the bottom of the body and sew a seam, thereby securing them. Stuff the arms and sew a floral angel tilde to the body.
Dress
Cut a piece of floral fabric measuring 26 x 52 cm plus seam allowance. Fold the piece crosswise in half, right side inward, and stitch. 
Turn the dress inside out and press the seams at the hem and top of the dress. Hem the hem.
Place the dress on the figure, fold the folds along the top edge and secure with pins. The dress should be high-waisted (see illustrations). Sew the dress to the angel figurine.
Fold the fabric for the belt in half, right side inward, and draw out the pattern - template. Baste the workpiece, stitch and cut. 
Turn the belt right side out, iron it and tie it around the tilde flower angel figurine. Secure with a few stitches so that the ends of the belt lie neatly.
Sew one paper flower to a decorative belt, secure the other in the angel's hair
Wings
Fold the fabric for the wings in half with the right sides facing in and transfer the pattern. Baste the workpiece, stitch, cut out leaving allowances, turn right side out and iron. 
Sew the tips of the angel's wings to create feathers. 
Stuff the “feathers” with a wooden Chinese stick, and then fill the rest of the wings with stuffing. Sew up the turning hole. Sew the wings to the tilde figure.
Sandals
Trace the sandal template onto the rubber sheet twice and cut out. Using a few neat stitches, sew the sandals to the figurine’s legs and secure a small flower with a bead. 
All that remains is for the doll to do it using blush and pencil. 
Now our Flower Angel Tilda is ready for summer!
After all, spring is already in full swing! The trees are already all green and in full bloom! And we will try to keep up with the times and post flower patterns in the Tilda style! Of course, fresh flowers are better than artificial ones, but they are so short-lived. And if you make textile tilde flowers, they will delight you until you get bored! And then you can give them to someone and sew new ones for yourself. So go ahead, get inspired by huge spoons and make your creative fantasies come true!
These very simple, but no less charming daisies or other flowers can be made and planted in pots. Place on the windowsill between or instead of flowerpots with live plants.
And a standard wish: don’t be afraid to experiment with colors (after all, even if patterned blue daisies don’t exist in nature, let them live in your room)! Everyone probably knows the option - rosette. Simply roll up a long strip of fabric and stitch at the bottom. The decoration is both independent and self-sufficient, and an option for any exhibition!
And here's a surprise! If you think that it’s impossible to come up with anything simpler, then we hasten to dissuade you. Here is a great version of a tilde flower without thread and a needle!


Once upon a time, the Tilda doll was created by the Norwegian artist Tone Finnanger exclusively as a textile toy for children. But the people's love for these cute and slightly naive creations turned out to be so great that other types of tildes soon appeared. Easter bunnies and sleepy bears, thoughtful cats and playful bees, plush bunnies and exquisite flowers, and this is not a complete range of possible incarnations.
Currently, the Tilda brand covers most of the hand made products. Tone Finnanger's books with patterns and master classes sell millions of copies. Entire sets for needlework are produced, including patterns, fabrics and even threads. The only production that cannot be launched is the factory production of ready-made Tilda, because the Norwegian principle is unshakable - dolls must be sewn exclusively by hand.
The happy fate of being subjected to general tildomania did not pass me by either. To be honest, up to this point, the last time I sewed was in my distant childhood at a cutting and sewing class, so I decided to start from the very basics. And I found it easiest to sew a product such as a tilde flower.
Master class on sewing tulips

For beginners like me, I offer a master class on sewing tulips. But first, a photo from the Internet, so to speak, for inspiration. Well, did you want to create a bouquet of tulips for yourself? Then let's get started.
Materials and tools required for work:
- fabric of two colors (natural materials are preferred - cotton, linen, flannel, but satin is also possible);
- filler (can be foam rubber, padding polyester, cotton wool, holofiber);
- wire or bamboo stick for the frame;
- threads to match the fabric, needle;
- simple pencil, scissors;
- sewing machine.
Operating procedure


- Fold the fabric in half. The pattern for our tulip couldn’t be simpler, so we draw it directly on the fabric, by hand. Approximate dimensions for a finished tulip of 35 cm are indicated in the photo below.
- We pin the fabric with pins and sew along the contour using a sewing machine. You can also sew it manually using a needle-forward stitch. Don't forget to leave a hole at the bottom of the bud for stuffing with filler.
- We cut out the parts, retreating from the edge approximately 2-3 mm. To prevent the fabric from puffing up, we make additional cuts in the corners. We turn the resulting blanks inside out and iron them.
- We insert the wire into the stem so that it protrudes beyond the edge by about 1.5-2 cm. We fill the bud tightly with filler and place it on the protruding part of the wire. Then we carefully sew it to the stem with a hidden seam, having previously gathered it at the base. We sew the leaf approximately in the middle of the stem.
- If desired, the tulip can be decorated with lace, beads or embroidery. The main thing is that all colors and accessories are combined with each other. That's all, your hand-sewn bouquet of tulips is ready. We enjoy the result.
Master class on sewing roses

Having learned how to sew tulips, it’s time to consolidate the material by sewing another flower. Let's start making a textile rose. The materials used in this master class are almost the same as above:
- scraps of fabric of two types;
- filler;
- thread and needle.
Operating procedure


- Using the same principle as in the first master class, we make the base for our flower in the form of a trefoil. We apply the design to the material folded in half. We sew, leaving a slot for filling, then carefully cut out. We fill it loosely with the filling, and sew up the incision with a hidden seam.
- For the flower itself, take a strip of fabric (I took natural linen), fold it in half, and pin it together. Draw an arbitrarily wavy line along the fold line. Then we sew along the intended contour.
- Carefully cut out, retreating 2-3 mm from the edge. If the material is very loose, it is advisable to overcast the edge. Then we turn the workpiece inside out and iron it.
- We sew a strip along the edge and pull the thread a little. We begin to collect the rose petals by twisting them inward in a spiral and sewing them to the base. Congratulations, the textile rose is ready.
Having mastered these two master classes, you can make other simple tildes yourself, for example, a daisy or a “Valentine”. Good luck everyone.
By the way, we have a master class “” - also quite an exciting activity.
Tilda textile dolls, popular in our time, have gained recognition all over the world due to their simplicity and ease of execution. Even novice craftswomen can make their favorite Tilda with their own hands. Surely, every needlewoman has at least one such soft toy in her arsenal. In the collection of designer Toni Finanger, creator of the Tilda style, along with dolls, there are also various other toys: hares, monkeys, ducks, horses, hippos and others.
Currently, Tilda-style dolls have covered most of the handmade products. Tony's books, which contain photos, a master class, and patterns, are sold out in huge quantities. You can also find handicraft kits on sale, which contain patterns, fabrics, threads, and even the necessary accessories. The main principle of the creator of such toys is that dolls must be sewn by hand, so you won’t be able to find factory Tilda anywhere.
All Tilda-style dolls are sewn according to the same rules, and by making a couple of similar toys using Toni Finanger’s patterns, you can easily come up with your own patterns. Also, patterns and a master class on creating these charming Tilda can be easily found on the Internet.
Outside, spring is beginning in full swing, so today’s master class wanted to show how simply and easily it is possible to sew an integral attribute of this time of year - flowers. Real flowers, of course, are better than artificial ones, but they fade so quickly. But if you make Tilda textile flowers, they will be pleasing to the eye until they bore you. But even in this case, you can present them to someone, and make others for yourself. So let's start our master class and turn your creative ideas into reality!
Master class and pattern for making flowers in the Tilda style
To make a flower in the Tilda style you will need the following materials:
- Fabric of any color (at your discretion)
- Filler (sintepon or any other)
- Threads that will match the color of the fabric
- Needle, scissors
- Pattern
- Wooden sticks
- Glue "Moment"
We take our pattern and transfer it to the fabric. 
We cut out all the necessary parts (petals, core and leaves), sew them, leaving a small hole in the leaf through which it can be turned out and stuffed. In the petals and core, cuts are made directly into the material.
 Using scissors, we make small cuts in each corner so that the Tilda flower does not end up with folds.
 We make cuts in the blanks, that is, in the petals and the middle. Turn it right side out and fill it tightly with padding polyester. We sew up all the holes with a hidden seam. 
Now we take a wooden stick (it can be a kebab stick), and with the sharp end we very carefully pierce the seam of one of the petals. We pass the stick through the petal until it stops.
 Then we sew the petals together with a hidden seam. This is what an assembled flower looks like in the Tilda style.
 After which, we move to the middle of the flower. It must be finished along the edge with a buttonhole stitch and threads that match the color.
 We place the processed center on the flower and sew it to each petal.
 All that remains for us to do is just the leaf. Using the pointed end of the stem, carefully pierce the leaf at its top seam.
 To prevent the leaf from spinning on the stem, it must be fixed. Select the place on the stem where the petal will be placed and mark it with a pencil. We move the sheet a little higher, smear the stick with glue and slowly move the sheet back.
That's all, and our Tilda Flower is ready! If you want to place a flower in the ground, it is best to cover the lower part of the stem stick with acrylic paint, which will prevent moisture penetration. We hope that you liked our master class and you will be able to make a lot of flowers, maybe even a whole bouquet that will delight you all year long!
Doll making is a branch of needlework related to the sewing of decorative toys. Tildas have their own characteristic features, so it is simply impossible to confuse them with other dolls. The characters embodied in this technique are quite different - they include fairies, girls, and representatives of the animal world. Tilda Angel is very popular, because such a toy can be a wonderful gift for any holiday.
Characteristic features of Tilda
The main distinguishing feature of all pupae of this type is the elongated, slightly exaggerated shape of all limbs and head. Besides this, Tilda's eyes are indicated by two sewn-in dots, beads and artificial doll eyes are not used here. Any Tilda has light makeup, at least rosy cheeks. Hair is made either from yarn or wool for felting.
The materials for sewing such cuties are exclusively natural - calico, linen, cotton, etc. There is a rule according to which a doll’s clothes should not contain more than three colors, and preference is given to pastel shades. Ribbons and lace serve as decoration; rhinestones and other shiny decorations are inappropriate here. The dolls can be filled with holofiber, padding polyester or cotton wool.
As a rule, for the “naked” parts of the doll’s body, fabric is taken that best resembles the natural skin color. However, it is not always possible to find such material. In this case, you can dye the white calico yourself. Proportions and ratio of material and dyes:
- Fabric - 1 m.
- Water - 2l.
- Coffee - 6 tbsp. l.
- Salt - 2 tbsp. l.
- Vinegar 2-3 tbsp. l.
 Wash and rinse the fabric thoroughly before dyeing. Pour water into the pan. Add coffee and salt, boil the fabric in this liquid for at least 20 minutes. After this, rinse 2-3 times in clean water. Add vinegar to the water one last time. It is best to dry the fabric without squeezing, without throwing it over the rope, otherwise a dark stripe will remain.
The variety of shapes, the emphasized tenderness and softness of these toys and their individuality have won the favor of thousands of fans around the world. With the help of such a toy, you can create a composition for a photo, for example, by planting it next to a cup of real tea, scattering anise stars and cinnamon sticks nearby.
Angel of autumn
Tilda angel can serve as a wonderful gift for any autumn holiday. A life-size pattern will result in a doll with a height of 60-63 cm. The young lady in a coat, beret and rubber boots is Tilda the autumn angel. A master class on sewing such a beauty will require:

Making a figure
 Print the pattern sheets in A4 format and cut out the parts. In the figure, the dotted lines indicate the places of tissue transition. Therefore, before transferring the pattern to the material, you need to sew the pieces of fabric together in pairs and iron the seam.
After this, fold the fabric face to face and pin along the transition seam with needles so that this line coincides when sewing. Trace the pattern pieces onto the material, cut them with seam allowances and stitch without closing along the line of the future connection of the pieces. The allowances need to be notched. The result should be the following parts: two arms, two legs and a solid torso with a head.
Turn right side out and carefully iron all elements. After this, fill the legs with holofiber to approximately the knee, machine stitch along this level, after which continue stuffing the parts. The doll's legs will bend. Sew up the legs filled with holofiber.
The body is tightly stuffed with filler in the upper part; there should be less holofiber in the middle and bottom so that the doll bends. Stitch the bottom. The handles are tightly stuffed, but the holes are not sewn.
Baste and stitch the legs to the body. Carefully sew the arms in with a hidden seam.
Hair for an angel is done in several steps. First of all, you need to outline the line of the bangs and embroider it with floss threads. After this, insert several pins into the seam line, and insert a wire perpendicular to them into the head, piercing the doll’s head right through. Thread a few turns of thread along the wire, then begin to wrap the doll’s head with this thread, following the pins as a guide. After all the hair has taken its place, wrap the ends of the threads around the wire, bend it and wrap it towards the head. Sew the parting with threads. The hairstyle is ready.
Draw eyes with a pencil and dot them with acrylic paint. It is best to use a thin brush or toothpick. Brown Tilda's cheeks.
We sew clothes
 We sew clothes - pantaloons, skirts, coats and berets. Transfer the pantaloon pattern onto the fabric folded in half and cut it out, not forgetting the allowances. Finish all edges with a closed cut, and carefully iron the finished garments. Put the pants on the doll, gather a few folds at the hips and tie them there with a thread.
For the skirt you need a rectangle of fabric 40 by 30 cm, which is folded in half with the pattern inward. Sew along the side seam, hem the bottom edge in one fold, and pull the top edge onto the thread with a fold, but do not fix it. Place the skirt on the doll, pulling it almost to the armpits, and only after that fix the fold. Glue a satin ribbon as a belt and decorate with a button.
The paper pattern of the beret is traced on the fabric in 4 copies. Cut out the parts and stitch along all the lines except the bottom edge. Turn it onto your face and iron it. The beret is held on the doll's head either with glue or with a hidden seam.
It is better to sew a coat from a denser material than other clothes, for example, from fleece. Transfer the pattern details to the material and cut out. Baste the sleeves with the main part, baste the hood. Sew these parts to the base, and then stitch the sleeves themselves along the middle seam. Turn right side out and sew the remaining gap. Put the coat on the doll.
Decorate with wings
The wings for the autumn beauty are somewhat different from other Tild angel dolls; their patterns are designed in such a way that the wings are put on the doll’s back like a backpack. Transfer the details onto white fabric in two copies. Make two loops from a narrow satin ribbon and glue them to one outlined part so that the tips of the loops go inside the outline. Cover with the second piece and stitch, leaving a slit. Turn the wings out through it and fill them with holofiber. Sew the opening with a blind stitch. Place the wings on the back of the tilde. The angel is ready!
Spring fairy
This cheerful spring doll will be an excellent gift for International Women's Day or will serve as a pleasant decorative element in any room. To sew a flower angel Tilda in the least troublesome way, a master class is simply necessary. To work you will need:

Work order. Transfer the body pattern details onto the fabric. Fold the material in half and secure with pins. Sew along the drawn lines without closing them. Cut out the pieces using zigzag scissors. Turn right side out and stuff the parts with filler. Sew the legs to the bottom of the body. Sew the arms into the appropriate places.
Dressing up the angel
 For the top you need a strip of fabric 10 by 20 cm. Fold the material along the long side with the pattern inward, stitch along the length. Turn right side out and make a few cross stitches in the middle. Wrap the strip around the neck of the tilde and bring it down to the chest, forming a top. Sew the ends to the body.
Pants should be roomy. For them you need to translate the pattern of the trousers twice and sew the pantaloons. Iron the finished product. Gather the bottoms of the legs with a thread, put it on the doll and secure the thread. Fold the top edge in and align it with the sewing line of the top. Sew with a hidden seam.
The denim jacket is the most delicate work in the whole process. Allowances for details should be no more than 0.5 cm. Change the back to denim, pockets and collar too. Sew everything together into a single whole. Sew the sleeves along the middle seam, insert them inside the jacket face to face, baste and topstitch. Turn the jacket right side out, iron it and put it on the doll.
Hair. Sew floss threads on both sides of the parting, passing the needle under the middle seam of the head. The length of the thread determines the possibility of braiding the doll's hair or doing another hairstyle.
Paint the eyes with acrylic paint and tint the cheeks with blush.
Wings for Tilda consist of two parts that are sewn to the jacket. If necessary, this part of the clothing can be tied to the body with several stitches. The flower angel is ready!
Attention, TODAY only!