Decoration of bottles for March 8th. We arrange gift champagne
As you know, champagne is a sparkling wine that is made in France, in the small town of Champagne. But nowadays, many other countries also produce this drink and its original name has become generally accepted for almost all sparkling wines. Today, not a single significant celebration is complete without champagne, thanks to which it has already become a tradition to decorate bottles before placing them on the table or presenting them to your loved ones. In this article you will learn how to decorate a champagne bottle for special occasions and using different materials.
How to decorate a bottle of champagne for a wedding
A wedding is the most significant and exciting event for all people. Therefore, when preparing for it, attention is paid to everything, every detail. Decorating a champagne bottle is one of the must-have things. And this requires non-standard and original solutions, for example, creating beautiful flowers from polymer clay. To do this you will have to stock up on the following:
- Champagne;
- Paint in an aerosol can;
- Flowers made of polymer clay (you can buy or make your own);
- Contour pencil;
- Beads;
- Scissors, glue.
It won’t be difficult to decorate a champagne bottle like this for a wedding. First, paint the bottle with spray paint, then draw the outlines with a pencil and carefully glue the flowers and beads to the intended places.
In the following photos you will see how else you can decorate a wedding bottle of champagne with ribbons, lace, beads and other available materials. Pay attention to the option of creating unique “bride and groom” symbols from bottles with your own hands.


Champagne bottle decor for March 8
The best way to please a girl on this day is to have a romantic dinner. Are you looking for how to decorate a bottle of champagne for March 8th? Below you will find interesting ideas and photos.


Bottle decoupage is one of the most original ways. For it you will need the following:
- Champagne;
- Acrylic primer;
- Napkins with pictures (postcards or other images made of thick paper must first be soaked in water or thinned with sandpaper);
- PVA glue or superglue;
- Varnish or paint (aerosol ones are best);
- Glitter.
First of all, you need to remove the labels from the champagne bottle. Then we apply a thin layer of acrylic primer and let it dry. As soon as the bottle is dry, glue a napkin with a pattern onto it and level it over the surface. After drying, you can apply several layers of paint or varnish. This completes the decoration of the champagne bottle for March 8th.

How to beautifully decorate a bottle of champagne for the New Year
An unusual bottle of champagne for the New Year can be both an excellent gift for friends and a table decoration. A lot of things are used to decorate it, from multi-colored napkins to sequins and beads. In general, everything is bright, shiny and colorful.
To decorate a bottle of champagne for the New Year you need:
- Champagne;
- Paper, fabric, garlands or other wrapping materials;
- Candies;
- Paints;
- Glue;
- Glitter.
After removing the labels from the bottle, cover it with paper and create a bumpy effect. Apply a layer of paint one at a time, let it dry, then glue on glitter, candy, beads and other available materials. Tie the New Year's bottle with ribbons to complete the decor.


How to decorate a bottle of champagne with sweets
Champagne and chocolates are a great combination. Why not combine them for a homemade gift? To decorate a bottle of champagne with candies you will need:
- Champagne;
- Candies;
- Glue (double-sided tape);
- Papyrus paper (for the base);
- Washi paper (for candy wrapping or decoration).
Wrap the bottle in paper. If you wish, you can also wrap the candies themselves in beautiful paper or foil. Carefully stick the candies onto the champagne bottle and add some ribbon to create a border or a washi paper decoration.


Also read how you can decorate a bottle of champagne, wine or cognac using twine, thread, fabric and other improvised means in the article.
Other DIY champagne bottle decor options (7 photos)
As you can see, there are a huge number of ideas for decorating a bottle of champagne and the final result depends only on the imagination of the author. Below you can see various decor options in the photo.
Useful tips
If you are preparing for a holiday, be it a wedding, birthday, anniversary or New Year, a bottle of champagne must be present on the table.
At the same time, by decorating such a bottle, you will also decorate the festive table, which means you will add another zest to the holiday.
How to decorate champagne as a gift with your own hands
In this master class you can learn how to make a pink lady from a champagne bottle.
You will need:
Bias binding(10-11 m)
Glue (preferably construction glue)
Scissors
Fabric for bows
1. To make the top of the dress you can use silver braid. You just need to glue it, covering the emblem on the bottle.


2. After you have made two overlapping rows, prepare a pink ribbon. Use just a little glue to stick the tape to the bottle. Do it a little obliquely.
When you have reached the middle of the bottle, you should have something like this:


3. After you have wound the fabric to the end, its end needs to be glued in the place where it will be approximately covered by the skirt. This way you will hide all the seams.
4. It's time to make the skirt. To do this, prepare a ribbon for the bow and gather it onto a thread. In this example, the tape is 1.5 meters long, but you can choose it yourself, make it longer or shorter.


5. The skirt can be attached to the bottle using glue or thread tied around the bottle.
How to decorate champagne. Hat for a lady.

In this example, you will be able to make a hat for the lady that you prepared earlier. The only difference is the color chosen to cover the bottle. In this example it's blue, but you can leave it pink, or choose a color that you like best.
* Prepare the bottle by decorating it as in the previous example.
Cooking the hat
1. Cut a circle from a plastic bottle. The size of the hat will depend on the diameter of the circle.
2. Inside the cut out circle, cut out another circle - you will get the part of the hat that is attached on top of the champagne. This means that you need to measure the diameter of the neck of the bottle, and make the inner circle a little larger so that the hat is a little larger.


*Remove strips one at a time.


*Use a stapler to attach the cardboard to the plastic. Next, use your imagination to decorate the hat. In this example, satin ribbon and lace were used.


The photo on the left is a top view, the photo on the right is a bottom view.


How to decorate champagne with sweets

You will need:
Quiet paper (2 orange sheets, 1 green sheet)
*Tissue paper is thin paper, also known as tissue paper. You can find it at gift wrapping racks, as well as in specialized art stores.
Candies (in this example there are 48 pieces)
* Raffia is a long fiber that can be found on the leaves of the raffia palm tree. They are popular among florists and are used in arts and crafts.
Hot melt adhesive
Hot glue gun
1. Prepare some orange tissue paper and cut it into 7 x 7 cm squares.
2. Apply glue to the flat side of each candy. Now you need to glue the candy into the middle of the paper square.


* It is better to decorate the bottle with candies from the bottom up in a circle.
* Try to glue the candies tightly to each other.
4. Making leaves. To do this, prepare green tissue paper and cut out long narrow leaves from it.
5. The leaves need to be glued together in several layers. Next, you need to decorate the neck of the bottle with them.


6. Your bottle will look even more like a pineapple if you wrap some raffia around the neck.
How to beautifully decorate a bottle of champagne
It is customary to decorate weddings with beautifully decorated bottles of champagne. In this master class you will learn about another original way to decorate a bottle. A satin ribbon and your imagination will help you.

It is worth noting that such a decoration is suitable not only for a wedding table, but also for any other holiday, for example March 8 or a birthday.
You will need:
Silk fabric
Satin ribbons (2 colors, the width of each ribbon is at least 4 cm)
Golden braid
Bias tape
Lining
1. Preparing a dress pattern. It consists of a bodice and a skirt.


First you need to do it on paper. Take the dimensions of a champagne bottle as a guide and then transfer it to the fabric.
* It is best to use thick satin and silk.
2. Sew along the edge of the satin ribbon, loosening the thread tension on the sewing machine in advance.
* It is advisable to put fasteners at each end so that when working with ribbons, the tightened edges do not come apart.
3. Using tailor's pins, you need to attach the ribbon to the bottom edge of the skirt. Make a zigzag stitch using a machine.


4. Decorate the entire skirt by alternating ribbons of two different colors (in this case, white and burgundy).
* Leave no more than 3 cm between rows.
5. When you sew the ribbons, you should make sure that the top row completely covers the joint seam of the bottom row.


*If you want to hide the stitching on the wrong side, you can use a lining. It is worth placing the skirt on the fabric, drawing the outline of the part and making a lining.
6. Fasten all the parts using pins. It is also worth securing the edge with machine stitching (see picture).


7. Now you need to edge the edge of the product with bias tape.
8. Decorate the bodice with ribbon. To do this, you need to put the tape on the bodice and then grind along the edge, i.e. fasten the two parts together and then twist them out.
9. The seam must be hidden by sewing the bodice and skirt with ribbon.


10. Start decorating the dress with a bow (brooches, sequins).
How to decorate champagne with your own hands for a wedding

For the wedding table, you can prepare 2 colorful bottles of champagne and tie them together with ribbons.
You will need:
Champagne (2 bottles)
Spray paint (white)
Satin ribbons (color white and lilac, length 2 meters)
Contour on glass (in this example, lilac)
Pastel
Stationery glue, electrical tape or tape
Cyanopane glue
Polymer clay flowers
Double sided tape
1. Remove the stickers from the bottles by soaking them in cold water. Degrease the surface with alcohol or window cleaner and dry.
2. Using office glue, glue paper decorations onto the glass of the bottle. You can use duct tape or duct tape instead, but in this case no glue is used (obviously). When you paint the bottle and remove the decorations, you will be left with clean glass.

In this example, patterns were used in square shapes, wavy stripes, blades of grass and butterflies.
3. Now the bottle needs to be painted. Using a can of white paint, paint the bottles in 3 layers (read the instructions for using the can carefully). You can try replacing the spray paint with acrylic paint.

Make sure that after applying a new layer, the previous layer is completely dry. To do this, you may have to leave the bottles to dry for a day.
4. Carefully remove the pieces of paper (insulating tape, adhesive tape).

5. Time to decorate - glue flowers onto clean glass, paint them with pastel and outline. The latter can also draw arbitrary patterns.

6. You can fill the empty spaces with beads glued with cyanopane glue.


7. Tie the bottle with a satin ribbon. You can use double-sided tape under the tape to keep it in place. You can tie the ends with a knot and a bow.


The ends of the tape can be singed over a candle. They can hang down to the bottom of the bottle.
How to decorate a bottle of champagne with your own hands

You will need:
Satin ribbon (1 chocolate color, 1 white color; length 2m, width 3cm)
White satin ribbon (length 60cm, width 6cm)
Base fabric
1. First you need to cut out a dress, focusing on the size of the bottle.
2. You need to make shuttlecocks from satin ribbons. To do this, sew a stitch along the edge and pull it together to create ruffles.


3. Sew ruffles onto the skirt.
4. The first row should consist of the widest strip that needs to be stitched.
5. From the center of the waist line you need to draw an isosceles triangle (see picture).


6. Sew white ribbons, 3cm wide, around the perimeter of the triangle.
* In order for everything to work out neatly, you should secure the product with pins, and only then start grinding.
7. Cover the edges of the triangle with a frill made from chocolate-colored satin ribbon.


9. Use wide white tape (6cm) to cover the gaps in the drapery. On top of this ribbon also apply a narrow chocolate ribbon (3cm) and stitch.


* If you pull the end of the thread, you will be able to tighten the ribbon and distribute the folds beautifully and neatly.
* With this detail you can hide undraped areas.
10. Prepare a satin ribbon (6cm) and sew it onto the bodice of the dress. You can add sequins for beauty and sew on ties.


11. At the bottom you can decorate the dress with white ribbon bows.
How to decorate a bottle of champagne with ribbons


For a wedding or anniversary, the following champagne bottle decor will also suit you.
You will need:
Satin ribbon (3.5 m)
Gold brocade ribbon (1.5 m)
Glue (preferably instant)
Scissors
Champagne bottle with gold foil
1. Prepare a bottle and tape and measure its approximate length for the first layer. To do this, attach the tape to the neck of the bottle.

2. When you have measured the length, cut the desired piece of tape and mark several points on it with glue.

4. Measure out the second piece of tape. It will be longer.
5. Proceed with the second piece as with the first piece of tape, i.e. Mark the dots with glue and glue. It is advisable that the ends of the ribbons be positioned equally, this will ensure a beautiful and neat pattern.
6. Continue gluing the next two layers (3rd and 4th) in a similar manner.
7. Now prepare the gold ribbon. It also needs to be measured and glued. Make 2 rows (see picture).

8. Another piece of gold tape needs to be glued to the bottom of the bottle.
9. Prepare the blue ribbon again. Measure and glue to the bottom of the bottle so that the seam is at the back.


10. Now we cut 7-8 blue ribbons of the same length and glue them too - so that the seam is at the back.
11. Here's the rear view. A not very neat seam has formed that can be easily closed. To do this, prepare a stationery knife and use it to make a slot for the end of the tape, which needs to be inserted there.


12. Apply a little glue to the tip of the blue tape and push it through the gap.


14. Pay attention to the middle of the bottle, there is an open space there. This is where we attach another piece of golden ribbon. The corners that stick out from the front need to be cut off.


15. Now you can decorate the front of the bottle - add bows, lace, beads, etc.


How to decorate champagne for the New Year

You will need:
Thick aluminum foil
Medium thickness wire
Decorations (artificial or natural spruce branches, tinsel, small New Year's toys, ribbons, beads)
1. First you need to wrap the bottle in foil. It is advisable to cover in several layers (from 2 to 4 depending on the thickness of the foil). Try to press the foil tightly against the bottle.
2. Now you need to attach the wire. Wrap it around the bottle, but not tightly, so that you can then remove it when you want to open the champagne.


3. Proceed to the most important thing - the actual decoration. In principle, there are many options and they depend on your imagination and available materials.
You can take a few Christmas tree branches and use glue to attach them to the foil. This can be done in a spiral (see picture), and it is advisable to start from the base of the bottle.
In those places where the foil is visible, you can attach ribbons, fabrics, wide braid or decorative paper. Places where glue may be visible can be hidden with tinsel.
4. Add beads, pine cones, toys, candies, small Christmas tree decorations, etc.


How to decorate a glass bottle (video)
How to decorate a bottle of champagne (video)
How to decorate a bottle with your own hands (video)
On March 8th, men, beloved girls, wives. This is the first holiday of spring, it resembles the sun, flowers, bright colors, so decorations for this day need to be made or selected accordingly. If your task is to worry about decor for March 8, then make flowers the basis of the composition. You can create a tree with flowers, decorate glasses and a bottle of wine.
How to make a flower tree?
To make this decoration, you won’t need a lot of time, just a few hours of free time, colored double-sided paper, parchment, a knife, scissors, a vase with tracing paper, sand, shells and pebbles, rhinestones, beads, a base for a tree (you can take a real branch) .
- First we make paper flowers. To do this, cut double-sided paper into squares, some with a side of 9 cm, others with a side of 11.
- We fold each square in half, then wrap the protruding corner at an angle of 30 degrees, then wrap the remaining square around it. You should get a triangle, you need to cut off the sharp part on top so that it turns out round, make cuts on both sides with a sharp knife and straighten the figure.
- Attach a beautiful paper flower to a branch and wait until the glue dries. To decorate the entire branch, make as many flowers as possible and distribute them on a wooden base. When the composition is completely ready, you need to prepare a vase with sand, pebbles, shells, beads, rhinestones, etc. for it. If desired, you can decorate the tree with decorative ribbons and ribbons.
Decorating glasses for March 8
To make the holiday truly magical, you shouldn’t forget about the glasses. We want to offer you one of the simplest methods, which requires simple materials at hand. So, to make decor for March 8th with your own hands, we will need:

- semolina;
- PVA glue;
- notebook sheets;
- brush, scissors;
- ribbons;
- polymer clay;
- small decorative flowers.

- From notebook sheets you need to cut out templates in the form of a semicircle. Attach the straight side of the sheet to the top of the glass using small pins, and the round side should be at the bottom.
- Coat all the space that is not covered with sheets and the leg well with glue.
PVA, and before it has time to dry, sprinkle the glass well with semolina. When the semolina has dried, you can remove the notebook sheets. To prevent the semolina from crumbling, leave the resulting mixture for several hours. The most important thing is not to rush, otherwise all your efforts may be in vain.
- When the glasses are dry, roll out the clay into thin ropes and carefully place them on the base of the glass so that the larger circle of the number encircles the stem. Also apply wavy clay lines of any shape to the top of the glass. If you can't find this material, you can use play dough or make your own.
- Decorate the base and top of the glass with flowers, and glue them with glue. The last stage of decorating the glasses is to tie a ribbon bow on the top of the stem.
Unusual bottle of wine for March 8
- a bottle of wine or champagne;
- threads of the same color and thickness;
- PVA glue;
- scissors;
- any decorations (artificial flowers, large beads, ribbons, etc.).
Apply glue to the bottle and immediately, before it dries, start winding the thread around it, making sure that there are no gaps left. Important! Work must begin from the neck, otherwise the material may slide off the glass.

After this you can decorate the bottle. For example, glue or sew beads, attach a jewelry bracelet to the neck, glue flowers, rhinestones, etc.
All that remains is to give her the real atmosphere of spring. There are no restrictions on decor, but it is better if there are flowers, because Women's Day is always associated with the sun and flowers.
Thank you for reading our article!
We hope it helped you. We will be grateful
if you leave your rating
By the way, a bottle of sparkling wine will do just fine. Decorated with your own hands, it will look original and exclusive! You can use any available material you have at home for decoration: threads, beads, chains, beautiful buttons, fragments of postcards, etc. We suggest decorating ordinary champagne with satin ribbons, lace, artificial flowers, rhinestones and glass stones. Since this is a spring holiday, it is more relevant to decorate the bottle with ribbons the color of lush grass.
To decorate a bottle of champagne we need:
- bottle of champagne – 1 pc.;
- satin ribbon 2.5 cm wide green - 3 m;
- double-sided tape – 1 pc.;
- light green nylon tape 1 cm wide - 1 m;
- decorative flowers (for hobbies) – 7 pcs.;
- rhinestones – 20 pcs.;
- glass pebbles – 15 pcs.;
- hot glue gun – 1 pc.;
- green crepe paper;
- dark green lace with scallops – 0.5 m.
The convenience of making this bottle is that there is no need to wash the labels and degrease the bottle itself. The only thing is that the bottle should not be cold, but at room temperature. Otherwise, the resulting condensation can ruin the entire work.
1 step. Work begins with preparing the working surface. Cover the bottle with double-sided tape up to the tear line of the foil on the neck.


Step 2. Having chosen a shade close to the ribbon, cut out a square measuring 15 cm x 15 cm from crepe paper.

Step 3. We place the paper on top of the bottle and secure its ends on four sides, pressing it to the adhesive tape.


Then we press the resulting ends of the folds to the neck.

Step 4 Next, we proceed to wrap the entire bottle with a satin ribbon. Thanks to the presence of double-sided tape on the surface of the bottle, the satin does not “slip” and each new turn is securely held in its place. Only the ends of the tapes need to be secured with glue. At the top, on the neck, we wrap the ribbon with a slight inclination, and below, on the wide part of the bottle, we make a horizontal wrap.


Finally, using a hot glue gun, glue the bottom edge of the last tape to the bottom of the bottle.
Step 5 After this, we measure lace with scallops of a contrasting dark green color around the circumference of the bottle and glue it to the bottom using a hot glue gun.

In the same way, but in a mirror way, glue on another piece of lace.

Step 6 We divide red decorative cherry flowers for hobby into separate fragments and glue them in a chaotic order onto the bottle.

We tie bows from nylon tape according to the number of pasted flowers.
Almost no holiday is complete without champagne. Sparkling wine is a must on the New Year's table.
It is often bought for weddings and March 8th. To prevent a bottle of champagne from getting lost on the festive table, it is enough to decorate it.

A beautiful bottle of sparkling wine can also be an original gift.

Champagne decoration for wedding
When preparing for a wedding, attention is paid to every detail. An unusual bottle of champagne can decorate the newlyweds' table or it can be used in the traditional sale of alcohol at a wedding.

The bottle can be decorated with flowers made of polymer clay. First you need to get rid of all the labels, then paint the champagne bottle with spray paint.


Flowers are glued to the bottle, and you can use other decorations with them - beads, rhinestones and other little things.

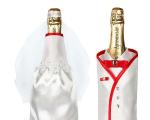
You can also decorate a couple of bottles of champagne in the style of the bride and groom. To do this, you can use specially tailored suits, or you can make a “groom” and a “bride” from bottles using ribbons yourself.

In order to make such a decoration yourself, you need to cut the ribbon into pieces.

Then glue each piece of tape to the bottle so that they all connect in one place. You can sew a skirt from gathered mesh onto the bride's bottle. And on top, so that the seam is not visible, glue a beautiful braid. You can glue beads symbolizing buttons to the “groom’s” bottle.

Original champagne for the New Year
The New Year is celebrated with a glass of champagne, so it is important that the bottle of this drink is festively decorated. Most often, for the New Year, champagne is decorated in the shape of a Christmas tree or pineapple. Candies are suitable for this decoration.

You can also use various ribbons and beads to give the tree a more elegant look. And for the pineapple you will need leaves that can be made from paper. You will also need glue or double-sided tape.

To make a tree made of candies and a bottle of champagne as a base look more magnificent, the candies must be glued to the bottle in a checkerboard pattern, so that each subsequent candy is at the junction of two candies of the previous tier.

For the “Christmas tree” it is better to take candies in a green wrapper, having a rectangular shape, and for a pineapple – semicircular candies in a yellow wrapper.

To make a pineapple, the candies are also glued in a checkerboard pattern, tightly adjacent to each other, so that the bottle itself is not visible. It is good to make leaves from thick paper. It is cut into the shape of a real pineapple leaf and glued to the neck of the bottle.

Also, a New Year's tree is made from champagne using green tinsel. It is wrapped around the bottle, glued at regular intervals to the base, and decorated with beads or candies on top.


A bottle of champagne for March 8
The best gift for any girl this holiday will be a romantic dinner. And what festive dinner would be complete without champagne? And if the bottle is also beautifully decorated, it will be an unforgettable evening.

On March 8, a bottle of sparkling wine can be decorated with flowers made from paper, fabric or polymer clay by simply gluing them to the bottle. Also in place would be a bottle decorated with ribbons similar to decorations at a wedding.

But for a holiday like March 8, it would be appropriate to decorate champagne using the decoupage technique. To decorate, you will need a primer or base, acrylic paints, acrylic varnish, PVA glue, brushes and a sponge, as well as a napkin with a beautiful pattern.

First you need to remove the label from the bottle and degrease it. Then the bottle is covered with a layer of primer, and after drying, a design from a napkin is glued to it using PVA.

After drying, paint is applied over the remaining free spaces using a sponge using blotting movements, and then varnish. This bottle will decorate any table.


Photo of champagne bottle decoration