Tree in Yin-Yang style “Road to the Sun. Black and white beaded tree “Yin-yang” Beading trees yin yang
Height 50 cm.
Good afternoon, dear needlewomen, even ancient Chinese philosophers believed that everything in the world consists of two opposite principles, Yin and Yang. The basis of this ancient wisdom was the idea that every thing, situation, feeling, etc. are two-valued, have two poles and have their opposite: day - night, war - peace, man - woman... Let us today touch upon the ancient wisdom and create a classic tree in the Yin-Yang style.
For work we will need:
— black beads (not transparent) — 150 g.
- white beads (not transparent) - 120 g.
– beaded wire – 3 coils
- aluminum or copper wire for the frame - 1 m.
- mold for filling the stand
- white and black threads (floss or shoe silk)
- large white and black beads for creating decor (landscape) 20 g each.
- gouache paint (watercolor) white and black
— brushes
- plaster
- PVA glue
— car varnish transparent aerosol
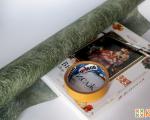
Materials provided by handmademart.net
Technique – loop weaving.
Step 1. Weaving branches.
Weaving is carried out according to the same pattern for both colors, both white and black. Before starting weaving, we prepare strings with beads on separate spools. It is better to choose a wire of a more neutral color (for example, silver) and thinner, then the branches look more airy.
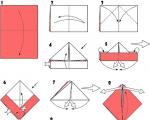
Stepping back 10-15 cm from the edge, weave a loop, the loop should consist of 8 beads, the number of loops on the workpiece is from 15 to 17 pcs. (we place the loops at the same distance from each other) from the last loop we make an indent of 10-15 cm and cut the wire (see photo 1). The number of loops on the workpiece should not be even.

When the loops are ready, we begin assembling the workpiece - starting from the central loop, we twist the wire (see photo 3). After the last pair of loops, we twist the wire at a distance of 3-4 cm. We straighten the branches in a neat parallel order (photo 4).
We produce about 70 pieces this way. white blanks and 100-120 pcs. black.

Step 2. Assembling the branches and tree trunk.
According to the creative plan, the black branch seems to cover the white one on top (and accordingly it is larger and more magnificent) and the arrangement of the branches will form the shape of a heart.
For black branches we need blanks. We wrap the twig blanks onto a piece of wire with a diameter of 1-1.2 mm and a length of 15-20 cm using strong black thread (the number can vary from 5 or more pieces). White blanks are attached directly to the barrel frame with white thread.

To form the trunk and branches, we will use 2 pieces of wire for the frame with a diameter of 3 - 3.5 mm and a length of 45-50 cm. It is better to use copper wire, because aluminum is very soft and loses its shape under the weight of the beads (unfortunately, I ran out of copper, so I had to use aluminum and then strengthen it). So, from pieces of wire we form a frame of branches. Don't forget to form a loop at the end of the frame.

We fasten the branches to the frame with a strong thread, starting from the crown and placing subsequent branches in a spiral in relation to the trunk. Important! The branches turn out to be heavy, so it is better to strengthen the frame with additional wire (or improvised means. As happened with me).

Step 3. Planting and shaping the trunk.
To cast the stand we use any interesting shape. Place the tree trunk with a loop in the prepared mold and fill it with a mixture of plaster and water (the consistency of liquid sour cream). Leave until dry, after which you can remove the mold (the main thing is not to rush at this stage, the wet base of the stand will crack easily).
The tree trunk is decorated with a mixture of equal parts of gypsum, water and PVA glue. Coat the branches with a more liquid solution. We thicken the bottom of the trunk with a thicker solution. To give the trunk texture, we use a sharp knife - we form (cut) the bark along the hardening mixture. Let it harden for a while.

We make holes in the base for “planting” the decor - this can be done in two ways. First, at the stage of casting the stand in the liquid solution, we install pieces of cocktail tubes. Once the solution has set, the tubes can be easily removed. In the second method, we will need a drill with a handle - we can drill all the necessary holes before painting (it is very easy to drill, the main thing is not to get carried away, the hole should not be deep). The drill can be replaced with a sharp awl.

Step 4. Painting. Decoration.
For coloring we will need paints of two colors - black and white. I use regular children's gouache.
The upper black branch is painted black until the branches intersect; accordingly, we paint the white branch and trunk with white paint. Let it dry well. Then we paint according to the “birch” principle - with a dry, hard brush, using horizontal movements, we paint the bottom of the trunk and roots with black paint.
Paint the bottom of the stand.


Today we will try to learn how to weave a Yin-Yang tree with our own hands from the most ordinary beads. Many of you are familiar with the “Yin-Yang” symbol, which symbolizes a certain ambiguity. This symbol came to us from Ancient China. Chinese sages have observed for many years that many phenomena have two sides. Our tree will be black and white, made of beads of two colors, stylized as “Yin-Yang”. Before we begin our detailed master class on how to make a tree, let's prepare the necessary materials.
We weave a Yin-Yang tree from beads with our own hands
What we need:
- thin wire for beads (3 coils);
- thick wire (1 m);
- beads (black 150g and white 120g);
- large beads of two colors (20 g each);
- threads: wool or floss, black and white colors;
- acrylic paints;
- brushes;
- pva glue;
- gypsum;
Our symbolic tree should consist of small branches, which will then be combined into larger branches.
Making thin branches
To weave the Yin-Yang tree with beads, let's start making branches of black and white flowers. To do this, stepping back a little from the edge, string 8 beads onto a thin wire and twist it into a leaf.
We need to make an odd number of such leaves, the distance of the twisted wire between them should be 1-2 cm.
We form a branch, starting from the central leaf.
When all our leaves are connected, we need to twist the wire down, about 3 cm. In order for the crown to be lush, you need to make about 65-70 of these white branches and 100 black ones.
Forming a large branch
When our supply of thin branches is ready, we can combine them into one large branch. For this we need a thick wire; it will take on the role of a frame. Let's cut pieces of thick wire to the length we need and begin to tightly wrap thin branches to it using floss threads of the desired color. To make one large branch you will need about 5 small ones.
Making the main frame
When our thick branches are ready, we will start making the frame. To do this, take a thick wire and bend it in a semicircle, form the first loop from one end, and bend the second end into a second, larger loop. If we did everything correctly, we will have a frame for our tree that resembles a heart shape.
If the wire we took is not elastic enough, you can use other available materials, for example, wooden or bamboo sticks, to strengthen the tree trunk.
We attach the branches to the frame.
The branches of the Yin-Yang tree will be attached according to the beading pattern described above (using threads).
Working on the plaster base
We will make the base of the tree from plaster or alabaster. To do this, we will dilute it to the proportion of sour cream and pour it into the mold. The gypsum hardens very quickly, so before it hardens, we will make holes into which we will then insert wire with beads imitating “grass”, complementing the Yin-Yang style.
Processing the trunk
The tree trunk can also be treated with plaster to give it the texture of wood. To do this, you need to pour a plaster mixture over it, and use a pointed tool to depict “bark.”
We paint the barrel and add details.
We will paint the barrel black. If you want, you can decorate the base with large black and white beads. So you have learned how to weave a Yin-Yang tree.
Bead weaving is a very exciting activity, and after learning how to make Yin-Yang trees, you can also prepare a good gift for a loved one. In order to better understand what other variations are possible, look at various photos with different tree options.
A tree of love is made in a similar way; it will look good when combined with a Yin-Yang tree.
The tree of love is a stylish composition that looks like a heart. This thing will definitely become a symbol that will speak about your feelings without words. Absolutely anyone can make such a tree, first of all, because the work does not require a large number of tools. The most important thing is your desire and creative spark.
We take a wire that is thick enough. After all, it is with the help of this wire that we will shape the trunk. It is better to make such a heart-shaped tree from two different parts. One end of each wire needs to be twisted into the trunk, and the other parts should be shaped like a heart.
We make thin branches for our tree. At this stage of work, we will need beads and wire. The color of the beads will depend only on your choice. If you are planning to make a heart, then pink and light blue shades will suit you. The wire from which the branches will be woven must be chosen flexible and thin.
Cut a small piece of wire, about 25-30 cm, and put about 5 beads on it. We twist the wire so that we get the shape of a leaf. When we get the first leaf in the shape of a loop, you can move on to the next leaves. We recommend that you make 8-9 leaves on one branch.
Once you have the required number of leaves, start forming a branch. To do this, simply intertwine the two halves of your wire with each other. To make a tree you need to prepare 20-25 branches of each color. You will connect three thin branches into medium ones. The middle ones are three thick, and then assemble the trunk from the thick ones.
Secure the resulting two parts of the barrel to our ready-made base made of thicker and stronger wire. After you attach the beaded trunks to the base, it is advisable to wrap them on top with floss threads of a suitable color.
Now you need to take the container in which you will fix your tree and secure it there. For fixing, gypsum mortar is usually used. If desired, trunks can also be primed with this solution. After complete drying, they can be painted.

In order to consolidate the knowledge gained, we advise you to watch several videos on how to make a love tree from beads.
We hope that the love tree will become one of your favorite crafts in your assortment thanks to the simple instructions outlined in this master class.
A two-color Yin Yang tree made of beads requires perseverance and proper skill from the craftswoman. The finished product can be safely “introduced” into the interior of a home or office, or given as a gift to a loved one.
- beads (black, opaque) – 150 grams.
- beads (white, opaque) – 150 grams.
- wire (beaded) - three coils.
- wire for the frame (copper or aluminum) - 1 meter.
- mold for stand.
- black floss threads.
- white floss threads.
- large white beads. – 20 grams.
- large black beads. – 20 grams.
- PVA glue.
- paints in white and black shades.
- gypsum.
- tassels.
Master class on weaving Yin Yang wood with beads
Making twigs
The “Chinese” tree, the photo of which stimulates action, is made using the loop weaving technique. Our master class will tell you how to start work correctly and create an unusual and touching souvenir:

Making flowers
If you want your Yin Yang tree to be more lush and elegant, then you can make it bloom. In the photo this product looks very advantageous.
Making petals
In order to make cute leaves for your Yin Yang, you will need to perform the following manipulations:

Making leaves
- Take seven beads and make loops;
- Make several things, attach them to the flower and secure with floral tape;
- Use the same method to make leaves for the white flower.
Assembling twigs
 The Yin Yang tree suggests the free flight of the artist's imagination. The classic version, which looks impressive in the photo, involves covering a white branch with a lush black branch. The obi of the Yin Yang branch are arranged in the shape of a heart. How to properly attach tree branches? Follow the tips that our master class offers:
- Make several blanks for black branches;
- Cut a piece of wire no more than twenty centimeters long and 1.2 millimeters in diameter;
- Wrap the black blanks using a strong thread of a similar shade (you will attach the white branches to the trunk frame).
Assembly and landing of the barrel
Our master class will help you quickly assemble your Yin Yang tree. The photo shows that it is advisable to use pieces of copper wire. The product is assembled as follows:
- Take two wire pieces, the length of which is 45-50 centimeters, and the diameter is no more than 3.5 millimeters. Form a frame of branches, at the end of which make a small loop;
- “Arm yourself” with a strong thread and screw the branch to the frame. You need to start screwing from the top of the head, placing the branches in a “spiral” relationship to the trunk of the product;
- To prevent the wood from deforming, strengthen the frame with another piece of wire;
- Attach the trunk of the tree using a loop to a pre-prepared mold of an interesting configuration;
- Prepare the gypsum mixture (its consistency should be creamy);
- Dry thoroughly, then remove the mold.
Decorating the trunk
In order for the Yin Yang tree in the photo and in “real life” to look no worse than a factory exhibit, its trunk needs to be “ennobled”. Our master class will tell you how to do this:
- Prepare a mixture of PVA glue, water and plaster;
- Carefully coat each branch and the bottom of the trunk;
- Give the trunk texture. To do this, cut through the bark on the hardening gypsum-adhesive mixture;
- Allow the product to harden;
- Using an awl or a delicate drill, make several holes to place the decor.
Painting
 Here comes the most “creative” and interesting moment of the work process. Our master class will also help you paint an almost finished Yin Yang product:
- “Arm yourself” with a brush, and, using gouache (any kind, you can also use children’s), paint the top branch black (exactly up to the place where the branches intersect), and the bottom and tree trunk white;
- Dry;
- Using a hard, dry brush, paint the bottom of the Yi Yang trunk and roots with black paint. Movements must be horizontal;
- Don't forget to paint the bottom of the stand mold.
The finished tree can be placed both in the office and on your home desktop. Stylish and amazingly beautiful, this product will always delight you and your loved ones.
If you want your Yin Yang tree to be no different from the cute souvenirs sold in boutiques and shops, then draw a “yin-yang” pattern on a plaster stand. First, coat one half with glue and lay out black beads. Then do the same manipulations, only with white beads, with the second part of the pattern.
Video: Weaving colorful Yin-Yang trees
Yin-yang is popular in needlework because it is easy for beginners to make. It was not chosen in vain; the weaving technique is simple, and in appearance it looks very catchy and interesting due to its colors.


When creating a yin yang tree, the needlewoman requires special attention, patience, and perseverance. Stock up on the anticipation of your creation and you will be satisfied with your work; you will definitely find a place or corner where to place your own pictorial art.
Preparing for work
You need to stock up on the following materials:
- tenth size beads (white and black) 50 grams each
- 60 cm 3mm wire – 50 pieces
- thick copper wire, two pieces, 15 cm each
- threads
- acrylic paints
- PVA glue
- finishing stand
Video master class tree made of yin-yang beads
Weaving twigs
Because our design involves 50 pieces of wire, we divide them in half and weave 25 branches - from white bugles, 25 - from black. The branches collected among themselves will be divided like this - five white and five black.
1. We weave the first one, consisting of nine petals. We string 10 white beads onto a wire and move them to the middle of the tool. Now we twist the wire nine turns - this will be the central petal.

2. We have one petal, we continue to weave four pieces on both sides. Having strung 9 beads on one end of the wire, you need to retreat 1 cm from the twisted place and twist the second petal in a similar way with nine turns.


4.Now we make its leg by twisting it 25 turns, which we will wrap with light yarn. Dip the tip of the thread in glue, apply it to the leg and begin to wrap tightly in one layer. Then our design will look neat. At the end, cut the thread, leaving a tail of about 1 cm.


5. We make five such branches. In the fifth, there is no need to cut the thread; we will use it to wrap all the branches made. Starting with the first one, having tied it a little, take the second one and continue the wrapping process so that a beautiful bouquet is formed in your hand. I advise you to periodically lubricate the wire with glue.

6. We wrap our assembled bouquet of five branches with a thread to the end of the entire length, cutting the thread and leaving the tip. We will have five lush bouquets with light beads and similar ones with black beads.


Assembly of branches
Let's move on to the steps of connecting according to the color of the branches to the general wrapping with yarn. We will have one tree white, the second dark. We will twist them together after finishing the work. Using the example of one assembly composition, we will consider the detailed steps of forming a tree. You need to insert a piece of thick wire (we bend it with pliers so that the stand comes out) into the middle and patiently wrap it with yarn in several layers to the bottom roots.

This is a long procedure, because the thick pin also needs to be wound. The thickness should be the same along the entire length of the composition.

We weave these two products together with effort. Having twirled our creation in our hands, we beautifully straighten the bunches, creating splendor.

Final stage
Now we come to the end. We will plant the tree trunk in a round stand with alabaster mortar. The solution is made like this:
- Pour a little plaster (alabaster) into a small container, gradually adding warm water.
- Bring it to a creamy consistency and transfer the finished mass to the main stand.
- Next, insert the tree, place it in the center and set it aside for 6 hours to completely harden.


4. When the concrete has dried, draw a line in the yin yang sign. We paint one part with black paint. Then fill the concrete with PVA glue and sprinkle with appropriate beads.

A wonderful composition is ready. We straighten and create lush bunches, decorate a corner of the interior. I am sure that you coped with this design and were satisfied.
In a similar way, they are woven with beads of red, pink, and blue colors. Such an invention, in principle, will look great in different colors, individually matching it to your home interior. Good luck in your work!


We bring to your attention the following video lesson, slightly different from the previous one. The knitting technique is the same, but the volume and weave are different, it will be interesting. You will also see examples of other work options.
Video master class “Creating colored yin-yang trees”
I suggest you make a very original product with your own hands that will decorate any home or become a wonderful gift. A yin-yang bead master class with step-by-step photos will help you create real beauty. This bright and unusual decoration, symbolizing the masculine and feminine principles, can become a real talisman. I will be happy to tell you how to make yin-yang.
For weaving we need:
- Beads in two colors: black and white. Size No. 10 (Czech) or No. 12 (Chinese).
- Wire with a diameter of 0.3 mm.
- Threads for winding in two colors: white and black.
- Acrylic paints: white, black.
- PVA glue.
For a solid yin-yang tree, you need to weave 2 identical small trees, the only difference is that we will weave them in different colors. One will be white and the other black. In the process we will connect these two trees to each other. Weaving uses a technique.
We collect 9 black beads onto a piece of wire 45 cm long, move them 7-8 cm from the edge and make a loop.


In total you need to fly 7 loops. They should be located approximately 1 cm from each other.

Now we take the wire with loops, first bend them towards each other, and then begin to twist them together.

Next, you need to turn all the loops so that they are perpendicular to the topmost loop. And we also turn the row of loops in the middle so that these loops are between the loops of the top and bottom row.
Afterwards you need to slightly lift all the loops.

We weave 3 pieces of such branches.


Using similar weaving, we make the same one, but only from white beads.

In total you need to make 10 black and 10 white branches.

Assembling a yin-yang tree
Before you start assembling the yin-yang tree, you first need to wrap the wire on each branch with threads. The color of the threads should match the color of the beads.

When everything is wrapped, we begin assembly.
Take the black branch - it will be central. We attach the second one to it a little lower. On the other side, we wrap another branch.

Immediately between these branches we wrap another one.

A little lower we wind three more in a circle. We wrap the remaining ones below in the same way in a circle. The result was 3 rows of branches.


We assemble the white bead tree in the same way.
Now we take the finished trees and twist them together. For the finished tree we make a round one. We draw the Inyanevsky symbol on it with paints.