Long simple skirt. How to sew a long skirt to the floor with an elastic band
› Sewing a long skirt with your own handsSewing a long skirt with your own hands
Your attention is presented to the model of long skirts with patterns. Sewing a long skirt with your own hands is quite within the power of each of you. Little experience - choose simple patterns for long skirts and materials that are easy to process. Self-confident - it's time to sew a long knitted skirt.
If you need to sew a long skirt to the floor - this is a matter of just a few centimeters in length. To any pattern of a long skirt, add the missing centimeters below - and the pattern of a long skirt to the floor is ready. You just need to clarify exactly how long the skirt should be.
How to lengthen a straight skirt pattern
In principle, any skirt pattern, even a short one, can be lengthened to the floor. For example, there is a pattern of a straight short wrap skirt. To lengthen it - as easy as shelling pears - we complete the rectangles of the desired size to the bottom edge of the pattern, according to your measurements. That's all, you have a pattern of a straight long wrap skirt.
How to lengthen an a-line skirt pattern
By the same principle, you can lengthen the pattern of the trapeze skirt. In this case, you need to extend the vertical and side lines down by the same amount, and set aside the same amount from the lower cut of the skirt in several places.
It remains to draw a new bottom line - it should be at the same distance from the previous one and repeat its rounded shape. Naturally, a long A-line skirt at the bottom will be wider than a short one.
Now, having changed the length of the pattern of the desired model of the skirt, you can sew a long skirt to the floor with your own hands.
Here is a photo - how to sew a long skirt. These are models of long skirts with patterns, for each there is a step-by-step construction of a pattern, layout on fabric and useful sewing tips.
 |
Cotton satin, laid in opposite folds, looks great. The skirt is lined, with a high one-piece belt, floor-length at the back. Processing features require experience in sewing. |
|---|
There are two ways to sew a product with your own hands. First: use diagrams and drawings that are difficult to understand. Second: using ready-made drawings and several measurements, quickly and efficiently create the necessary product with your own hands. In this article, we will talk about the second method.
How to quickly sew a long skirt
To sew a long skirt, you will need a little: suitable material, threads to match the fabric, chalk, centimeter, sewing machine, pinning needles if you need them.
It is immediately necessary to identify several features of tailoring a skirt. Firstly, if you are not sure that you can make the lines perfectly even, then it is best to take threads that match the fabric. Secondly, it is more difficult to work with flowing and stretching materials. Therefore, choose a dense material that will not deform and stretch during the process of sewing a skirt.
And it is also worth noting that even if you perfectly sewed a skirt from cheap material, the product will not turn out to be of high quality. Therefore, even if you decide to save on tailoring by doing it yourself, then you cannot save on fabric if you want to wear a skirt for walks, visits and work.
It is easiest to sew a skirt with two or four wedges. You will need the following data: waist circumference, hip circumference and product length. one wedge (we take a pattern for a skirt consisting of 4 wedges.)
- On paper, draw a vertical line, the length of which is equal to the length of the product plus 1 centimeter for the seams and 4-8 centimeters, depending on the width of the elastic band that will hold the skirt.
- From the vertical line in any direction, measure a distance equal to 1/8 of the width of the hips.
- From the new point down, also draw a straight vertical line.
- Now you need to determine the angle of the skirt flare. If you want the skirt to be comfortable to walk in, but the product is not very wide, then it is best to choose 25-30 centimeters.
- Since this drawing is 1/2 of a wedge (and you will cut the wedge by using the pattern twice, shifting it in a mirror position), then you need to measure 15 centimeters from the bottom of the product and draw a new line reaching the top extreme point of the pattern.
- Also, do not forget to measure 0.5 cm horizontally from the middle vertical line and do the same with the top point of the second vertical line. This will be the waistline. More clearly you can see the drawing in the figure below.
How to sew a long warm skirt
Whatever fabric you choose, it must be washed and dried before cutting. This is especially true for warm woolen fabrics, as they have the peculiarity of "sit down" a few centimeters after the first wash. Very dense fabrics are somewhat more difficult to work with. It is worth remembering that the middle line of the pattern should coincide with the shared thread of the fabric. The share thread is the main direction of the fabric, when buying in a store, you can ask a consultant to help you properly position the fabric when cutting.
How to sew a long skirt with an elastic band
Sewing a skirt with an elastic band is the easiest way to sew. To do this, you need to decide in advance what width of elastic band you will use. For denser fabrics, an elastic band of 4-6 centimeters is better; for thinner summer fabrics, an elastic band of 3 centimeters is enough. In any case, when cutting, it is necessary to add the width of the elastic band multiplied in two + 1 cm for the seams to the length of the product.
- First, you need to tuck the fabric on top by 0.3-0.5 cm and sew it from the inside.
- After that, once again tuck the fabric to the width of the elastic band + 0.5 cm for a margin so that the elastic band can be easily inserted into the formed "pocket". When hemming the product a second time, it is necessary to leave a distance of 5 cm (approximately) in the seam through which you will insert the elastic. This can be done by hand or with a pin to make it easier to move the elastic between fabrics.
- Then the elastic must be sewn, and then sew the remaining distance in the seam of the skirt. With this method, the elastic will be inside the skirt, it will not be visible at all, and the skirt will look neat even from the inside.

How to sew a long chiffon skirt
Chiffon is a more capricious material. You can also sew a skirt from it from 2, 4 or 8 wedges, but it is worth considering some features. Chiffon is a very thin material, so a skirt made of it should be lined. For the lining, you need to choose a thin, but opaque lining material. The lining wedges are cut according to the same pattern, but the length of the lining wedges should be 2-4 centimeters less so that the lining is not visible. The edges of the chiffon and the lining must be overlocked and fastened with an elastic band or belt, depending on the method you choose to fit the skirt.
How to sew a long pleated skirt
To sew a pleated skirt, you need to choose a larger expansion angle of 50 centimeters, then your skirt will lie in beautiful waves. At the end of the article there is a video instruction for sewing a pleated skirt.
How to sew a long skirt for a girl
For a girl, sewing a skirt is somewhat easier, using the same scheme for constructing a drawing, but from the measurements of a child. It can be made expanding right from the waist, and fasten the fabric with an elastic band at the waist itself. It is important to remember that comfort is important for the child! Therefore, it is better to make a skirt from a light fabric with a large flare angle.
Sewing a simple skirt to the floor will not be difficult even for a novice craftswoman. After all, you can do without a pattern, it will be enough to make just a few measurements. In this article, we will analyze in detail what and how to measure, how to cut out details and sew. For those who do not want to bother with building a drawing, I offer ready-made free patterns of a long skirt, which can be downloaded at the end of the article.
How to build a skirt pattern to the floor
First we need to decide on the fabric. It is desirable that it be stretched in the transverse direction. Otherwise, the skirt will hinder movement.
Required measurements:
- Waist,
- Hip circumference (optional measurement, needed for verification),
- Length from waist to outside of foot.
- Step length (needed so that the skirt does not hinder movement).
With the first three measurements, I think there should be no questions. But in order to measure the length of the step, or rather it would even be to say the circumference, you need to take your usual step and measure the circumference with a centimeter tape, clasping the ankles.
On a fabric folded in half, set aside a quarter of the OT on top, for example, if your waist is 68 cm, then you will need to set aside 17 cm + a seam allowance.
Set aside the length along the fold line, for example 90 cm. From the point obtained, lay off a quarter of the step circle to the side. So, if your measurement of this value was 88 cm, then you will need to postpone at least 22 cm. Of course, you can measure more, but if you take a smaller segment, keep in mind that walking in a skirt will not be very convenient. To remedy the situation, you will have to make an incision, but we sew without it.
Finally, check if the skirt is tight at the hips. To do this, measure about 18-20 cm below the waist and measure the width in this area, it should be at least a quarter of the circumference of your hips. If you have a narrow waist and very wide hips, you will have to slightly increase the waist mark, and increase the width of the lower segment by the same amount.
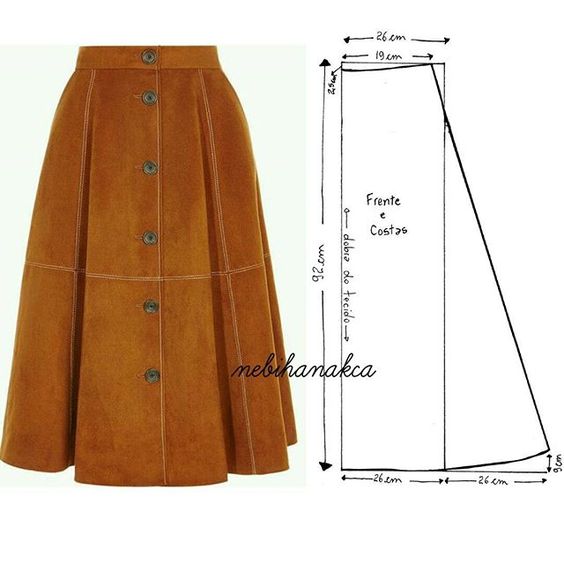
Method number 2. According to the method of Marlene Mukay.
Marlene Mukay suggests building a long skirt pattern based on the circumference of the hips. Below are drawings of such skirts. We see that a rectangle is initially drawn, the width of which is a quarter of the OB. We measure a quarter of OT from above, and another quarter of OB is deposited along the bottom from the edge of the rectangle. The edges of the skirt need to be slightly rounded. In my opinion, Marlene Mukai's patterns are one of the most accurate and at the same time simple. By the way, all measurements in the drawings are indicated taking into account allowances. Size chart below.


How to sew a maxi skirt
Cut out the pattern pieces. Lay them right sides together and sew the side seams. Perform a bottom hem.
To process the top, cut a strip of fabric, the length of which will be equal to OT, the width is about 20 cm. Fold it in half and sew it to the top cut of the skirt. If you have very wide hips, and the fabric is not elastic, then you can cut a longer strip, and then insert an elastic band into it or stitch rubber veins.

Other maxi skirt options
Here are some more options for long skirts. The size chart for these drawings is the same as for Marlene Mukay's patterns.


You can sew a skirt of any length. In our master class, we opted for a long sun skirt.
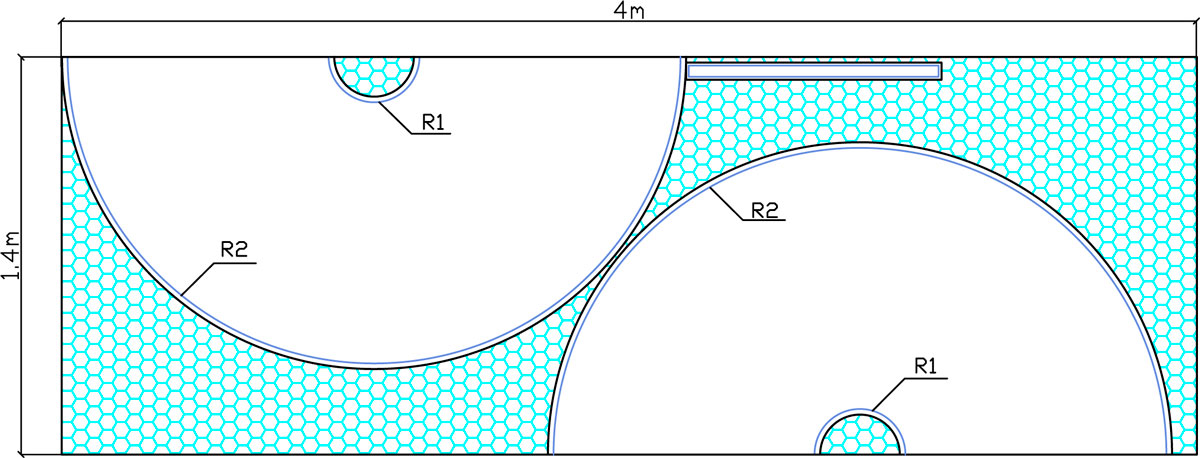
How to build a sun skirt
A sun skirt is one of the options for a flared skirt. It is based on a circle. You can make a sun skirt pattern yourself with the help of our master class. A step-by-step illustrated master class will tell you how to take measurements correctly, make calculations for construction and complete the construction of a long skirt-sun, half-sun skirt and flared skirt based on 1/6 of the circumference.Step 1
We cut 2 halves of the "sun" and the belt, taking into account the allowances for the side seams and the hem of the bottom - 1.5 cm, and for the upper cut of the skirt and the belt - 1 cm.
Step 2

We overlock the side sections of the front and rear panels on the overlock on the front side.
Step 3

We grind the right side seam 1.3 cm from the edge.
Step 4
Iron out the side seam.Step 5
Cut out a strip of adhesive fabric or interlining 4 cm wide and equal to the length of the belt.Step 6

Duplicate the belt detail with glue cloth.
Step 7

We fold the part of the belt in half (along the long side) with an adhesive cloth inside and iron it.
Step 8

We overcast one long section of the belt detail on the overlock (on the front side).
Step 9

We lay two lines with large stitches along the front and back panels along the waist line 0.7 and 1 cm from the edge (for fitting).
Step 10
Slightly collect the front and back panels of the skirt on two lines along the waistline to the length of the belt.Step 11

We sew the belt (with a raw cut) to the fitted panels of the skirt 1 cm from the edge.
Step 12

We iron the allowances towards the belt.
Step 13

We prick with pins a hidden zipper on the front panel of the skirt “face to face”, the edge of the fastener coincides with the middle (upper) fold of the belt.
Step 14
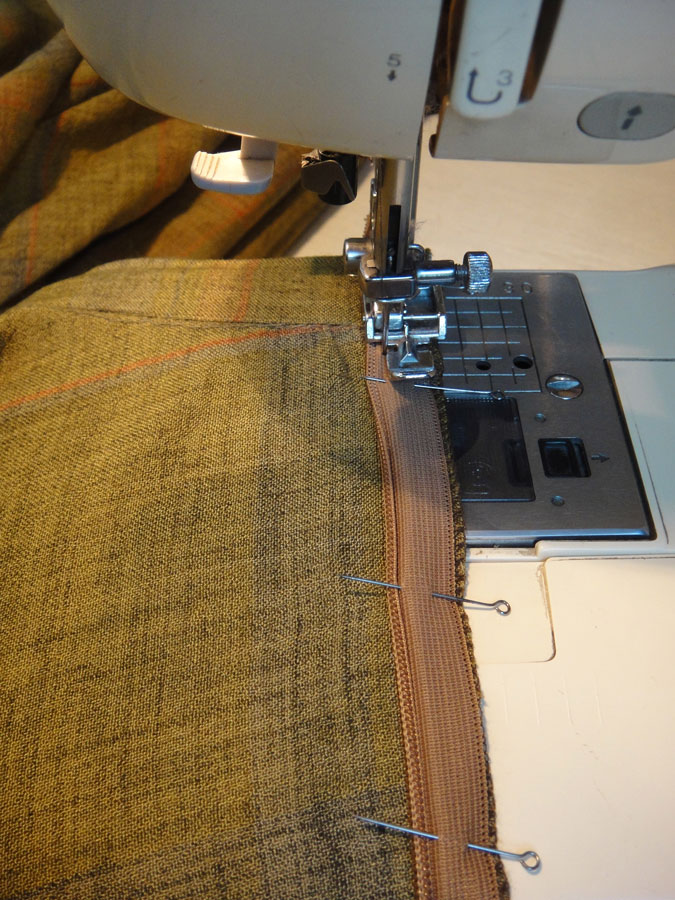
We sew a zipper to the front panel of a long sun skirt. We use a special foot for a hidden zipper.
Step 15

We prick with pins a hidden zipper on the back panel of the skirt “face to face”, the edge of the fastener coincides with the middle (upper) fold of the belt. We check whether the seam of attaching the belt matches when we fasten the zipper.
Step 16

Attach the zipper to the front of the skirt.
Step 17

We grind the side seam of the sun skirt from the bottom to the zipper, we make a bartack at the base of the zipper.
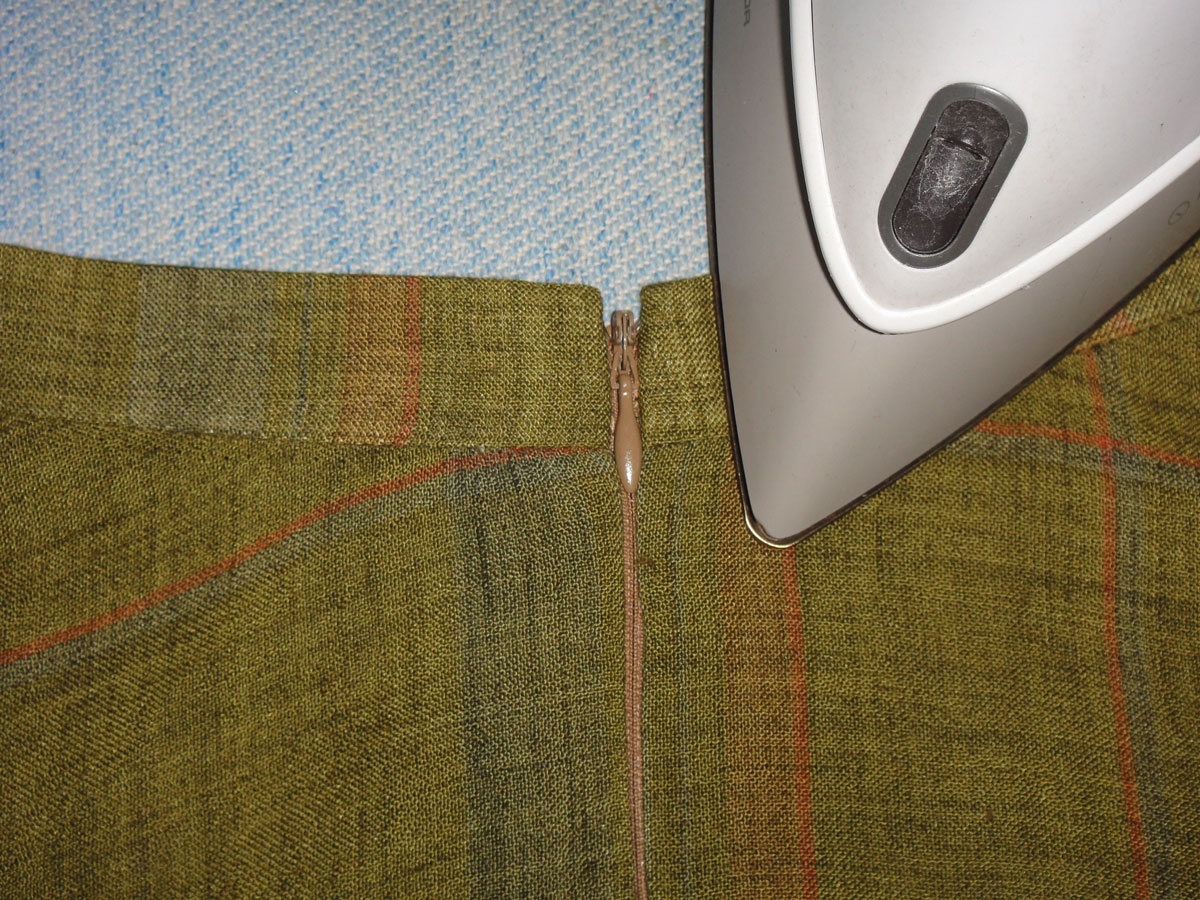
Step 18

Iron out the side seam.
Step 19

We fold the end of the belt along the upper fold line face to face (turn inside out).

We grind the outer and inner halves of the belt, laying the line in the line of attaching the zipper, or retreating from it by 1 mm towards the cut.
We twist the end of the belt, iron it. Repeat the same with the other end of the belt.
Step 20

We pin with pins or we outline the inside of the belt to the skirt. We adjust, laying a line along the front side of the skirt in the seam of attaching the belt.
Step 21
We iron the belt.Step 22
We level the bottom from the floor. It is best to do this on the figure on which we sew the skirt, but you can also use it on a mannequin.Step 23

We bend and iron the bottom of the skirt.
Step 24

We hem the bottom of the sun skirt with a hem seam with a closed cut.
Step 25
Iron the bottom of the skirt.
The long sun skirt is ready!
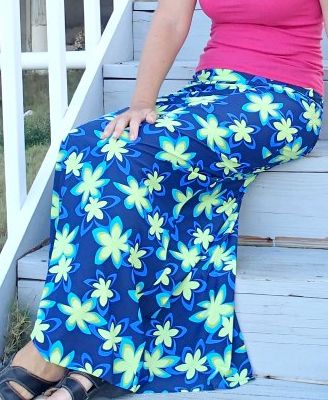
You can also sew.It is impossible to imagine a summer women's wardrobe without a light summer skirt. She gives not only lightness and salvation from the summer heat, but also gives the image even more femininity. A girl in a skirt fluttering from a light breeze attracts the attention of others. You haven't got this trend of the season yet? Or in stores did not see a suitable model? Or maybe you saw the fabric from which you wanted to sew the original one? Whatever the reasons, but if you want to sew a summer long skirt with an elastic band and without a pattern with your own hands, but don’t know how to do it, our master class will come in handy for you. And do not worry about the fact that there is no sewing experience. Sewing this product is so simple that any girl who has never held a needle in her hands will cope with the task. So, we sew a long skirt with our own hands!
We will need:
- piece of fabric;
- thin elastic band;
- scissors;
- sewing machine.
- Sewing is simple, but very practical and stylish, let's start by determining how much fabric we need. To do this, stand in front of a mirror and, unfolding the fabric, make one and a half turns around your waist. Cut off excess fabric. If you want to sew a long wrap skirt, then the fabric will need 40-50 centimeters more.
- This completes the measurement process! As you can see, a pattern for sewing such a skirt model is not required. Now that the fabric is prepared, you can start sewing the product. Fold the piece of fabric in half, and sew the edges with a sewing machine. If you do not have one, you will have to sew the skirt by hand. This, of course, will take more time, but it will not affect the final result.
- After the side seam is sewn, turn the product right side out. You should get a wide and long "pipe".
- Now you need to process the top edge of the skirt. Please note that fasteners and zippers are not provided in this model, so girls with wide hips and a narrow waist need to process the upper cut of the skirt not with ordinary, but with elastic threads. When processing, the seam will gather into a small fold, which is what we need.
- After you finish and cut the thread, turn the piece right side out. Your "trumpet" has now been transformed into a skirt.
- If the type of rubber band suits you, then proceed to processing the hem of the skirt. Tuck the edge 0.5-1 centimeter, stitch and iron. An elegant skirt to the floor is ready! If you want to hide the elastic, you will have to do the sewing of the belt. To do this, cut a rectangle from the fabric about one and a half meters long and at least 50 centimeters wide.
- Fold the fabric in half and stitch. And again, your detail will resemble a long pipe, but already narrow.
- After finishing the processing of the side seam of the belt, proceed to the processing of its ends. To do this, turn the part on the front side and fold the edges inward by 2-3 centimeters.
- Close them and you can start stitching.
- It remains to iron the finished product with an iron, cut off all the protruding threads, put on a skirt and beautifully tie a wide belt around the waist.


Don't want to wear a long, floor-length summer skirt, sewn with your own hands, with a textile belt? Feel free to replace it with a wide belt. This skirt goes well with basic tops, T-shirts with trendy prints, blouses that look like a men's shirt, and even thin plain turtlenecks. As for shoes, the best solution is flat sandals, ballet flats or sandals with low and stable heels. Complete the look with stylish accessories, and a truly summer look is ready!