Ideas for school made from thick cardboard. What you can make from cardboard and paper with your own hands
When purchasing large household appliances, food, shoes and other goods, packaging appears in the house that must be stored until the warranty period expires. Then you can throw them in the trash, but there is a more constructive solution - make them into interesting decorations for the interior of a child’s room, or gifts. Ideas about what can be made from cardboard come spontaneously. They are driven by the shape of packaging materials, the need to complement a gift with an unusual form of packaging or an interesting postcard.
As a rule, cardboard is remembered when it is necessary to make a carnival costume that must keep its shape.
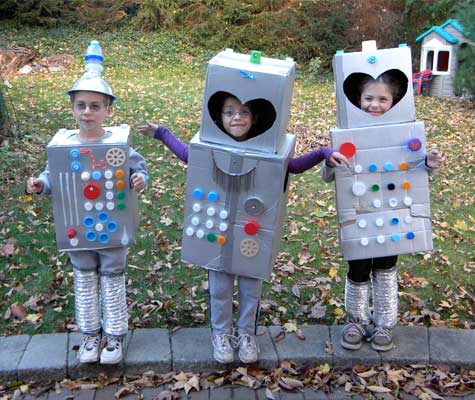
Dinosaurs, tractors, corn farmers, robots, cell phones – such life-sized and symbolically designed costumes will delight kids. They are necessary not for carnivals, but for the game. With the help of such costumes, children can be captivated by a new game, learn new songs and poems with them. Everything that kids fail to learn when studying under the strict supervision of their parents, they will remember better in a playful way.

As a rule, cardboard is remembered when it is necessary to make a carnival costume that should keep its shape

For studying history, costumes of knights, gladiators, and historical figures are more suitable. True, such costumes are more complex in execution. Cardboard can be painted with gouache. The only drawback of this paint is that it gets dirty even after drying. It is better to cover boxes made of corrugated cardboard, from which voluminous suits are made, with colored paper.
For decoration, you can use large buttons, badges and other lightweight elements made of wood or plastic.

What can you make from colored cardboard with your own hands?
Colored cardboard is not very durable; it is best used for making cards and gift boxes.
DIY cardboard card
A postcard based on this sketch is made from two sheets of contrasting cardboard. The lighter cardboard should be smaller than the bright cardboard on each side.
- The light sheet is folded in half.
- Stepping back 2 cm from the edge, you need to mark a line 6 cm long on the outside of the sheet. At a height of 3 cm from the first line, draw a strip parallel to it, of the same length.
- Above it, after 2.5 cm, the next line 4 cm wide is marked.
- The third and final line will be at a height of 2 cm from the previous one. Its length is 2.5 cm. All marked lines are cut.
- Now they need to be turned inside. To make them look like a stack of gift boxes, they need to be decorated with longitudinal strips of contrasting paper with small elements made of foil glued on.
- The edges of the card are also decorated with shiny stripes.
- Letters with the name of the holiday to which the card is dedicated are cut out of foil or velvet paper and pasted onto a cardboard base.
- All that remains is to glue the decorated light sheet of cardboard onto the colored one. They fold backwards.
- The corner elements of a larger sheet are cut out in squares so that when folding its edges onto the outside of the decorated sheet, a neat frame is obtained.
On the outside of the resulting address, you can paste a holiday symbol (tree, date) or the word “congratulations.”
Gallery: cardboard crafts (25 photos)


A toy book for a child made by parents
When using cardboard, painted on both sides, you can make a book for your child with three-dimensional elements. To make the base of the protruding elements, the same strip cutting technique is used as when creating a postcard.

When using cardboard, painted on both sides, you can make a book for your child with three-dimensional elements
Crafts from cardboard tubes
Thick cardboard tubes are the most fertile material for creating home decorations. They can be cut with a construction knife into elements of the same length. This allows you to create furniture with a glue gun that can serve a person in everyday life. For an open gazebo, you can make a table and chairs from cardboard tubes without much expense.
- For sitting you will need 64 pieces of pipe, 38-40 cm high - this is the standard height of chairs.
- The tubes are glued together 8 pieces in a row. There are also 8 such plates. They need to be glued together.
- To form the armrests, you will need pipes with a height increased by 20 cm. There are also 8 of them in a row. Each armrest consists of two rows. 58 cm elements will require 32 pieces.
- The back of the chair is glued together from 15 80-centimeter elements.
- The base of the table is formed from tubes glued together. A tabletop made of laminated thin fiberboard or glass is glued onto it.

For an open gazebo, you can make a table and chairs from cardboard tubes without much expense
Curved bench
To make this type of furniture you will need not only cardboard, but also pressed wood.
- Two identical parts are cut out of wood. They will serve as the legs of the bench.
- When using tubes of different diameters, it is necessary to drill appropriate holes for them in the legs. Their height varies depending on the design. To make the seat comfortable, the line of the holes should be smooth.
- The length of the tubes is chosen arbitrarily.
- The ends of the tubes, lubricated with assembly or carpenter glue, are inserted into the holes.
- Wooden bases are strung onto tubes. This bench will look more interesting if the edges of the tubes protrude slightly outward.

To make this type of furniture you will need not only cardboard, but also pressed wood
Such a bench will decorate not only a gazebo in the garden, it will become indispensable in the hallway of an apartment and even in the living room. It can also be used in the kitchen when peeling potatoes.
Glowing openwork hemisphere
You can use this decoration in landscape design by installing it in front of a homemade waterfall or illuminated fountain or under a street lamp. Thanks to the mirror used at the base of the structure, the light will be reflected, creating the effect of glowing from within the ball. In the absence of external light sources, the hemisphere can be used as a candlestick.
To make it you will need thick-walled cardboard tubes, a large round mirror, glue and varnish that protects from moisture.

You can use this decoration in landscape design by installing it in front of a homemade waterfall or illuminated fountain
Preparation method:
- Tubes of different diameters are cut into circles with a width of 3 cm.
- Before installation, each element is coated with several layers of varnish on all sides. This preparation can take a long time.
- Assembling the hemisphere begins by gluing the elements of the bottom row to the mirror surface.
- At the end of the first row, the only element with the largest diameter is glued.
- A frame is created around it from alternating narrow and medium elements with a slight shift inward.
- Then the work continues in a circle. The first few rows have a slight deviation from the vertical into the sphere.
- When the wall is equal in height to the largest structural element framed by the frame, the bevel will be steeper.
- The top center ring is installed last.
This openwork decoration will glow not only in the evening, the sun's rays will also enliven it.
Teremok for a baby
Smooth cardboard tubes are very similar to logs. It is much easier to use them than to make a little tower for a child from wood. It will be much more interesting than the fabric tent that commercials push on parents.
- To make the “log house” spacious, it is enough to take tubes 120 cm long.
- It is necessary to make slots in the tubes, at both ends, equal in width to the diameter. The tightness of the tubes to each other depends on the depth of the holes.
- All that remains is to fold the house and decorate it with a roof made of thick corrugated cardboard.
- The door and windows can be cut after assembling the house, or you can form openings from shortened pipes during the process of folding the elements.

Smooth cardboard tubes are very similar to logs
Using the same principle, you can assemble fairy-tale towers for dolls and other toys. Only the diameter of the pipes needs to be chosen smaller. And the material may not be so dense.
A few more ideas for using cardboard pipes in the interior
Cardboard tubes with strong, thick walls have many practical uses. They are used as organizers for pencils, pens and other necessary items. They are used to make shelves for equipment, for storing clothes and soft toys.

Cardboard tubes with strong, thick walls have many practical applications


Crafts made from white cardboard
The simplest crafts made from white cardboard are appliqués. To make them you will need a sheet of white cardboard and a colored base. Having cut out the silhouettes from white material, they need to be glued onto a colored sheet. When depicting a white poodle, bear, or swan, additional materials will be required that will give the image texture. This could be: cotton wool, scraps of napkins, wool fibers.

The simplest crafts made from white cardboard are applications
It is a little more difficult to make the applique convex without using additional means of expression.

It's a little more difficult to make the applique convex
Using the example of a squirrel, you can see that in order to obtain a three-dimensional figure, it is necessary to cut out individual elements, bend them and connect them together with glue.
From white cardboard you can make a three-dimensional figurine of a hare, a polar bear, a cat, or a dog.

From white cardboard you can make a three-dimensional figurine of a hare, polar bear, cat, dog
To make the body, a strip of paper is cut from the sheet and glued together with a tube. The parts of the legs are attached to it from below, and the head from above. It is cut out along with the ears. To make the animal’s muzzle convex, the workpiece is folded lengthwise and crosswise. The fold lines converge at a point that forms the bunny's nose. All that remains is to draw his eyes, nose, and mustache.
Silhouette paintings look very impressive.

Silhouette paintings look very impressive
Pieces cut with a blade will not stick to the background sheet. They are attached to a three-dimensional frame, which can be a candy box. The peculiarity of such interior decoration is that when the lighting angle changes, shadows will appear on elements not adjacent to the sheet, the picture will come to life and be filled with new colors. If you look at a girl on a swing, it may seem that she is actually swinging. This effect will be enhanced by the flames of a candle burning on the side of the image.
A white openwork house cut out of seven sheets of cardboard will become a spectacular decoration of the mantelpiece. To make it you will need two templates with drawings.

A white openwork house will be an effective decoration for the mantelpiece.
One with an image of wall decor, the second with an ornament of the roof and lower part. Edges are added to the pediment side walls for bonding to the pieces on all sides. After cutting out the openwork elements, the remaining parts of the product are attached to them.
What can be made from thick cardboard
Using several layers of thick cardboard, connected with glue, and decorated on top with a blanket stitch made with thick thread, you can make partitions for a box with an attached lid.
It is also easy to make from thick cardboard:
- The longitudinal partition is cut from top to middle.
- The transverse ones are cut from below to the same distance.
- The resulting grooves are a lock; they will securely hold dense parts.
- Upholstery fabric is used as a decorative outer layer - tapestry. Before gluing it onto the cardboard, a beautiful button is sewn to the front of the bar.
A thin elastic loop is glued to the lid. The treasury is ready.

A wicker vase for small items is made from a blank of thick cardboard.
- After drawing a heart or a circle for the bottom, you need to cut out two identical parts.
- By visually dividing the perimeter of the workpiece into equal sections, it is necessary to determine the weaving step.
- In accordance with this parameter, strips 5-7 cm high are cut out of cardboard.
- In their upper part, in the middle, round holes are made using a hole punch. They will be needed at the end of weaving to decorate the top edge.
- The lower ends of the planks are glued between the bottom blanks.
- Weaving is done from the bottom up.

Wicker vase for small items
What does corrugated cardboard look like and what can be made from it?
Corrugated cardboard is a dense packaging material consisting of at least three layers - two smooth outer layers and a curved inner layer that creates cells. The second type of corrugated cardboard is specially produced for handicrafts.
Large, practical items can be made from packaging cardboard. For example, a doll house.

Large practical things can be made from packaging cardboard
You can use a box of loose cookies as a basis. To model a doll's home, it is enough to cut window and door openings in the body. The window elements are not completely cut out; they can be decorated as shutters. The window frame bars are glued from the inside.
The door can also be left, pasting it with colored paper. The roof is formed from the remains of cardboard.
Chest for gifts from Santa Claus - a fabulous casket
- It is made from two packaging boxes of equal length.
- The lower one remains virtually unchanged.
- The upper part is cut out of three parts - two semicircles and one straight part.
- It is better to make halves of a circle from one circle. It is drawn with a diameter 2-3 centimeters larger than needed for the side parts.
- The required part size is marked on the workpiece. Triangles with a base width of 1-1.5 cm are cut out of the “extra” strip.
- The remaining teeth on the workpiece are bent. The top part of the casket lid will be attached to them.
- It is better to paint corrugated cardboard after priming it twice. Otherwise, the colors will appear faded.

Money box
A piggy bank made of corrugated cardboard is made without glue. It folds and is secured at the corners from the inside with a decorative cord. At the bottom of the piggy bank, the hole is sealed with paper or postal tape.

A piggy bank made of corrugated cardboard is made without glue
Fake fireplace made of corrugated cardboard
A fireplace made of cardboard is not just a decorative thing. It is intended to support the tale of Santa Claus. Made before the New Year. It is hardy enough to withstand a decorated Christmas tree.
- The portal is assembled from a former packaging box;
- Strengthened from the inside with slats;
- The outer part is decorated with foam elements;
- The false fireplace is secured with slats on a foam pedestal;
- It is painted together with decorative elements in white with a blue tint or ivory.

A fireplace made of cardboard is not just a decorative thing


Toys made of corrugated cardboard will be an excellent decoration for the New Year's fireplace. Only for their production is used a special - ornamental material created specifically for quilling.

Corrugated cardboard toys will be an excellent decoration for the New Year's fireplace.
Many types of cardboard can be used to make crafts. Thin cardboard is suitable for making appliques, postcards, and baby books. It is more advisable to use denser ones for making stable toys. Corrugated cardboard is suitable for making scenery for amateur theaters, including home theaters. Corrugated cardboard for quilling allows you to create absolutely fantastic crafts.
DIY bright desktop organizer made of cardboard (video)
DIY cardboard spinner (video)
A creative person can easily come up with and build a craft with his own hands from any available materials. Ordinary people can also easily make a masterpiece of their own if they wish, using certain Internet sites or master classes.
In our article today we will talk about crafts from cardboard boxes that you can make yourself or together with the kids.

Such games develop children's imagination, and the result will delight everyone.

For crafts, boxes of various sizes are suitable, from which it is easy to construct different objects: from large boxes - household items in the form of furniture, cars, airplanes, etc., from small boxes - photo frames, boxes, pencil utensils, etc.

Options for various crafts made from cardboard boxes are presented in the photo.
Original ideas
By making various crafts from boxes with their own hands, children develop fine motor skills, attention and imagination. If it is necessary to use cutting objects, adult assistance is required to avoid injury.

It is better to immediately distribute the responsibilities before work, the child does the simpler work, and you do the remaining, more complex work.

For crafts, you can take any cardboard boxes.

Egg trays were no exception. This is an ideal option for creativity. They make excellent animals, birds and inflorescences. The easiest way to make a chicken is in the form of a package for an egg.
Cockerel
To make them, take: an egg tray, paper scissors, acrylic paint, a brush, glue, felt cloth or multi-colored paper.

The work process is not complicated, you should do everything in order:
- cut out part of the tray (the cell with the protruding part);
- cut a cell in the shape of a rooster with a huge tail;
- paint it with acrylic colored paint, drawing the bird’s feathers, and leave to dry;
- cut out blanks from felt material or paper for a beard, comb and beak;
- fix these blanks with glue;
- make eyes, decorate with feathers.

The cockerel is ready!

Flower
Making a flower craft is a little more difficult. Materials needed: egg tray, PVA, paint, wire and scissors. These crafts can be made in different ways.

For example, cut a cell and along the folds inside the cell, cut out the petals that need to be twisted and inserted into each other; if you want, add additional petals.

The resulting inflorescences are attached to a wire or fixed near the surface to make a flower arrangement. A milk carton can also be used. For example, in the form of a bird feeder, well, toys or houses.
Cubes
Cubes are a favorite pastime for all children. It’s very easy to build it yourself. You will need: 1 liter milk bags with a square base, a paper knife, a measuring ruler, a colored marker, double-sided tape, pictures.

Let's start making cubes:
Note!

- wash and dry milk cartons;
- set aside 7 cm twice from the bottom of the bag along the edges and make marking lines with a marker;
- on one side, set aside another 1.5-2 cm from the mark upwards and cut off the entire remaining top;
- cut along the ribs to the mark at the bottom and assemble the cube like a simple box, the long side will be the lid;
- Stick various funny images, letters or photographs on the side faces.
- fold the cube in the usual way.

To attach images to the side faces of the cube, before gluing the main image, cover the cube with pieces of newspaper soaked in glue. Next, coat the finished craft with colorless acrylic varnish. If you place small objects inside the cube, you get a rattle.

Frame
A candy box makes a great photo frame, decorative box, etc. They are very sturdy and well shaped, sometimes with a hinged lid.

Cover the box with gift wrapping paper, lace or satin fabric, decorate with a composition using various little things, pins, bows, etc. and the box is ready.
Postcard
A flat box will be useful for creating a greeting card with a frame. To do this, in addition to the box itself, you will need:
- Greeting Cards,
- paper in bright or pastel colors,
- PVA glue,
- corrugated cardboard,
- stationery,
- ribbons, bows and other decorative things.

Trace the outline of the card over the lid of the box. Then step back 1-2 cm from the sides to the center of the outline, trace the resulting outline with a pencil and cut a window.

Note!

From corrugated cardboard paper, cut out pieces for finishing the interior and exterior. Secure the postcard on the opposite side of the hinged lid with tape so that it can be seen through the made window.

Attach a ribbon to it and the side and disguise the places where they are attached with corrugated cardboard parts on the side and a corresponding postcard on the inside of the lid.

Complete the design with various decorative elements. Place congratulatory words and a small present in the inside of the box.

Other crafts
You can also create crafts from matchboxes. Most often they make doll furniture, vehicles, boxes, etc.

Large cardboard boxes intended for household appliances easily make crafts in the form of children's household appliances, vehicles and forts.

Note!

Become a real architect and delight your child with a real castle or their own house. Moreover, your child will be proud of such a creation made by his beloved mom and dad.

The child himself will be able to invest a piece of his labor into the production process. Girls will be delighted to have their own miniature kitchen or dollhouse.

Crafts from boxes for children, made with love by parents, will leave unforgettable, vivid memories for the child for life.

Photos of crafts from boxes


Nurturing creativity in children is the key to their all-round development. Creating various products with your own hands shapes your thinking and helps you study different material textures, colors, shades. The little man learns to work with glue and scissors. Paints, pencils and felt-tip pens enable children to express themselves creatively. Children as young as 3 years old can make crafts from cardboard.
This type of crafts is very popular in preschool institutions due to the availability of the material, the durability of the products, and the ease of creating creative works.
Until recently, making cardboard toys was considered the prerogative of children. Nowadays, DIY cardboard crafts have become a favorite pastime for many adults. Cardboard is used to make postcards, panels, packaging boxes and even furniture and much more.
Beautiful elegant boxes, houses for dolls and babies, frames for paintings and photographs - many of these works will decorate the interior and add originality to the design.
For creativity you need to prepare the following materials:
- Cardboard: technical, corrugated or ready-made colored.
- Scissors (for babies with rounded ends so that children do not get injured).
- Stationery knife. Be sure to check the knife lock so that the blade does not come off during operation and injure the child.
- PVA glue, glue gun, as well as narrow and wide tape.
- Stationery: markers, felt-tip pens, pencils, colored paper, stapler, clips.
- The following are also used to decorate cardboard products: colored ribbons, beads, and decorative cords.
- A ruler and compass will definitely come in handy.
- Templates, layouts.

First works
Cardboard crafts for children are quite diverse. They will interest both boys and girls. At first, the help of adults is especially necessary for the little ones. Cutting out of cardboard is quite difficult for kids, so the help of adults is invaluable. The very first job that a baby can easily do with the help of adults is an airplane.
To create it, you will need a toilet paper roll; if you don’t have one, you can glue it yourself. Also prepare a stationery knife or scissors, brads, a sheet of cardboard, preferably corrugated, an awl and paint.
Children under 5 years old are not entirely confident in using scissors and a stationery knife, so an adult should take on the job of cutting out the elements of the craft. Let's look at the step-by-step production of an airplane.

Step one.
Draw the elements of the toy yourself or find samples on the Internet and print them.
Step two.
Make symmetrical holes in the roll for the wings and tail. Using an awl, carefully make holes in the middle of the circle and the future airplane propeller.
Step three.
Help your child assemble the parts correctly. Connect the propeller and the circle with brads. Leave a small gap between these parts. Insert the resulting workpiece into the sleeve. The airplane is ready.
The kid can paint the plane with paints or stick colorful pictures. The resulting toy will bring a lot of joy to your child. The child will be proud of a handmade craft.
Together with your children you can make toys with moving parts. The little one will be delighted that he made a bear and it moves its paws.

This teddy bear is made very quickly. You need to copy the details of the bear onto cardboard. Cardboard can be pre-painted. You can find a diagram of the teddy bear on the Internet or draw it yourself.
All received elements, except the upper legs, are cut and glued. In order for the teddy bear to move its upper legs, these parts must be connected to the body with buttons on the front and back sides. We connect the resulting structure with a stick.
The teddy bear can be painted with paints or the surface can be smeared with glue and covered with cereal. Pieces of fabric are suitable for decoration.
Cardboard houses
A special place in making DIY cardboard crafts for children is occupied by the creation of houses, castles, and towers. Every child needs a place that he considers only his own, so that he can retire there and play without the constant supervision of adults. This desire of the baby intersects with the desire to imitate adults, to try on adult life.
To make a house, prepare packaging boxes for equipment: TV, computer, refrigerator. To add individuality and color to your craft, use colored paper, markers, and paints. Discuss the appearance of the house with your child. Look for ready-made diagrams on the Internet.
So you have:
- several cardboard boxes in which household appliances were packaged;
- house diagram (ready-made from the Internet or created independently);
- a stationery knife, as well as scissors for cutting out parts;
- tape, glue and glue gun for fastening structural elements;
- felt-tip pens, paints, pencils and markers.
You need to transfer the house template onto cardboard, cut it out and glue it together. The house can be made into one room, or you can build a real castle.
When manufacturing, consider the following:
- To prevent the baby from feeling cramped, the door should not open inward.
- For greater structural stability, use cardboard pipes. These are available in stores or you can make them yourself.
- Do not let your child cut out the details. Technical cardboard is a very dense material, and to cut out a part according to a template, you need to apply force that kids don’t have. Trying to help, the restless person may not be able to hold the knife in his hands and get hurt.

After the house is assembled, decorate your craft together with your baby. From the box you can also make a ship for your child, doll houses for your daughter, or a real kitchen like your mother’s.
By imitating adults in play, children undergo socialization in society and try on the role of mom and dad. For girls, from several boxes you can glue together a multi-story house where dolls will live.
The master class presented below on how to create a dollhouse with your own hands will provide a step-by-step basis for such crafts.
To make such a craft, you do not need large financial expenses and a lot of time.
Prepare:
- a cardboard box that can hold 2-3 floors for dolls;
- multi-colored tape;
- stationery knife;
- white paint for windows;
- pieces of fabric, wallpaper, as well as felt-tip pens and paints for decorating crafts.
Step-by-step instructions for creating a house.

Step one.
Cut the box into two halves along the tape line. The top flaps of the box must be cut off.
Step two.
We use two cut pieces to create the second floor and the triangular pediment of the attic. We attach the received parts with tape.
Step three.
From the second half of the box we cut out the roof, stairs and another floor.
Step four.
Cut out windows and doors according to the markings. Glue the stairs to move to the next floor.
Step five.
Use white paint to paint the windows and steps on the stairs. You can make furniture for dolls from leftover cardboard.
Such a house can be covered with colored paper, pieces of wallpaper or painted with paints, built up or expanded to the side.

Types of crafts
There are crafts made from colored cardboard, which are often used in children's creativity. In preschool institutions, children learn to create cards, appliqués, various gift boxes, as well as boxes for storing small items, such as jewelry or small cars.
When doing creative crafts with children, they often combine several types of materials. An interesting result is obtained when plain cardboard and colored paper are used together with corrugated paper. Products made from corrugated cardboard, such as postcards made using the quilling technique, look very beautiful.
- Application.
- Finger puppets. Cut out the figure and make two round holes for the fingers at the bottom of the craft. In this way you can assemble your child's first puppet theater.
- Crafts made from corrugated cardboard: postcards, panels, toys. Typically, floral motifs are chosen for postcards and panels. The quilling technique is more difficult to learn. Work in this technique requires more perseverance, scrupulousness, and accuracy. Children's crafts using the quilling technique are available to children from 5 years old.
- Boxes of different shapes and types. Can be round, square or triangular. Colored ribbons, beads, and embroidery are used for decoration.
To create a round box you will need:
- corrugated cardboard;
- glue;
- scissors;
- ruler;
- round form;
- materials for decoration: beads, flowers using quilling technique.

Step one.
Cut a strip from cardboard. The width of the first stripe will determine the height of your piece. Wrap the strip on a flat shape with a round base, for example a glass; a roll of tape will also work. Cut off the excess strip. Secure the ends of the strip wrapped around the mold with glue.
Step two.
Carefully cut out the second strip, which will become the edge of the lid. Wrap it over the first strip and secure the ends with glue. After the glue has dried, remove the blanks.
Step three.
Apply glue to one of the edges of the workpieces. Place the greased edge against the cardboard. Press firmly. When the glue dries, cut off any excess with a utility knife.
In every home there are many things that seem to be no longer needed, but it’s a shame to throw them away; one of these things includes cardboard boxes. Boxes of household appliances, electronics, shoes, dishes, and who knows what else. I present to you a selection of ideas and master classes for crafts that will benefit your home.
1. A convenient box for storing linen, seasonal items, old photographs, postcards, and New Year's toys. It would be better to also make a lid for such a box. Use wide tape to glue parts together, and PVA glue to glue fabric.
2. Box-chest for storing jewelry. For gluing we use PVA glue. To give the desired color we use paints and varnish. You can also decorate the chest using decoupage. To do this, dilute the PVA glue a little with water, apply it evenly to the surface to be decorated, take a three-layer napkin, separate one layer with the image and carefully place it on the prepared area. When the surface of the chest dries, coat the top with varnish or PVA glue (the glue will dry and become transparent).
3. And this is a toy for a cat - "The Elusive Ball"
Here's a tight box with a lot of holes,
where the ball rolls freely. The cat's task is to catch it.

4. But a strong shoe box can be a good storage for accessories, beads and other small handicraft items. We prepare small boxes, cover them with napkins (you can also use matchboxes) - ready. Now everything will be in its place.
4. Speaking of matchboxes, they can make a very cute chest of drawers in which you can store chains, rings, and any other small items. Making such a chest of drawers is not difficult, but the most interesting thing is decorating it (colored paper, glue, beads and buttons).
5. Make your children happy. Imagine how fun it will be to make toys from matchboxes with your child - cars, trains, castles, doll furniture. And for the little ones, make a visual alphabet; in each box there will be a miniature object corresponding to each letter.
6. From large cardboard boxes, make the best gift for your daughter - kitchen furniture and household appliances; the little housewife will love it, and will also instill useful habits and skills.
7. Any child up to middle school age will be delighted with their own house, even if it’s made of cardboard. And you can think about the layout and design together, this will unite you and allow the child to gain even more trust and sympathy for you.
From a large cardboard box, for example, from a refrigerator, you can make a children's house. Make a door and windows in it, lay a rug inside the house, decorate the house with cheerful curtains, cover the walls with beautiful pictures, stickers or children's drawings.


An interesting idea is to decorate a children's house with LED garland.

8. Juice and kefir boxes regularly end up in the trash, but wait. To make a winter house for birds from such a box - even five minutes will be a lot - just a couple of movements with scissors. Make time for nature on your day off, take the whole family and go to the park to hang out feeders with seeds and grains. This is the best example of caring for our little brothers and frugality that you can show your child.
9. If your family is real juice fans, you can make a shelf for children's toys from empty boxes. On the one hand, everything is in sight and at hand, on the other, everything is in its place.
10. Young children often ask to have pets, but they do not always understand what kind of care they require and what kind of responsibility it is. To begin with, you can make a cat, a dog or an aquarium with fish from cardboard boxes. Let him feed imaginary animals and play with them. Soon, by the behavior of your child, you will understand whether he is really ready for another family member to appear, or whether it was just a momentary infatuation.
Little children love to carry toys around with them on a string. A simple craft for kids made from a cardboard box - a cat or dog made from cardboard. Read a detailed master class on how to make such a craft from waste material on the website madebyjoel.com
Remember, by turning seemingly unnecessary things into something useful and applicable, you learn and teach how to take care of things, appreciate what you have, take care of nature, and save the family budget. Get creative and have fun with it.

If you have accumulated a large number of small boxes,
then you can make a whole city out of them. More details on how to do
beautiful houses made of cardboard boxes, read.
You can use cardboard toilet paper rolls and boxes to make a garage for cars or a parking lot.

Slide for cars or balls


11. A crib for a doll can be made from one box by cutting out its sides, or from two boxes by gluing them together. In the second option, you will get a bed for a doll with legs.


12. The imagination of a child who climbs inside can easily turn a large cardboard box into a car, plane or ship. Mom and dad can help the baby organize an interesting and useful game by adding the necessary parts to the homemade transport. Steering wheel, wheels, headlights - all this can be made from available things, the main thing is to use your imagination.


If you make a car or an airplane out of a medium-sized box, and then attach straps to them, you will get a car/airplane costume. By wearing these costumes, children can play pretending to be cars or airplanes. Boys will especially like these games.


You can cut out the side of a large cardboard box and make a playing field out of it. To do this, draw on cardboard with colored felt-tip pens roads, bridges, forests, rivers, houses, in general, anything you want.

See also others.
Useful tips
If you still have cardboard boxes after purchasing electronics or other items, there is no need to throw them away.
You can make a huge number of crafts from cardboard, both for home and for children.
Here you can learn how to make 5 very interesting and useful things from cardboard, and also see what incredible crafts some masters of their craft make.
DIY cardboard garland

You will need:
Sequins on the dress (sequins)
Stationery knife
Superglue or hot glue
Rope.

1. Draw straight letters, geometric shapes or patterns on cardboard and cut them out.

* To get a letter on cardboard, you can simply use a ruler and a pencil, or you can print the letter on paper, place the paper on the cardboard and use a utility knife to cut out the letter, tracing it along the outline.
2. Prepare sparkles (sequins) and start gluing them to the cardboard. You can use different types of sequins and it is not necessary that the sequins be on a thread.


3. When all the letters or shapes are ready, place them on a flat surface back to front and in reverse order and glue the thread to them.

When the glue has dried, the garland can be hung.

How to make a desktop organizer out of cardboard

You will need:
25 sheets of cardboard (25 x 25 cm)
Ruler
Pencil
Stationery knife
Glue brush (if necessary).

1. Using a ruler and pencil, draw on one sheet of cardboard the places where you want to make indentations (for pens, small items, etc.), leaving at least 2.5 cm from the edge of the cardboard.
2. Place the finished sheet of cardboard on a new sheet, trace where you made the holes and cut them out of the new sheet.

3. Repeat the same steps with other sheets, but leave 5 sheets untouched at the end.

4. Start carefully and evenly gluing together all the sheets with holes. You can use a brush to apply glue. You can first glue 5 sheets, then five more, and so on until the end.

5. Glue 5 untouched sheets together to make the bottom of the organizer.
6. Now all that remains is to glue the bottom of the organizer to the cut out part of 20 sheets.

Let the craft dry overnight and then you can use it.

DIY cardboard crafts: geometric lamp

You will need:
Thin cardboard
Scissors
Stationery knife
PVA glue or hot glue
Ruler, compass and pencil (to draw a pentagon)
LED light bulb (it is important that there is an LED light bulb so as not to burn the cardboard)
Lamp socket.
1. Start drawing pentagons (a figure with 5 identical sides) on cardboard. To begin with, you need 11 pieces, later about 10 more. In this example, the side size of each pentagon is 6 cm, but you can choose a different size, as long as all the figures are the same size.

How to draw a pentagon (video)
To draw an even pentagon, watch this video:
Once you have drawn and cut out the pentagon from your cardstock, use it as a template to trace and cut out the rest of the pentagons.
2. Inside each of the 11 pentagons, draw 5 smaller pentagons. In this example, the distance between them is approximately 6 mm.

3. Using a utility knife, cut out all the shapes from each cardboard pentagon (see image). This is the longest process, but it is quite simple.

4. We begin to collect parts.
Prepare one group of 5 pentagons. Place the largest one on the table, and glue the next largest one on top of it so that its ends touch the sides of the large pentagon. Continue in the same style until all the pieces have been glued.


5. Repeat step 4 with the remaining groups of pentagons.
6. Assembling the lamp.
When all the parts are assembled, you can assemble the lamp. Place one piece on a flat surface and begin gluing the remaining pieces to its sides. Try to glue so that adjacent parts also have glued sides (see image).

*You will have to lift the pieces up a bit. You will get something similar to a vase.


7. Now you need to make the base for the lamp. To do this, you need to draw a few more pentagons (in this example there are 8 of them) and cut them out.
Inside each shape, draw another pentagon (1 cm from the edge) and cut it out. Remove the cut out part and carefully glue all the other parts together.


8. For the light bulb, you need to cut out another pentagon and make a hole in it for the lamp socket.


9. Glue the part from step 8 to the base of the lamp.

10. After attaching the light bulb to the base, place the lamp where it should be (on the base) and make a small cut (or hole) for the cable. You can add a little glue to better attach the base to the lamp.


DIY cardboard wall decoration (diagram)

You will need:
Scissors
Pencil and ruler (to draw some squares)
Acrylic or spray paint.
1. Cut cardboard (cardboard box) into several squares of different sizes.

2. Color all the squares. In this example, metallic color was used.

3. Prepare a large sheet of cardboard and paint it.
4. Start painting all the other squares and gluing them to the large sheet.

*Glue however you like.
5. You can stick the work to the wall using double-sided tape or simply place it on a shelf near the wall.


DIY cardboard furniture: cloud-shaped shelf

You will need:
Several sheets of cardboard
Stationery knife
Pencil
Scissors.
After the text instructions, you can find video instructions for creating this shelf.
1. Take one sheet of cardboard and draw a cloud on it. It is better to draw so that one side of the cardboard sheet serves as the bottom of the cloud (see image).
2. Cut out your cloud with scissors.
3. Use a cardboard cloud to make several more of the same blanks - trace it on each sheet and cut it out.

* In this example, 23 sheets of cardboard were used - 3 sheets will follow the shape of the cloud and 20 will be "inside" the cardboard structure and they have a similar structure, but they can save cardboard (see video).
4. Cut the unused cardboard into small pieces that need to be glued between the cloud pieces
5. Start gluing carefully and one by one all the parts of the shelf, not forgetting to glue pieces of cardboard between the parts (see picture).

6. To hang a shelf, you first need to attach one hook and one nail (see video) and hang the shelf on them.
How to make a shelf out of cardboard (video)
DIY cardboard chandelier (photo)


Crafts made from paper and cardboard: mirror decorated with cardboard parts
All the little parts are made from cardboard paper towel or toilet paper rolls.
First you need to cut the roll into rings of equal thickness, and press down these rings with a hammer. The resulting parts can be used to make beautiful jewelry and crafts.