Do-it-yourself pom-pom toys: tutorial. Do-it-yourself toys from pompoms How to make animals from pompoms
Zoya Reasonable
DIY soft toys made from pompoms.
Soft toys are loved not only by children, but also by many adults, especially women. Bears, cats, bunnies and other animals occupy pride of place in the interior. Many women needlewomen knit soft toys themselves.
We made crafts for the regional New Year's competition. I wanted to do something interesting. Sometimes I knit (when I have free time). I got the idea to make something out of yarn.
Surely, every woman has small balls of yarn leftovers in her bins. You can’t knit any big thing from them, but it’s a shame to throw them away. These are the leftover yarns that will be useful for making soft crafts.
Today I will introduce you to a direction in needlework that I discovered about two years ago, like making toys from pompoms with my own hands.
How to make pompom toys
Basic materials and tools for making toys:
Yarn for knitting (color depending on the toy)
Eyes, nose (you can use black and red buttons or beads)
Scissors
Felt (any other material)
Needle (if using beads/
Ribbons for DIY accessories
Glue with glitter (to give the toy a New Year's mood)
Ceiling tile adhesive
To make toys, you first need to complete pom-poms.
It is this detail that is the basis for this type of toy. The first thing you need to do is execute the template. Draw a circle on the cardboard using a compass. Its diameter will be equal to the size of the pompom. Inside the large circle, mark the same small figure (about 2-3 centimeters in diameter). Fold the cardboard in half and cut out two identical pieces. Make a cut on one side of each piece. The sizes of the templates depend on the size of the toy you have in mind.
The next stage is winding the threads. Place the circles one on top of the other and wind the yarn on them tightly and evenly over the entire surface of the pattern. The thicker the layer of thread you wind, the more magnificent and beautiful the ball will turn out. To make toys from pompoms with your own hands, these are the kind of lush pompoms you need.
Next, carefully cut the threads with scissors in a circle along the outer edge of the product. Place a piece of yarn between the cardboard circles, tighten it and secure the knot. It is necessary that the bundle of threads from which the pompom is made is tied exactly in the middle. Now remove the pattern and straighten the ball. The pompom is ready!
I make it simpler, it seems to me, I cut out a strip of cardboard with a width depending on the size of the pompom, put a thread along the strip and wind the yarn.


At the end I tighten the thread and cut the workpiece on one side

I straighten the pompom.

For DIY pompom toys, you also need small pompoms. These could be paws, noses, ears, animals. It is almost impossible to make it on a cardboard template. In this case, I use a regular fork.

I wrap the yarn around the tines of the fork in a tight ring.

Then I use scissors to cut the threads in one place

I tie the bun in the middle and straighten the small pompom.

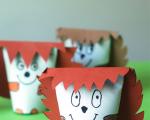
Soft toys "Chicks".


Chickens- a very funny toy made from pompoms. To make chickens you need to take: yellow and orange yarn, eyes for toys, felt, cardboard, glue for ceiling tiles, glue with glitter, toothpicks.
You need to make two pompom balls of different sizes from yarn. I made the chicken-girl from yellow yarn, and the cockerel from orange and yellow yarn. The resulting pompoms can be sewn together; I connected them with a toothpick pre-lubricated with ceiling glue.
I cut out two small circles from white cardboard and glued eyes on them (this makes the eyes more expressive).
I glued eyes to the small pompom that will be the head of the toy.
I cut out a cone from orange or red felt (you can use any other material) and formed the cockerel’s beak from it. For the chicken I made an open beak.
For the cockerel, I cut out a comb from cardboard, covered it with red material and glued it to the head.
On the pompom, which is larger in size (serves as the body), I glued wings made of cardboard covered with felt.
I cut out paws from cardboard and also covered them with red felt (you can use any other fabric). I glued the legs to the chicken, because the legs are made of cardboard, the toy will be stable.
I added a bow tie to the boy chicken figurine, and a bow for the girls, maybe a hat, etc. /

I made the toys as decorations for the Christmas tree, but they can also be used to decorate the interior. In the next publication I will continue the story about my toys.
Dear friends, thank you for your attention.
Publications on the topic:
"Showcase" for fish. When creating the exhibition “Life in Lake Baikal” in the mini-museum of our garden, I was faced with the problem of what exhibits to offer.
The tools and materials for making pom pom toys are simple and inexpensive. The main ones are cardboard or plastic rings and woolen rings.
I needed to prepare some kind of master class for teachers and educators. Without thinking twice, I decided to make toys from pompoms.
Dear colleagues! I bring to your attention my master class on making topiary from pom-poms “Autumn Tree”. For manufacturing.
My son is growing up, we are already writing and cutting. He is my most important assistant in everything. We decided to make creative letters. We took paper in A3 format.
Master class on artistic creativity with children of the preparatory group. Making a soft toy from pompoms Objectives: Goal: to introduce wool yarn, its properties, one of the old techniques for making toys, to teach how to make toys.
A child aged 5 years and older can already make quite complex crafts that you can not only admire or give to someone, but also play with them. As a means of improvisation, you can use various materials, for example, woolen threads, from which you can teach your child to make pom-poms, and from them into cute toys.
The child will then be happy to play with his creation.
Making animal toys from pompoms develops imagination, attention, and fine motor skills. This activity calms you down and teaches you how to finish what you have started.
How to make pompoms from yarn?
Before you start creating crafts from pompoms for children, you need to make the pompom itself.
Materials for making pompoms:
1. Scissors;
3. Cardboard;
5. Thick fabric.
Making pompoms:
1. Using a compass, you need to draw two large identical circles on thick cardboard. Inside the large circles you need to draw small ones. Next you need to cut out large circles and the middle in them.


3. Next, you need to take a needle and thread a thread of the desired color into it, in accordance with the selected craft model. After this, you need to thread a needle and thread into the inner small circle between the two existing circles and wind the thread in a circle. Since there is a very large consumption of thread, you should immediately take the thread as long as possible.

4. You need to wrap the circle until the small middle is completely hidden.
5. After the entire circle is filled, you need to use scissors to cut along the outer perimeter of the threads.

6. To prevent the threads from scattering, they must be held with your hands. Then you need to slightly lift one cardboard and tie the middle of the threads with a thin rope.
7. After the pompom is tied, both cards can be removed and you can see the result.

Master class “Chicken”
Required materials:
1. Yellow knitting threads;
2. Thick paper or cardboard;
3. Scissors;
4. Compass;
5. Red cardboard or felt;
6. Wire;
7. Wire cutters;
8. 4 black beads;
9. Large gypsy needle;
10. Glue gun or glue moment.
Manufacturing process:
1. Make 3 yellow pompoms. For one toy you need a large pompom, and for the second 2 pompoms of different diameters.

2. Glue the paws and comb cut out of cardboard or felt to the large pompom. Glue in beady eyes and make a red beak.

3. For the second chicken, sew pompoms together and form wire legs.


4. Cover the wire legs with red thread.

5. Glue the comb, eyes and beak to the chicken.

6. Chickens - ready!

For inspiration, Curious World has prepared a selection of pom-pom animal toys for you.


Decoration in the form of fluffy bubo balls has been present in elements of our clothing since childhood. It turns out that these pom-pom buboes can be easily created independently, and ready-made fluffies can be used to form real masterpieces in the form of toys. Such toys will be an excellent gift for both children and adults. And the process of creating toys from pompoms will be an entertaining pastime for all family members. We bring to your attention simple master classes on creating pom-poms and toys from them.
How to make a pompom


Required material:
- thick paper or cardboard;
- knitting threads of the desired color;
- scissors;
- compass;
- large gypsy needle.
- Using a compass, draw two identical circles on paper. Inside each circle, draw inner circles of the same diameter. Cut out the details.
- Make large circle cuts in one place. Fold the paper circles so that the cuts do not match.
- Measure out at least 2 meters of thread, pull it into a large needle and wind the thread onto the structure made from cardboard circles.
- Thus, you need to wind the thread to the end. The more thread is wound, the more fluffy and voluminous the pompom will be.
- Cut the thread along the edge of the cardboard stand, in a circle.
- You need to move the cardboard rings a little to the sides and tie the entire bundle between them with one thread in a strong knot.
- Remove the cardboard templates from the pom poms.
- Flatten the pompom, giving it a uniform fluffiness.
Crafts
Several options for creating simple toys that can be made from pompoms.
Snowman


Required material:
- white knitting threads;
- thick paper or cardboard;
- scissors;
- compass;
- long skewer;
- thimble;
- black or dark blue beads;
- PVA glue;
- large needle;
- crochet hook;
- plastic bottle cap;
- bright knitting threads;
- plasticine.
- Make three white pom-poms of different sizes (each one is at least 1 centimeter smaller in diameter).
- You need to make a hole in the bottle cap with a hot awl and insert a skewer into this hole. It is best to glue the skewer into the cork and seal the hole of the cork with plasticine. This will be a support for the snowman.
- Place all the pompoms on the skewer in the correct order.
- Knit two handles for a snowman from white threads from an amigurumi ring. Knit in the round with single crochets.
- Sew handles on the sides of the middle pompom.
- Attach a thimble to the end of the skewer instead of a hat. To prevent the thimble from falling off, it needs to be filled with plasticine.
- Glue beads instead of eyes and buttons. Make a carrot nose from yarn or plasticine, glue a red thread instead of a mouth.
- Knit a scarf from bright yarn using a chain of chain stitches and 3-4 rows of single crochets. Put a scarf on the toy.
Chick


Required material:
- yellow knitting threads;
- thick paper or cardboard;
- scissors;
- compass;
- red cardboard or felt;
- wire;
- wire cutters;
- 4 black beads;
- large gypsy needle;
- glue gun or glue moment.
- Make 3 yellow pompoms. For one toy you need a large pompom, and for the second 2 pompoms of different diameters.
- Glue the paws and comb cut out of cardboard or felt to the large pompom. Glue in beady eyes and make a red beak.
- For the second chicken, sew pompoms together and form wire legs.
- Cover the wire legs with red thread.
- Glue the comb, eyes and beak to the chicken.
Hare


Required material:
- felt for ears;
- 2 beads black or blue;
- pink threads;
- cotton wool;
- scissors;
- floral form;
- thick paper or cardboard;
- compass;
- glue gun;
- large gypsy needle.
- Using cardboard templates, make two pompoms of different diameters.
- Cut out ears from felt.
- Make a tail out of cotton wool.
- Sew the pompoms together to form the hare's body.
- Sew on the ears and tail.
- Glue on beady eyes and a small pink nose made of thread.
- If desired, you can make the hare's paws from miniature pompoms or felt.
- You can insert antennae into the bunny's face using thick dark fishing line or glued threads.
Teddy bear

Required material:
- knitting threads of the desired color;
- thick paper or cardboard;
- compass;
- scissors;
- large gypsy needle;
- satin ribbon;
- a large black bead or a ready-made spout;
- glue gun
- Make templates for pompoms from paper: 2 large ones for the body, 4 medium ones for paws, 3 small ones for ears and nose;
- Make pompoms according to the templates in the desired color.
- Sew two large pompoms together.
- Sew all 4 paws of the bear to the sewn body, trying to maintain symmetry.
- Sew pom-poms-ears and a pom-pom nose to the head.
- Glue the eyes and plastic nose, you can replace them with beads.
- Tie a ribbon-bow around the neck of the toy.
Caterpillar

Required material:
- colored threads for knitting;
- thick paper or cardboard;
- scissors;
- large gypsy needle;
- wire;
- glue gun;
- beads or decorative eyes.
- Cut out cardboard templates to create pompoms. All pompoms should be reduced.
- Make the desired number of multi-colored pom-poms. They can be made plain or colored (if you alternate the threads).
- Sew the pompoms together, gathering them on a thread from largest to smallest. The largest pompom will act as the head.
- Glue the eyes to the caterpillar.
- Insert the wire into the body of the caterpillar and give it the desired shape.
- Make horns for the caterpillar using glued and dried threads. They can also be made from colored wire and beads.
- Use soft fabric balls to make a nose and legs for the caterpillar.
Piglets

Required material:
- pink threads for knitting;
- 3 pink buttons;
- pink felt;
- scissors;
- thread and needle;
- glue gun;
- thick paper or cardboard;
- compass;
- needle and thread;
- beads, decorative eyes;
- colored pieces of satin ribbon.
- Make three dense pink pompoms.
- Cut ears and hooves for piglets from fert. Sew or glue them to the pompoms in the right place. The legs can be made from miniature pink pompoms.
- Sew a button nose to each piglet.
- Glue eyes or beads using a glue gun.
- Tie ribbons into bows and sew or glue them to the piglets.
Smeshariki

Required material:
- colored threads for knitting;
- thick paper or cardboard;
- compass;
- scissors;
- colored felt;
- beads or decorative eyes;
- needle and thread;
- glue gun
- You need to initially decide on a cartoon character and make a pompom of the appropriate color.
- From fert of the same color you need to cut out ears, legs and handles for the smesharik.
- Sew or glue the felt pieces to the pompoms.
- Glue beads or ready-made eyes.
- Make a nose out of threads or contrasting beads.
A large selection of interesting ideas with various photographs, among which everyone will find something they like for themselves or as a gift for family and friends. But no one will remain indifferent to these fluffy balls!
Summer is ahead, which means all teenagers have holidays and a lot of free time. But after a week or two of lying on the couch with a tablet, I want to do something more interesting. So why not get carried away by creating something with your own hands, because the holidays seem to be made for creativity? , paper crafts and - this is not the whole list, . Don’t forget about crafts made from pompoms. very simple and quick, but crafts made from them will delight the eye for a long time.
We have collected for you the most interesting and original ones that even someone who has never done any type of needlework can handle. In addition, making these can be for any teenager or simply add bright colors to everyday life.
Pom pom crafts: pom pom garlands
Bright, soft pom-poms can add rich accents to a room or add a festive mood to any party. These pompom decorations can be hung on the wall, on windows, in doorways, and even hung outside.
Crafts from pompoms: hair bands with pompoms

Why spend money on new hair ties when you can make many different ones with your own hands? Add one or more thread pompoms to a regular elastic band and surprise everyone not only with an original hand-made elastic band.
Crafts from pompoms: sandals with pompoms

Tired of last year's sandals? Update them with homemade pom-poms and your shoes will be as good as new. By the way, thread pompoms can be used to decorate not only sandals, but also flip-flops, ballet shoes, pumps and even sneakers.
Crafts from pompoms: keychains from pompoms

Unusual in the currently fashionable boho-chic style, thanks to its bright colors, it can lift your spirits even on the cloudiest day. I took out the keys with this keychain and it was instantly more fun!
Pom Pom Crafts: Pom Pom Photo Frames

Probably most teenagers have an Instagram account where they store a lot of photos. To avoid constantly digging through your phone in search of your favorite ones, print them out and put them in pom-poms or on the wall.
Crafts from pompoms: decor from pompoms for summer bags
.png)
Soft thread pompoms are perfect for woven summer bags. Pompoms can be attached to the bag in a chaotic manner or depict some kind of pattern. If the bag is wicker, simply tie thread pompoms on the back side, but if it is, the pompoms must be sewn on.
Crafts from pompoms: DIY bracelet with pompoms

Several bracelets on one hand are a modern trend among teenagers. A bracelet with pompoms will go well with or. In addition, the bracelet with pom-poms is multi-seasonal and will look great even with an autumn sweatshirt.
Crafts from pompoms: headbands with pompoms

Unusual ones have been leading among various jewelry for girls for several years in a row. If you are already fed up, replace the ears with bright pom-poms. Don't be afraid to stand out!
Crafts from pompoms: decorative wreaths made from pompoms for the wall
.png)
It turns out that walls can be decorated not only with garlands, photo frames and shelves, but also with beautiful decorative wreaths. And if flower wreaths don’t last long, and weaving for the New Year 2018 is still very far away, make a decorative wreath from soft pom-poms. Bright, beautiful and unusual, it will definitely attract the attention of all guests in the house.
Pom Pom Crafts: Pom Pom Toys

To please your little brothers, sisters or nephews, make pompom toys for them. These can be different monsters or, rabbits or. Children will enjoy playing with such soft and very cute toys.
Crafts from pompoms: do-it-yourself pom-pom panels

- It’s always a win-win option for what to give your mother or grandmother for her birthday. Such panels can decorate any wall or take their place of honor on a shelf.
Pom Pom Crafts: Pom Pom Decorations for Pencils

Before going back to school, update your stationery by adding pom poms to pencils and pens. You'll see that tests written with such pens will only bring the highest scores.
Pom Pom Crafts: Pom Pom Letters

Make large letters of your name out of soft pom poms and hang them on the door to your room or on the wall above your bed. Simple and original!
Crafts from pompoms: mobiles made from pompoms with your own hands

This can be hung in the room under the main chandelier or attached to a lamp, or it can be made for parents to decorate their baby’s crib.
Crafts from pompoms: bookmarks for books made from pompoms

Crafts from pompoms: scarf decor from pompoms

Cute pompoms don't just have to be on hats. They look especially beautiful on large knitted scarves. Such a warm scarf with bright pom-poms will warm you even in the most severe cold.
Crafts from pompoms: DIY pompom rug

This is suitable for the bathroom, in the bedroom near the bed or in the hallway. By making this incredibly soft rug, you will update your interior and save your parents from having to buy a new one.
Pom pom crafts: pom pom magnets

Decorate boring refrigerator magnets by gluing fluffy pom-poms to them, and leave messages for your family before you go to see friends or go shopping. Or so that they don’t forget to feed the cat.
Pom Pom Crafts: Pom Pom Succulents

Does your family not particularly like to look after plants, but really want to add some greenery? Make cute ones out of pompoms and place them around the rooms. Original, isn't it?
Pom Pom Crafts: Pom Pom Dream Catcher

- an Indian talisman that is believed to protect the sleeper from evil spirits. It’s also a cool decor for the room and a great gift. Add bright pom-poms to the catcher and see only the most pleasant dreams.
Crafts from pompoms: decorate a jacket with pompoms

How to turn an old boring sweater into a trendy item? Add colorful pom poms! Tie pompoms to your jacket and be the most stylish at your friend's party.
Crafts from pompoms: New Year's wreath made from pompoms

If you are already thinking about how to decorate your apartment in such an interesting way for the New Year 2018, make it out of pompoms. So what, it’s still early, but there will be plenty of time for crafts. You can also make decorations for the Christmas tree from bright pom-poms.
Crafts from pompoms: paper clips with pompoms

Gray paper clips are a thing of yesterday. Attach matching pom-poms to multi-colored paper clips and let your notes and essays be the most unusual.
Crafts from pompoms: decorations from pompoms for a blanket or blanket

You can add some zest to a plain blanket or blanket with soft pom-poms. True, this option may be very interesting for a four-legged friend, if you have one, so it is better to make pom-poms small.
Crafts from pompoms: DIY pompom beads

Soft pompoms will look interesting in a necklace. These will be an original addition to a boho-chic look: multi-layered clothing, gypsy or ethnic motifs, texture and drapery.
Pom Pom Crafts: Gift Wrapping with Pom Poms

Do you often rack your brains? Plain paper, thread and yarn pompoms are the ideal solution for gift wrapping for all occasions. In addition, such packaging does not require huge expenses, but looks very stylish.
Crafts made from pompoms: ottoman seat made from pompoms

A soft ottoman made from an old car tire and yarn pompoms will harmoniously fit into the interior of a country house or garden. We are sure parents will be delighted!
Crafts from pompoms: decorative “flowers” from pompoms

Probably the coolest idea is decorative “flowers”. String multi-colored pom-poms onto pieces of wire wrapped in thread or wooden twigs and place in a vase. Such a bouquet can surprise even the most experienced florists.
Crafts from pompoms: decorations for pillows made from pompoms

Soft pompoms are perfect for pillows. You can decorate the entire pillow with pom-poms, just the corners of the pillow, or decorate the pillow around the perimeter - it’s your choice, but any option will look amazing.
Crafts from pompoms: tassels made from pompoms for a bag
.png)
If you are not tempted by the idea of decorating the entire bag with pom-poms, make a small tassel decoration and hang it on the handle of the bag - there is no overkill, there is a bright accent.
Now you have a large selection of different ideas on what you can make from pompoms with your own hands. It’s up to you to choose which pom-pom crafts to start your needlework with. But each of them is able to add a bright accent to the image, as well as add comfort and style to the interior.
Toys are always fun and positive, and especially when they are fluffy, soft and so funny! Many women are involved in needlework, so working with yarn will be a pleasant and familiar experience for them. Even primary school children can be taught to make toys from pompoms with their own hands.


We will need:
- thin but dense cardboard;
- yarn;
- compass;
- scissors;
- "Gypsy" needle.
Work order
- Decide what diameter D the ball should be. Now you need to make a drawing. We are doing a master class on calculating diameters. Draw a circle with a diameter of approximately 3 cm. We will push small balls into this hole. Add 3 cm and the diameter of the ball and divide in half (3 + D)/2 = R – radius of the great circle. Cut two rings and cut them in one place.

- Fold the rings so that the slots do not match.

- Measure 2 m of thread, insert it into the needle and begin winding it onto the rings. You can do it differently: roll up several small balls and wind the thread from them into rings.

- You still have to finish it with a needle. We wind the required number of layers.

- Carefully cut the yarn along the edge of the template with thin scissors.

- The next task for children can be difficult. Help them, spread the cardboard rings a little and hold them there while the child threads a strong thread between them and ties them into two knots.

- Remove the cardboard rings.

- The master class is over - the first pompom is ready. Now you can make various toys for children from them.

He is so snowy and cold that even he himself is frozen and stands with a red nose, wrapped in a warm scarf. Let's start the master class with preparing tools and materials.
We will need:
- white yarn;
- hook;
- wooden skewer;
- thimble;
- beads for eyes;
- pva glue;
- plasticine;
- cork from a plastic bottle.
Master class on making a snowman
- Cut cardboard disks of three different outer diameters and the same inner diameters. With their help we will make three pompoms of different sizes. But first you need to make a support. Burn a hole in the plastic cork with an awl, insert the tip of a wooden skewer into it and seal the inside of the cork with plasticine.

- Place the pom poms on the axle, starting with the largest one. Try not to do this too tightly so that the snowman looks slender.

- Crochet two white cap feet, pull them together and sew both to the middle pompom. It is necessary to make stitches through the middle of the pompom, sewing two legs at the same time.

- Attach a thimble to the top of your head using the end of a skewer. Glue or sew beads on the eyes and nose. We will not give a master class on knitting a scarf here, just try to make a strip of 6 loops with a 1x1 rib.

To make toys for children from pompoms, you must first imagine what you want and choose the right color of yarn. So, to complete the “Three Little Pigs” master class, you will need a ball of pink threads and three pink buttons. You can use small pieces of pink felt to make ears and hooves. Sew the buttons onto a long thread, and then glue them and the piglets' eyes. Finish the master class by gluing different bows to each pig.

A funny story in pictures, written for children, about funny Smeshariki became the reason for the appearance of these cute toys on store shelves. A master class on making them will save a lot of money on the family budget.
- Choose the color of yarn you want and make a pompom.
- Cut out eyes from paper and ears from felt.
- It is better to make noses from contrasting threads.

You don’t need any design to make them, just imagination and the desire to please children.
Making chickens is as easy as making smeshariki. You need to make two pompoms, slightly different in volume. Tie them together. The one that is smaller will become the head. It should be decorated with a beak made of red paper and two black eyes. Glue two legs cut from the same paper to the body below.

Master class “Snake”
To make a wise snake, we don't need diagrams. Simply knit seven small identical pom poms, winding rows of different colors each time. They should be done as evenly as possible, then our Kaa will become colorful and striped. We knit the eighth large pompom from plain yarn - this will be the head.

Take a long fishing line, thread it through the bead, and insert both ends into a needle with a wide eye. Now instead of a knot at the end of the fishing line you have a bead. Thread the line through all the pompoms, starting with the tail. The last one should be the biggest one
Do not make the pompoms touch too closely. Secure the fishing line to your head. Glue on the eyes and long forked tongue using paper or felt. The fluffy, kind and wise boa constrictor is ready.