How to make dolls out of fabric. DIY traditional folk doll
Since ancient times, folk dolls in Rus' have occupied a special place, because life is impossible without holidays, the performance of rituals, the preparation of national costumes and the use of various objects of applied art. Dolls were made not only for children, their main role was ritual.
A bit of history
The history of the folk doll, which was used on holidays or when performing folk rituals, is rooted in those years when there was paganism in Rus'. Long before the Baptism of Rus', the Slavs celebrated the resurrection of Dazhdbog every spring, baked Easter cakes, which were then sacrificed to him. Even then, pysanka was a magical amulet of the ancient Slavs.
According to historians, with the introduction of the Orthodox religion, each pagan holiday gradually acquired a Christian meaning: the ancient holiday of Kolyada (winter solstice) became the Nativity of Christ, Kupala (summer solstice) - the feast of John the Baptist, Christian Easter coincided with the spring Slavic holiday, which had the name Velikden. The tradition of painting Easter eggs and baking Easter cakes also came from the ancient celebrations of the Great Day.
From there, the tradition of making ceremonial Easter dolls and winding dolls, which are considered the most powerful amulets for women, also appeared.

Varieties of dolls
The life of a Russian, and indeed of any other people, is impossible without rituals with national costumes, holidays and folklore. Antique dolls have always been made from various items that were at hand: straw, tree branches, pieces of cloth, rope, moss.
The types of folk dolls in Rus' were as follows:
- Ritual - were made to participate in rituals (agricultural, wedding, festive).
- Charm dolls were made from ashes, pieces of cloth, birch twigs. The main rule in their manufacture was the lack of tools. Such dolls were made for a specific person or family, usually without a face (it was believed that a faceless doll could not harm people).
- A play folk doll was made from materials found in the house (remnants of clothing), no larger than a fist.
play baby dolls
Play folk dolls were made for young children to have more fun with them. They were made only from natural materials: grass, cones, clay, charcoal, moss and fabrics. All dolls had to be faceless so that the soul could not move into them, and they could not be used for witchcraft. Game baby dolls have always been protective to protect the child from evil spirits. Traditional rag dolls made especially for children had their own names:
- Ash doll - the first baby dolls were made from ash, which was taken from the hearth, then mixed with water and rolled into a ball - a head was obtained; such dolls were considered a strong amulet for a child.
- A friend doll was made so that the child was not afraid to stay at home alone (for example, a “bunny on a finger”, a bird, twist dolls). Such a doll (folk) is a toy that was made by a grandmother together with her granddaughters, a mother together with her daughters, teaching them and at the same time accustoming them to creativity and hard work.
- A bird doll was made from a piece of bright fabric in the shape of a square, giving the shape of a bird with the help of tying with threads. Such birds are made small and hung in the corners of the house or above the baby's bed.
- Swaddling - a doll, swaddled with cloth, was placed in a cradle for a baby to take on all the misfortunes from evil spirits.
- Senya-Malina - a doll with a red-sunny mane, conveying the image of a handsome man in a bright shirt, was popular in the villages of Northern Pomerania, various fairy tales were composed about him and called northern Munchausen.

rag dolls
Starting from the age of five, the girls themselves began to “twirl” their dolls under the guidance of their grandmother or mother. A folk rag doll was made from woolen or cotton pieces of fabric, linen and multi-colored ribbons and threads. It was necessary to make a rag doll only with a good mood, love. According to tradition, it was also customary to sing and talk, make a wish.
Twisting dolls (or another name for poles) are made by twisting a piece of fabric or a tube of birch bark, on which clothing details are then put on: a shirt, skirt, sundress, shower warmer, a braid is made of thread or yarn on the head, fixed with a scarf.
In the manufacture of all toys, it was forbidden to use threads and needles, as well as to draw a face on dolls: it always remained pure white.

ritual dolls
Folk ritual dolls were made in compliance with the ancient rules (without a needle and thread) for a certain ritual, in order to then be burned (Maslenitsa, Kolyada), drowned (Kupavka) or buried in the ground (Likhomanka, Kostroma). Sometimes the pupae were then given to children to play:
- Kostroma - is done for Shrovetide, it was set for the entire festive week, and then burned.
- Easter doll (head made of egg) and Easter dove (necessarily bright red) - used to decorate the house for Easter.
- Kupavka - was made on the feast of Ivan Kupala, then it was celebrated on the water, and by the way it swam (it would go into the whirlpool, swim freely or be washed ashore), they predicted what the whole year would be like.
- Vesnyanka - girlfriends gave each other, calling for the imminent arrival of spring.
- Fertility - a doll depicting a mother of many children, attracted wealth to the family.
- Fever pupae - usually 13 pieces were made to protect the child from diseases, they were put on the stove in a row.
- Nurse - with large breasts, the more the better.
- Herbal egg - a useful chrysalis, filled with fragrant medicinal herbs, purifies the air in the hut or over the baby's cradle, driving away the spirits of disease (the grass must be changed every 2 years).
- Kuvadka dolls were intended for men; during the birth of their wives, they provided protection from evil spirits with the help of magical rites (kuvads). Immediately after a happy birth, the pupae were burned during a cleansing ceremony. Starting from the end of the 19th century, folk kuvadka dolls began to be used in a different way: they were hung over the baby's cradle as amulets or placed directly in the crib so that the baby would play in the absence of the mother (there were often several of them of different colors, they were a substitute for rattles).
Many ceremonial dolls were at the same time protective.

Charm dolls
Traditionally, protective folk dolls were participants in family ceremonies: the birth of children, weddings, amulets against diseases, death and funerals. There were a great many of them:
- The bell (invented in Valdai) is a doll that brings good news. She has 3 skirts according to the number of kingdoms and types of happiness (copper, silver, gold). Acts as a talisman that creates a good mood in the house. Having presented the Bell to his friend, a person adds a joyful mood to him.
- Girl-woman (Changeling, Spinner) - a doll with two heads, four arms and 2 skirts. Its secret is simple - one doll-girl is hidden under the skirt of another - a woman and appears if she is turned over. It reflects a dual feminine essence: a young girl is beautiful, cheerful and carefree, then, having married, she becomes a woman (economical, caring, protecting her family, children and home).
- Lovebirds - amulets that protect married couples, are made on one hand as a symbol of the fact that a husband and wife will go through life together in joy and in sorrow. According to the established tradition, such lovebirds are hung up after the church wedding at the head of the wedding procession, and after the wedding they are kept in the house as a talisman of family fidelity.

- Bereginya (keeper of the family) - hung over the front door to protect the house from evil spirits and the evil eye.
- Grain (Krupenichka) - consists of a bag of grain, symbolizing prosperity and a well-fed life.
- Plantain is a small (3-5 cm) doll with a knapsack in her hands (a pinch of native land or ash lies inside), which is intended to protect travelers.
- Cleansing doll - helps to get rid of negative energy in the house.
- Puppet-column "Fertility" (made differently in various Russian provinces and named after their names: Vladimir, Moscow, Kursk, etc.), several Pelenashki were usually tied to her body so that the family would flourish and not fade away - they gave it to young people to the wedding with best wishes.
- Ten-handled (has many hands) - helps the hostess to keep up with everything around the house.

Motanka dolls
The Slavic motanka doll originates from the Trypillia culture. It is based on a twisted svarga, the prototype of which are the motifs presented in many on clay products found during excavations of burials of the Trypillia era.
Svarga is a symbol of movement, spirals and energy whirlwinds, obtained by twisting and twisting, which has a ritual meaning. Instead of a face, she depicted a cross, which testified to her stay outside of time and space. She is the archetype of the Great Goddess.
The motanka doll is made without the use of cutting and stabbing tools, only natural materials are taken: straw, herbs, flowers, corn cobs, grains, pieces of worn fabrics (you just need to make sure that the fabrics are from “happy” old clothes) that were previously worn by relatives people.
When making the body of a motanka, no knots should be tied, the only exception is a small knot at the end, symbolizing the tying of the umbilical cord. While tying it, the craftswoman must make a wish and secure it with her strength. Sometimes arms are made separately, which are then attached to the body.

The outfit and headdress are made separately, it can be embroidered, decorated with lace. Each element has its own meaning:
- the skirt is a symbol of the earth, a wavy line on it is a connection with water;
- shirt - the trinity of the world;
- decorations on the head (ribbon, scarf) - a symbol of connection with the sky.
All separately made parts and decorations are manually wound to the body. Our ancestors were sure that if the doll is started, then it must be finished, otherwise misfortunes will come. Not a single woman left work unfinished, as she was afraid that this would bring trouble and illness to her family.
Folk Doll Museum
Starting from the 1990s, museums of folk puppets began to appear in Russia and gained great popularity, telling about Russian puppet culture. Now there are already about 20 such projects in the country, some of which also represent author's and antique copies:
- The Moscow Museum "Doll's House" was established in 1993 by the efforts of figures of Russian culture (O. Okudazhava), it has a collection of old dolls, houses for dolls, an exposition of folk and theatrical specimens.
- The Museum of Unique Dolls (established in 1996 by Yu. Vishnevskaya) contains a collection of copies of the Russian Empire of the 19th-20th centuries, European dolls, Asian dolls, toy houses.
- The Zabavushka Folk Toy Museum presents collections of clay, straw, patchwork exhibits, and a Russian folk doll is also presented here.
- The Toy Museum in Sergiev Posad (founded in 1918 by the collector N. D. Bartram) exhibits a collection of ancient clay and wood products, porcelain dolls in Russian folk costumes, a collection of toys from the children of the Russian Emperor Nicholas II;
- St. Petersburg Puppet Museum - since 1998, it has been presenting collections of modern and folk exhibits, holding thematic exhibitions (40 thousand items are stored in the museum: dolls, decorations, clothes, ethnographic items, souvenir items in historical costumes of various eras and peoples , author's works of modern masters and designers).
- Museum-estate "Bereginya" (village of Kozlovo, Kaluga region) - under the guidance of folk craftswoman Tarasova, 2,000 traditional dolls from all over Russia were collected; among the exhibits are samples of traditional crafts (Gzhel, Filimonovskaya, Dymkovo, etc.), toys in national costumes of regions of Russia and peoples of the world (40 countries).
Dolls in Russian folk costumes
Since ancient times, the clothes of a Russian woman had distinctive features and characteristics, by which it was possible to determine her age and estate, what region she came from, her occupation and whether she was married. Each Russian province was distinguished by its styles and colors in the formation of a folk costume.
The Russian national dress has one main feature - a simple silhouette that does not emphasize the shape of the body. This simplicity was balanced by a variety of colors in different parts of the clothes, in bright finishes, embroidery and multi-color applications. The folk costume, which our ancestors wore until the beginning of the 20th century, was sewn taking into account not to hinder human movements, to be comfortable at any time of the year under various weather conditions. Structurally, the costume was made in such a way that almost no scissors and sewing were used. The main elements of clothing are a shirt (of different lengths: for men it is shorter, for women it is almost to the toes), a sundress or a skirt (poneva). All this women embroidered very beautifully and decorated with decorative elements. A headscarf or kokoshnik was always worn on the head.

Also distinguished by their appearance were dolls in folk costumes, which were made by women in a particular region of Russia. Rag dolls were usually given as gifts to relatives to seal blood ties. Often clothes for toys wore features inherent in local costumes. An important principle according to which folk dolls were made was that the costume could not be removed, the toy, together with the clothes, represented an integral image, inherent only to it.
At the same time, the costume determined the ethnically specific type of doll, which could not be changed, assigning a certain role in children's fun. For example, a toy in a pink sundress could not play the role of an adult married woman in the game, and a “wife” doll could not be a bride.
Dolls from the series "DeAgostini"
Of great importance in the popularization of Russian folk costumes is a series that includes dolls in folk costumes, produced by the DeAgostini company. The series consists of 80 issues, each of which contains not only a porcelain toy in the national costume of a certain region of the country, but also a description of clothing details, the history of the location, traditions and customs of the region, and other interesting information.

The traditional Russian folk doll is a holistic view of our Slavic ancestors about the structure of the world and the universe, expressed through folk art and needlework, which supported a person in his spiritual life.
Today in stores you can buy everything that the child wants. Ranging from rattles to electronic gadgets. But for some reason, children are always drawn to dolls or animals made with their own hands from knitwear or fur. What is it that attracts them so much? Such a doll can be sewn independently, at home, together with the child.
How to sew a doll yourself?
Modern needlewomen have the opportunity and special material for making dolls. This includes special knitwear, fillers, accessories for eyes, eyelashes, hair from yarn and thread, ready-made wigs. Shops for needlewomen provide everything necessary for creativity. Therefore, many try to sew on their own. Making such a doll with your own hands (some of the patterns are available in this article) is an interesting activity that often becomes an exciting hobby.
You can do sewing without going to the store:
- it is enough to choose a flesh-colored knitted T-shirt;
- a little synthetic winterizer;
- a couple of beads;
- threads and needles for sewing;
- yarn for hair;
- pattern.
simple doll
A primitive rag doll-amulet was sewn by our grandmothers and great-grandmothers. Children love them for the warmth and comfort that these toys give them. Not a single factory doll, even a very beautiful one, will become the toy with which the child will sleep for a long time. Children are guided by sensations: in a dream they touch the doll, and it is plastic, cold. There is an association not with a doll, but with a car or a bucket. And this is wrong. Therefore, the doll should be warm, soft and cozy.

Without thinking twice, you can independently make a pattern for sewing. While the child is sleeping, the contour of the torso, head, arms, legs is quickly drawn. Everything is transferred to knitted fabric. Be sure to leave a seam allowance - 5 mm. All this is stuffed with padding polyester - 80% of the product is ready. You should think about who it will be: a girl or a boy?

The clothes, the length of the hair, and the expression on the face depend on this. Having decided, you should mark the eyes, mouth, nose on the face. The simplest thing is to embroider everything. You can use beads or buttons to make out the eyes. But if the child is very small, then there is a danger that he can tear off or bite off and swallow the bead. Therefore, everything is embroidered. Hair is made from yarn: threads are wound on a cardboard of the desired length, sewn in the middle with a “forward needle” seam. On the reverse side - cut and the wig is ready. It should be sewn, trimmed and braided with ribbons. Having figured out how to sew a doll, you need to think about clothes for her.
Clothes for dolls
If a woman knows how to knit a little, then this is the best option for making clothes for dolls. Knitters always have a lot of balls of multi-colored yarn left - it's time to put them into action. You can make a blouse and a skirt. Or overalls and booties from the remnants of yarn. A dress made from a piece of calico will also look beautiful. The cut can be made simple, one-piece. Decorate with lace, braid, ribbons.
Great importance should be attached to the color scheme, select fabrics of the same texture. It is desirable that clothes can be taken off and put on. This develops a skill in the child, the desire to dress himself properly.
Patterns of other types of dolls
All fabric doll patterns should be transferred to material that can be used more than once. For this, a film or transparent tracing paper is suitable. Thus, the pattern for sewing a Waldorf doll should also be transferred. This type of toy appeared at the beginning of the twentieth century. In Germany, the first schools were organized in which teaching was conducted according to a special program. Toys were made by hand from natural materials: wood, cotton fabrics, pure camel or sheep wool.

It is the manufacture of rag dolls according to the Waldorf model that has gained wide popularity in the world. This is an ordinary toy made of fabric, which is made according to a pattern, but only from special knitwear. Feature - in the manufacture of the head.

Head decoration
For these dolls, a small ball of threads with a diameter of 5-6 cm is taken. Natural wool strips are folded in the form of rays, in the middle of which a ball is inserted. This is how a ball is obtained, on which an elastic bandage or knitted sock is pulled.
At the base it is pulled together with strong threads - it turns out the head. It is pulled with threads vertically and horizontally in such a way that it is shaped like a child's head. A place is chosen for the nose and a small bead or ball rolled from wool is fixed. And only now the upper puppet jersey is pulled on. Eyes are already marked on it, a mouth is embroidered.

The Waldorf rag doll is sewn for a short time: it takes the most time to make the head, and most importantly, the hair from the threads. To do this, take a skein of yarn and crochet a small hat. It should be tight to the head and match the hairline. Then it is sewn around the perimeter to the head and pre-cut identical pieces of yarn are already tied to it. This process is long, but the hair turns out great.

Another way is to embroider the entire surface of the head with a stitch. And then sew on threads of the same length. This way of designing hairstyles allows you to comb your hair, braid pigtails or make ponytails.

Assembly of the torso
The head should have a certain shape. Hands are sewn to the bottom of it and are well fixed. For a fabric doll pattern, the lower part looks like a jumpsuit. The legs and torso are stuffed with wool and sewn around the neck and arms. The lack of wool is supplemented through the side holes - sleeves, and then sewn up. Fingers are stitched on the legs and handles. But if this is not done, it will not be worse: both options are acceptable.

Now you can start sewing clothes and decorating the face. Clothes can be knitted, as in the previous version. The Waldorf doll turns out to be very soft, without a rigid frame and absolutely not dangerous for the child.

Tilda dolls
Many needlewomen who start with large dolls gradually move on to finer work: they try to sew Tilda dolls. Patterns for them can always be found in specialized literature. This toy was created by Norwegian artist Toni Finanger. She invented and released cats, bears, bunnies: they are all made in the same style. But not every pattern produces what is intended. How to sew a doll that has such thin arms and legs? Yes, it's not that easy.

But the difficulty lies not in tailoring, but in stuffing it. Wool is poorly stuffed into such narrow details - it lies unevenly. “Cellulite” appears on the arms and legs: lumps of six are visible on the surface.

But first you need to cut out all the details and stitch them. Then, using a pencil, gradually fill them. You should not take too large balls of wool so that the surface of the knitwear is smooth. All details are collected. A wig is being made for Tilda. For such a do-it-yourself doll, hair can be made from yarn or wool. Threads are wound on cardboard of the desired width. On the one hand, they are stitched, and on the other, they are cut and sewn to the head.
doll face
In the classic version, the Tilda doll has no nose, mouth, or ears. Beads are sewn on her - eyes, make a blush - and that's it. The hairstyle is a special part, a detail. Her hair should be just "chic". You can, of course, embroider eyebrows and mouth. But you can not do this. This is the beauty of the Tilda doll.
And they make different clothes for them. For a doll with your own hands, you can make any patterns of clothes, it's not at all difficult. Beautiful dresses, robes, pajamas, hats and even shoes - all needlewomen make themselves. It is very easy to dress a ballerina doll.
Tilda - ballerina
A ballerina dress consists of only two parts - a skirt and a gathered ruffle ribbon for the top. From a thin fabric, nylon, for example, a ribbon is cut, 40 cm long and 10 cm wide. It is sewn together and gathered on a thread along a wide edge. The assembled part is sewn to the body like a skirt. Another piece of tape, 2 cm wide, is assembled on a thread along the entire length, in the middle. Draped and sewn from shoulder to shoulder. This design makes the doll airy, light and looks like a ballerina. Accuracy in manufacturing plays a special role: threads should not hang anywhere, the edge is beautifully processed.

In fact, having learned how to sew a doll, everyone understands that it is not too difficult to do this. And with a certain skill - and quite simply. And you can do this hobby with your children. Such communication brings parents and children closer together, promotes mutual understanding, develops fine motor skills and imagination. Many sew characteristic dolls (even pregnant or very full ones). The way people can be in real life. Together they come up with outfits for them, sew and dress them.
Dolls are addicted not only to children, but also to adults. They can be bought not only in the store, but today handmade dolls are widespread and they are even more popular than store ones. You can make them from various improvised materials, and special ready-made kits are sold for sewing dolls. In general, this is a very exciting and interesting activity to create a doll with your own hands. Such dolls will be interesting both for children's games and for decorating the interior, and there are also special connoisseurs of puppetry - these are doll collectors. Therefore, dolls can be created for different categories of people and for different purposes, and all of them will be in great demand.
Do-it-yourself dolls can be made from nylon, textiles, felt, felt and other fabrics and materials. Today we will look at master classes of fabric dolls from textiles.
See material for making dolls here - http://ali.pub/3jp0hs
this seller is relatively inexpensive and has a lot of positive reviews.
Also see master classes with patterns of felt dolls
I have been dreaming of a handmade textile doll for a long time and therefore I want to collect clear and detailed master classes for my piggy bank, so that when the time and opportunity arises to create a doll with my own hands, and all the necessary patterns, templates, step-by-step lessons and various secrets for making, are always under hand for easy searching.
I had to wander through the back streets of the Internet to find understandable master classes. I don’t have links to the masters, but the author can be recognized from the photo, many are signed.
Patterns with a doll pattern. Do-it-yourself tilde dolls, step-by-step master classes.
The template can be saved to your computer and resized in any editor as you wish. You can print the template or attach a white or translucent sheet of paper to the computer screen and lightly transfer all parts of the doll onto the sheet with a pencil, then cut out the details of the doll.

We transfer all the details to the fabric in the right amount, do not forget about the seam allowances, calculate the size of the details in advance.

All details are cut out very carefully and also carefully stitched so that all the bends are even and look beautiful from the outside.
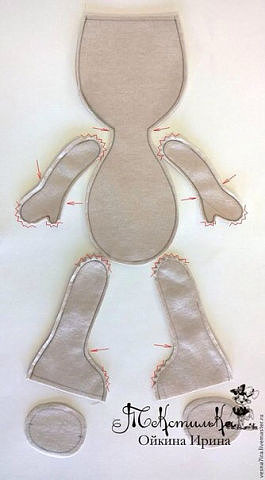
A small hole is left on all parts so that they can be turned out. You can turn it out using any thin and long object.

After turning out, fill the parts tightly with any suitable filler.

The remaining hole is sewn up with a blind stitch.

On the sole of the foot we find the middle, mark it and fit it to the seams on the lower leg.

We cut off the legs of the lower sole with the shin with pins

We flash

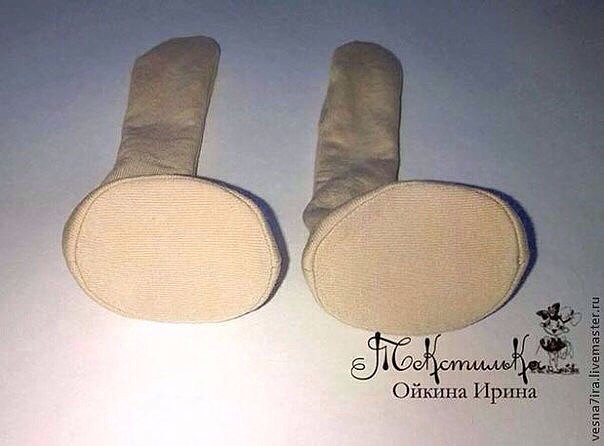
Turn out and fill with filler.

The next part of the work is the head, for its manufacture you will need a foam ball, they are sold in needlework stores of different diameters. As well as a rectangular piece of synthetic winterizer or other filler.

We wrap the ball with synthetic winterizer
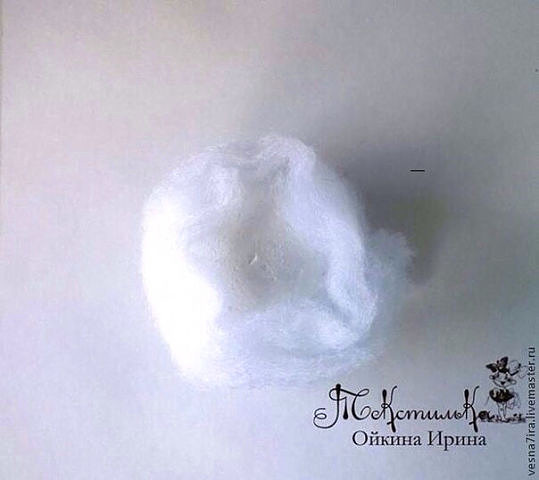
And we put the resulting ball into the cut-out part of the head with the body, we sew the head on top.


For static for the body, we wind the filler onto a wooden toothpick smeared with glue.

We tuck the pattern of the body and insert the wound filler inside the body

All details are ready

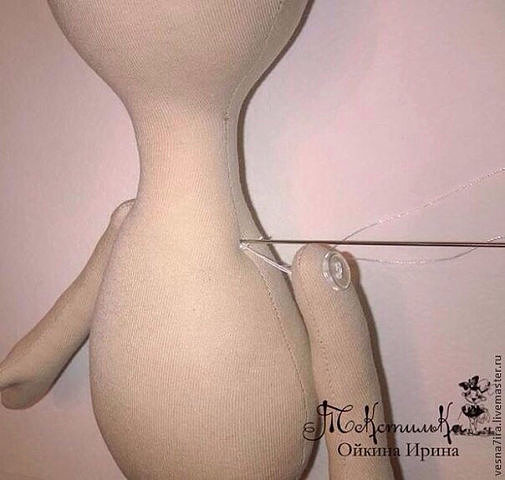
On both sides, it is necessary to mark the same distance where the hands will be sewn.

In order to sew the details to the body, we need small buttons.


The legs are sewn in a similar way

Needlework as an art form helps to create original toys with your own hands. The choice of improvised materials does not limit the imagination and the desire to make something special, beautiful, different from everything else, a unique work that will decorate the house or become a good gift. Do-it-yourself dolls made of fabric with patterns are one of the possible options for creating your own masterpiece. For sewing rag dolls, different technologies are used, and choosing affordable or unusual ones, you will learn how to sew dolls in an exclusive version.
Types of textile dolls
Not one, but four millennia take us back to the time of the appearance of dolls. Then they were part of sacred rituals: magical functions were assigned to the figurines or they served as a talisman. Later, the doll turned into a children's toy, and since then the art of sewing textile dolls has existed as a type of needlework. The existing variety of techniques determines the creation of the following types of dolls:
- amulets with protective functions (Plenashka, Column, the names of textile dolls often reflect their purpose);
- ritual (Maslenitsa, Ledeya, Zernovushka, Ognya);
- theatrical (used in performances, including puppets on a frame);
- games for children;
- interior for collecting;
- finger (help develop fine motor skills, imagination);
- pumpkin heads (distinguished by a large oval-shaped head that looks like a pumpkin);
- Waldorf (simple in shape, with a hard head, soft body, well-shaped arms and legs);
Step-by-step instructions with patterns and a description of making fabric dolls
To create original textile toys, novice craftswomen cannot do without step-by-step instructions with patterns. Such indispensable recommendations indicate the necessary material at hand, the pattern pattern as the basis for future crafts. A step-by-step presentation of actions, taking into account the nuances that may arise when making dolls with your own hands, serve as a guarantee that the result of the work done will please you.
Sewing a Tilda doll with your own hands
A feature of fabric crafts is considered to be a slightly shaded tone of the face and a blush, as an indispensable element. Tilda is the most popular toy among those that can be created by craftswomen who are passionate about needlework. To give a dark tone to white fabric, so that Tilda's skin becomes the desired shade, tea infusion is used (4 black tea bags per 2 liters of water), into which textile blanks are dipped while still hot. To make the color uniform, the fabrics are allowed to soak well, evenly straightened to dry to avoid streaks, and then ironed.
Materials for sewing a doll:
- pattern-pattern,
- fabric (cotton),
- stuffing (batting, holofiber, synthetic winterizer, shreds of fabric),
- felt,
- threads (mulina, wool),
- needles,
- scissors,
- decorative details (beads, buttons, lace),
- improvised means (hook, toothpicks, wooden sticks) for turning out small parts, stuffing.
You can make a Tilda doll with expressive facial expressions, smooth contours and a soft silhouette with your own hands based on the following step-by-step instructions:
- Print out a sketch (pattern), lay it out on fabric and circle the details. It is recommended not to cut them out immediately, but to stitch along the contour, and then the fabric base is cut out with an allowance of 3-4 mm.
- Carefully turn out small, thin details with the help of an improvised tool so as not to pierce the fabric.
- Next, turn on the iron and go through all the fabric details of the craft.
- Stuff the blanks with filler to make some elements of the toy heavier, use grits.
- Sew together all the details of the toy.
- Make hair out of woolen threads, collect in a hairstyle.
- At the final stage, sew on beads or make eyes using floss using the French knot technique.
- It will turn out to make your Tilda exclusive if you pick up shoes, make a cap, sew a beautiful skirt or dress decorated with a print.
How to sew a doll amulet in Russian folk style
Charm dolls are created for various purposes: with the wishes of health, for financial prosperity, for protection from evil spirits, for the preservation of joyful energy, and others. Following the traditions of the Russian folk style continues today, when modern craftswomen sew original dolls with their own hands to decorate the interior, and at the same time want to protect the house and relatives. A prerequisite is to make a doll with a white face, accompanying the sewing process with good thoughts. Then it will turn out to make a unique craft, which will become a symbol that protects against adversity.
To sew a doll-amulet you will need the following materials:
- white fabric measuring 15x15 cm,
- bright print fabric measuring 80 x 20 cm,
- thin tape (contrasting or matching in tone),
- floss threads,
- sewing needle,
- stuffing (cotton wool, herbs, buckwheat).

Step-by-step instruction:
- Fill a square flap of white fabric with cotton wool, roll it up, giving the shape of the head, fasten with a red thread.
- Make handles by choosing a bright chintz fabric and the same technique for shaping the volume.
- Tie a thin ribbon around the head of the future amulet, fasten it, fixing the ends at the back.
- Next, start sewing the base, and for this, fold the chintz fabric 45x20 cm in size in half, fasten the edge from the wrong side.
- Cut out a circle with a diameter of 15 cm, which is sewn on from below and serves as the bottom of the amulet doll.
- Turn out the resulting bag, unscrew from the top edge 10 cm, insert the tape and carefully stitch it so that it can move freely.
- Then the inside is stuffed to the top with cotton wool, herbs, the top is wrapped with red thread.
- It remains to bring together all the details of the craft, hiding the ends inward, where possible, or covering the joints with decorative elements. An apron, beads, a scarf, in harmony with the basis of textile crafts, look good on a folk-style amulet doll.
Master class on sewing a textile doll for the interior
Handwork keeps positive energy, so the tradition of needlework is inseparably connected with everything that affects the creation of a cozy atmosphere, style when creating an interior. The most affordable, original, interesting option to decorate a little princess's nursery is to sew a textile doll. There will be no difficulties with creating crafts, and if the baby’s age does not limit her participation, then involve the child in the creative process, helping to learn new skills.
Materials:
- pattern,
- scraps of fabric,
- pieces of felt of different colors for hair, eyes, mouth, legs, hands,
- scissors,
- floss threads,
- needle,
- pins,
- glue,
- filler.


Step-by-step instructions for the original do-it-yourself doll made of fabric with patterns:
- Print the diagram, lay the paper on the fabric, attach with pins, circle the contour with a pencil. Using scissors and a seam allowance of about 3 mm, carefully cut out the pieces.
- Turn on the iron and iron all the blanks so that they become smooth.
- Fold the pieces of felt in half to cut out the arms, legs, eyes, and torso.
- Using floss threads, needles, sew two elements of the body with hidden stitches. Do not sew this part from below.
- Using the same seam technique, make legs, arms, using felt.
- Stuff all sewn parts of the craft with filler, pushing and compacting it with a pencil. It is necessary to leave only a little free space at the top of the legs and arms to sew to the torso.
- Use the leftover felt and your imagination to make the hairstyle, eyes, nose, mouth of the toy by sewing or gluing the details.
- Textile crafts for the interior will be successfully complemented by a beautiful outfit that matches in tone with the decor.
How to sew a hand puppet for the theater
Materials:
- pattern-pattern (pattern),
- fabric (plain natural, coarse calico or satin, faux fur is suitable),
- scissors,
- thread,
- paints,
- PVA glue.

Making a finger puppet:
- Print the pattern, fasten the templates to the fabric, cut out with a 5 mm seam allowance. But if you need to decorate the craft with embroidery, then do it before cutting the fabric so that it is convenient to pull the flap over your fingers.
- Stuff bulky parts with filler.
- Before sewing the details, apply the necessary patterns or patterns to the fabric with paints: eyes, nose, mouth, clothing items. Hares, cats, chanterelles are animal dolls that are easy to add mustaches so as not to bother with their creation for a long time using other materials. It is better to give preference to special paints for fabrics, the economy option is the usual soluble ones, but before applying them, the fabric must be impregnated with a weak PVA solution.
- The details provided for by the pattern are sewn together, be sure to draw out the bottom of the base and sew on decorative elements
- Even before you start sewing a finger toy, think over a costume, accessories, which they start creating when the base is ready.
- Try to maintain proportions so that the product created by your own hands turns out to be beautiful and put on your hand.
Video tutorials for beginners on making fabric dolls
The tradition of making do-it-yourself dolls from fabric with patterns lives on in our time. Different fabrics, decorative finishes do not limit the imagination, turning a simple activity into an interesting hobby or the basis for creating your own business. The choice of techniques that differ from each other in the level of complexity will allow even beginner needlewomen to create original crafts. It is not necessary to go to the store to buy a doll or baby doll for your child. Watch video tutorials on making dolls and you will learn how to make unique handmade items.
Master class on creating a soft doll for children
Making a rag doll "Angel"
Making a Pumpkinhead doll and clothes for her
How to make a knitted Waldorf butterfly doll
Sewing lesson for a rag doll ballerina
How to sew "Lalaloopsy" from fabric and thread
Photo of beautiful handmade dolls
Improving the technique for creating textile dolls with your own hands, you will be able to reach heights when your work becomes an author's doll. A good motivation or source of inspiration will be a large photo gallery, which presents the unique work of craftswomen. The creative process requires not only an idea or imagination, but certain skills in order to make an exclusive doll with your own hands, unlike the others. Look at the examples of works in the photo below to see how beautiful an author's doll made from the heart can be.
History testifies to the appearance of dolls more than 4,000 years ago. Today, even for beginner needlewomen, making dolls with their own hands helps to realize their talents, use them in the development of their child.
Modern techniques of such hand-made products are represented by different types: games for children, amulets, ceremonial, theatrical, interior. Making dolls with your own hands, both for beginners and experienced craftsmen, is preceded by the preparation of the necessary materials / tools.
Namely:
We sew a textile doll with our own hands
It is important to consider that a do-it-yourself doll for beginners must necessarily consist of the following actions:

Fabrics for the author's doll
The experience of skilled craftsmen shows that for those who are just starting to create dolls with their own hands, it is best to use previously used clothes. Experienced needlewomen do not neglect such second-hand, along with the remnants of new fabrics.
In all cases, these should be fabrics made of cotton, wool, knitwear, leatherette, natural silk, leather.
It is very important to combine materials of different types, textures, plasticity and color palettes. The main requirement is their naturalness, attractiveness of appearance, absence of artificial dyes.
Tilda and its varieties
The first Tilda doll was created with her own hands by a young Norwegian designer Toni Finager in 1999. This is one of the toys that, even for beginner needlewomen, creates rich opportunities for making various products. 
A distinctive feature of the man-made style of tildomania is the use of environmentally friendly materials, the unusual smooth lines of the "body" and the size of its parts. These are elongated torso and limbs; small head, pastel tone of the face with miniature beady eyes, nose, mouth; bright ruddy cheeks.
The desired colors can be achieved with the help of natural dyes (tea, coffee, powder, pencil lead, etc.).
Fillers are sintepuh, sintepon, holofiber and even calcined cereals. The fastening of the handles / legs is carried out by sewing / buttoning them. Pure wool yarn, floss and other natural materials are used for hair. The outfits certainly use colored prints, various accessories, ruffles, lace.
Tildomania has found application in the manufacture of dolls in different images (blonde, brunette, country, romantic, etc.). Along with dolls, there are various toys of this stylistic direction in the form of fairies, angels, various animals, as well as soldiers, airplanes, etc.
Such products can be used not only as children's toys, but also as interior decor elements, creative gifts.
We make the doll hair and hairstyle
The hair extension process consists of the following steps:

The right choice of material, length, hair attachment allows you to vary hairstyles: shortening, weaving braids, creating “tails”, etc. Mixing multi-colored strands helps to achieve original combinations when creating a harmonious image of any doll.
How to make a doll face
There are different options for creating volume, reliefs, facial expressions using hosiery technique, overlays for the forehead, chin, cheeks, nose, sculptural textiles. The first step in creating a doll's face is painting it with paints. For this, moisture-resistant acrylic dyes are best suited, which form a rubber-like film on the fabric. 
In addition, they have a large color palette. First, it is necessary to draw on the head filled with synthetic winterizer / holofiber, eyes, nose, contours of the lips with a clear indication of their corners, chin. After checking the symmetry of the location of these parts, using a long needle and a strong thread, a "tightening" is carried out to form the necessary recesses / bulges of the face.
This kind of analogue of stitching thick blankets allows you to create the necessary size and shape of the nose, the shape of the eyes, the roundness of the face as a whole. After that, using a brush, the face is tinted with oil paint or pastel in different halftones for the pupils and whites of the eyes, eyebrows, wings of the nose, lips, cheeks.
Master class: Waldorf doll
A properly made Waldorf doll with your own hands for beginners and experienced needlewomen is a chance to take advantage of the achievements of the most common alternative pedagogy in the world.
Its popularity is due to the orientation towards the systematic development of the child's personality, the creation of a natural playing environment, favorable conditions for familiarization with creativity, culture, and spiritual development. A distinctive feature of this doll, simple in form, is a hard head, a soft body, a clear design of movable limbs, and the roundness of all outlines.
The proportions of the model are determined by the correspondence of the anatomical, physiological structure of the baby's body in different periods of development.
The “face” of a baby doll can change from a passionless, neutral expression to a pronounced one in “growing up” products. This allows you to give the toy different feelings, stimulating his imagination. Together with her, the baby seems to get an adequate idea of \u200b\u200bhis real body.
It is important to know that a Waldorf doll can be made exclusively by hand and using only natural materials! 
The dimensions of the doll when creating a pattern should correspond to the age proportions of the child's body. For babies under 2 years old, the head is from 1/3 to ¼ relative to its length, respectively: from 2.5 to 4.5 years - 1/5, and for 5-year-olds and older - 1/6. For one-year-old children, it is recommended to sew butterfly dolls, corners in bags, diapers.
They do not have hair, clear facial features and limbs, and "maturing" dolls already possess them. The overall dimensions of the pattern increase independently.
Then you need to select the necessary materials for sewing the body, clothes, stuffing, hair (threads, trimmings of white and flesh-colored knitwear, sheep's wool, sliver, straw, yarn). It is not recommended to use heavy, dense, albeit natural, cotton wool as a filler.
One of the most popular options for making a doll for the smallest with a size of up to 15 cm is as follows:

Features of the doll on the teapot
More than 200 years ago, a peculiar detail of the tea ceremony appeared in Rus' - heating pads with painted porcelain faces and insulated fluffy skirts. Today, man-made dolls for a teapot are used as a colorful part of the interior. To create a doll, you will need fabric, insulation, scissors, thread, floss, needle / sewing machine, decoration details. 
The work process consists of the following actions:
- preparing a doll pattern according to the height / volume of the teapot, transferring it to the fabric to cut out the details and then stitching them together (except for the bottom);
- eversion of the workpiece is obvious, placement inside the filler;
- preparation of the lining and its stitching with filler, while leaving a hole;
- stitching both blanks around the circumference, and after turning through the hole - completely;
- making a floss wig and gluing it to the head with a toasted face, painted eyes, lips, eyebrows;
- tailoring (dress, apron with frills, lace, buttons, etc.);
- full design of the doll and hoisting it to the required place.
Motanka or charm doll
These dolls have long been considered the keepers of the hearth and travelers, mediators between living and future generations. The skirt worn on them represents the earth, the ribbon and scarf represent heaven, the shirt represents the present, future and past of life. Ancestors passed them down from generation to generation.
The important points are the winding of threads on the svarga (face) without eyes, eyebrows, nose, lips in the form of a sacral cross. It is here, on the symbol of the mother of God Lada, that the main magic of the doll is concentrated. It is noteworthy that all parts of the body, hair, clothes are hand-wound with threads (cross to cross) in the direction of the sun without cutting them. 
The work should be done in a good mood within one day. All this contributes to a happy fate, resistance to diseases and spoilage, taming of natural phenomena (drought, rain). Each turn symbolizes the filling of the doll with the potential of energy.
There are 3 types of coils:
- diapers (for newborns);
- dolls in wedding dresses, which were intended for young wives before the birth of a child;
- beregini - fertile, herbalist, wishful, Easter, willow, etc. They should have been located near the house or on its eastern part.
How to sew a doll from nylon tights
Making such a toy does not require special materials and skills. Here you will need tights / stockings made of nylon, synthetic winterizer, threads (for sewing, knitting), a needle, scissors, pieces of fabric, ribbons for clothes. Along with interior "hosiery" in the form of fairy-tale characters, children's play dolls are popular. Their implementation is within the power of even beginners.
Step by step instructions: nylon sock doll
The most affordable is the manufacture of a baby doll of a simple form. 
The algorithm of actions is as follows:
- fill the sock with synthetic winterizer and tie;
- mark the place of the neck with a rare stitch, and then pull it off and wrap it a couple of times with threads;
- to form a spout, place a small circle on the head and pull it off;
- mark circles for the legs with stitches and pull them together;
- in place of the seam of the sock, make a hole-navel by threading the needle from the back and grabbing the capron from the tummy. The buttocks are similarly designated;
- ears, cheeks are made by pulling the threads in the right places, the eyes and eyebrows are embroidered with threads, and beads are used for the eyes;
- the smiling mouth of the baby doll is made with the help of red threads (the needle is stuck through the top of the head, where the knot will be located);
- handles are made from scraps of excess nylon on the head, and then sewn to the body;
- hair is made from nylon socks of the desired tone;
- clothes are made of fabric, socks of different colors.
This technique will be the first step to mastering more complex models.
Dolls from plastic bottles
A variety of ways to make dolls makes it possible to combine different materials with light plastic bottles of different sizes. They can be used both as a frame and as the main component of a toy for children of all ages.
There are different types of models, namely:

These examples can be supplemented with the know-how of users or with their own ways of creating exclusive models.
Author's frame doll
For the manufacture of the frame of the doll, aluminum / copper wire (length about 30 cm), of the same or different diameters, is used. It makes 2 loops 12 cm long (for the head, torso) and 16 cm (for the legs). When making a doll frame up to 50 cm in size, up to 2 m of wire is required. 
The head is made separately from a part of a sock/tights with the further formation of an oval and parts of the face, fixing eyes, hair from yarn/an old wig. Palms made of pieces of wire, loops at the ends of the legs for shoes are wrapped with synthetic winterizer / electrical tape (arbitrary thickness).
A piece of sock / tights is put on the blank for the palms, on which the outlines of fingers with nails are embroidered, and “shoes” made of leatherette are embroidered on the legs. The head is sewn to the torso covered with padding polyester. The final touch is tailoring and dressing. The attractiveness of such a doll lies in the mobility of different parts of the body, modeling its different positions.
Cut out paper doll
This method of making dolls has been popular for over 200 years. Colorful images on cardboard of characters in luxurious outfits served as blanks for them. In times of scarcity of toys, paper dolls were their alternative. Today they are considered as an opportunity to realize the creative potential of children and adults at the lowest economic cost.
 A do-it-yourself paper doll for beginners is the easiest way to make a doll for a child.
The creation of different models consists in drawing a silhouette on thick paper (a box of sweets / shoes), cutting it out along the contour and coloring it. This is followed by the manufacture of clothing, accessories with fastening by bending several "valves" on them. Here you can give scope for a flight of fancy to the kids themselves.
How to make a voluminous paper doll
One of the newest methods of manual creation of three-dimensional toys is the use of 3D technology. For three-dimensional models, flat templates of princesses, Disney / fairy tale characters, angels, animals, birds, etc. printed on thick paper are used. These can be both independent figures, and in the form of inserts in books. 
When they are issued, they apply:
- gift colorful paper,
- fabrics,
- glue,
- thread,
- buttons,
- decorations
- other available materials.
Among the most accepted techniques are:
- modular origami,
- pieces.
Each of them can be performed in various ways, which can be found in virtual master classes. As a result of borrowing the experience of others, you can create author's creations that are unlike each other, capable of becoming both toys and interior decorations, author's collections, and an exclusive gift.
Any of the ways to make a doll with your own hands expands the possibilities for manifesting your individuality. For beginners, this is a kind of test for patience, the possibility of realizing their fantasies. It gives experienced craftswomen a chance for further improvement, and allows children to reveal their talents and appreciate work.
Video: do-it-yourself doll for beginners
How to sew a doll with your own hands, see the video clip:
Do-it-yourself Tilda doll, master class:


