How to make a Christmas tree from cardboard with a ball. Simple New Year's toys for the Christmas tree made of paper - ideas for DIY crafts with children
Making a Christmas tree - hanging for a ball Materials needed to create a Christmas tree: - cotton fabric for patchwork; - binding cardboard 1 mm thick; - gold (or other) cord; - a piece of paper for scrapbooking; - grommet; - ready-made decorations (artificial cones, berries, fir branches and other decor); - Christmas ball; - a sheet of office paper; - PVA glue (for carpentry); - second glue; - hot glue. Tools: - metal ruler; - construction knife; - pencil; - brush for PVA glue; - glue gun for hot glue; - office clips; - scissors; - hole punch; - eyelet installer or equipment for installing eyelets and a hammer; - Printer. You can use my template by printing it on an A4 sheet. The Christmas tree according to this pattern will be about 22 cm high. Cardboard 1 mm thick will be quite enough. Thicker cardboard is more difficult to cut along curved lines, especially if you are new to this process. A short digression about binding cardboard and tools for cutting it. Cardboard comes in different thicknesses - from 0.5 to 5 mm, approximately. It should be cut with a large knife (model knife, construction knife) - along straight lines along a metal ruler, along curved lines by hand. You need to cut the binding cardboard gradually, running the knife along the same line over and over again, trying to keep the blade perpendicular to the cutting plane. For cardboard 1 mm thick, two passes of the knife are usually sufficient. There is no need to try to cut through the cardboard in one movement - it is difficult and there is no point in putting so much strain on your hand. To ensure that the template did not move during cutting, I applied PVA glue in several places on the tree and stand, and glued the template to the cardboard. Then it can be removed painlessly. I will share my cutting algorithm. Perhaps you will find your own course of action. To begin with, I cut the branches of the Christmas tree from the inner corners to the outer ones along their upper borders. I brought the cutting line along the bottom branch to the edge of the cardboard. Then I cut through the lower borders of the branches, and brought the cutting line from the top branch, along the crown, to the edge of the cardboard. And I removed the extra corner. Then I cut out the bottom of the tree. I cut the straight lines of the trunk using a ruler and finally cut out the left side of the tree. The direction of the cutting lines is indicated in the photo. I rounded the tips of the branches and the top of the head with large sharp scissors. I removed the template from the Christmas tree blank and traced the blank with a pen on another piece of cardboard. The photo shows that there are small traces of paper left from the template, but they won’t bother me at all. I will cover this part of the tree with fabric on the other side, and traces of paper will hide inside the tree. I cut out another one just like the first tree. Then I cut out the oval part of the stand using the template. I didn’t cut a hole in it, but just marked it with a knife - I’ll cut it out later, after trying on the Christmas tree covered with fabric in place. I transferred the stand part onto cardboard and cut out two more similar ovals. I applied PVA glue to the tree and spread it with a brush. The layer of glue should be thin so that it does not bleed through the fabric, and uniform so that there are no un-glued areas that can turn into bubbles. I glued the Christmas trees to the fabric and cut them out with allowances of 5-10 mm. Please note that the trees should be glued to the fabric in a mirror image of each other. I cut the allowances into strips, not reaching the cardboard by 1 mm (i.e., the thickness of the cardboard). In sharp corners between the branches of the tree, I made sure to make a cut right into the corner. I did not cut any allowances around the barrel. I turned all the allowances under and glued them on the wrong side, except for the bottom one - at the base of the trunk. I left free “tails” there. I applied instant glue around the perimeter of one of the trees, closer to the edge, and on the plane of the cardboard. I folded the trees inside out to each other and pressed them tightly. Secondary glue works precisely at the moment of compression, and the quality of gluing depends primarily on the compression force, and only then on the time of exposure. I pressed down the places where the allowances were the thickest (at the ends of the branches and at the top of the tree) with paper clips, having previously placed pieces of cardboard under them so that there would be no pressed marks left on the fabric. Using a hole puncher, I made a hole in the top left branch of the tree. And installed a grommet in the hole. If you do not have a special tool for installing eyelets, you can take your Christmas tree to some studio or shoe repair shop. Applying a thin thread of instant glue to the joint of the tree parts, I glued a gold cord around the perimeter of my tree. I tried the finished tree on the stand to determine the required length of the slot. And in two oval blanks I made slits of the required size. The blanks were glued together to form a stand 2 mm thick. Of course, you could immediately take 2 mm thick cardboard for this. But, given the oval shape, it is easier to cut out two parts from 1 mm cardboard than one from 2 mm :) Just like the Christmas trees, I covered the stand with fabric, turning all the allowances inside out. In the hole, the fabric was cut in the middle and folded inside the hole. The tree was inserted inside the slot so that the lower edge of the trunk was flush with the plane of the stand. I laid out the allowances and laces in different directions and glued them well. The remaining (third) oval part was covered with scrapbooking paper. If you wish, you can cover this part with fabric, like all the others. Or you can use felt. And I glued this oval to the stand from below using instant glue - the same way I glued two Christmas trees to each other. I secured everything in a circle with clamps for a while. And just like before, I decorated the joint of the parts with gold cord. And then I assembled a small composition at the base of the tree from an artificial spruce branch, cones, berries and a gold brocade ribbon. All this decor was attached using a glue gun with hot glue. In the end, all that remains is to hang a bright ball, and now the mood becomes New Year's, a little more beauty, miracle and magic appear in life;) Tatyana Churbakova's workshop
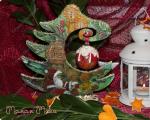
So, the first one was this Christmas tree. Made using decoupage technique.

I needed: thick (boxed) cardboard, PVA glue, putty (the kind I had lying around at home), paints (gouache), spray varnish, white enamel (spray), sandpaper (not the finest), napkins for decoupage, sequins, ribbon ( for a ball), a New Year's ball (New Year's - suitable in size), silica gel (an absorbent material that is placed in boxes with shoes), then velvet craft paper, corrugated paper and a little lace and real forest moss were taken separately...

I made the patterns by eye, as I wanted, the only thing was that I had to tinker with the hook for hanging. I wanted the ball to hang in the center, but in the end I still didn’t get it right, but let everyone think that’s how it should be)))
My cardboard was quite thick, it was difficult to cut (I cut it with a utility knife on a board - not with scissors), then I glued two halves of the Christmas tree and three pancakes for the stand. When everything was well glued, I made a slot to fit the leg and inserted the tree into the stand.

The next step was to putty on the ends of the tree and the stands. To do this, I used a table knife (it was very convenient to work with, almost like a spatula). I smeared it thicker in those places where I couldn’t even out the unevenness of the two parts when cutting out the cardboard. The putty dried quite quickly, but it was necessary for the base to dry well so that the tree would not fall off... Dry it - you need to sand it (not the most pleasant task, but necessary). Next you need to look at the Christmas tree, painted white... I primed it with a 1:1 mixture of gouache and PVA, thereby getting rid of dust after sanding and preparing the surface for painting or gluing. To be honest, I shouldn't have painted it green. But what's done is done...

After drying again, we proceed to decoupage. I’ll say right away that I’m not a master or a fan of this method, I just liked the picture. I glued two fragments of different napkins. Then, when it dried a little, I had to paint on it, since the green background had done its dark work. Santa Claus got a greenish tint in his beard, and the girl actually turned into a ghost... Well, then they added a snowball on the branches, in general, they tried to revive the picture... There are almost identical images on both sides...

As the play progressed, the thought occurred to me that the ends were asking for decoration... I looked in the bins and found silica gel (balls from shoe boxes). I glued it on PVA.

I finally secured the napkins and decor with two layers of spray varnish.

Now it's the ball's turn. As luck would have it, the red balls all turned out to be smaller in diameter than needed. I had to decoupage the blue one. But first I painted it with white enamel. By the way, the napkins stuck very well to the paint, which was still a little damp, then I smeared a little PVA on the edges and that’s it.

I wanted to make a ball with snow. To do this, I again used putty, diluted it a little with water, put it in a bag - a gripper with a zip-lock fastener, cut off the tip, but overdid it, too large a hole gave a too thick layer of “snow”))) I also glued silica gel and coated the ball with varnish .

Here, in fact, is the result.

And this is the second model. Made using velvet and corrugated paper. The greenery is forest moss. My husband brought it from hunting)))
I will skip the stage of cutting, gluing, priming and filling the base, everything is the same as the first model. And then look...

My collage is a little out of order, but I think everything is clear. The ends were painted with white gouache. Using the template, I cut out “clothes” for the frame of the Christmas tree from green velvet paper. I glued it. Then I applied white gouache to the surface with a sponge. This must be done with an almost dry sponge, otherwise you will only get wet spots....

I made roses out of corrugated paper. A lot of! But this is not such a tedious task if you do homework with your child at the same time, or rather check how he did them, or listen to a series on YouTube))) In total, I made about 35-40 flowers.... I think the manufacturing process is of no concern to anyone will be perplexing. Everything is elementary! After twisting, I glued the base of the flower a little so that the spiral did not unwind.

Good afternoon dear friends. We continue to prepare for the New Year and prepare crafts for this holiday that can easily be turned into gifts. In the last article we looked at it in general, and today we will create Christmas trees in a narrow manner. Link previous article.
Today's crafts will be made exclusively from paper. And there are so many instructions that with a normal approach, even a child can handle creating a Christmas tree. And if you don’t think it’s enough, you can try to make or create it yourself.
Well, for now we will begin to create beautiful forest beauties that will decorate your home throughout the holidays. And if you make a few pieces, you can assemble a whole fairy-tale forest on the window.
Take a regular sheet of paper. Of course, ideally it is better to take green, but white will do. We bend the sheet in two along the long side and draw the diagram shown in the photo below.

After applying the design, cut along the lines and bend as shown below. We make three blanks, and then glue them together. It turns out very beautiful and stylish. I am sure you will not see such Christmas trees anywhere else.

The following set of templates for making will allow you to create a Christmas tree in 3D format. You need to save and print the templates. We draw the diagram on a sheet of paper folded in two along the long side. And then we cut it out.


We cut along the main contour, and where the lines go inside we only make cuts. We bend the cuts at the end. Here, too, it is necessary to make two identical blanks in order to glue them together at the end and get volume.

If you wish, you can cut out more than just a Christmas tree. And a Christmas tree together with a fawn or a small Christmas tree standing next to it.


If desired, any craft can be painted to make it stand out from the rest of the Christmas trees. You can also use paints that glow in the dark.

And here is proof that children really love to do their own handicrafts.

Our beauties are ready. It turned out simply gorgeous. How do you like this idea?

For the next Christmas tree, it’s better to immediately take colored paper and immediately make a green Christmas tree. The tree is created from loops and curls.


On that score, if there was something you didn’t understand from the photo, I’ll leave a video on how to create such a masterpiece.
Christmas tree using origami technique (simple diagram for children with description)
Many people have been able to fold various figures from a sheet of paper since childhood. Well, remember they made airplanes or boats, all this is a simple origami technique. And I simply cannot help but talk about the fact that you can make a Christmas tree using the origami technique.

In order to fold the Christmas tree, you need to find an old book without a thick cover or a notebook with writing on it. Found it? Now let's continue, we wrap all the pages from the left corner to the middle. And so on every one. Therefore, a book that is too thick will not work.

Then we bend all the pages into a bag again.

The lower ponytail will need to be trimmed using scissors. Try to do everything slowly and carefully.

The product is completely ready. All that remains is to straighten out all the pages and sprinkle them with glitter.

How about this idea? The Christmas tree is a little more complicated to make, but it turns out more beautiful. First, train on a white sheet, and then when you understand the whole process, you can do it on a green one.


The following beauty can be offered to children during a labor lesson in elementary school. All instructions are provided below.


How to make a three-dimensional Christmas tree from corrugated paper for the New Year 2019
As promised above, today there will be various options for making forest green beauties. And for the next craft you will need special corrugated paper or crepe paper. You will get a very beautiful Christmas tree.
You will need to find:
- cardboard or thick paper
- corrugated green staple paper
- scissors
- red paper
- various bows
- beads
Production stages:
We make a beautiful tall cone out of cardboard and cover it with green paper.


Make the strips about 10 cm long. We wrap each strip on a thin wooden stick or on a small brush to make a bud like this.

Fluff each bud and glue it to a paper cone. For a cone about 10-15 cm high, you will need to make over a hundred of these curls. To decorate the Christmas tree, you can use both ready-made and homemade bows. Christmas balls can be made from cotton balls sprinkled with glitter.

If the first option is too difficult for you, I suggest another option for making a Christmas tree from corrugated paper. It is less labor intensive.
We make the base of the Christmas tree from cardboard. You will need green paper, 18 cm wide and 2 meters long. We fold it in two along the entire length. Apply glue to the edge, leaving a free strip of 2 cm.

Glue and pull together to make a small skirt.

Next, we decorate our cone in a spiral with this blank. Don't forget to glue the strip to the cone. Finally, we decorate with improvised toys.

Or here’s another option for making a New Year’s beauty. We cut multi-colored strips 2-3 cm wide and wrap each strip around a cardboard cone to the very top.

Or you can do it like this.

New Year's beauty made of colored paper and cardboard
To make such a Christmas tree you need to make some blanks, three semicircles of different diameters. On each semicircle we make small cuts to create a fringe.

Then use scissors to twist the fringe. And we glue cones from the blanks. Well, then, on the large cone we put less on the middle cone and the smallest one. At the end we will make a beautiful star.


Here is a similar option, but in the video there is a small life hack on how to quickly and beautifully cut these circles.
But such Christmas trees will look very organic on the holiday table. All are made from the same paper circles of various shapes. By the way, if the question of preparing salads is still open to you, here are some tips.


Or this option for making Christmas trees from simple wrapping paper.

Well, if you want to make something big, beautiful and warm, you can make a big beautiful New Year's beauty. To make a large Christmas tree you need to glue together several sheets of cardboard. Roll them into a cone.

Wrap the resulting cone in beautiful wrapping paper.

After removing everything unnecessary, decorate the Christmas tree with improvised toys and a star.

You can also make a Christmas tree from cardboard, but we won’t make cones.

You will need to print this stencil.

Next, cut out the resulting stencil, apply it to sheets of cardboard, trace it and cut it out. Fold in the middle. We make 8 identical blanks.

We'll go through the edges with a hole punch. If you have a figured hole punch, you can use it. We glue the middles together using double-sided tape.

Then we sew with white thread along the holes made. And we also cut out the star.

Finally, it is advisable to decorate with artificial snow and white sparkles.

Try making a colorful Christmas tree like this from paper circles and a wooden stick.

Or try making the same Christmas tree from candy wrappers and magazine clippings. Finally, coat the tree with glue and sprinkle with flour or sugar.

You can glue a Christmas tree from paper handprints. Preschoolers will really like this work.

And here is another master class on creating a Christmas tree from a glossy magazine.


And you can decorate your workplace with such a Christmas tree. You will need a green piece of A4 paper. We cut out a triangle and make a hole in the middle with a standard hole punch. We unfold the accordion and put it on the improvised trunk. Which can be made from the same sheet of paper rolled into a tight tube.


You can find these tips on the Internet. By the way, individual elements can be used to decorate the space around you.

A Christmas tree made from loops is something new; I really wanted to make something like this myself.

Another option for making crafts from loops.

Here's another idea on how to make a Christmas tree from improvised materials.

Let's return a little to decorating the office table. The next tree will be made from reminder leaves.

And even a preschooler can cope with this task.

Maybe you haven't tried making a Christmas tree using the quilling technique? So here's a good idea for you.

Master class on making a New Year tree from napkins
Yes, you can even make a beautiful New Year's beauty from napkins.

In order for you to get such beauty. You need several layers of napkins. Draw circles on a napkin, cut them out, and staple each circle in the center. Afterwards, crumple each layer to form a circle. Here are photo tips to help you.


You can decorate such a Christmas tree in the style of topiary.
Christmas tree stencils for cutting and printing
If you prefer the vytynanka style and you like painstaking work. I suggest making a Christmas tree to decorate the windows. Using this template you can make a Christmas tree in 3D.

We will make slits on one piece from the top and on the other from the bottom. And let's connect them together.


The stencil is printed.

Folds in two and is gradually cut out.

One craft is assembled from two blanks.

And here are your templates that will help you create this stunning beauty.


Do-it-yourself voluminous Christmas tree for a New Year's card
Each of our friends or acquaintances will certainly be waiting for gifts and congratulations on New Year's Eve. And for every gift or congratulation you can make an original card. And I will help you with my tips on how you can make a beautiful paper card with your own hands.

To make the simplest postcard you will need to print a small blank. Make cuts along the lines and fold and glue to the main background.


If you don’t understand something, here’s help in the form of a video clip.


Or try making a card like this.


Paper Christmas tree on the wall
Who said that crafts should be small and remote. I propose to make a large Christmas tree that will be mounted on the wall. There are immediately finished options, and there is an option in the form of a coloring book that you can color as you wish.
The first Christmas tree will be like this. We will make it from cut strips.

The second option will need to be downloaded and printed. Then collect it on a large sheet of Whatman paper.


Of course, these are not all the options for Christmas trees that you can make for the New Year holidays and decorate your home, office or room with them. But these options seemed to me the most beautiful and more New Year's. Happy new year to you.
The Christmas tree is, without exaggeration, the international symbol of the New Year, and it is also an image associated with children's carefreeness, miracles and sweet fairy tales. And if there’s anything to give for this holiday, it’s an original Christmas tree, which you can make yourself – for example, from cardboard.
We offer you original ideas: how to make a Christmas tree out of cardboard with your own hands, ready-made templates, step-by-step instructions with photos and videos.
Beautiful does not mean difficult, so many models of Christmas trees made of cardboard can actually be made even by children. Although they look very impressive, they can serve not only as an excellent craft for kindergarten or school, but also as a pleasant addition to gifts for family and friends.
Made from cardboard and tinsel
For production we need very few materials:
- white cardboard (it is advisable to take different formats - traditional A4 and larger ones from A1 to A3);
- tinsel, green or multi-colored - as you like;
- glue stick;
- double sided tape;
- compass;
- sweets in beautiful wrappers - round truffles look especially impressive.
Here's how to make such a Christmas tree:
Step 1. First you need to make a cone. To do this, draw a circle of arbitrary diameter on cardboard using a compass, depending on the height of the tree: 15 cm, 20 cm or even 30-40 cm. Then we cut off exactly a quarter of this circle and glue the remaining parts together, forming a cone, as shown in the figure.

Step 2. You can immediately make cones of different sizes, but their shape should be approximately the same - the upper corner is quite sharp.

Step 3. Now, using a glue stick or PVA, simply stick on the tinsel - in a circle to the very top of the head. For beauty, you can take 2 different tinsel in contrasting shades and simply alternate them in a spiral.

Step 4. Now let's attach the candies. This can be done with glue, but it is most convenient to use double-sided tape. The result is such a delicious beauty - a great gift for a baby, and he can make it himself.

And once again we will repeat the entire sequence of actions in the photo.

Made from cardboard and cotton pads
This craft takes a little longer to make because it requires more painstaking work. However, all the steps are simple enough that even younger students can handle them.
We will need again:
- cone,
- a lot of cotton pads (100-200 pieces depending on the size of the model),
- glue,
- stand. It can be made from some container, a pot, which is best decorated with tinsel first.
The sequence of actions is as follows:
Step 1. First, as in the previous case, we make a cone.

Step 2. Now we prepare the cotton pads. They just need to be folded in half 2 times, then apply glue to the bends and fix them on the surface of the cone, as shown in the photo.


Step 3. And so we paste the disks over the cone to the very top. This needs to be done quite carefully, in even rows. For convenience, on the surface of the cone, you can first (still on the circle) draw several even rows with a compass for reference.


Step 4. Now let's make the stand. To do this, you need to take a small pot and wrap it in shiny paper or tinsel, securing it with glue.
You will also need to make a “trunk” from a cardboard tube, onto which to glue a circle of cardboard. It is attached to the inside of the cone, after which the structure becomes quite stable.

Step 5. Now comes the most enjoyable stage - we decorate the Christmas tree as your imagination dictates. Ribbons, bows, tinsel, sparkles, and colored paper figures are suitable. It turns out to be a real collective creativity, in which several kids can take part.

You can see the whole process visually here:
In general, making Christmas trees from cardboard based on a cone is a fairly popular technique that allows you to use your creative imagination in all its glory. After all, along with cotton pads and tinsel, you can use a variety of materials - for example, threads, self-adhesive rhinestones, etc.
10 inspiring ideas: how to make a Christmas tree with your own hands
And there are other ways to make Christmas trees - here are 10 ideas for inspiration.
Christmas tree made of cardboard - an original photo stand
Now let's move on to a more complex model of a cardboard Christmas tree. For example, an original gift - a photo stand. You can make such a Christmas tree with your own hands and give it to colleagues, family and friends, or simply treat yourself with an original decoration for your favorite holiday.
Each person has, perhaps, hundreds and thousands of photographs, but among them there will probably be that very favorite photo, which in itself creates a festive mood. Why not make a special stand for such a photo?
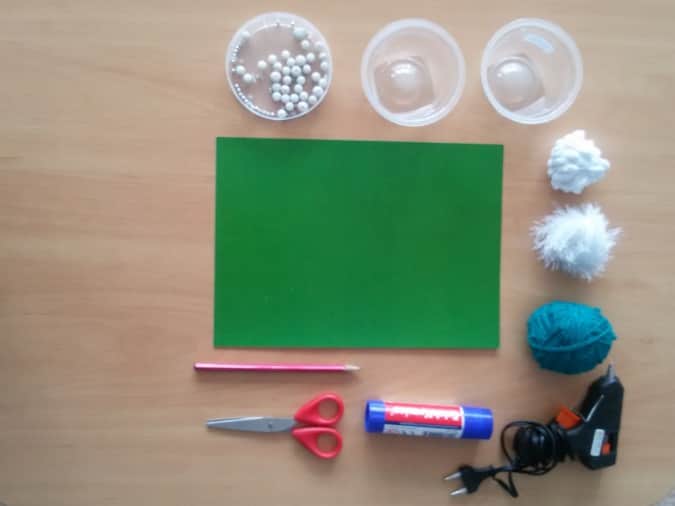
We will need:
- green cardboard - 1 sheet;
- a skein of thick green or blue-green thread;
- white bouclé threads or cotton balls;
- glue;
- pencil;
- scissors;
- beads;
- glue gun
We will act in stages:
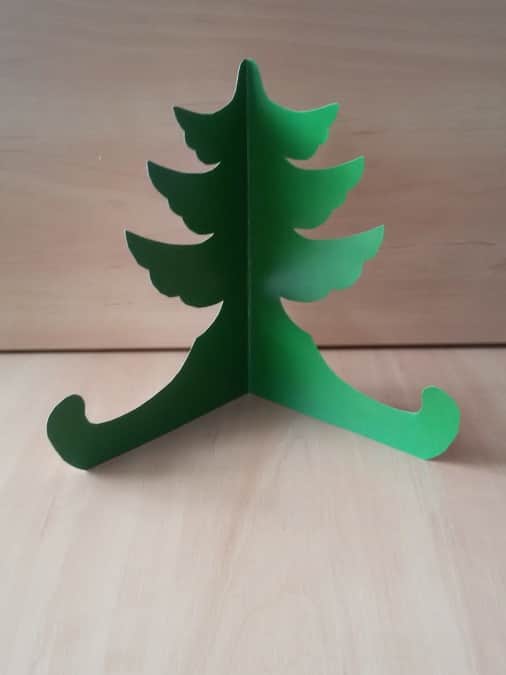
Step 1. First of all, fold a sheet of green cardboard in half with the wrong side out, and then draw half a Christmas tree on it. To do this, you can simply print the template or copy it from a sample.

Step 2. Cut out the workpiece along the contour (folded).
Step 3. Now let's take up the threads. They need to be folded in layers several times and cut into small pieces (1-2 cm each), placing them in a previously prepared container.

Step 4. Now comes a rather painstaking stage of work. Lubricate the surface of the Christmas tree with a glue stick and glue the skeins onto it. It is better to do this in stages so that dust does not accumulate on the sheet.
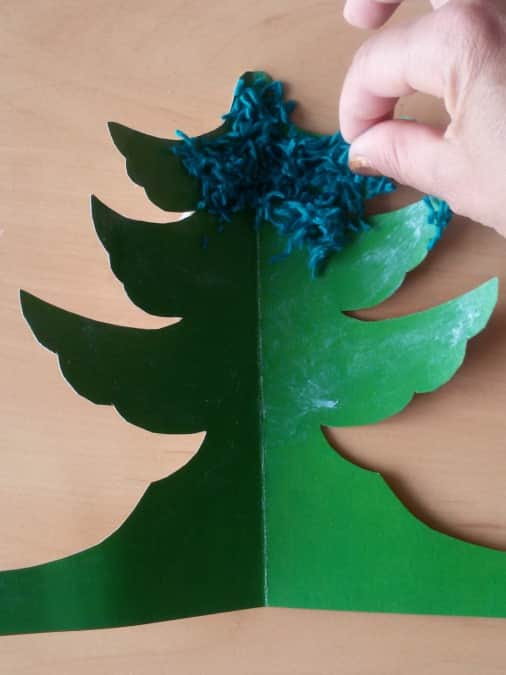
Step 5. Only the top 3 sections need to be decorated in this way, since we will decorate the bottom one differently.

Step 6. Let the Christmas tree lie for a few minutes and let the glue dry a little. In the meantime, take a bouclé thread or simply roll up several small lumps of snow-white cotton wool.

Step 7. These lumps can be glued using a glue gun or a glue stick. The work must be done carefully enough so that there are no glue stains left on the surface.

Step 8. Now you need to make tinsel for decoration. We will use weed thread or other similar material.

Step 9. Attach tinsel, glue other decorations - you get this festive photo stand.

New Year in the office: a quick Christmas tree
There are cases when you need to make a Christmas tree literally in a matter of minutes - for example, a friendly company is ready to receive guests, or the team is actively preparing for a festive corporate party that is about to begin. For such situations, we can get by with the simplest version of a DIY Christmas tree.
We will need:
- sheets of colored cardboard or any cardboard and green paint;
- scissors;
- pencil;
- colored paper, glitter and other elements for decoration.
Creating such a model will not take much time:
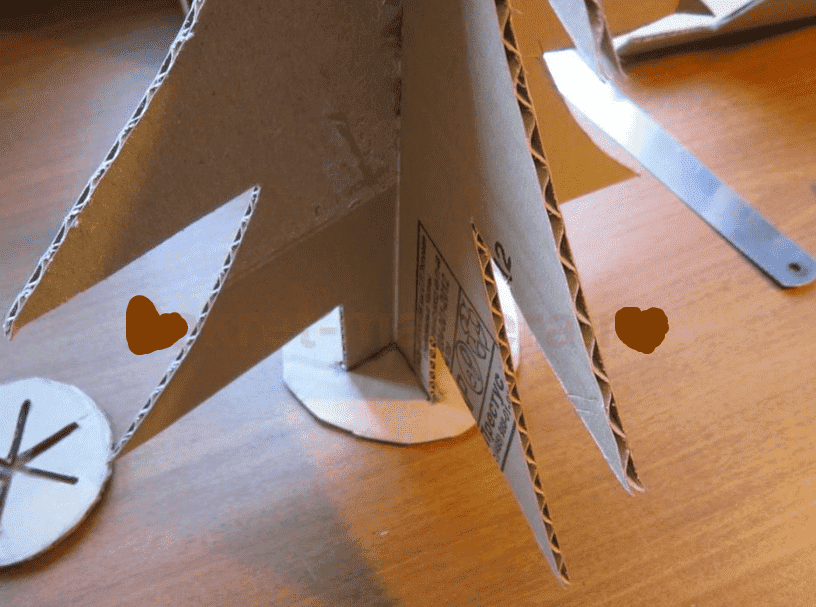
Step 1. First, fold the cardboard in half and draw half a Christmas tree on it - literally 3 or 4 triangles of different sizes, as well as a small trunk. Cut along the contour. Place the blank on another sheet of cardboard, trace the outline with a pencil and cut out exactly the same model.

Step 2. Cut out the stand: cardboard circles with bases (2 or 3 intersecting lines). We will make neat cuts along the lines.
Step 3. Now we bend the Christmas tree blanks in half and insert them one by one into these slots: 2 or 3 pieces, depending on how many lines are made at the base.
Step 4. All that remains is to paint the Christmas tree green and decorate it with colored figures, sparkles and other materials.
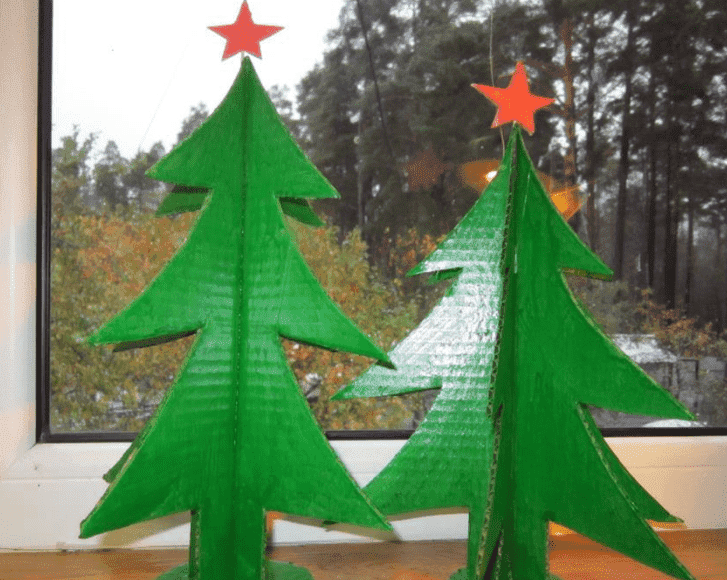
For example, these stars, which can also be cut out of cardboard.

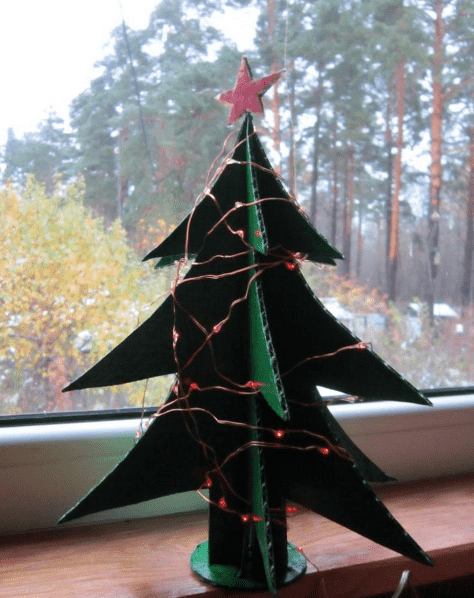
By the way, a cardboard Christmas tree will support even the weight of a small garland - let’s take advantage of this opportunity.
How to make a Christmas tree out of cardboard with your own hands: 10 ready-made templates
Of course, during production you can use a ready-made template. Here are a few samples of the New Year's forest beauty that can be printed, cut out, and then made from cardboard in a matter of minutes.


3D Christmas tree using papercraft technique
And here is another very interesting model of a forest guest, which, despite such an ornate name, is quite simply made. Although, of course, in this case you need to spend a little more time.
And the result will definitely please you, because the finished product will look like this:

In order to make a Christmas tree out of cardboard with your own hands using the papercraft technique, we will need:
- several thin sheets of cardboard (or thick sheets of colored paper). By the way, they can be alternated in color: dark and light green;
- glue;
- compass;
- ruler;
- pencil,
- and also a stick or wire.
We will act like this:
Step 1. The product is based on the same blank - this is a circle drawn with 6 lines and 2 circles. The largest circle is twice as large in diameter as the smaller one.
Step 2. You need to make 5-6 such blanks or even more. Each subsequent one is 1-2 cm smaller in diameter than the previous one.
Step 3. After all the models are prepared, cut the circle inward to a smaller circle, as shown in the photo. We glue each fragment together, making a cone out of it.
Step 4. At the last stage, we simply string each element onto a stick or wire (you must first make a hole in the center with a needle).
Step 5. The crown can be made from a small cone of the same color. All that remains is to dress up our Christmas tree and put it in the most visible place.

Using the papercraft technique you can make several different Christmas trees - “thicker” and “slimmer”. The result is a small forest that can certainly create a cozy atmosphere of childhood in any home.
By the way, this “forest” can easily be made hanging - to do this, you can take a beautiful ribbon and attach it to the top of the trees with glue or a needle.

Details and comments can be seen here:
Folding Christmas tree made of cardboard - easy and quick to make
Here’s another quick option - this Christmas tree is made from several cardboard circles, which are also placed on a skewer.
Accordingly, we will need:
- cardboard,
- wire or wooden stick,
- as well as a cap from a plastic bottle or another similar object - it will serve as a stand.
We will act like this:
Step 1. Cut out several circles of different diameters - each subsequent one should be 2 cm smaller than the previous one.
Step 3. After all the pieces are ready, straighten them, make a small hole in the center and put them on a skewer.
Step 4. The last stage is to make a hole in the stand (lid) and attach a skewer to it. We decorate our Christmas trees - that's all, the holiday is approaching!

Here are just some examples of making a Christmas tree from cardboard with your own hands. It is clear that the finished model can be of completely different sizes - from small beauties on the table to quite large ones that can be placed on the floor or on the bedside table.
Create a festive mood and gifts - to the delight of yourself and your loved ones!
Happy New Year!