How to knit a dress with Irish lace. Crochet chocolate dress
The ability to knit Irish lace, according to experienced needlewomen, can be called the highest degree of professionalism in crocheting. An intricate canvas created from motifs of varying complexity and shades cannot fail to attract attention and arouse the admiration of others. A dress that uses Irish lace is a real work of art that you can create with your own hands using a crochet hook and thread.
Learning to make Irish lace dresses: technical features
The technique of knitting Irish lace has its own characteristics; they will be relevant when working on any product, including the creation of a dress. Let's pay attention to the main points.
- For knitting, linen and cotton threads of different colors are used, including sectional dyeing. They should also be different in thickness. Thick yarn is used as a basis for tying and creating voluminous elements. For the main motifs, medium-thick yarn is used, and for the connecting mesh, thin threads are used.
- The work also requires hooks of different sizes; the size is selected depending on the stage of work and the thickness of the yarn.
- It is customary to use a variety of plant motifs as the main elements in Irish lace - flowers, leaves, branches, buds, etc.
- First, individual elements and motifs are knitted, they are laid out on a pattern or template, secured with safety pins and connected using a regular or irregular mesh. Or you can first completely crochet the product in the form of a net, and then sew Irish lace onto it.
Using the Irish lace technique, craftswomen create decorative elements for wedding and evening dresses, as well as dresses and sundresses made entirely of intricate motifs. Experienced needlewomen usually create original, unique works, because Irish lace is a technique that does not imply strict rules or clear forms, it gives unlimited freedom to imagination.
To help beginning knitters, we offer a step-by-step master class with a description of how to create a summer dress using the Irish lace technique, which can serve as the basis for creating an original work.

Let's prepare materials:
- yarn “Iris” of different colors;
- hook;
- pattern;
- safety pins;
- soft surface for fixing motifs.
- First of all, you need to prepare a pattern for the desired product. You can draw it on paper and then cut it out, or take a finished dress of the desired shape and use it as a basis.
- As you work, the motifs will need to be fixed on the pattern; it is best to lay out a blanket or bedspread on the table or floor.
- Threads will be required in different colors. For floral motifs, you can choose bright colors - one or several; section-dyed yarn is well suited for these purposes. For the leaves and mesh we will use green yarn. If desired, the work can be made monochromatic, in which case the dress will turn out to be more restrained and laconic.
We begin work by knitting motifs that will become the basis for a dress using the Irish lace technique. You will need quite a lot of them; in order not to make a mistake with the quantity, you can immediately pin them to the prepared pattern.
The main elements will be flowers of various shades, shapes and sizes. You can make them different in volume; to do this, you need to take thick threads as a base and tie them with thinner ones.
Flowers can be knitted using the pattern below, other shapes can be used if desired.
We will complement the flowers with leaves of different shapes and sizes. Using the pattern below, you can knit a leaf, which is one of the main motifs of Irish lace.
Let's add thin openwork leaves to them; they can be made in a different shade.
We will also knit some shamrocks.
Thus, we knit 10-15 elements each and pin them to the pattern. When a sufficient number of elements are ready, we begin to connect them using an irregular mesh, which is knitted by a set of chain loops and double crochets.

We knit the front and back separately according to patterns, and connect them together using an irregular mesh.
A unique, one-of-a-kind dress is ready!
A selection of videos on the topic of the article
The amazing technique of Irish lace allows you to create dresses that can be equated to works of art. In the video you can see the stages of creating amazing things using this technique and get interesting ideas for inspiration.
Lace knitted dresses have always been and will be quite popular because they look very feminine and graceful. Of course, a true lady can look charming in jeans and a simple T-shirt, but a lace dress... What woman could refuse that? Nowadays, knitted dresses can be bought in stores, as well as ordered from craftswomen, because it often happens that things that would correspond to all your ideas are simply not found on store shelves.
I would like to put dresses knitted using the Irish lace technique on a separate level among all. Even though the process of knitting them is quite labor-intensive and painstaking, the result is definitely worth the effort spent on it. Let's take a closer look at what types of Irish lace dresses there are, what it is and how to wear it correctly.
What is Irish lace?
First, you need to understand the most important thing: what is Irish lace? Surely many women have seen things knitted using this technique and admired them, but did not know the name. So, Irish lace is a knitting method in which the product is assembled from individual motifs. Most often they are plant-based, that is, leaves, flowers and so on, although there are also geometric shapes. First, these same motifs are knitted, and then they are put together.
There are several methods for assembling motifs. Some craftswomen simply immediately connect them together, but the most common method is to connect the motifs using a grid. For those who like this method, but find it too labor-intensive, there is a workaround - you can first knit an elegant mesh, and only then sew Irish lace motifs onto it.
Irish lace dress
Dresses knitted with Irish lace are the most popular items for this knitting method. Of course, you can also see shawls knitted using this technique and skirts, but dresses are clearly in the lead here, which is completely surprising to me, since they look the most impressive. There are many different models of Irish lace dresses, so to speak, for every taste. You can knit a classic dress, or a more revealing one for a beach holiday, and you can also knit wedding dresses from Irish lace that look simply amazing. Since lace dresses are most often translucent due to the fact that there are always holes in the knitting - small and not particularly so, for the more shy representatives of the fair sex, you can put a lining under these dresses. If you think it over correctly, it will only add charm to the dress, and you will also feel comfortable in it.
How to wear dresses and sundresses made of Irish lace?
Dresses with Irish lace have a unique style, so you need to wear them wisely to make them look decent and attractive. Of course, the main role is played by what the dress itself is like. It should be stylish and interesting, and not knitted in the manner of Soviet robes, which, no matter how you put them on, will look simply terrifying, especially on a young and beautiful girl. But it is also important to know how to wear it.
For example, heeled shoes go best with a lace dress - no ballet flats or sneakers, as they will ruin the whole look. The most you can afford are sandals. In addition, you should not wear a lot of jewelry - earrings will be enough, since a dress made of Irish lace in itself is a worthy decoration for any girl. If it’s cool outside, then you can put an elegant bolero or cape on top of such a dress, but lace will look no less interesting with a denim or leather jacket, which will only emphasize its elegance.
 |
 |
According to legend, Irish lace was first made by sailors who missed their native lands on long voyages.
In the 14th century, the technique of creating aerial patterns reached its peak of popularity. Nowadays, the fashion for them fades away and then revives again, it all depends on current fashion trends.
Technology or art
In addition to the prosaic “sea” version, there is another theory about the origin of the art of weaving Irish lace, according to which natural patterns were woven into finished fabrics by nuns in the monasteries of Ireland.
The history of the spread of lace is closely connected with the history of the country. Most of the country's inhabitants lived poorly and had the opportunity to eat only food that they grew themselves. Crops often spoiled due to heavy rains or died due to fires. In one of the cities of the country, at the monastery, the nuns opened small schools for girls, in which they began to teach students the skills of Venetian lace.
The work used simple coarse flax threads and small wooden sticks. Cotton was inexpensive and could be purchased in large quantities, which gave room for creativity. Knitting from cotton thread turned out to be voluminous. Flowers and plants seemed to come to life on the fabric. The highlight of the execution was the assembly of individual elements, from which entire canvases, tablecloths or clothes for the fair sex were then created.
The dimensions of knitted lace elements are not regulated by anything other than the personal taste of the craftswoman. Weave huge peonies or miniature butterflies to your heart's content.
Airy image
You will find inexpensive Mango guipure dresses.
Black dresses with a white collar will allow you to choose a less pretentious outfit.
In the monasteries, each craftswoman specialized in one particular pattern: a leaf, a bud, a petal, a geometric figure, and so on.
The method of knitting individual parts was kept as a family secret, jealously guarded from curious tailors. Unfortunately, many unique schemes have sunk into oblivion and cannot be renewed. But some have survived. For example, there are books in which it is printed.
The originality of lace did not go unnoticed by Italian, French and English fashion designers, and the nuns' business instantly expanded. One of them turned out to be Mademoiselle Riego de Blancardier. Thanks to her, they began to use a working tool that resembles a modern crochet hook when making lace.
Riego de Blancardier wrote a book on needlework in 1846, in which she collected all the patterns and ornaments made from cotton thread known to her. The author's advice is still used by craftsmen and tailors who work with weaving techniques.
The fashion for airy hand-knitted patterns was revived by Queen Victoria of England. She was a big fan of needlework; her summer outfits and umbrellas were not complete without lace trim. The queen's sympathy was echoed by the courtiers. Apprentices sewed outfits entirely from lace or decorated individual elements of clothing.

Runway chic
Fashionable styles
Irish lace has inspired world designers to create not only individual masterpieces, but also collections. Famous brands Oscar de la Renta and Roberto Cavalli have become the authors of evening and cocktail dresses made using ancient weaving techniques. The dresses are covered from top to bottom with floral and plant motifs. Many fashion designers have used the “mermaid” silhouette; it amazingly emphasizes the grace of the female figure.
In the 21st century, when any type of ornament or pattern can be created using machinery and other automated equipment, Irish lace is made exclusively by hand. A machine cannot recreate the volume of weaving; this is only possible with the help of the thinnest hook. The product is assembled using the hands of a craftsman and a miniature needle. The result is an outfit that doesn't have a single seam.
The works of the talented designer Asya Verten are widely known. The peculiarity of the master’s creative approach lies in the combination of correct proportions, the use of exclusive details and shades of threads, well-placed accents and a perfect fit. The craftswoman carefully thinks through every detail of the dress.
For example, the “Eden” dress, made by Asya Verten, created a real sensation among fans of Irish lace. In one outfit, the artist combined five shades of green and seven shades of red. Thanks to the skillful combination of colors, the patterns create the impression of three times the volume. From the outside, the design appears to be printed on fabric. The final accent in the design was Swarovski crystals. They decorate rose petals.

Eden from Asya Verten
Crochet - is it possible to create a masterpiece with your own hands?
Let's return to the question of the peculiarities of lace weaving and creating outfits. The uniqueness of knitting lies in the use of threads of different thicknesses:
- the middle one is used as the main thread to create a pattern;
- a thick thread is used as an auxiliary thread, it is used as a supplement to the middle thread;
- fine mesh or miniature decorative elements are knitted.

Simple DIY outfit (photo)
For each type of thread, a hook of a certain thickness is used. The voids between the elements are filled with a mesh, which is also crocheted.
Each motif has a three-dimensional texture on only one side. It may consist of petals in several tiers.
The mesh, which is knitted between the parts, is made randomly or in an orderly manner (loin type). It is better to make connections from a thinner thread. You can start weaving from any element.
The density of the details depends on the style of the outfit and the individual preferences of the craftswoman. It is recommended not to overload complex motifs with an intricately shaped mesh.

Schemes for creating a masterpiece
Below is the technique for knitting a lace dress:
- To work, you will need threads of three types of thickness, the same number of hooks, a pattern according to which the product is supposed to be made, and a special soft surface to which the craftswoman will pin the finished parts.
- The work begins with weaving various motifs. These can be flowers, insects, plants. It is important to use detailed diagrams with descriptions.
- The finished parts should be laid out on a paper pattern. You can come up with your own design, or you can repeat the designer’s pattern. The products are secured taking into account darts and gathers so that the finished dress fits exactly to the figure.
- After this, all the motifs are gradually connected to each other using a grid. It consists of a chain of air loops and columns in a chaotic order. The result is a single piece of product.
- Finally, the dress is removed from the pattern. If the craftswoman made the back and front separately, then the parts should be connected.
Knitting traditional patterns
Below are several traditional patterns that will help you master the weaving method.

Shamrock

Flower diagram

Floral patterns (outline)
Children `s dress
Children's dresses made using the Irish lace technique can have a fitted silhouette and a trapezoidal shape. The outfit does not need additional decoration, since the dress itself is sufficiently decorated.
Contrasting threads may be used in girls' outfits. For example, on a white background, scarlet roses or burgundy poppies, green petals or ivy look original.

Child model

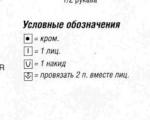
Designations on diagrams (photo)
Evening models
Evening dresses made from Irish lace fit perfectly, as they are made to individual measurements. This outfit simultaneously combines sexuality, status, beauty and uniqueness of a woman. on the floor can be worn over silk underwear, a combination in tone or in a contrasting color.
Most often, designers create models complete with underwear. The classic version of the ensemble is an openwork dress worn on a light brown silk lining (to create a naked effect). Those with an extravagant character can wear.

Evening look
Wedding dresses
Products made using the Irish lace technique have delighted and inspired fashionistas and designers for several centuries. The method of weaving patterns does not become outdated over the years; on the contrary, ancient techniques are revived again and again in the creation of new outfits.
Don’t forget to replenish your summer wardrobe with a new item of the season - surprisingly feminine and graceful.
Video
This video will tell you how to sew a dress from Irish lace with your own hands.
The lace model will not go unnoticed. As the old saying goes: “A man chooses a woman, and a woman chooses a man from among her admirers. So, an openwork dress will provide a woman with a wide choice!
IMG_5257-1.jpg.
This is my first dress in IR.
Next I will describe how it was given to me. maybe someone will find my work useful
I was inspired by Irish lace from the Internet and decided to try to make it for myself in the same style.
I haven’t worked with Irish lace yet, but it will be even more interesting.
To begin with, I knitted samples of some motifs that I like and are not particularly difficult to perform.
Below I will give a detailed description of each of them. 
WP_20160515_10_10_46_Pro.jpg
One skein of 50g is untied here.
Violet threads from YarnArt. 
WP_20160601_18_52_28_Pro_1.jpg 
WP_20160520_11_35_58_Pro.jpg
These are multi-layered flowers, as many as can be obtained from one skein.
I knit the rest of the skein or small elements or, like here, a twig, as long as the thread is enough. 
WP_20160520_11_36_36_Pro.jpg
Knitting a flower:
Dial 6 v. connect into a ring.
1r. Three lifting loops, 15 double crochets in a ring.
2 rub. 8 arches of 3 air loops secured with a single crochet.
3 rub. We make a petal over each arch. the first and last single crochet, and in the center 5 tbsp. double crochet
4r. 8 arches from 5th century. p., with fastening under between the leaves of the previous layer.
5 rub. We make a petal over each arch. the first and last single crochet, and in the center 7 tbsp. double crochet
6 rub. 8 arches from the 6th century. p., with fastening under between the leaves of the previous layer.
7r. We make a petal over each arch. the first and last single crochet, and in the center 9 tbsp. double crochet
If the description is not very clear, there are many schemes of similar flowers.
Here you can fantasize with the number of layers and the shape of the petals 
.jpg
This is a diagram of a leaf. I'll describe it in more detail with photos.

WP_20160522_13_04_51_Pro.jpg
1. tie a 16th century chain. p. connect into a ring, tie with 24 st. b\n, and make 3 lift-turn loops

WP_20160522_13_07_27_Pro.jpg
2. Rotate the work. Skip one bottom st. Knit 11 sts, taking both braids.
Arch of 5 air loops. Skip one bottom st. Knit 11 sts, taking both braids.
3 lifting and turning loops.

WP_20160522_13_10_47_Pro.jpg
3. Rotate the work. Skip one bottom st. Knit 10 sc, taking both braids.
Then four single stitches under the loops of the arch. Arch of 5 air loops. And three more single stitches under the hinges of the arch. Further
We continue knitting st b/n, stop without knitting 2 st b/n to the edge and make three lifting and turning loops.

WP_20160522_13_13_23_Pro.jpg
4. Rotate the work. Skip one bottom st. Knit st b/n in each bottom. Three tbsp. b/n under the hinges of the arch.
Arch 5th century p. and four more tbsp. b\n under the arch. Be careful at this stage.
On the side where we knit three columns under the arch, a concave edge will be formed, where four - a convex edge of the leaf.
After four tbsp. We continue knitting under the arch, not reaching two sts. to the edge.

WP_20160522_13_16_40_Pro.jpg
5. Rotate the work. Skip one bottom st. Knit st b/n in each bottom. Four tbsp. b/n under the hinges of the arch.
Arch 5th century p. and three more tbsp. b\n under the arch. We continue knitting, not reaching three stitches here and in subsequent rows. to the edge.
We make three lifting and turning loops.

WP_20160522_13_20_59_Pro.jpg

WP_20160522_13_25_16_Pro.jpg

WP_20160522_13_29_47_Pro.jpg

WP_20160522_13_34_26_Pro.jpg

WP_20160522_13_39_28_Pro.jpg

WP_20160522_13_45_06_Pro.jpg

WP_20160522_13_50_25_Pro.jpg
6.--12. We continue to knit everything in the same way, guided by the principle, after turning at the beginning one st. we skip,
under the arch we knit 4 stitches on the convex side and 3 on the concave side and at the end three stitches. we don't tie it up.
Continue knitting until the leaf reaches the desired size. I like the number 12. One big + 11 small holes.

WP_20160522_13_57_58_Pro.jpg
13. We untie in the same way as the previous rows, but under the arch we make only 7 tbsp. b\n.

WP_20160522_14_02_20_Pro.jpg
14. We untie in the same way, but on the rounding we make 2 tbsp. b\n extra, so that the round edge does not pull.

WP_20160522_14_05_00_Pro.jpg
15. Well, we knit the final row to the middle of the rounding, the last st. replace it with a blind loop and secure it.
A blind loop will allow you to finish the knitting by nullifying it.

WP_20160522_14_06_23_Pro.jpg 
WP_20160522_14_06_37_Pro.jpg
During the knitting process, the leaf spins very much, so it looks unsteamed.

WP_20160523_17_41_40_Pro.jpg
50 grams of leaves and small parts from the remainder
Next is a small MK of the "Curl" motif 
WP_20160525_14_19_47_Pro.jpg
1. Tie 20cm of cord in a pigtail. Make 3 lifting loops. Link st. s\n

WP_20160525_15_54_28_Pro.jpg
2. Twist the post. I do 5 pairs of entanglements. In total, tie 12 twisted columns into each loop of the braid.
This way the braid lies in a circle.

WP_20160525_16_03_25_Pro.jpg
3. Tie another 9 twisted columns with fastening through one loop into a pigtail,
so that there is no further rounding or it is minimal.

WP_20160525_16_06_19_Pro.jpg
4. Next 3 tbsp. s\n in two steps, 3 tbsp. s\n in one go, 3 tbsp. b\n. and further until the end of the motive with blind loops.

WP_20160525_16_13_08_Pro.jpg
5. Rotate the work. Tie with arches from 3 in. p., securing art. b\n between entwined posts,
and in the area of blind loops every third.
Secure with a blind loop opposite the fourth entwined post. to form a loop.

WP_20160525_16_26_09_Pro.jpg
6. turn the work. Make the piping of the arches: 2 tbsp. b\n, 3 c. p., 2 tbsp. b\n.
Finish with a blind loop.
This is a cute and not at all complicated curl.

WP_20160530_16_54_44_Pro.jpg
50gr. curls.
Next I will knit a large openwork shell 
WP_20160601_22_45_39_Pro.jpg
1. Tie a braid about 32cm - 100 loops

WP_20160601_22_56_30_Pro.jpg
2. 3 lifting loops and art. s\n in the first loop of the braid. 2nd century P..
Then knit two tbsp. s\n in every second loop of the braid,
alternating with two c. p.. knit 25 pairs.

WP_20160601_23_04_27_Pro.jpg
3. Continue knitting pairs of stitches, but alternating with one in. p. to the end of the braid

WP_20160601_23_21_25_Pro.jpg
4. Rotate the work. Tie the arches st. b\n: 3 pieces under 1c. p, 4 pcs each under 2v. P.
Secure 21-22 pairs of posts into the ring opposite, so that it fits nicely in a circle.
Knit 3 blind loops into the braid loops

WP_20160601_23_27_10_Pro.jpg
5. Art. b\n in the third loop of the arches. again 3 blind loops in a pigtail.
St s\n in the third loop of the arches.
thus knit six stitches. s\n.

WP_20160601_23_39_03_Pro.jpg
6. Next, knit 4 blind loops in a pigtail, and switch to double crochets,
so that the shell spreads a little. At the end of the braid, make a tie
three tbsp. b\n the outermost column of three air loops. Secure the end of the work with a blind loop.

WP_20160601_16_33_46_Pro.jpg
I applied almost half the volume.
I start to play around, I scattered motifs all over the dress,
I appreciate what happens.
I bought 12 skeins in total. This is spread out into 4 skeins.
This means the second half will be about the same.
The remaining threads are for gathering and perhaps a small sleeve,
it will be seen along the way.
I hope to fit into 12 skeins
Another "spiral" motif

WP_20160605_15_23_19_Pro.jpg
1. Wind 3 turns of thread around your hand. you can use a template: a book, a ruler, etc.
The final size of the element will depend on the length of the wound thread.

WP_20160605_15_25_38_Pro.jpg
2. Knit 2 tbsp. b\n for three threads.
Thread an auxiliary thread to make it easier to hold the work at the beginning.

WP_20160605_15_27_09_Pro.jpg
3. Knit 5-7 tbsp. b\n already for all six threads

WP_20160605_15_27_58_Pro.jpg
4. Pull out the auxiliary thread and move the knitted stitches to the edge,
so that the hole at the beginning closes and so that the turns lie more tightly.

WP_20160605_15_43_34_Pro.jpg
5. Continue knitting in stitches, every 10-12 stitches I move them slightly, compacting them
as much as it pleases the eye.
When the row ends, I insert an auxiliary thread so that the work lies more comfortably in the hand.

WP_20160605_15_50_37_Pro.jpg
6. Knit to the end, pull out the auxiliary thread
and knit another 5-6 stitches into the outer loop.
Fasten and trim, leaving 50 cm of free thread, thread through a ketel needle.
Or any with a large comfortable ear.

WP_20160605_15_53_17_Pro.jpg
7. Next we will sew. We lay out the lace in a circle and sew the pigtails through the loops.

WP_20160605_15_59_59_Pro.jpg
8. This is the front side.

WP_20160605_16_07_20_Pro.jpg
9. Continue stitching as much as you like. Either to the end or leaving a tail.
I'll leave a small tail for now.
When assembling the dress, you will see what to do with it next.

WP_20160608_16_35_23_Pro.jpg
A berry or a button, as you please.
1. Wind 10 turns around a pencil.
2. 3. 4. Knit three rows of single crochets one above the other, always inserting the hook into the center.
You can knit more until the hole in the center closes.
The volume of the berry depends on this.
I plan to use this item right away.
That’s why I immediately make two lifting loops.

WP_20160608_16_41_11_Pro.jpg
I turn the button inside out on the face, on this side it looks more convex.
I attach it to the shell inside with a blind loop, make two more blind loops for a total of three blind loops in the braid.
Then double crochet the button and alternate almost until the end.
At the end I make the stitches longer, I decide by eye, one stitch with two crochets,
and two more double crochet stitches. Trying not to pull and lay down beautifully.

WP_20160609_13_52_13_Pro.jpg
Untying the fifth skein
In the comments there was a question about the hook number. I find it difficult to answer.
I have an old Soviet set for 4 rubles 50 kopecks. I use the smallest one.

WP_20160623_12_15_11_Pro.jpg

WP_20160626_11_58_28_Pro.jpg
Another skein of curls.

WP_20160714_12_56_56_Pro.jpg
Another skein of leaves.
This results in a lot of dense elements.
I decided to introduce another easier one.

WP_20160713_10_43_26_Pro.jpg

WP_20160713_10_46_22_Pro.jpg

WP_20160713_10_50_44_Pro.jpg

WP_20160713_10_54_42_Pro.jpg

WP_20160713_11_10_09_Pro.jpg
And so I tied off one skein of violet with this flower.

WP_20160713_11_10_11_Pro.jpg
For further work, assembling the product, it turned out that additional devices would be needed.
I made them myself in a couple of days.

WP_20160715_17_34_09_Pro.jpg
These are oval pillows for placing under the undercuts of the butt and hips.

WP_20160715_20_09_41_Pro.jpg
This is a 33/40 cm rectangular tablet for collecting straight areas.
For convenience and rigidity, plywood is inserted inside.

WP_20160716_14_14_33_Pro.jpg
Based on the size of my cups, I made two hemispherical pillows,
for ease of work in the area of chest darts.

WP_20160716_16_21_22_Pro.jpg
This is the set of pillows for work.
On the advice of experienced craftswomen, I decided to use foam rubber.

WP_20160721_21_51_36_Pro.jpg
Now to make the base for the work on which the lace elements will be basted.

WP_20160722_01_37_34_Pro.jpg
All elements are laid out on the base and basted inside out.

WP_20160722_01_37_47_Pro.jpg
Since I don’t have a model figure at all. And I know from experience that the most interesting thing is
It’s like the product will fit exactly on a real person.
In the magazines they are all super pretty.
So for those who are curious, here are my measurements, height 153, hips 104, chest 88, waist 74.
For edging the neckline and zipper line I used a cord based on a pigtail,
tied on both sides with a crayfish step.
During the basting process, we still had to tie up the elements. not enough.
And I decided that they should be tight.
As a result, the elements took 10 skeins of Violet thread from YarnArt 282m in a 50-gram skein.
The dress is already noticeable, weighs half a kilo.
I'm moving on to assembly.
I decided to assemble it using a needle with the same thread, in other words, to sew a mesh.
Working with a tablet looks something like this: we prick a straight section.
Let's sew. We chip away. Let's move it. We prick the next section.

WP_20160814_17_01_16_Pro.jpg
For convenience and greater anatomical accuracy of the product, we use pads on the undercuts.
So I sewed off the front of the dress.

WP_20160904_17_46_22_Pro.jpg
And the back

WP_20160904_17_46_51_Pro.jpg
The view from the inside wrinkles a little, because when we prick the tablet, we stretch the elements and the canvas a little.
Don’t let this bother you, the better the fit will be.

WP_20160904_17_47_40_Pro.jpg
We assemble the sleeve unfolded on a tablet

WP_20160917_18_33_09_Pro.jpg
Sew off the mesh sleeves.

WP_20160920_09_48_28_Pro.jpg
Sew the side seams of the sleeves.

WP_20160920_10_51_17_Pro.jpg
We sew the sleeves into the armhole.

WP_20160920_15_46_32_Pro.jpg

WP_20160920_15_46_56_Pro.jpg

WP_20160920_15_52_29_Pro.jpg
Using a small pad, we begin to sew the mesh along the side seam of the sleeve and the armhole.
here you will have to tinker, pinching the product in small sections due to the complex shape of the armhole.
But it's worth it!!! do not neglect the accuracy of the cut, the product will thank you later,
And fits like a glove

WP_20160920_16_30_17_Pro.jpg
Next, after the entire mesh is sewn off,
I washed the dress manually and without ceremony
spin speed 800. The dress is cotton, takes a long time to dry.
It is better to dry in a warm room.
then ironed it without removing it from the base.
And then I cut off the basting.
I will not describe the making of the lining.
Anyone who knows how to sew will sew.
If you don't know how, order it from a dressmaker.
Advice, the lining also needs to be sewn according to the figure.
I used the same pattern as for making the base.
do not forget to allow for a loose fit so that
When walking, the dress did not creep up.
The lace and lining were joined manually along the neckline and zipper.
This is what the dress looks like from the inside out.

WP_20161005_11_21_50_Pro.jpg

WP_20161005_11_22_07_Pro.jpg

WP_20161005_11_23_00_Pro.jpg

WP_20161005_11_23_10_Pro.jpg
I decided to sew up the slit in the back of the skirt with a flower, but left a slit in the lining,
All the same, the lining is not knitwear.
The dress is not long and elastic, there is no discomfort when walking.

WP_20161005_11_36_55_Pro.jpg
A little close-up.

IMG_5257-f.jpg
And this is all that remains of 12 skeins of thread. almost right next to each other.

WP_20161005_12_04_10_Pro.jpg
Well, here's the finish. Thank you for your patience to read to the end.
Good luck to everyone in all your endeavors.
And the pleasure of the work done.

IMG_5314-1.jpg