Master class “Beautiful DIY Christmas card. Postcard “Merry Christmas!” do it yourself: make it yourself Homemade Merry Christmas cards
What could be better than a handmade New Year or Christmas card? This gift is made with love and with all my heart. Homemade greeting cards are always original, unique and carry a special warmth. And most importantly, they give joy not only to those who receive them, but also to those who create them.
It takes very little to make New Year or Christmas cards. You will only need colored paper of various textures, scissors, glue and decorative elements for decoration: ribbons, buttons, beads, seed beads and more. And several of our master classes will help you quickly and easily create New Year cards, delighting your family and friends with unique creations.


We will need: cardboard or any thick paper, 2 satin ribbons 2 meters long and 0.5 cm wide, lace fabric, transparent Moment glue, ballpoint or gel colored pens, beads, bugles, a bright bead or button.

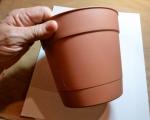
Step one. We cut out a rectangle measuring 10 by 15 cm from cardboard - this is a postcard blank. Other sizes can be taken upon request. We cut out decorative elements from lace and decorate the card as shown in the photo. Carefully glue the lace elements using a small amount of glue. Next, with a colored pen we write a congratulatory inscription in the corner. Then we move on to making a Christmas wreath. Take two different colored ribbons and tie them together at one end.

Step two. Fold part of the green ribbon in half so that its ends are placed crosswise - this way a loop is formed. We also make a loop from beige ribbon. We pass these two loops one into the other and press well. As a result of this, a new green loop is obtained; we form and thread a new beige loop into it, after which another beige loop appears. Thus, forming loops and threading them into the resulting ones, we weave a wreath about 20 cm long, after which we glue its ends. This Christmas wreath can be woven from three or four multi-colored ribbons using any of the existing braid options and it will become even more elegant.

Step three. Glue the wreath to the card and start decorating it. Glue a lace bow onto the wreath, and snowflakes cut from lace fabric onto the card. We decorate the wreath with glass beads, and glue a bright button or large bead onto the bow.

Step four. Adding the final touch to the festive background - using a needle, glue on small white beads as snow. We decorate the back side of the card with lace snowflakes and write warm words of Merry Christmas. The Christmas card is ready. During the creative process, you can change the size, number of decorations, add new details, so that the result is an original and bright congratulation.
New Year card using scrapbooking technique

We will need: scrap paper, thick colored paper, PVA glue, pencil, elements for decorating the Christmas tree.


Operating procedure:
- We cut out a single or double base from scrap paper with a fold according to your desire. You can take any sizes.
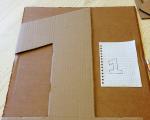
- We decide on the size of the Christmas tree and, depending on its size, cut rectangles out of colored paper, starting from the largest (the lower part of the Christmas tree) to the smallest (the upper part). Each rectangle should be slightly shorter than the previous one in length, as shown in the photo.
- Using a pencil, roll each rectangle lengthwise into a tube and secure it with glue to maintain its shape.
- We connect all the tubes with glue, adhering to the shape of the Christmas tree. Next, glue the resulting Christmas tree onto the front side of the card and decorate it. The design can be very diverse. We attach rivets, beads, bows, sequins, sparkles or other decorations using double-sided tape or glue.

We will need: scrap paper, green strips of paper and glue.
Operating procedure:
We make the base of the card with a fold and decorate its inner part with the symbol of the New Year. We make the Christmas tree from strips of paper folded like an accordion, and the tiers are made from strips of different widths. At the bottom we have the widest stripes. The closer to the top, the narrower the stripes become. The depth of the accordion bend is also different. We bend the bottom strip into an accordion with the largest “step”. With each tier, the depth of the bend decreases. Such New Year cards are very simple to make, which even a schoolchild can do.


We will need: buttons, glue, thick paper and various decorations.
Operating procedure:
We decorate New Year's cards using buttons of different shapes, colors and sizes left over after sewing. We sort them by color and glue them to the base. You can use buttons to make any New Year or Christmas attributes: a Christmas tree, a snowman, a snowflake, a deer, a Christmas wreath - in a word, everything that your imagination suggests.

We will need: colored cardboard, glue and colored paper.
Operating procedure:
We make simple and very cute New Year cards together with the children. We cut out various geometric shapes from colored paper: circles of different diameters, rectangles, squares and triangles of different sizes. We make compositions from ready-made elements and glue them onto a base cut out of colored cardboard. You can make a snowman with a bird, Santa Claus or Snow Maiden, as shown in the photo, or come up with your own stories.
New Year's card with a three-dimensional Christmas tree made from tea bags - master class
For such an original and cute card, you only need colored cardboard for the base, glue and colored tea bags. In the absence of such bags, you can take colored paper. We make the Christmas tree, strictly following the diagram, and glue the green beauty onto the base, decorating it with sequins.


A few more ideas for cards for the New Year and Christmas
From colored paper circles you can create a bright and cheerful congratulation for friends on one of the main characters of the New Year holidays - Santa Claus.

An interesting version of a postcard with Christmas trees - the main attribute of the New Year. Attached to the photo is a very simple master class, according to which New Year's greetings to friends can be made in just a couple of hours.


This simple and sweet Christmas card is sure to delight your loved ones. A master class with step-by-step photos will help you make a Christmas wreath from colored paper.

An original idea is to make New Year's greetings in the form of Christmas tree balls with warm words for each family member and hang them on the tree. Such congratulatory balls are decorated with Christmas tree figures, snowflakes, serpentine, rhinestones and sparkles.

Making an unusual and elegant card using the quilling technique requires a minimum of materials, a little skill and a small amount of time.

Amazing and simply fabulous New Year's scenes can be created from ordinary millet and rice.

Make your own unforgettable card, breathe a piece of your soul into your creation and give the holiday to your friends and family.
Christmas is one of the kindest and warmest holidays. Gifts for it are prepared in advance, with soul. The cutest and most sincere ones are those that are made with your own hands. A homemade Christmas card will probably be a hundred times more valuable than a souvenir purchased at a pre-New Year sale. We offer ideas on how and from what you can make a card for the New Year and Christmas, and we provide instructions on how you can make it together with your child.
Best ideas
New Year and Christmas symbols are similar, so the images used to make cards for the New Year and Christmas may be the same. The only difference is that Santa Claus, Snowman, and Deer are more suitable for a secular occasion, while angels and candles are more suitable for a church, Christian occasion.
A handmade New Year or Christmas card can be decorated with:
- Christmas tree;
- Father Frost, Snow Maiden, Santa Claus;
- hares, deer;
- candles;
- balls;
- Snowman;
- Angel;
- boxes with gifts;
- bumps.
You can use the following as a card base: 
- white or colored cardboard;
- thick colored paper;
- wallpaper;
- scrapbooking paper;
- fabric glued to cardboard.
For decoration you may need:
- colored cardboard, paper, regular or special for quilling and origami, corrugated;
- fabric, including lace, crocheted snowflakes or napkins;
- openwork paper (disposable) napkins for baking;
- rhinestones, sparkles, beads, beads, sequins;
- clear or colored nail polish, glitter polish;
- cotton wool, foam rubber, polystyrene foam;
- wrapping paper;
- ribbons, canvas, serpentine;
- "rain" and tinsel.

If you want to make a very unusual card, you can use cereals: rice will help to depict snow, millet will be suitable for the month, stars, beans or buckwheat can be used to depict gifts, figures of Santa Claus. Powdered sugar, starch, and flour can serve to create frost.
It will be difficult to make postcards without a minimum set of tools:
- pencil;
- eraser;
- rulers;
- scissors;
- stationery knife;
- glue;
- double-sided tape.
You won't always need all of the items listed, but with them all at your disposal, you will have no problem making any of the card options you choose.
New Year card with Christmas tree
The Christmas tree is one of the most famous attributes of the New Year and Christmas. The advantage of this image is that it is easy to depict even without an artistic gift: even a child can draw and cut out a cone from paper. We offer several options for postcards, the main decoration of which will be a spruce.
Corrugated paper
 To make a postcard you will need:
- colored cardboard;
- green corrugated paper;
- double sided tape;
- ruler;
- pencil;
- scissors.
How to craft:
- Cut out a rectangle from colored cardboard. Use a ruler to find the middle, and use a pencil to draw a thin axis.
- Stepping equal distances from the axis to the left and right, measure out segments that smoothly decrease from the bottom to the top of the sheet. Measure distances of the same size on tape and cut thin strips.
- Place the tape on the cardboard, following the markings.
- Cut the corrugated paper into strips of approximately 2-3 cm.
- Remove the protective layer from the bottom strip of tape. Glue corrugated paper onto it, making folds. When the tape section is finished, cut the paper.
- In the same way, stick the paper onto the upper pieces of tape.
- Cut out a star, balls, candles from red paper, and stick it on the “Christmas tree”. Garlands can be made from beads.
Do not think that the New Year's card according to these instructions will be the same for everyone. After all, you come up with how and what to decorate the “Christmas tree” yourself, so the craft will turn out to be unique.
Paper card for scrapbooking
 What you will need:
- several different sheets of scrapbooking paper;
- scissors;
- ruler;
- glue;
- pencil.
How to make:
- Cut out squares from paper, the length of the edges of which differs by 1 cm.
- Wrap it around a pencil and glue the edges together to make multi-colored tubes.
- Glue the tubes together in order of decreasing length.
- Glue the cone onto a piece of scrapbooking paper.
- Decorate using your own imagination.
If you have scraps of wallpaper for walls at home, you can do without scrapbooking paper. Using the same principle, you can make a Christmas card from a colorful magazine or wrapping paper.
Postcards with Christmas trees made of colored paper
An interesting and unusual option for making a postcard with a Christmas tree is to make strips of different lengths from green paper, fold them like an accordion, and stick the outer edges on the inside of a card made of thick paper folded in half. Glue the longest accordion on the bottom, and the shortest one on top. On paper, draw animals, gifts or something else, and draw a Christmas star on top.
Another option: draw a circle on green paper, cut it out, cut it in half. Fold the semicircle into a cone as shown in the picture. Why don't you like a Christmas tree?
The third option is to make triangles using the origami technique and attach them in the desired order to a sheet of cardboard. How to do this - see the illustration attached to the material.
Nothing prevents you from making a simple applique from paper, fabric, Christmas tree tinsel - these options are suitable if you are making a card with small children for friends, relatives or kindergarten.

Button cards
Postcards made from buttons are interesting and stylish. They are good because a purchased postcard can be used as a basis. You just need to figure out where to attach the buttons to give it a new look. Of course, you will have to sew on the buttons yourself.
A slightly more complex option is to make a combined postcard, where buttons serve as the main or additional decorative element, depicting Christmas tree balls, a snowman, the body of a bullfinch, or another element of a complex picture drawn or made in the form of an appliqué.
The greatest difficulty is presented by postcards on which the design consists entirely or almost entirely of buttons. It takes painstaking work to put dozens of buttons of different sizes and shades into a harmonious composition.
If you are making a card with Father Frost (or Santa Claus), you can complement the composition not only with buttons, but also with a belt buckle.
Postcards with snowmen
The advantage of such a symbol of the New Year as a snowman is the simplicity of its shape. Even a small child can make a postcard with it with his own hands.
The simplest option is to cut out 2-3 circles of different diameters from white or pastel colored paper, stick them on colored cardboard one above the other, add a “nose”, “eyes” and a hat from colored paper in the appropriate shades. The craft will look original if you use another material (fabric, foam rubber) instead of paper. 
A postcard with a snowman will look unique if you depict his view from above. You will need the same circles of different diameters, a nose, a hat, eyes made of colored paper. You just need to stick the circles on top of each other, decorating the last circle with the remaining elements. Falling snowflakes look good on this card. They can be cut out of plain paper and glued using regular glue. The task is no more difficult than with the traditional method of making a snowman applique card, but the result is completely different.
Christmas cards with angels
Angels often decorate Christmas cards sold in stores. You can make these and even better ones yourself. Various types of applications are available even to kids. The task for adults is to find a suitable stencil or draw the angels themselves. 
Angels made from fan-folded paper, fabric, or lace will look unusual.
We suggest considering the option of making a three-dimensional Christmas card with angels.
It will require:
- a thick sheet of white paper;
- a thick sheet of colored paper;
- scissors;
- glue;
- stencil.
How to do:
- Cut rectangles of the same size from white and colored paper and fold them in half.
- On white paper, stencil an angel so that part of his figure falls on the fold.
- Without bending the sheet, cut out the figure of an angel so that it has connections with the sheet on the fold and on the other side. Unfold the sheet - you should have two angels looking at each other.
- Bend the angels inside.
- Glue white paper onto colored paper.
All that remains is to decorate the front side of the card according to your imagination.
Using the same principle, you can make cards with other figures: Christmas trees, snowmen, snowflakes, deer, hares, gifts, Santa Claus.

New Year cards with snowflakes
 Snowflakes will make any card more delicate, airy and openwork. Most often they are used as additional decorative elements. These can be openwork contours cut out of paper or napkins, figures that can be “rolled” in glitter, varnished or left as is. You can make snowflakes with your own hands from seed beads, beads, and bugles. You can stick rhinestones on paper in the desired order.
We suggest making a card with edges in the shape of snowflakes with sparkles. It looks very beautiful, and even a child can make it himself.
Required:
- clear nail enamel or glitter polish;
- nail decorations in the form of sparkles, rhinestones;
- a sheet of colored cardboard (you can also use white);
- pencil;
- scissors;
- a small sheet of white paper with congratulations;
- glue.
Additionally, you may need a stencil, although in this case you can do without it.
Manufacturing instructions: 
- Fold the cardboard in half.
- Along the contour of one side, draw and cut out snowflakes approximately as in the picture on the right.
- Cover the outline with nail polish or enamel.
- Decorate with sparkles or rhinestones.
- Draw smaller snowflakes in the same way in the corners.
- When the snowflakes are dry, open the card and do the same on the inside.
- Glue a sheet of congratulations. Apply varnish along the contour.
After the varnish has dried, you can make an applique on the front of the card or decorate it in any other way.
This card is suitable for both the New Year and the Nativity of Christ.

Postcard with Christmas wreath
 Another attribute of the New Year and Christmas is a wreath. He has every right to decorate your Christmas card.
You can make a wreath from paper, thread, wire, ribbons, buttons, and Christmas tree tinsel.
There are two main technologies:
- A circle is drawn on the sheet, then the wreath parts are glued in layers.
- The wreath is made separately on a frame made of wire, a bracelet, and a curtain ring, then attached to paper using glue, double-sided tape, thread and a needle.
If you decide to use a needle and thread, you might consider making a card with a button wreath.
A Christmas ball, a deer, Santa Claus's staff, snowdrifts, snowballs, candles and many other New Year's symbols can also inspire you to make a holiday card with your own hands.
Ten to fifteen years ago, almost all of us bought postcards to congratulate our family and friends on the holidays. Today we are less and less likely to regard this as something significant and valuable: it is easier to call distant relatives, and to give a gift to loved ones without “loading” them with extra waste paper.
However, cards made together with children can become not just a greeting card, but also a holiday decoration for your loved ones. They can be hung on the Christmas tree or placed on a shelf along with other New Year's accessories. Here are some simple ideas for homemade cards.
Christmas tree made of threads
You will need:
Knitting;
hot glue;
pasta in the form of letters;
colored paper;
a can of artificial snow.
Make the base of the card out of cardboard according to your wishes (can be double or single, large or small). Cut out a triangle from another sheet of cardboard - this is the future Christmas tree, it should be slightly smaller than the postcard.
Take a triangle and wind threads around it in any shape so as to hide the cardboard base of the Christmas tree. The threads can be plain (preferably green) or multi-colored.
Hot glue the finished tree to the card base. Make sure the threads are not unraveling. Glue beads on top - decorations. Sprinkle with fake snow.
Use pasta or other letters to create the inscription of your congratulations. You can paint the letters in bright colors.
Serpentine can be cut from self-adhesive or regular colored paper using a hole punch.

Application "Snowman"
A regular applique will be interesting if it is made from different materials. We took felt and shiny sticky paper. You can also use other materials: foil, velvet and corrugated paper, pieces of fabric of different textures.
Otherwise, this craft is no different from a regular applique: the details of the plot are cut out and glued on. It is better to use PVA glue here.

Postcard “Mittens”
You will need:
Knitting;
PVA glue;
sequins, confetti or colored paper;
gel pen.
On the cardboard - the base of the postcard - draw the outlines of the mittens with a simple pencil. Then shade this pattern liberally with PVA glue. It is advisable that the glue jar have a sharp nose, then you can “draw” with it more accurately.
Cut 15-25 pieces of approximately 5 cm from the thread. Connect them in a bunch so that the ends are at the same level. Then start finely chopping them with scissors right above the “mittens” filled with glue. Thus, you need to cover the entire surface covered with glue. Correct the drawing with a sharp object - a toothpick, etc. Let the mittens dry and shake off excess lint. Make sure there are no bald spots - places where cardboard is visible.
Using a gel pen, draw a rope on the mittens and write your congratulations.
Stick on sequins, confetti or colored paper details.
Draw the outline of the card with PVA glue and glue a knitting thread of a different color (or the color of the mittens) onto it.
In this way, you can make “knitted” designs not only of mittens, but also of other items: socks, hats, scarves, and also decorate postcards, turning the details on them into fur, giving fluffiness to animals, snow, etc.

Card made of beads
You will need:
PVA glue;
beads or beads;
green felt.
Draw two circles of different sizes on cardboard - these are future Christmas tree decorations. Shade them liberally with PVA glue. Carefully sprinkle beads or beads so that the circles retain their shape and there are no empty spaces left in them.
Cut out a fir branch from green felt and glue it on top.
Make “pendants” for New Year’s balls in the form of a string of beads.

Christmas tree made from magazine sheets
A Christmas tree made from multi-colored magazine pages will look original if you stick it on colored cardboard (we used velvet paper). Simply cut magazine sheets of different widths and roll them into tubes, securing them with PVA glue.
When the tree is glued, place a star or other decoration on top. You can also glue beads onto the Christmas tree itself.

Christmas tree made of tangerines
Prepare tangerines in advance by cutting them into slices and drying them on a radiator or in another way. This craft will be a good decoration for the kitchen.
You will need:
tangerines in circles;
hot glue or PVA;
flax seeds, sesame seeds, coriander;
sugar or gelatin.
Glue mugs of dried tangerines in the middle of the cardboard, creating a triangle.
Then use PVA glue to outline them and draw a trunk. Sprinkle these areas with coriander and flax seed.
Sprinkle sesame seeds on top of tangerines. This can be done without glue. If the mugs are completely dry and the sesame seeds do not stick to them, run a wet finger over them, then decorate with the seeds and let dry.
Draw snowflakes around the tree with PVA glue and sprinkle them with either sugar (they will be white) or gelatin (they will be tinted).
You can make a loop on the top of this card so that it can be hung in the kitchen.

Christmas tree made of pasta
You will need:
pasta of any shape;
hot glue;
colored paper;
gold paint.
Cut out a Christmas tree from cardboard. Stick some pasta in the middle and cover it with gold paint. Then glue the beads on top of the pasta.
Decorate the ends of the branches with sequins. Make a star out of colored paper.
This card can also be hung on a Christmas tree, so a loop at the top would be a good idea.

Volumetric Christmas tree
You will need:
velvet paper or colored cardboard;
sequins, confetti, colored paper;
Fold the card base in half.
Also fold velvet paper or colored cardboard in half and cut out a Christmas tree.
Glue sequins, confetti or colored paper appliqués onto the tree.
Glue the tree by the tips of the branches into the middle of the card so that it becomes voluminous when opened.

Bouquet with holly
As you know, holly is a symbol of Christmas, so it, like spruce, can be used in holiday decorations.
You will need:
green paper;
hot glue;
velvet paper;
toothpicks;
Take 30 toothpicks, connecting their ends like a fan. Generously coat the area on the velvet paper where you will attach the bouquet with hot glue. Quickly, before the glue hardens, stick on the “fan”; if necessary, coat not only the base with glue, but also the top of the toothpicks in the place where they are attached. It is important that all toothpicks are held tightly.
Then drip glue into the hole in the bead and put it on a toothpick, creating a bouquet of your choice.
Cut two holly leaves from green paper and stick them at the base of the bouquet so that all the glue is hidden. Cut out a bow from paper of a different color and glue it onto the holly.
If desired, you can make toothpicks of different lengths and then the bouquet will be more magnificent, because the beads in it will be at different levels.

Quilling style postcard
You will need:
colored paper;
PVA glue;
letters made from pasta.
Cut out 4 long strips of green paper and twist their ends into a tube: bend one in one direction, the other in the other. Make several strips of colored paper, twist them into a tube and glue the ends to form balls.
Apply PVA glue to the cardboard in the places where your ornament will be located, and glue the twisted strips to create a pattern.
Decorate your card with glitter paper snowflakes. Cut out a ribbon from red paper and stick it at the bottom. Glue your congratulations from macaroni letters onto a red ribbon.
A wonderful tradition is to give greeting cards not only for the New Year, but also for Christmas. We offer you several master classes on how to make a “Merry Christmas” card with your own hands.
Embroidered card
Master class on creating a postcard on the theme “The Nativity of Christ” with your own hands using a needle and thread:
- Make a blank postcard, that is, fold a sheet of cardboard in half.
- Sketch out a Christmas tree on the front side with light movements of a simple pencil.
- Using an awl, make holes at the main points on the Christmas tree (where the line bends). The holes must be paired in each place.
- Take a needle and thread a green thread (wool or floss) through it.
- Embroider the Christmas tree along the drawn outline, passing the needle through the holes.
- Try to pull the thread tighter so that it fits tightly to the cardboard.
- Draw and sign “Merry Christmas!”
Card with sequins
Procedure for creating a postcard:
- Make a cardboard blank.
- Make a beautiful inscription “Merry Christmas!”, For this purpose you can use markers of unusual colors (for example, silver).
- Take several sequins of different shapes and colors: round red and rectangular green.
- Make leaves from green ones. To do this, make their edges zigzag.
- Green sequin leaves can be bought ready-made right away.
- Sew the red and green pieces using matching thread colors to create flowers and leaves (see picture above).
Your DIY “Merry Christmas” postcard made from sequins is ready!
Postcard using scrapbooking technique
Instructions for creating a simple postcard on the theme “The Nativity of Christ” with your own hands using scrapbooking technique:

- Cut out a rectangular sheet of decorative cardboard and fold it vertically into an envelope. To do this, simply bend it twice.
- Cut out a square that is slightly smaller in size than the main compartment of the card.
- Make curly edges on the cut out square. This is easy to do using special scissors with teeth.
- Glue a square inside the card with a glue stick and sign it.
- Cut a piece of decorative tape. It is better that its design is thematic. The ribbon should completely encircle the folded card and be long enough to cover the bow.
- Flatten it and place the reverse side of the card in the middle.
- Using a glue gun, glue the fabric to the cardboard.
- Tie the rest of the ribbon at the front of the card into a pretty bow.
Card in the shape of a Christmas sock
Master class on how to make a figured card:

- Cut out a large sock from red cardboard.
- From white cardboard, cut out a piece of heel and toe, a heel, and also a large rectangle.
- Glue the rectangle in the center of the sock, and all the other parts in the corresponding places.
- Cut out six red circles and six green leaves with zigzag edges.
- Glue the circles into opposite corners of the rectangle in the shape of a flower - a kind of symbol of Christmas.
- Write “Merry Christmas!” on the rectangle.
- Take your glitter glue and make diagonal lines on the white areas of the sock.
The hand-made “Merry Christmas” shaped postcard is ready! It will look impressive and original.
DIY Christmas cards
Three-dimensional cards are not as difficult to make as they seem. To create it you just need a little more materials than usual.

A detailed description of how to make a “Merry Christmas” card with your own hands:
- Cut out several identical elements from cardboard or paper. If you want to make a card with then cut out many blanks of long leaves in several shades of green (from light to dark). If you want to make a card with a Christmas flower, then cut out flowers from three long petals of different shades of red and different sizes.
- Take a sheet of cardboard folded in half and start assembling the craft on its front side. To make a wreath, you need to glue the leaves in a circle, layering them on top of each other. And to make a flower, glue the blanks with petals on top of each other in decreasing order - first larger, then smaller. Each new layer rotates approximately forty-five degrees relative to the previous one. Glue green leaves under the very first row.
- Add the finishing touches. Glue sequins or special droplets into the middle of the flower or leaves, which are convex on one side and smooth on the other.
This is how you can make three-dimensional “Merry Christmas” cards with your own hands. The photos above illustrate the process.
Wonderful Christmas card with a 3D Christmas tree
Master class describing how to make a do-it-yourself 3-D postcard “The Nativity of Christ”:

- To create such a card, you will need to take a card blank, wooden flat sticks (like for ice cream), dry glitter (shimmer), double-sided tape, a glue gun, beads of different sizes in the same shade as the glitter, and a decorative figurine for the top.
- Lay out the sticks in front of you and shorten each one so that you end up with a Christmas tree.
- Cover the wooden sticks with double-sided tape on both sides.
- Remove the backing paper from the tape on one side and sprinkle some shimmer on top.
- Brush off excess glitter with a brush.
- Remove the protective layer from the tape on the other side of the sticks.
- Glue one long stick vertically in the center of the card blank.
- Step back a little from the bottom and glue the longest piece on top of the previous one.
- Glue sticks to make a Christmas tree. Make a small space between rows.
- Using a glue gun, attach the beads and the top to the branches of the Christmas tree.
- Sign the card.
Postcard with thread decor
This greeting card is very simple to make, but looks beautiful and unusual.
Description of how to make a “Merry Christmas” card with your own hands:

- On the top of the cardboard blank, draw sticks of different lengths. This can be done with colored pencils, markers or gel pens. It is better to choose black color. This way the decor will look very stylish.
- Take colored twine or thick decorative thread. If there is neither one nor the other, then the material can be made independently. Take regular thick threads (preferably wool) and weave them into tight braids. Choose thread in rich colors.
- Draw a spiral under one of the lines drawn earlier. The size of the ball depends on its size.
- Immediately glue the thread in a spiral. Each new row should fit snugly against each other and the cardboard.
- Make the rest of the balls in the same way.
- Make a sign saying “Merry Christmas!”