New crafts from beads trees. bead tree
Today we decided to present to your attention another DIY craft - a tree made of beads. To make a tree from beads, which we will call “lilac magic”, we will need the following materials:
a) White, purple, pink, yellow and green beads;
b) Green wire 0.3 mm thick;
c) Brown tape;
d) Acrylic paints of several colors (brown, bronze, black, green);
e) Construction gypsum;
e) A piece of polystyrene foam;
g) Masking tape.
First we need to make a tree consisting of flowering branches and green twigs. To create beautiful flowering branches, pour pink and purple beads in equal proportions into a separate container and mix them thoroughly.
Now we begin to set the beads on the wire, while the wire from the main skein does not need to be torn off yet, and the total length of the beads to be strung on this wire should be about one meter. This length of wire thread with beads should be enough to create 70-100 branches for our future tree.

After this, let's step back about 10 cm from the edge of our wire and count out 10 beads.

We connect the resulting segment into a ring and twist the wire at the base to secure it.

We retreat half a centimeter from the resulting ring and make another similar ring-loop.

In the same way we make a few more such loops (7-15 pieces).

After this, we need to determine the middle ring-loop (in our case it is the seventh). Slightly separate the middle loop as in the photo and connect the ends of the wire.

Next, you need to give the branch a natural look; to do this, twist it and distribute all the rings-loops equidistant from each other and bend all the rings in the direction of the central loop. We have our first branch.


We leave some length of wire for the stem of the twig, and cut off the rest of the wire. Similarly, in the same sequence, we make 35 more of the same branches.

Using the same loop weaving technique, we must make green branches with leaves, using only green beads.

The next step is to assemble the tree. This procedure is carried out by first making one middle one from the three previous branches.

Then, these medium branches are combined into large branches.

Now large blanks of branches need to be lengthened and strengthened using denser wire one millimeter thick and wrapped with tape on top.

Let's collect all the branches into a small tree and strengthen the trunk with wire.

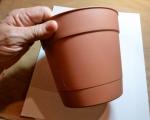
Let's take a foam blank and give it an oval shape. Now we take three pieces of polystyrene foam, the sizes of which are reduced by a pyramid. From these pieces of polystyrene we form a slide and secure the resulting structure with masking tape.

We attach the tree to the foam base. You can simply stick it into the foam and secure it around with wire.

Now we need to make the base of the tree more natural and durable; for this, pour about 100 ml of water into a separate small container and, constantly stirring the water, add plaster in small portions so that a thick but spreading solution is obtained. Since gypsum hardens very quickly, we make small portions and quickly apply the solution to the product. First we will make a trunk, then a rock, and at the end of this stage - stones around the perimeter of the stand.

It is convenient to apply plaster to wood using a thick brush with stiff bristles. Gypsum, flowing down the tree trunk, will form a characteristic relief. Depending on the desired thickness and shape of the trunk, you can apply from one to five layers of alabaster. After the plaster has completely dried, you should cover the trunk of the future tree with brown paint, the clearing near the tree with green paint, and the stones with white paint.

Then dip a dry brush or small sponge into the black acrylic and use a blotting motion to cover the rock and stones.

Using a dry sponge, randomly apply bronze paint at the base of the tree.

To give our clearing a beautiful look, we need to plant a lot of flowers, for this we apply a small amount of quick-drying and highly desirable transparent glue. Pour colorful beads onto it and wait for the glue to dry. After this, use a soft brush to remove excess beads. You can also plant flowers in the clearing, which we do in the same way as the twigs. In our case, there will be flowers in the form of spikelets made of white and yellow beads.


We make cute flowers from purple beads. To do this, we will form five purple loops on the wire and at the end one yellow one. Those. the total number of loops obtained is six.

To get a flower from this wire blank, you need to wrap the purple loop rings around the yellow ring and twist it to secure it. We make green bushes in the same way. We will stick these flowers and bushes into the lawn near the tree.

In order for our flowers to easily fit into the foam, you can make narrow holes in it using an awl or a needle.

The final look of the craft. Photo 1.

The final look of the craft. Photo 2.
The craft is ready! Now we know how to make a tree from beads with our own hands at home. In the next lesson you can try to make flowers from napkins yourself.
The article offers you weaving patterns and tips for making trees from beads.
How to make a tree from beads with your own hands for beginners and beginners: step-by-step instructions with photos, master class
Beaded tree - a beautiful souvenir and home decoration, handmade amulet and a good gift for friends. You can buy a money bead tree from those who do needlework, but it will not be cheap, because the master takes a long time to make such a product and spends a lot of beads on it. It will be much cheaper to make a tree with your own hands by choosing the necessary pattern, color of beads and design of the finished craft.
What you will need:
- A large number of beads (depending on the size of the product). Choose beads of one or more colors.
- Thin copper wire (its quantity also depends on the size of the craft).
- The basis for the tree is a branch (found or broken on the street).
- Gypsum foundation for wood (you can buy regular gypsum or cement mixture).
How to make a tree:
- First you need to “tidy up” the stick that will serve as the tree trunk. The branch is cleaned and opened with varnish; if there is no varnish, you can cover it with acrylic paint of any color.
- The branch should be planted in the gypsum mixture and left until completely dry.
- Then start working with beads, string up to 10 beads on a thin wire and twist a ring at the base.
- There should be up to 10 bead rings on one strand of wire.
- The wire should be twisted into a twig; it should be strong.
- The base of the wire should be wound and fixed on the branch.
- You should make a lot of these branches with beads to make the tree very lush.
- When the crown is finished, you should start decorating the foundation. Using superglue or silicone-based glue, fix pebbles, broken glass or mirror (broken CD, as an option), or any other decorations.
Product in photo:

Option 1
Option 2

How to make branches for a tree from beads?

Option for a branch for a tree made of beads
How to make a tree trunk from beads?
The tree trunk for such a craft can be different, depending on your preferences:
- For realism, many craftsmen use a real tree branch. It is varnished or coated with paint.
- Some people also use a branch, but completely wrap it with thin copper wire so that the tree has no gaps.
- Another option is to wrap the entire barrel with matte brown or black electrical tape.
- In some cases, you can also use thick wire twisted into one bundle.
- Many craftsmen, in order to support the whole idea of the craft, wrap the barrel with wire with stringed beads. This makes the tree very beautiful.
- A practical option is to wrap it with woolen thread or a whip (canvas thread).
Options for beaded tree trunks:
Barrel wrapped with electrical tape

Birch trunk wrapped in white thread

A trunk wrapped in brown thread

Trunk painted to look like realistic wood

Barrel opened with varnish

Painted barrel

Barrel wrapped in thin wire
Money tree made of beads: diagram, photo
Each beaded tree is woven differently, depending on what type it is: birch, bonsai, oak, rowan and many others. You can make a tree easily and simply using special diagrams in which all the stages are shown in the pictures.
Tree diagrams:

Beaded palm tree: diagram

Red maple bead: diagram

Ruby tree: diagram

Beaded birch: diagram

Beaded mimosa: diagram

Beaded apple tree: diagram

Sakura branches: diagram
Tree of love made of beads: diagram, photo
Love tree- a kind of amulet for the family, which will definitely give positive energy to all household members, and especially to those who are in love. You can order such a tree from a craftsman or make it yourself, using diagrams and ready-made photos.
The tree of love is a good gift and souvenir. It can be given as a gift for a wedding, anniversary or any other occasion.
How to make a beaded love tree:
- Such a tree, or rather two trees, have a trunk base made of wire. This is what allows the wood to bend and make the shape of a heart.
- Two trees are woven in exactly the same way. Choose your favorite design above and start creating trees. Please note that they should make a lush crown only on one side.
- Secure the trees to the foundation and wait until dry.
- Bend the tree trunks to make a heart shape.
- Decorate the foundation according to your preferences.
Options for beaded “love” trees:

Frame - metal or plaster

Original love tree with flowers
Tree of love in the shape of a heart

Two-color love tree

Souvenir tree of love made of beads
Flowering trees made of beads: weaving pattern
You can decorate a beaded tree only with beaded flowers. Weaving flowers, of course, is much more difficult, but with time and effort, you can improve your skill and make an incredibly beautiful product. To weave flowers you will need beads and thin wire.
When weaving, you should strictly adhere to the patterns and number of beads. Finished flowers are attached to tree branches and trunks by screwing wire.
Color schemes for beaded wood:
Option #1

Option No. 2

Option No. 3
Beaded tree “heart”: diagram
The heart tree often symbolizes love. A married or loving couple can keep such a product at home to protect their union from envy and any negativity. Making a tree is not difficult. To do this, you can use one-color beads or beads of two colors.
Video: “Tree heart made of beads”
Beaded tree - sakura: how to weave?
Cherry blossoms- a delicate and beautiful tree, which, as a talisman, will protect its owner from the negative influence of others and help him find true love. This tree should be woven from wire and pink beads. Decorate the tree with lush “blooming” of beads, make it lush, with heavy” hanging branches on a thick trunk.
Blooming sakura made of beads:
Weaving pattern
Ready product
Yin Yang bead tree: weaving pattern
Tree "Yin Yang" made of beads– This is a product made in black and white. It is believed that such a craft contains feminine and masculine energy, allowing the person who has it to live in harmony with his body and thoughts. Such a tree allows you to have the ancient teachings of Fung Shui and advises placing it in a recreation area: bedroom, hall, living room.

Tree "Yin Yang" made of beads
Bead tree “Eywa”: diagram
Tree "Eywa" very similar to the willow or willow familiar to the Slavic people. The tree has thin long branches that fall all the way to the ground. You can also make a similar tree from beads and weave its branches from multi-colored beads, most often lilac or violet.
Finished goods:

Tree made of multi-colored beads

Euwa tree with lighting

Purple Euwa tree
Tree of happiness from beads: how to weave?
The tree of happiness is a talisman for home and family. This tree can be woven from beads of any color and shape, and can be woven with sequins and large beads. The shape of such a tree must be round. As a rule, such a tree repeats the well-known “topiary” craft. The more shiny and colorful materials you use for the product, the more joy and positive energy the tree will bring you.
Video: “Tree of happiness made of beads and sequins”
Autumn tree made of beads: how to weave?
The autumn beaded tree has matching bead colors:
- Yellow
- Gold
- Brown
- Orange
- Reds
- Burgundy
You can choose any type of wood for weaving: birch, maple, oak and create a beautiful craft for your home that will lift your spirits.
Product options:

Option 1

Option 2
Bonsai trees made of beads: how to weave?
Bonsai is a small tree in real life, demanding and “capricious” to care for. However, such a tree is considered very auspicious if it is in the house. It gives its owners health, good luck and prosperity. You can also weave a bonsai tree from beads, charging it with your positive emotions and love.


Ready product
New Year's tree made of beads: how to weave?
Even a New Year's tree can be made from beads. This craft will decorate your home during the New Year holidays, will be a wonderful gift for loved ones, or a product that can become a winner at any art exhibition.
Orange tree made of beads: how to weave?
In this case, the tree is decorated not only with small green beads imitating leaves, but also with large orange beads resembling fruits. The craft is very beautiful and original, and can become the best gift and home decoration. In addition, the orange tree is a symbol of prosperity and wealth!

Ready product
Video: “Master class: beaded wood”
Tree beading: basics, step-by-step master classes.
Women have been decorating themselves and their homes since time immemorial. Of course, in those days, women were limited in resources, but over time, the art of decorating the house with their own hands developed more and more.
Later, with the advent of glass, a new type of needlework appeared - beadwork. Using threads and multi-colored beads, craftswomen made all kinds of jewelry (earrings, pendants, bracelets, hair ornaments), and did not forget about their home, because comfort in the home is the main task of women.
Today, one of the most popular trends in beadwork is beaded trees. They come in completely different sizes, from mini sakura on keychains to two-meter beauties. Beginning craftswomen ask themselves: do they weave only sakura trees, or can they weave other trees as well?
Indeed, sakura are by far the most popular, but this is due to the great love for the east among our craftswomen. In fact, any tree or shrub can be woven from beads; birches, mountain ash and flowering garden trees look especially beautiful.


How to weave beautiful trees from beads? Master classes and patterns for weaving trees from beads
Beading trees is a relatively easy direction in this type of needlework. Even a beginning young needlewoman can master this technique. Everyone knows that children love to make things with their own hands, but if the technique is labor-intensive and complex, girls quickly lose interest.
Weaving trees from beads is popular both in children's creative circles and for adult craftswomen. This is a fascinating and beautiful craft that can be used to create amazing decorations for your home, office, or even as a gift.


How to make a birch tree from beads? Master Class


The Russian birch tree does not leave indifferent both the Slavs themselves and admirers of Russian nature around the world. We have prepared a step-by-step master class on weaving birch trees. To work, you will need green beads of three to four shades.
The more contrasting the colors, the richer and brighter the foliage will be. You will also need wire measuring 0.3, 1 and 3 mm, thread for winding, PVA glue, alabaster, acrylic paints and two brushes (wide and thin).

We take the thinnest wire, cut off a piece of about 40 cm. String 7 beads, step back 5-7 cm from the edge and twist the loop. The colors of the beads are strung in a chaotic order. In total, wind 9 loops on one thread, the distance between the loops is about 1 cm. Fold it in half, one loop remains in the center, twist the rest together into one branch.


You need to weave 15 such branches, and using the same technology, but with 11 loops, 57 pieces. The smaller ones will go to the top, the rest will be evenly distributed throughout the tree.


Let's move on to the next step. From branches with 9 loops we form 5 large branches, 3 thin ones in each. We also repeat with the remaining branches. To the branches that are longer we wrap 1 mm wire with threads. Set aside and return to the top. From the short ones we connect two trunks, in one of 3 branches, in the second with 2. We wind 3 mm wire to each and wrap it with thread.


The next step is to form the crown of the tree. One top will consist of 3 branches and 12 long branches are tied to it. The second of 2 branches, and 7 long branches are tied to it.


We connect the trunk so that the thicker top is 1 - 2 cm higher. Wrap it with construction tape. We leave small ends of the wire at the bottom and bend them in different directions like roots for stability.


Choosing a shape for the base. Cover with a bag, pour in diluted alabaster and lower the birch tree. We fix it so that while drying it does not bend to one side. We wait about 10-12 hours until it dries completely.

We hide the beads in foil so as not to stain them with paint. We prime the trunk and base with PVA glue. We wait a few hours and move on to painting. We cover the trunk with white paint in two layers. We wait until it dries completely and move on to decorating the bark. Using black paint we draw stripes like on a real birch tree. Again, wait for it to dry and decorate the base to your liking. Remove the foil and straighten the branches.


Master class on weaving a money tree from beads, video
The money tree protects owners from financial failures and attracts new cash flows to the home or office. In order for a tree to work more efficiently, it is worth investing a piece of your energy into it by doing it yourself.


To complete the work you will need gold-colored beads, oriental-style coins, thin wire and wire cutters. The tree can stand on its own roots, or you can place it in a mold like the previous birch tree.
Video: Golden money tree made of beads. Autumn golden tree. Autumn tree
Christmas tree made of beads, step-by-step master class


For the new move, coniferous beauties leave their clearings and penetrate into every home, every office, and even every store. Those who do not decorate their homes are called stingy Scrooges who do not like the winter holidays.
In recent years, environmentalists have finally conveyed to humanity that the cutting down of coniferous trees is turning into an annual disaster, and it is best to replace natural spruce trees with artificial analogues. We suggest getting together on a winter evening and weaving a winter beauty from beads!
Video: Step-by-step blue spruce master class
Beaded maple, master class, photo


Maple is a beautiful, luxurious tree for a long time, unfairly forgotten by bead weavers. Today, these luxurious trees are rarely seen at exhibitions, but still appear. The technique is more complex than in previous master classes, but by watching the step-by-step master classes you can master this technique.
Video: Beaded maple leaf
Video: Beaded maple. How to assemble a tree from beads
Master class on weaving weeping willow from beads


Weeping willow is a favorite of needlewomen. It has been embroidered on paintings and tapestries, on dishes and souvenirs for many centuries. She is also loved by fans of beadwork and is no less popular than sakura.


In order to weave willow, you will need green beads (as in the case of birch, you can take several shades), wire, thread, alabaster and materials for decoupage.
Video: Master class on weaving weeping willow from beads
Master class on weaving rowan berries in the snow using beads
Winter rowan, how much beauty and tenderness there is in this landscape. Do you want to place a winter beauty in your home? It is not difficult! Just one evening spent weaving beads and a bright rowan will take up residence in your home.


To work, you will need white and dark red beads, copper or dark brown wire, and, as usual, alabaster and material for decoupaging the base of the winter rowan tree.
Video: Master class on weaving rowan berries in the snow
Beaded lilac, master class, video
But with the arrival of spring, the air is filled with the delicate aroma of lilac. But lilac branches are famous not only for their delicate aroma, but also for their elegant clusters of flowers. The beaded embodiment of lilac is as beautiful as the branches created by nature. And it can please the eye all year round!


To create a bouquet of lilacs, you will need beads in a shade from white-pink to deep lilac, green wire, or any other color, but you will also need additional thread for winding.
Video: Beaded lilac
Unusual and beautiful beaded wisteria tree, master class


And in conclusion, a delicate and touching wisteria made of beads. Another tree that is perfect for a girl’s bedroom, will decorate a classic interior and add sophistication to the office.
For the tree you will need beads of 3 colors (pale pink, purple and green), wire, thread for winding and alabaster for the base. Wisteria trees are usually small and delicate, so the work will take very little time. And the result will be amazing!
Video: Wisteria tree made of beads
Galina: having a growing granddaughter is both pleasant and troublesome. After all, she needs to be occupied with something and of course I am against TV. One cloudy day I decided to show my 5-year-old needlewoman how to make beads. The reaction was so interesting - for the first hour I sorted through the beads like treasures. Well, then we started the simplest thing - weaving a twig. And she liked it! Now she loves to visit her grandmother and weave more and more toys, trees and keychains. I recommend it to all grandmothers!
Maryana: Not long ago I was drawn to beadwork, and as it turned out, there is nothing complicated about it. Just a couple of evenings and the first tree was woven. I recommend that beginners buy sets at first, since the number of beads and wire footage are clearly distributed there. And only then, with experience, you can assemble mini sets yourself for unique products.

Video: Beautiful trees made of beads
Beaded wood is a very interesting interior decoration that can decorate a workplace, office or simple room, and can also bring happiness, good luck and tranquility (feng shui) to life. This is probably why many people loved them so much. Every day, a certain number of people begin to master the art of beading, or they simply look for unusual ideas on the Internet. Even a beginner can make an ordinary tree from beads with his own hands. More advanced weaves may require a lot of experience.
The Tree of Happiness is a Feng Shui talisman that was created to attract love, money, health and happiness. The purchased product looks like a tree with some kind of precious stones instead of leaves and fruits. Each of these stones contains a strong charge of energy, for example, love and happiness in some area of life.
You make trees of happiness with your own hands from different materials: paper, beads, beads, from natural resources (dried flowers, for example), etc. Depending on what material and technology you choose, the work can last a couple of hours or a couple months.
This master class will help you make a very simple tree of happiness from beads with your own hands.
For work we will need the following materials:
- beads;
- various sequins in the shape of butterflies;
- twine or threads for work;
- thin and thick wire;
- mold for our plaster;
- plaster and container for its creation;
- sharp scissors;
- centimeter.
This is the simplest tree that does not require bead weaving skills. If you want to make more interesting bead trees with your own hands, weaving patterns may be required.
Gallery: tree of happiness made of beads (25 photos)


Operating procedure
Using a centimeter, measure and cut forty centimeters of wire. We plant and arrange fifteen beads in the center.

Our product is ready! Now you need to make a stand for it.
We prepare a solution of our gypsum: pour some water into the mixing product and add gypsum in powder form. Let's stir everything. The finished mixture should look like liquid sour cream. Everything is very simple, but if something doesn’t work out, you can find a training video on the Internet.
Pour the solution into the mold, let it harden for about one hour.
When the plaster is ready, take out the casting.
Let's prepare the solution one more time.
Place the tree vertically in the recess and slowly fill it again with plaster. Let's wait until everything hardens, after which you can decorate the base of the tree at your discretion, for example, paint it with paints and decorate it with ornaments. There are many options for creating beaded trees with your own hands. Craftsmen, of whom there are many, will help you select materials and technology for an unusual tree that can become a tree of happiness for you and your loved ones.
Ava's tree of happiness: master class
 Let's try to create with our own hands the Ava tree of happiness, which will also become a lighting fixture . For work we need to take about 200-300 grams different beads in lilac tones. We pour all the beads into one box and mix them, and then string them onto a large wire.
The wire must be very thin so that with every breath of wind all the branches tremble, but at the same time it must be strong. We will take the wire from the transformer for a special table lamp.
First we will make the frame of the tree.
Let's take twelve pieces of special wire, attach everything together and plaster it.
We plaster in a certain way: dilute a mixture of gypsum and water, the gypsum should be like thick sour cream.
Let's take a candy box with the desired bottom shape. We put a plastic bag on the box so that later our tree can be simply removed from the box. Now let's put our pieces of wire in the center and fill it with plaster. Let's leave it all to harden for 24 hours.
When the plaster is ready, remove it from the mold and place it on a stack of newspapers. Let's leave it again for a day, since the plaster should dry completely and give up all the unnecessary water to the newspapers.
Now that the base has hardened and completely dried, we turn the tree upside down and place it on future tree trunks, and begin to varnish the bottom of the stand. Let's leave everything in this state for five hours. When the varnish dries, let's turn everything back and directly begin to create the shape of the crown of our product.
 Once we are happy with the curves of our wire, we will begin making hanging branches from beads. To do this, measure the wire with beads to the required length and pass the free end of the wire back through all the beads except the lowest one on the branch.
Now we attach a branch of a certain length to the aluminum base, wrapping the ends of the wire around the thick main wire. All hanging branches are made in this way.
When everything is done, all that remains is to connect the LEDs to make the product glow.
We wrap all the branches with foil or cellophane and plaster them. After drying, we paint and varnish everything, then remove the foil (or polyethylene) and fluff the product, giving it its original shape.