Fake on the theme of autumn. Panel of autumn leaves
Collage "Autumn"Prepare:
Multi-colored threads
- flowers and leaves for decoration
- thin dried twigs
How to do:
1. Make a circle of dried twigs. Secure the structure with wire or thread.
2. Take a colored thread and wrap the circle so that you get a “cobweb”. Secure the end of the thread with a strong knot.
3. Decorate the round frame with leaves. They need to be inserted between the threads of the web. You can use any natural material for decoration.
DIY natural crafts on the theme of Autumn
"Crown of Leaves"
Necessary materials:
Scissors
- thick paper or cardboard
- colorful leaves and natural materials for decoration
- adhesive tape
Stages of work:
1. Measure the circumference of the baby's head. Add a few centimeters to this length. This data will be needed to cut a strip 5 centimeters wide. If one cardboard sheet is not enough, you can cut out 2-3 strips and glue them together.
2. Cut one strip again, but now zigzag. Only one side should be zigzag cut.
3. Cut a piece of adhesive tape the same length as the cardboard strips. Place the ribbons, sticky side up, on a flat surface.
4. Glue 1 cardboard strip to the top half of the tape, and the jagged part to the bottom. There will be an empty part of the adhesive tape in the center. This is where you need to glue natural materials for decoration.
5. Instead of adhesive tape, you can also use PVA glue.
Make some like this too.
"Finger puppets"
Necessary materials:
Thin brush or thin branches
- cardboard cylinders
- leaves
- colored paper
- PVA glue
- glue stick
- scissors
- small stones or buttons
How to do:
1. Start gluing the sheet evenly to one end of the cylinder. First you can glue colored paper, and then the leaves.
2. Glue small branches on the sides - these will be hands.
3. Glue pebbles or buttons along the cylinder.
4. Make eyes from plasticine and fix them on a cardboard cylinder.
Try doing this too.
DIY autumn garden craft
"Pine Pine Spider"
Prepare:
Thread
- thin branch – 4 pcs.
- cone
- plasticine or plastic eyes
- glue “Moment”
Stages of work:
1. Make paws from twigs.
2. Attach eyes to the bottom of the pine cone.
3. Tie a thread and hang the spider.
DIY crafts autumn kindergarten
"Stars from branches"
Necessary materials:
Raffia or paper tape
- gouache or acrylic paint
- branches of the same diameter and length
- Super glue
Stages of work:
1. Collect twigs in the forest, cut them to obtain material of the same length. In total you will need 5 pieces.
2. Form a star from the twigs. If desired, the branches can be painted with gouache or acrylic paint.
3. Using raffia, connect the branches to form a star.
4. Wrap the craft with bright ribbons or raffia.
DIY autumn theme photo:
"Decorations for napkins"
Collect acorns from a forest or park, clean them of dust and dirt, and rinse with water. Pierce each fruit through with a needle or awl. Stretch wire, fishing line or thread through the acorns. As a result, you should have a ring. Glue the acorn caps to the surface with superglue and coat with varnish.
"Tree with acorns."
Separate the caps from the fruits, paint them with paint of any color so that the craft blends organically into the interior. Attach loops made from twine to the hats. If there are branches left on the caps, tie a rope to them. If there are no branches left, use glue. For best results, place the vase on a tray covered with fall leaves and acorns.
Autumn candle
The easiest way to decorate a candle is to place it in a glass container. Beautiful handmade candlesticks will make the atmosphere in your home festive and cozy. First of all, choose a beautiful glass vase. If the candle is too low, pick up any object on which you can place the candle. A bowl works great. Just turn it upside down and install the candle. Additionally, decorate the bowl to make it unnoticeable. You can use willow branches for decoration. They bend well, so you can wrap them around a bowl. Fill the gaps between the walls of the bowl and vase with hay, moss, etc. Place a candle in the center and decorate it. To do this, use red and yellow leaves. Just cover the outer wall of the vase with them. Weave the twine into a braid and tie the leaves. The rope not only holds the leaves in place, but also serves as an additional decoration.
Room decor with branches
Branches are an excellent environmental material. To create compositions from them, you do not need to have special materials and tools. You can see unusual shapes in simple branches and driftwood and use them to create original crafts.
Be sure to clean and dry the collected branches. The branches can be used in their pure form or covered with paints or varnish. Large, sweeping branches will look great on the walls. They will become not only a decorative element. They can be used as lamps or hangers.
DIY autumn crafts for kindergarten
Application “Pieces of Autumn”.
During your walk, collect chestnuts, acorns, and beautiful leaves with your child. Even from the simplest leaves you can make funny little animals, as well as beautiful patterns and ornaments. Joint creativity will develop the baby’s fine motor skills, imagination, attentiveness and perseverance. Creating an applique is a simple process. Prepare dry leaves, clean them of dust and dirt, smooth them with an iron, placing them between two pages of a book or paper sheets. Prepare the paper, glue the prepared leaves using PVA glue. You can use scissors and cut out beautiful details. Children very often cut out animal figures. To cut out a realistic silhouette, just use a template.
Original candlestick
Candles make the interior cozy, interesting and magical. Prepare a large candle and decorate it with small ears of corn. Give your child the opportunity to paint the cobs with all the colors of the rainbow. Place a rubber band around the candle, insert heads of corn into it, and tie it with a beautiful ribbon. Coat each head of cabbage with additional glue so that it is better fixed to the candle.
Decorative basket
Necessary materials:
Beautifully colored leaves
- cones
- chestnuts
- acorns
- fruits vegetables
- wicker basket
- all kinds of cereals
How to do:
Line the inside of the basket with paper. If you have a floral sponge, place it on top. It is very convenient to insert autumn flowers into it. Place cereal and autumn leaves along the edges of the basket. Place the fruit in the center and insert the stems into the sponge. For better fixation, string the fruits onto wooden skewers and insert them into a floral sponge.
Autumn leaves made of felt
Prepare 2 pieces of fabric of different colors. Mark the veins on one section and cut them along the contour. Pin 2 leaves together with pins and sew along each vein. For this purpose, use a sewing machine or a needle and thread. Make the veins in the center of the leaf using machine or hand stitches. You can make a beautiful garland from these leaves and hang them in your home.
You should not perceive the message that you need to bring a craft made together with your child to kindergarten as another “strain” in life. At the first moment, such a thought may run through the parents’ ever-preoccupied head, but it won’t linger for long, that’s for sure.
Especially when you go online and look at what crafts you can make from the generous gifts of autumn. This is a whole fascinating world, you will definitely want to do something with your own hands together with your baby, and it will definitely be more than one craft.
This is a very correct tradition, organizing exhibitions of crafts in kindergarten on the theme of autumn with your own hands, going back to Soviet times. Psychologists have repeatedly noted the importance of this event and the active participation of parents and children in it.
We begin this most interesting work by preparing material for creativity. And where can you collect it in the fall, of course, on a walk! Together with mom and dad, on a day off, the child goes on a completely adult task, collecting the gifts of autumn.
A walk can be through the forest, or through a city park, or you can also take a walk on your property or dacha; everywhere will be incredibly interesting for both you and your child.
We definitely take bags for this important and pleasant event, because you will probably want to take as many natural gifts as possible and bring them into your home.
Don’t be afraid to add too much, from the remnants of the collected materials you can make something for yourself, this composition will delight your eye and warm your soul for a long time. If we briefly list what you need to collect for DIY crafts for kindergarten on the theme of autumn (photos), it will be something like this:
- leaves are bright, beautiful, fancy, of various sizes and colors;
- small pebbles, also of different sizes and colors;
- cones, acorns, chestnuts, nuts;
- several tree branches of different thicknesses and shapes;
- twigs of shrubs, such as boxwood, gooseberries, currants;
- Collect branches of coniferous plants and thuja in a separate bunch;
- moss, several plates;
- bird feathers, there will probably be a sufficient number of them in a wide variety.
You can significantly supplement this short list with attractive specimens that you like.
In addition, if you decide to make crafts for the kindergarten on the theme of autumn with your own hands from vegetables, then you should collect a small amount of them:
- apples, pears, quince;
- fruits of viburnum and chokeberry (not forgetting about the leaves), picking them along with the twigs.
- pumpkin and zucchini are also an excellent material for crafts, especially small ones and fancy shapes;
- cauliflower and broccoli;
- carrot.
You can also stock up seeds of various plants in advance; you already have some at home.
In addition, we prepare the materials at hand:
- a piece of cardboard from which you can then cut out the size you need;
- a couple of leaves of thick paper, maybe colored;
- braid of the thickness you need;
- threads;
- needle;
- scissors;
- PVA glue;
- cardboard box lid (where you can place the composition);
- pencils, felt-tip pens, paints with a brush.
We have provided the most basic set of tools; you can add or exclude something that does not correspond to your idea. Such basic lists are necessary for those who first decided to engage in such exciting creativity.
Crafts for kindergarten from natural materials
Surely, when you were walking with your child and discussing the topic of do-it-yourself autumn-themed kindergarten crafts (photo), you came up with more than one great idea. However, you can still use our advice, or take some details from the described process.
Composition with chestnuts
We put pieces of moss into a small cardboard box lid, or cover the bottom with beautiful leaves.
We carefully string large leaves onto wires and display them on the back wall of the composition. Decorate a wall of leaves by adding a dried autumn flower or a sprig of viburnum.
We make a Cheburashka figurine from chestnuts, for which we string them one by one on toothpicks.
On one of the chestnuts from below we draw the face of a Cheburashka, having first covered the surface with white paint.
We assemble the entire structure of the figurine, as shown in the photo.
In the same way, we construct a figurine of a cat and dumbbells, placing everything on the existing improvised platform. You can approach the work on crafts for the kindergarten on the theme of autumn from natural materials with your own hands more creatively and add something of your own.
Chestnut caterpillar
We prepare a stand for our craft, it can be just a piece of cardboard. Cover the stand with leaves.
We pierce the chestnuts one by one with wire, the length corresponding to the intended length of the caterpillar.
We lay our stylized caterpillar on the leaves, giving its body some bend characteristic of movement.
We decorate the caterpillar with multi-colored plasticine rings, placing them between the chestnuts.
On the first largest chestnut we depict the eyes, nose and mouth of the caterpillar using plasticine.
We stick bright horns on top, also made of toothpicks and plasticine.
Hedgehog made of plasticine and sticks
On the surface for the craft we lay out a randomly original autumn still life of leaves, thuja twigs, viburnum berries or rowan berries. The red color of these berries will add a special flavor to the autumn motif depicted on the surface.
We make roses from large leaves. To do this, we simply bend them in half and roll them into a tube characteristic of a rose. We secure the structure by making a stitch at the bottom with a needle and thread.
Having prepared a stylized fragment of the autumn forest, we begin to create the hedgehog itself, for which we sculpt it from plasticine.
Leaving the hedgehog's face untouched, we pierce the entire body with thin twigs; you can use toothpicks or matches, but with twigs it turns out more realistic.
You can place a small apple on the needles, real or made with your own hands, and you can also replace the apple with a mushroom, grape, or just a leaf, as you like.
Fragment of an autumn forest with inhabitants
On a cardboard for a DIY garden craft on the theme of autumn (photos) made from leaves, we lay out the autumn soil, as in the previous descriptions. You can create the composition simply on a blank sheet of paper.
We select beautiful leaves from various trees, place each leaf on a wire, which we wrap in brown plasticine, stylizing the tree itself.
On the prepared base, we randomly lay out the bases of the trees made of plasticine, into which we insert the trees. This is how an autumn forest turned out easily and simply.
Now the most interesting thing is that from pine cones of various sizes and configurations, as well as multi-colored plasticine, we sculpt a variety of bizarre and bright characters of fairy-tale forest animals.
Your child’s delight will know no bounds, because modern children so lack communication with mom and dad, so for them this joint creativity will be a real holiday.
Vegetable crafts
If you don’t have enough time for a walk to collect nature’s gifts, then you can make autumn-themed crafts for the garden from fruits and vegetables. There is also a large field for the application of your creative potential with your child.
Forest pumpkin hut
We depict a forest clearing using vegetables on a surface for a garden craft on the theme of autumn (photos). To do this, we show our imagination, lay out moss, leaves, add flowers for brightness.
We sculpt one or two hedgehogs from plasticine and seeds and choose a place for them in the foreground of the composition.
We place a figurine of a forest scarecrow, made of carrots and parsley, a little to the side; making it, like the whole composition, is very simple and quick.
We place a pumpkin in the center of the composition, having previously carried out some preparation. First, a cut is made on the side surface of the pumpkin, then a window is cut out with a sharp knife.
We cover our forest hut on top with a bunch of straw, as shown in the photo.
Fruit bowl
Pumpkin is the most popular vegetable when making autumn crafts, it is a pleasure to work with it, and there is room for your imagination to run wild. It’s simply a fairy tale to see what masterly carriages you can create using it, but we offer the simplest crafts for the busiest parents.
We will make a vase in the shape of a chicken, for which we first peel and seed the pumpkin, and then make artistic cuts. We cut with a slight asymmetry on one side, the height of which should be less.
We don’t throw away the trimmings, they will make a tail for a chicken. Photos of our DIY vegetable craft for the garden on the theme of autumn are provided.
We fill our vase with various available fruits, preferably grapes and some berries.
We place a beautiful colored napkin on a small tray and place the pumpkin with fruit, laying it on its side, long side down.
Stick in pumpkin scraps to create a beautiful tail.
On the short upper side of the pumpkin we attach a small white radish, peeled from the tails.
We stylize the radish as a chicken head with a scallop.
Place fruit on the remaining surface of the tray, our composition is ready.
Lamb with a bouquet of carrots
This is also an incredibly simple but very effective craft; you will need two heads of cauliflower, several carrots, and a pepper.
From one carrot we cut four legs, stick long toothpicks into each, and place the carrot parts on a stand ready to go.
On other carrots we make longitudinal notches in four places. Then cut part of the prepared carrots, up to about half, crosswise.
We string carrot circles onto long toothpicks to create stylized flowers. We stick the other end of the toothpick of each flower into the remaining part of the carrot, we have a vase of flowers.
Having prepared a stand for the lamb, crafts from vegetables for the garden on the theme of autumn with your own hands (photo), we proceed to its execution. First, cut off the stalks of cauliflower heads.
We place the largest and, preferably, slightly oblong head of cabbage on toothpicks in carrots. Next, we connect the second head of cabbage to the first using toothpicks.
At the junction we strengthen the pepper of any color and decorate the eyes in any way. Two reinforced leaves will serve as our ears.
Cheburashka from potatoes
You can also submit just a cute Cheburashka for the competition; it’s very simple to do, but the result is a rather touching craft.
Take two of the largest potatoes of any color and make a cut on one side.
From another large potato we cut the head and ears, and connect everything with toothpicks. On one side of the head we make a muzzle by inserting buttons and a bead.
We make the mouth from potato scraps.
We cut two small potatoes into two unequal parts, these will be the “handles” and “legs” of the Cheburashka, attach them to the body with toothpicks.
On one side we attach a bouquet of flowers, it’s just a miracle, what a cute creature!
Zucchini and carrot machine
You choose the size of the machine yourself, depending on the size of this vegetable you have. By the way, you can make such a machine from zucchini.
We start with carrots, cut them into four wheels and the rear design of the car.
We secure the wheels with long nails with caps. We carve the rear wheel to decorate the car.
From another fruit we cut a ring, 5-6 cm wide, cut it in half, clean out the seeds, place it on the top of the car as a body, and secure it with toothpicks.
We cut out windows in the “body” at the front and back, and attach half a small potato to the top.
A great craft for younger boys.
Cucumber caterpillar
This craft will turn out spectacular only from a long thin greenhouse cucumber.
Cut the cucumber and carrot into rings of equal thickness, then string everything one by one onto a thin wire.
We make eyes, a nose and a mouth, insert horns from green onion feathers. We place the caterpillar on a stand; you can also lay it out with leaves and moss.
Crafts from pine cones
Cones are also the most popular material for crafts; they are available and presented by nature in a wide variety. We recommend collecting pine cones while walking in the fall as much as possible, because the New Year is ahead, so they will still be very useful to us.
Hedgehog
From gray fabric we sew an oblong bag with one elongated end, which will be the face of a hedgehog. Turn the bag right side out and stuff it with cotton wool.
We decorate the hedgehog's face by sewing on the eyes - beads, the nose - a button, the mouth and antennae from scrap material.
Stepping back a little from the narrow part of the bag, we sew the pre-prepared cones to the hedgehog’s body one by one.
After the hedgehog is ready, we decorate it with autumn gifts, depending on what you have, so the hedgehog will be much brighter and more attractive.
You can leave the hedgehog as a completely self-sufficient craft for a garden of pine cones (photos) on the theme of autumn with your own hands. However, if you have the material and time, then it is better to additionally depict a fragment of a forest autumn landscape on the stand, where you can place our craft - a hedgehog made of cones.
Thematic composition
This craft is also very simple and quick to do, and is quite suitable for children in the younger group.
We cut out a circle from cardboard, you can lay out leaves and moss, put a sprig of rowan, make mushrooms from plasticine and distribute them in the clearing.
Stepping back 5 centimeters from the edge of the circle, we install a plasticine flagellum on our round stand, gluing it to the stand around the entire circle.
Glue the cones to the plasticine rope, pressing them tightly against each other. The result was a kind of fairy-tale forest clearing, surrounded by spruce trees. If you wish, you can also paint these spruce cones with green paint.
In the clearing you can place several large or small potato hedgehogs, which will not be difficult to prepare.
Forest inhabitants
Not only hedgehogs can be made from cones, although this is the most popular choice of authors in crafts. We offer a simple DIY craft made from pine cones (photos) for a kindergarten on the theme of autumn, a romantic scene in the forest.
The best option for the stand of this mise-en-scene would be a wooden circle of any thickness, but if this is not available, just a piece of cardboard will do.
From 2 round-shaped cones and more massive ones we assemble a figurine of a forest hero, connecting them using plasticine.
From thinner and “slender” cones we assemble a figurine of a forest beauty, also using plasticine.
From twigs we select legs and arms for our forest inhabitants and attach them to the body, also using plasticine.
We attach the hero’s legs with an appropriate swing, symbolizing his kneeling state. The hands are sticks, they should be attached tightly to each other, between them we insert a beautiful autumn bouquet of flowers.
From clothes it is enough for him to attach a long leaf to the back and glue on the eyes.
You will have to work hard on the image of the beauty, choose slender stick legs, and attach them with plasticine. Hands should be open, but not for hugs, but out of surprise.
As much as our imagination allows, we dress up our beauty, and be sure to attach a rowan ornament strung on a thread to her neck.
We attach a cap to the head and set surprised eyes. What a beautiful romantic autumn scene in the forest!
Penguin family
An incredibly beautiful and very easy to do craft, it can very well decorate your home. It may seem that this topic is not exactly autumn, but this is only at first glance, nature gives us cones in the fall.
We select a beautiful stand for this craft, cut it out figuratively and decorate it at our discretion.
We paint two small cones with white paint, you can apply silver glitter. We paint two large cones and one small one with black paint.
After the paint has dried, apply white paint on one side - the chest of penguins.
On the stand we symmetrically strengthen two white cones - Christmas trees.
We attach arms, heads, eyes, beaks and mouths to the penguins, place them on a stand, add something fluffy and shiny, further decorating the picture.
Hello subscribers!
It's bad weather outside, but maybe the sun is shining? It doesn't matter, because we have an unforgettable time of year ahead of us. It will be in colorful colors and with many surprises, because autumn always presents us with its gifts. But, besides this, it also reveals its natural riches to us. That is why in schools and kindergartens they immediately make crafts from natural materials, together with other components. These can be vegetables, as well as paper or plasticine, and many others. other.
Children, well, just love all this creative work, because they get different funny toys that they can then play with.
Besides all this, you can even take autumn leaves and put them into masterpieces or bouquets and insert them into or make something. Well, that's not all, cool souvenirs come from ordinary cones. So, if you are interested, stop for a minute and scroll through the entire note from beginning to end. I'm sure you'll find a lot of interesting ideas on what can be made from natural materials.
Well, if you have your own thoughts on this topic, please share below the article and write your reviews and comments.
I would like to start this conversation with the fact that you don’t even mean and can’t imagine that everything is much simpler than you think. It turns out that to make masterpieces you can take the most ordinary sticks, twigs, or maybe you have pebbles or shells. In general, we always have all this at hand, so why not take advantage of it.
I suggest focusing on stone products, which are always available in any area. If you were somewhere on vacation, you could bring these with you. It is advisable to take, of course, smooth pebbles. Take a log or plank and carefully glue the intended composition using a glue gun. Here you can make flowers, for example. To make the craft brighter and more aesthetically pleasing, paint it using acrylic paints.

A product in the shape of a hedgehog is quite popular, take a look. In my opinion, there is still not enough mushroom or autumn leaves. So this is easy to fix, take colored paper and cut out the desired image.

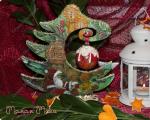
You can decorate a whole picture, make such a cheerful family in the form of birds on wood. As you can see, regular sticks are also involved here.
Oh, and by the way, do a still life.

For the youngest children, take the following composition as a basis. Draw a maple leaf or some other leaf on a piece of cardboard or A4 and then decorate it with multi-colored stones.

And if it’s even simpler, then choose a minimalist picture like this. Which don’t forget to decorate with colorful paints.

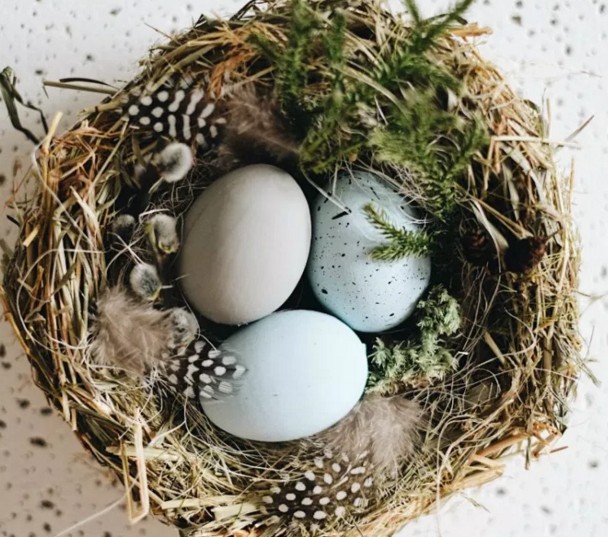
A straw bird's nest could be a great idea. You need to cut a circle out of cardboard.

And twist a flagellum out of straw.

And then twist a nest out of it along the diameter of the circle and secure the ends with threads.

In this way, wind it in a spiral so that you end up with a cup-shaped bed, and glue the straw onto the glue.


Then fill the souvenir with down or feathers and place eggs and pine cones.
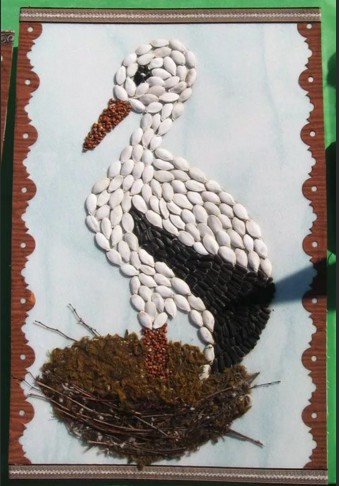
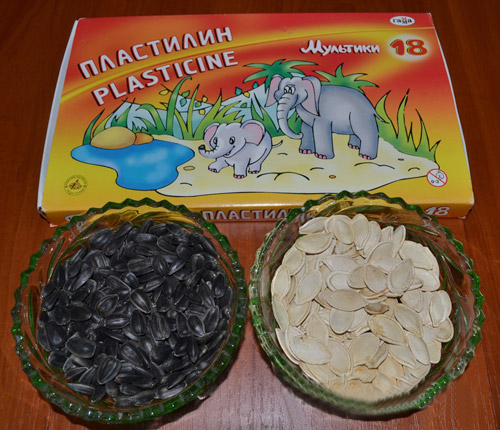
If you are a fan of pumpkin or sunflower seeds, then you can create something absolutely fantastically beautiful. Take a quick look at this photo. It was awesome! The author took and decorated the hedgehog, and its thorns with ordinary seeds and painted autumn.

But here we used pumpkin seeds, by the way, you can come up with a lot of all kinds of masterpieces from them. I have already shown you several such works. Now I'll show you this one. Who knows, the seeds are painted with paints, gouache or acrylic, and then glued.

Here the artist did not use glue, but placed everything on plasticine. The tree trunk is made of buckwheat grains.


They also make a stork from pumpkin seeds, this is a panel that comes out, or hang it on the wall like a painting and admire it.
I was shocked by another amazing and cool craft, I mean a chicken made from different seeds that the author made. For this masterpiece you need pumpkin and sunflower seeds, as well as plasticine.
1. From plasticine, sculpt the base, that is, the head and body of the bird.

2. Then start decorating the chicken by sticking seeds one by one, as shown in the picture. First there will be the wings.

3. And then the ponytail. It already looks funny.
Do everything carefully and take your time, it is from your efforts that success will await you.


5. Make the crest from red plasticine, and the beak from yellow.


I also really liked these trees made from beans and watermelon seeds.

You can also combine several types of natural materials to create a pattern. For example, how oats are also used here, and the rim is made from corn kernels.

Do you remember when you were a child they used to fly airplanes, so I also recommend making souvenirs from them. I mean maple ones.

This also includes crafts made from dry materials. The sun is so radiant.

Or a clearing and a forest.

Above all, use straw or acorns.

You will get not only pictures, but also people and insects from chestnuts.

At school, I remember they always made people like this during labor lessons.

Well, if you have a handful of pistachios, or rather peels, lying around, then imagine you can become a real decorator. Make a topiary like this.

Well, or a vase and insert dried or fresh flowers into it.

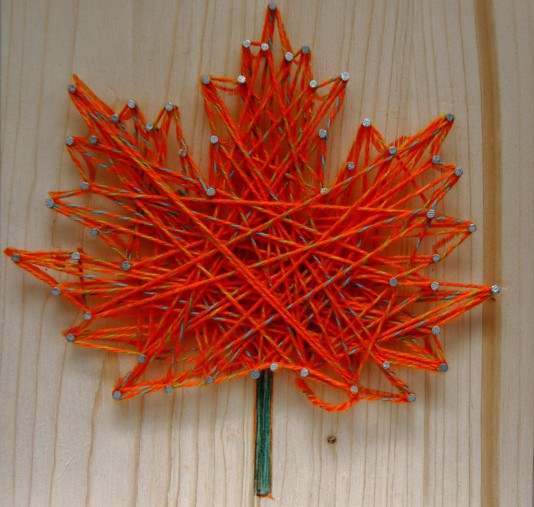
Well, in conclusion to this chapter, I want to amaze you. I found a fun pattern that you can easily make. All you need is a board, nails and woolen threads.
Trace a maple leaf on the plywood and drive in nails along the outline.

Follow the outline with an orange thread.

Then begin to confuse them in a chaotic manner, as if you were drawing patterns, a spider’s web. Great, did you do it?
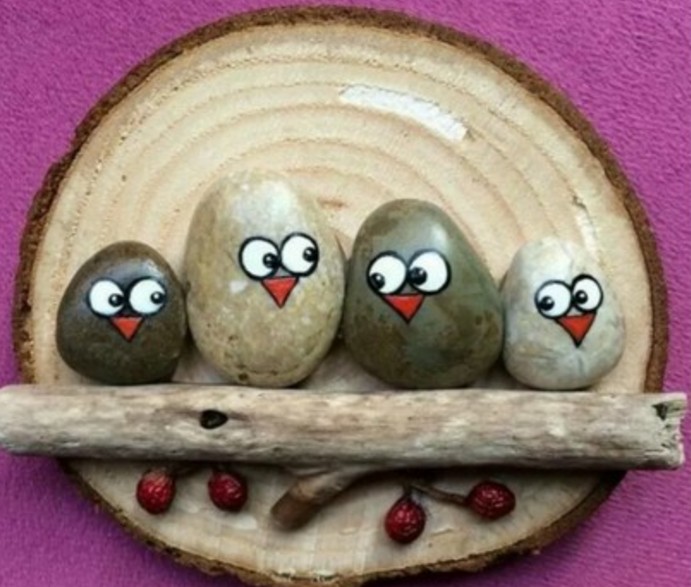
I also like this funny story, in which the author took ordinary logs and laid out these birds.

These friends are somewhat reminiscent of snowmen.

Crafts for elementary school “What autumn gave us”
Of course, to make compositions on this topic, it is enough to have everything you need at hand. This means you need natural material and available means. Plus your desire, imagination and of course fantasy. If it’s really difficult and inspiration doesn’t come, then take these ideas and create.
I suggest the girls take their favorite doll and decorate her with such a golden outfit.

This is how it turns out you can go to the park and pick up dry leaves and you are already a magician).


Brilliant, isn't it? Such a queen came out of an ordinary toy.
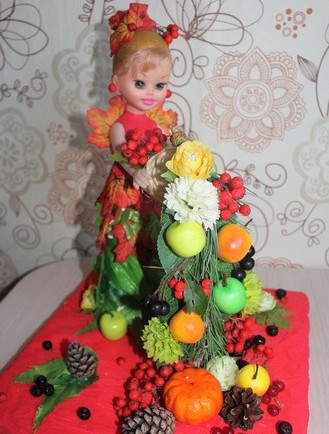

Do this work using physalis.

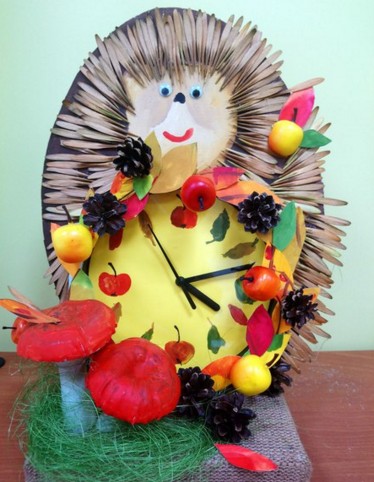
Or, for example, build an alarm clock or a clock from twigs.

A sprig of rowan and pine cones will help you decorate.

Well, last but not least, probably the most popular will be a craft using seeds. I always see such creations at exhibitions in kindergartens and school competitions.


Everyone knows that autumn is rich, so make wonderful masterpieces.


By the way, decorate your classroom amazingly by making garlands of acorns, chestnuts and rowan berries.

Or this idea.

Make a web and bring it to school.

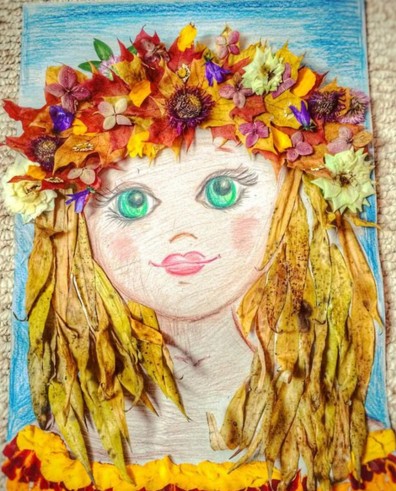
Probably the most enchanting thing will be this beauty, well, a real symbol of this time of year in all its glory, this is the girl’s face. Take any flowers, plants and create.


You can make a portrait like this. I think elementary school students and even preschoolers will cope with this work with a bang. Well, middle school even more so.


A gift like this looks super, these are roses, but unusual, and made from maple leaves.

You need to learn how to roll leaves correctly, here is the sequence of actions. Watch this short master class:

On this topic, how to create such a bouquet, I found this video on the Internet on the YouTube channel. Maybe it will be useful to you too. Enjoy watching.
You can decorate a wreath beautifully.


Don’t forget that it won’t be difficult to build a lot of creations from spruce branches.


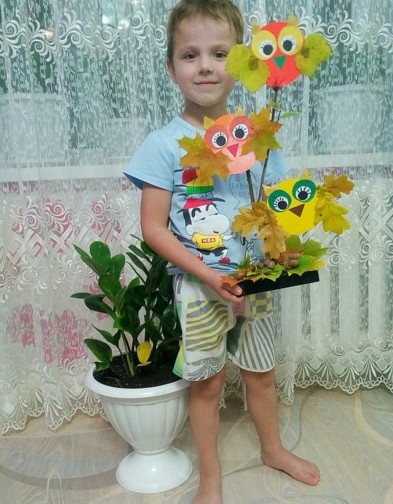
What a cute owl came out, you can’t take your eyes off it.

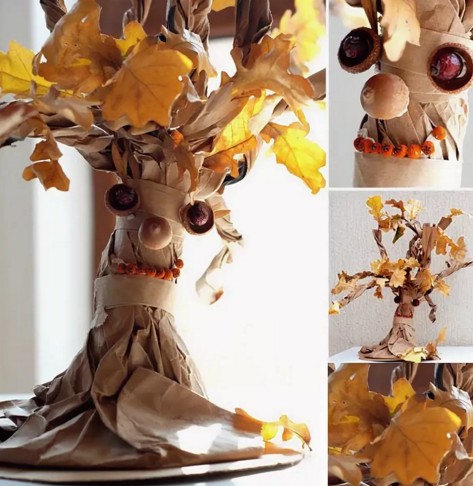
You can build an oak tree, look how wonderful it turned out.
Here's another idea, take note.

Autumn work in kindergarten from natural materials
I think the kids will like the work called applique. Cut the leaves into squares and stick them on a landscape sheet in the form of any character.

An unusual tree like this might also be a good idea. I would say magical, on one side there is winter on it, snow or frost, and on the other there is foliage.

You will need to make a trunk out of plaster, like a stand, and stick the collected branches into it. Let your little one decorate it now as shown in the picture above. Make a snowball from cotton wool, and greens from dry grass, leaves, and flowers.

Or you can make spiders or a hut on chicken legs with Baba Yaga. After all, children love fairy-tale characters very much.


Do you want to go the non-traditional route and use shavings from simple pencils or colored pencils as a basis and create such beauty.

Also create figurines from walnuts in the form of a bear.

And this little mouse.

Here are a couple more mice.

A panel using rowan berries also looks great.

You can take the following option as a basis, make the leaves from paper in the quilling style, and glue the rowan.

This funny kitten will clearly lift everyone’s spirits.

I also want to invite preschoolers to make a smart owl.


It is easy to build the following from tree cuts.

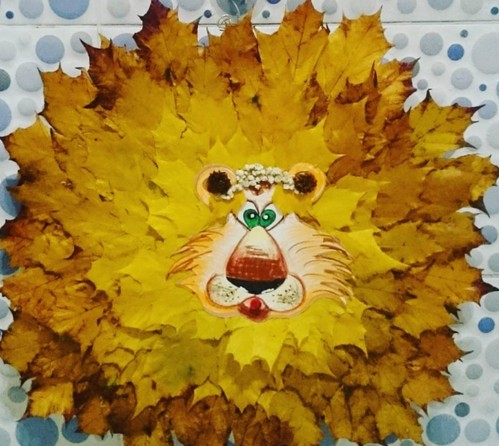
Or make a lion cub or a lion.


Also be happy to stick to simple models that are cut like this.

You can also draw, take dry tree leaves as a basis in the form of stencils and simply dip them in paint and make prints.

Or you can design a picture with birch trees like this.


Next job, draw an image of a woman or girl, and ask the child to do the hair.
Use your imagination and build little animals.

It’s interesting to design a boat.

Or make a peacock or firebird.

Toys and souvenirs made from pine cones: fast and beautiful
Well, now I present to your attention all the most interesting things from acorns, cones and probably plasticine. Because it is this component that will help recreate new toys and souvenirs.
Here is a picture that was made using paints, a background and multi-colored cones are drawn, which are also painted with acrylic paints.

The next work is such a cute topiary, from all that was in the forest. There are Christmas tree branches, cones, berries, even acorns.

If you love Masha and Misha from the cartoon, then you will like the next idea.

On this topic, I found this year’s new items for you in this video from the YouTube channel. So don't miss it!
Well, a couple more ideas that you can turn into reality.
These could be birds such as an owl or a swan, or a basket of pine cones.

It's easy to make an angel in the form of a doll, or a pendant.

They even make squirrels, but in addition to plasticine, felt fabric is also used.


In addition to all this, you can also take any fruits and vegetables and arrange any composition using natural materials.

Original crafts from leaves on the theme of Golden Autumn
If you have absolutely nothing to create from, then take and collect foliage in the parks and you won’t believe it, you can make such creations from it. Even kids 2-3 years old can handle it. Well, schoolchildren even more so. I have one child who lives in our house and studies in the third grade, so he painted the collected leaves like this.

And my son, who is already 5 years old and will almost soon be 6, will do such a miracle. This is the butterfly, he chose the second one, which one do you like better?

To be honest, I also really liked the hare and the fox. Look, even the bark has been adapted.


What kind of bird is this? Peacock, her ear and tail are beautiful!

Well, the following composition in the form of an aquarium and fish can also be a great idea.


In addition to all this, you can easily and quickly create insects.

But probably the most beautiful and charming craft will be in the form of maple leaves, they are folded in an unusual way, in the form of roses. Here are instructions for making such beauty. Repeat all steps as shown in this picture.
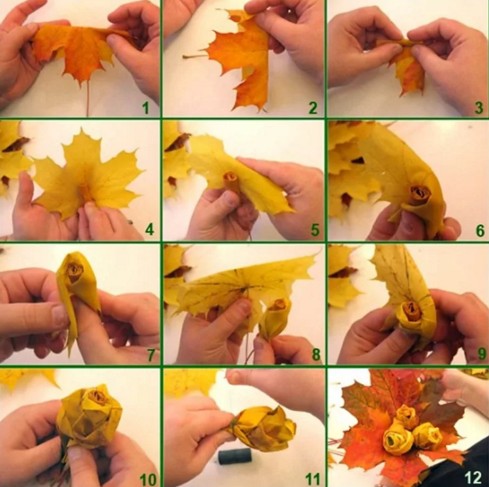
This is what should come out in the end.

You can make flowers from any type of leaves. This video will help you with this, watch the master class.
In addition, take a regular vase and place dry branches in it and decorate with foliage.

And also any photo frame can be presented in an unusual way.

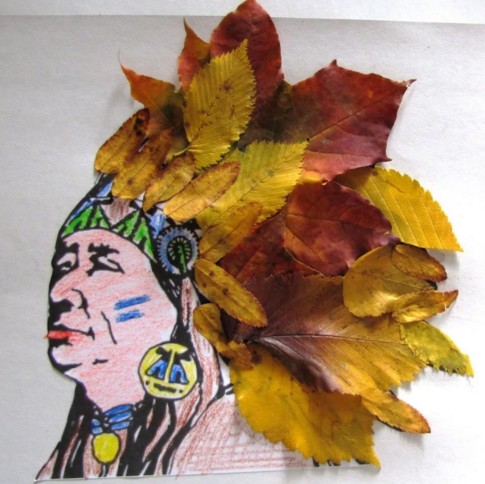
Well, give the boys who love Indians a leader.
Here are a few more cool ideas on what you can come up with and make from leaves. These are children's creations.


As you can see, there is so much to see here. A turtle, a snail, a helicopter and even a mischievous parrot.


Or post the fabulous Petya the Cockerel.

Besides all this, you can go a non-traditional route and make paintings.

And if you don’t have enough sunshine, then here’s an idea for you.

To decorate the interior, and even to an exhibition at school or kindergarten, you can also bring a vase of maple leaves. How to make it? You will need PVA glue and a balloon.
In short, you can look at these steps and build such a creation right today.

Or consider these stages of work.
1. Inflate a balloon, apply PVA to it with a brush and immediately apply the leaves.

2. This is what should happen.

3. Also apply glue on top of the leaves sparingly.

4. Now let the workpiece dry completely, and then pierce the ball with a needle. Now fill it with fruits and vegetables and get ready for the holiday.

I think that after reading and viewing this note, you no longer have questions about what can be made from natural materials; I think I have found enough ideas. Just take it and do it.
All the best and positive wishes to everyone. Bye!
Best regards, Ekaterina
Autumn is the best time when you can collect a large amount of different materials, from which you can later make various crafts. What can you use to create interesting things? Just think. It turns out that your materials for crafts will be:
- leaves,
- seeds,
- chestnuts,
- bumps.
How to make a bouquet of autumn leaves
Yellow leaves are the most popular material for autumn crafts. Autumn applications and various crafts are made from the leaves. In addition, they are repainted and truly beautiful masterpieces are created from them. Now we will propose making an autumn bouquet from fallen leaves.
Progress:
So, you will need maple leaves. For such work, you do not need dry leaves, but already yellowed, but flexible ones. So, you should make a rose from a maple leaf. First, you should bend a maple sheet in half for the middle. In this case, the front side of the sheet should be on the outside. The sheet is folded in half and rolled into a tight tube.
The resulting middle should be supplemented with petals. They are the ones who will help create a bud. For this work, it is worth placing a folded autumn leaf about 1.5 cm above the middle. Then we wrap this sheet around the middle and tie it with threads. The edges protruding from above must be folded back. For each rose we make 7 petals.
Autumn crafts from acorns
On long and rainy evenings, all residents make crafts on the theme of autumn. It is worth saying that such an activity helps to develop thinking. In addition, you can get continuous positive emotions from such an activity.
In autumn, in the forest or in the park you can collect a huge number of acorns. And from this natural material you can make unique crafts that will transform the design of your home.
You can make more than just crafts from acorns. It turns out that they can be poured into glass containers and used for home decoration.
And for the next craft you will need a dry twig and acorns. In this case, the acorns must be painted with acrylic paints and hung on this dry branch. A branch with acorns should be placed in an attractive vase. That's all, now you just have to admire this unusual decorative element.
On a note! To make the craft original, first remove the caps from the acorns before painting. After the paint has dried, glue them back on.
To decorate your home, you can felt acorns from wool. But it’s better to glue natural hats to them.
Acorn caps are also suitable for decorating a picture frame or mirror. You can also decorate a photo frame with acorns. It looks very stylish and cute at the same time.
Acorns are suitable for holiday decor. For example, you can make a bunch of grapes from them. And to make such a craft you need to take well-dried oak fruits. There is a through hole in the acorns using an awl. Then we put the acorns on the wire. The cuttings of acorns are wrapped in corrugated paper, but the acorns are painted with acrylic paints. Bunches of grapes are collected according to the principle of weaving a wreath. And brush leaves are usually made of paper. The bunches of grapes will be decorated with them.
What crafts can be made from pine cones?
In this publication you can see all the autumn crafts made from natural materials. It is worth mentioning that in addition to acorns, cones are used for autumn crafts. Now you can see how to make a funny spider from cones.
For this craft you should prepare:
- 4 branches that will be paws,
- big shot
- plasticine for eyes,
- thread and superglue.
Progress:
- First we make the spider's legs. To do this, we thread the brush through the thread, and then bend the threads.
- We attach eyes to the part of the cone that is not fluffy.
- Now all that remains is to fasten the thread and hang our spider.
Using the same technology, you can make funny monsters from pine cones.
Crafts from sticks and leaves
You can arrange an autumn star shower in your home at any time of the year. And to make such a craft you must prepare:
- sticks or cuttings from leaves,
- wire and thread,
- small berries and leaves that will be used for decoration.
Autumn crafts- these are works made most often from natural materials. Acorns and chestnuts, cones and nuts, seeds and berries, and even colorful leaves - all these are universal craft materials that autumn is so generous with. The section presents master classes and photographs from exhibitions from kindergartens and schools. If you were asked to make a craft with your child in kindergarten on the themes: “Gifts of Autumn”, “Pantry of Autumn”, “What Autumn Brought to Us”, “Golden Autumn”, etc. - be sure to look at the materials from this section.
The change of seasons brings variety to our lives and serves as a source of creative inspiration. Autumn is a special time. The energy accumulated over the summer is looking for a positive outlet, and nature pleases with an abundance of bright colors. Clear days alternate with monotonous rains, and cheerful walks with quiet homework. This is the best time to make crafts from natural materials with your children.
Autumn inspires
Contained in sections:Includes sections:
- Autumn bouquet. DIY compositions made from leaves and natural materials
Showing publications 1-10 of 4807.
All sections | DIY autumn crafts for the garden and school
Group drawing work “Golden autumn has come to us” (junior group) Theme "Came to us" golden autumn" Target:Continue to teach children to distinguish and name colors: red, yellow, green, orange; Practice drawing with your palm. Tasks: -learn to apply gouache evenly on your hand; -develop color perception, speech, enrich vocabulary;...
2018 Educator: Atmurzaeva Zara Kazbekovna. Coloring books are a great way to keep your child busy and add variety to his activities. As soon as the child takes a pencil or brush in his hands, he should be asked to color the drawing, because at this age he still does not know how to...
Do-it-yourself autumn crafts for the garden and school - GCD summary for broken applique in the middle group “A thin birch tree is a sign of autumn”
Publication “Summary of GCD for broken appliqué in the middle group “Thin Birch...” Goal: Creating an applique “A thin birch tree is a sign of autumn” using a broken applique made from natural material. Objectives: 1. Arouse interest in creating bright work. 2. Develop fine motor skills, tactile sensations, and imagination. 3. Learn to decorate a birch tree template...
Image library "MAAM-pictures"
Abstract of GCD “Autumn Landscape” application using dry leaves Scenario of a lesson for children of the senior group 5-6 years old “Autumn Landscape” Compiled by: teacher Kumratova Natalia Anatolyevna Educational area: Artistic and aesthetic development Purpose: to enrich the creative experience of children; promote further development of basic knowledge about...
Project for the development of artistic and aesthetic creativity of children in the secondary group “Golden Autumn” Project goals: - To introduce children to non-traditional drawing techniques. Instill interest in visual arts. To promote the development of aesthetic perception, artistic taste and creative abilities of preschool children. Draw children's attention to...
Autumn gives us an endless riot of colors and a lot of positive emotions from walking on warm days along the colorful park alleys. But, unfortunately, fine autumn days very often give way to periods of heavy rains and pre-winter coolness. Therefore, in order for a long time...
DIY autumn crafts for the garden and school - Exhibition of crafts from natural materials “Autumn Fantasy”
This event was held with the aim of introducing people to nature, accumulating knowledge about the world around them, developing creative abilities in children, as well as involving parents in the educational process in kindergarten. All kindergarten groups held classes, conversations about autumn,...
Do-it-yourself For convenience and speed of execution, I suggest taking a regular summer straw hat that fits the size of the child’s head. Choose a hat with a small curved brim. If there is no choice, then you can either cut off the too wide margins, or try and sew...
Teamwork in 1 ml. group “Golden Autumn” (non-traditional drawing) Drawing technique “Magic Palms” Purpose: to teach children to draw tree leaves using the “Cheerful Palms” technique, to add additions to the drawing (foliage of different colors); enriching its content. Tasks:...
Collecting autumn gifts with children is a most exciting activity. How much joy and benefit comes from joint creativity at this time of year. Searching and selecting materials, sorting and preparing them, thinking about an idea you like, and the very embodiment of the author’s plan - all these are opportunities not only for interesting communication, but also for broadening a child’s horizons, getting to know the world around him and teaching him basic work skills. And the development of imagination and fine motor skills of the hands, the development of patience and the ability to finish what is started are accompanying useful aspects of this creative activity. In addition, crafts made from natural materials are an excellent gift option for moms and dads, grandparents, which children can make with their own hands.
*For your material to be included in this section, add a couple of lines to your blog material in the “Categories” field, separated by commas and without quotes: "children's crafts, autumn crafts"