Craft Christmas tree from colored paper. DIY paper Christmas tree - original ideas
Of course, you can’t do without a Christmas tree. Some will install a real forest beauty, others will install an artificial one. But besides the big hero of the occasion, you can also make several small Christmas trees and place them in the rooms. Let the holiday be felt throughout the house!
You can make a Christmas tree at home from any material, from sweets to books. Today we will talk about how to make a New Year's symbol from paper. Simply put, take scissors, glue, paints... and get started.
Using colored paper, you can make a Christmas tree of various modifications, from flat to voluminous. Yes, even a whole forest of spruce!)

This beauty is very easy to make! We will need a sheet of colored paper or cardboard and scissors. Cut out a square and bend it as shown in the picture.


And the final stage:

New Year's decor is ready!

And the simplest option is to cut out two identical blanks from colored paper. After that, we bend them lengthwise and glue them together. The result is a tree like this. Decorate it to your liking.

Another easy option. We make a cone out of colored paper, decorate it and get a stylized Christmas tree.

Another simple option for making a stylized Christmas tree. Cut out a triangle from paper. We take a suitable wooden stick, it will be a tree trunk.

We attach a base to the trunk so that the future tree stands vertically, for example, a cork or a piece of plasticine. Now we string the paper onto a stick, like a sail on a ship. And here is the result.


Is it truly original and wonderful?
Making a Christmas tree from corrugated paper with your own hands step by step
For this craft you will need corrugated paper and cardboard. You can choose paper of any color to make your New Year's decor unusual and match your interior.

Watch in this video a master class of 5 step-by-step options for making Christmas trees from corrugated paper for the New Year 2019:
Now let’s describe the manufacturing process in a few words and photographs.
We cut out a sector from cardboard - two quarters of a circle and glue it into a cone.

The cone will serve as the trunk of the future Christmas tree.
Now let's start creating an analogue of branches and needles. There are several ways you can go here. You can make Christmas tree branches in the form of a belt around a cone. To do this, cut a strip of paper about five centimeters wide and long enough to completely go around the cone. We thread a thread along the inner edge of the strip that will be adjacent to the cone, stepping back half a centimeter from the edge. After this, roll the strip into a circle.

We make several such circles, and they should all be different in size - one smaller than the other. After all, they will fit on a cone like rings on a pyramid: first a large ring, then a smaller one, etc. So we put them on the cone. It turns out something like a “skirt”.

To prevent the rings from falling off, glue them to the cone. As a result, we get such a beautiful Christmas tree.

Instead of a cone, you can use a wooden rod on which we string circles made of paper.

We make the circles ourselves as follows. Take a strip of paper and fold it into an accordion shape. We fix it in the middle with a thread.
After that, we fan it out.

Now take the two halves and glue them together to make a circle. We also make circles of different sizes.

We string them onto the rod, starting with the largest and ending with the smallest. The result is a Christmas tree.
The process is more labor-intensive than previous options, but the result is wonderful.
How to make a Christmas tree from paper napkins
A Christmas tree made from paper napkins looks very beautiful. Here, just as in the version described above, a cone is used as a base. However, roses made from napkins are glued onto it. As a result we get:


We take the napkins, put them in a pile and fasten them in the center with a stapler. After that, cut out a circle from them.

The first layer is crumpled towards the middle. Then we do the same with the next layer.
And in this way we make all the layers so that the result is a rose.

You will need to make a lot of these roses. How much is difficult to say. It all depends on the size of the base - the cone.

Now we glue the finished roses to the cone, starting from the base to the top. We decorate with beads and as a result we get a beautiful Christmas tree.
Christmas tree made of paper - options for making a paper tree
Here is an option for making a paper Christmas tree that is suitable for small children. The fact is that the Christmas tree is made from the contours of a child’s palm.
Roll a cone out of cardboard. Next, take a green sheet of paper and a child. He applies his palm, outlines it and cuts it out. You will need a lot of such palms. Now we take the cut out palms and glue them to the cone. It turned out to be a wonderful Christmas tree.

Continuing with the cone options:

As you can see, the cone is good in any form).

You can use wrapping paper.

How do you like this stylish little thing from old glossy magazines?

It is made easier than steamed turnips).

Another very simple applique style option that can be easily made by a child. Take a sheet of colored paper as a background. Next, we will need several sheets of different colors. We cut strips of paper from them about half a centimeter wide. Their lengths are different: the first one is long, each subsequent one is slightly shorter than the previous one. We cut them, now we glue them onto the background sheet. Glue a star on top. The craft is ready.

Below is a video that shows how to make Christmas trees out of paper.
Christmas tree made from newspaper tubes
The Christmas tree can be made from any material. One of the simplest is a newspaper (although they are already disappearing from our lives). Tubes are rolled from it and then intertwined with each other. As a result, we get the following craft.

You can’t immediately tell that it was made from newspaper. The tubes can be painted in any color and the Christmas tree will be colored.
It all starts with making a large number of tubes. To do this, take a wooden stick and use it to twist a sheet of newspaper. Lubricate the edge with glue so that the tube does not unravel. We make a cone out of cardboard. We put it on a sheet of paper and start weaving. We glue the first row in the form of a pentagon.

Now we take the bottom tube and place it on top of the other. We take the next bottom one and put it on top again, and so on.

Thus, intertwining the tubes, we raise the “braid” to the very top.

We cut off the remaining long tubes at the end and attach a separately made star top.

The Christmas tree is ready. You can leave it white, or you can paint it.
There is another way of weaving:

And another model of the Christmas tree:

Making a Christmas tree from origami modules according to the diagram
One of the options for making a Christmas tree is to make it using the origami technique. Of course, this option is somewhat more complicated than all those described earlier, but the result is very impressive.

First you need to make modules. To do this, use the following diagram.

Approximately 650 such modules need to be made for a Christmas tree 20 cm high. Done. Now we collect the branches of the Christmas tree. We fasten the modules as follows: In the first row - 2 modules, in the second - 1 module.

We assemble the third row by attaching two more modules to the corners of the second row module. We insert it into the pockets located nearby, as a result the outer corners will stick out to the sides.
We assemble the twig, alternating first one, then two modules in each row.

We make either five or ten such branches. The splendor of the Christmas tree depends on their number. Now we glue the branches together, forming a circle.

You need to make several such circles. Depends on the height of the tree. For the trunk we use a wooden skewer or stick. We stick it into an eraser, plasticine, polystyrene foam - whatever is at hand.
Now we put the finished Christmas tree circles on a skewer. Glue the first row to the base. Then each subsequent row is glued to the previous one.

Having collected the entire Christmas tree, we make decorations for it. Below is a diagram of the assembly of another version of the Christmas tree from ready-made modules.

How to make a voluminous Christmas tree out of paper at home
Below are some rather interesting options for making a three-dimensional Christmas tree. The first option is that the Christmas tree is made from paper strips folded with ribbon and placed on a stick-trunk. We collect according to this scheme.
In the second option, take a blank sheet of paper: white or colored - green. We bend it in half and draw the contours of the Christmas tree. You can use these stencils.

Or like this.

For one Christmas tree - three stencils. Cut along the lines. After which all three blanks are glued together and we get Christmas trees like this.

And, finally, an original version of a large Christmas tree that glows from the inside. To make it, you need cardboard boxes from which we make pyramids. We dress each other. We put a lamp inside. As a result, we get such an original design.

Below is a pattern diagram for Christmas tree pyramid modules.

With a minimum of materials, but a maximum of desire, you can make something like this:

Here is also a worthy decor option:

Here are very laconic and stylish Christmas trees:

These are some interesting crafts that I think will decorate your home during the New Year holidays. Good luck and Happy New Year everyone!
A DIY paper Christmas tree is a very good and, most importantly, timeless idea when the question arises: what can you make and give for the New Year. A good gift combines sophistication of style, originality of idea and warmth of soul.
Of course, all these features are especially noticeable during major holidays. When the magical New Year's days arrive, we have much more free time, and it can be spent not only usefully, but also with pleasure.
For example, you can make New Year’s crafts with your children in kindergarten or school. Or you can make a Christmas tree - an original decoration for the office, and give such an unusual gift to your friends and colleagues.
We have prepared for you interesting ideas for paper Christmas trees that you can make with your own hands, including with your children. Let's consider several simple and at the same time original models - both as a gift and for decorating your home or workplace.
Let's start, of course, with crafts for the little ones. These green beauties are not the most complex, but they are definitely made, as they say, with soul. You can give them to dad and mom. And most importantly, such a decoration can be placed under a real Christmas tree next to a gift for the baby.
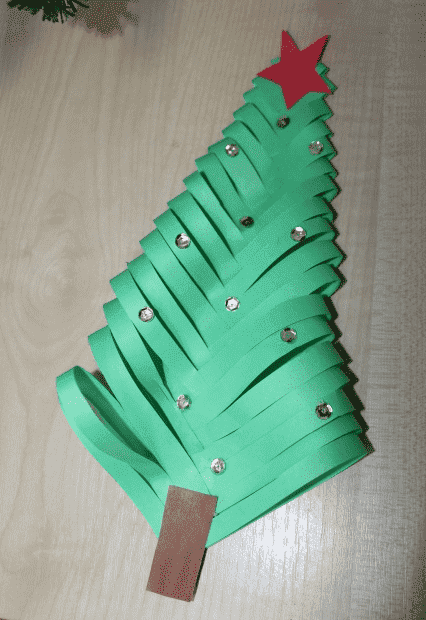
Christmas tree with rhinestones
Here, for example, is a universal model that can be made in almost any kindergarten group. The only condition is that for the little ones it is better to limit themselves to paper and glue, but in the older group you can also use beads for decoration.
We will need:
- sheets of colored paper in green, brown and red;
- glue;
- scissors;
- ruler;
- beads or beads for decoration (you can also take glitter, artificial snow and much more).

How we will do it:
Step 1. First we need to make a square blank. To do this, bend the triangle on an A4 sheet, and carefully cut off the rest.

Step 2. Turn the triangle over and draw 1 cm strips.

Step 3. We cut them from the bottom up, but we do not reach literally 1 cm to the top edge.

Step 4. Unfold the workpiece and glue each strip to the center in turn.

Step 5. After all the strips have been glued, let the workpiece lie for a while and dry. In the meantime, cut out a star on the top of the head.
By the way, you can cut quite a lot of decorations from colored paper - balls, cones and other figures. Rhinestones, beads, beads also look impressive - in a word, everything that sparkles and creates a festive mood. We glue the barrel on the bottom - and you're done.
Original postcard with Christmas tree
It is customary to give cards for almost every holiday, and this good tradition is well suited for the New Year. And the best gift is the one made with your own hands. Therefore, you can make another interesting figure with your kids - a three-dimensional postcard that easily folds between two pieces of paper and becomes flat.
We will need:
- sheets of colored paper;
- a thick sheet of cardboard for the base;
- scissors;
- glue.
We will act like this:
Step 1. First you need to take a sheet of cardboard and bend it exactly in half so that the colored part remains outside. It can be a leaf of any color, but it is preferable to choose shades that contrast with green - for example, dark blue, chocolate, light blue.
It is important that not only the Christmas tree looks good against their background, but also other decorations - for example, stars, which also need to be glued to the card so that it does not seem empty.
From them you need to fold an accordion with equal folds (about 1 cm each). In the middle, the craft is bent so that the result is a bow.
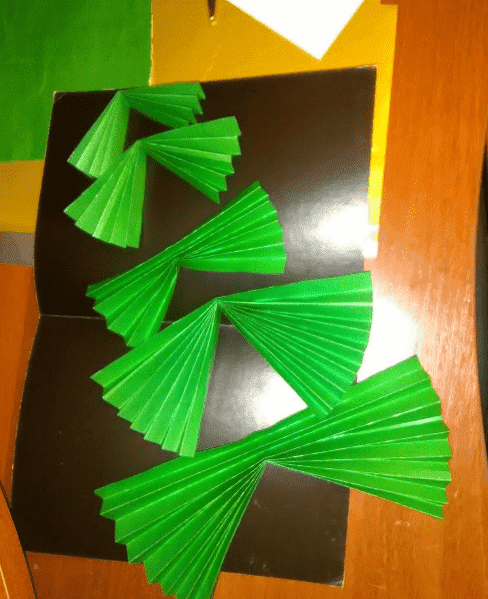
Step 3 . All these accordions need to be glued sequentially to the center of the future postcard. They should fit tightly enough to each other so that the tree looks like a complete, unified composition.
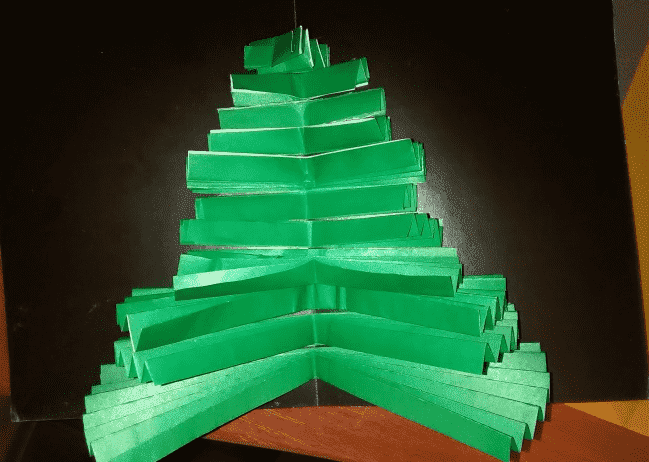
Step 4. Now carefully straighten each strip so that the Christmas tree takes on a three-dimensional appearance.
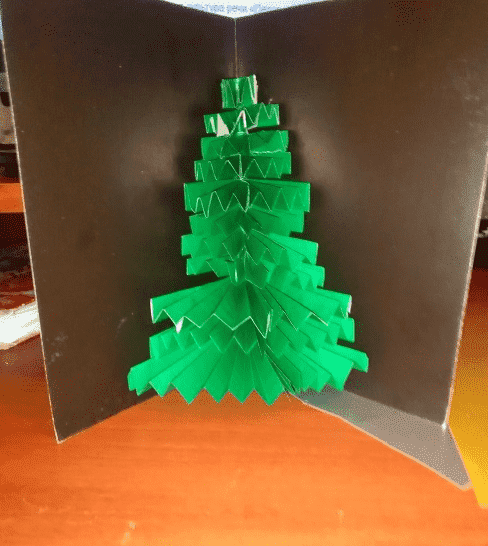
Step 5. All that remains is to glue the top of the head, stars and other decorations to the background of the card. On the reverse side you can glue a beautiful inscription made in advance, as well as snowflakes, cones, artificial snow and other elements of holiday decor.
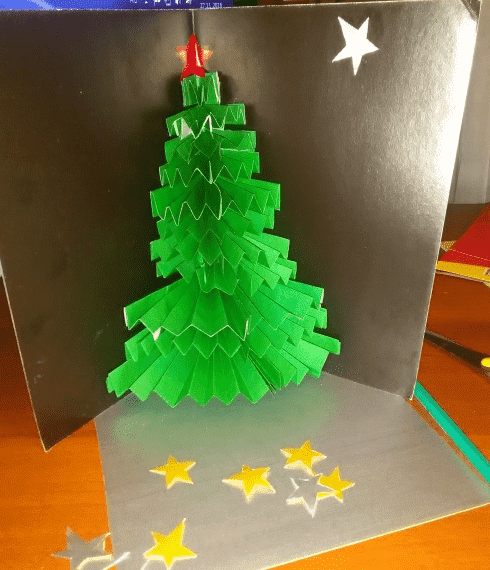
Velvety Christmas tree - an unusual photo stand
Now let’s move on to more complex models that you can give to colleagues, family and friends, or simply treat yourself to an original decoration for your favorite holiday.
Every person has, perhaps, hundreds and thousands of photographs, but among them there will probably be that very favorite photo, which in itself creates a festive mood. Why not make a special stand for such a photo?
For production we will need:
- green cardboard - 1 sheet;
- a skein of thick green or blue-green thread;
- white bouclé threads or cotton balls;
- glue;
- pencil;
- scissors;
- beads;
- glue gun

To make a Christmas tree out of cardboard with your own hands, we will act in stages:
Step 1. First of all, fold a sheet of green cardboard in half with the wrong side out, and then draw half a Christmas tree on it. To do this, you can simply print the template or copy it from a sample.
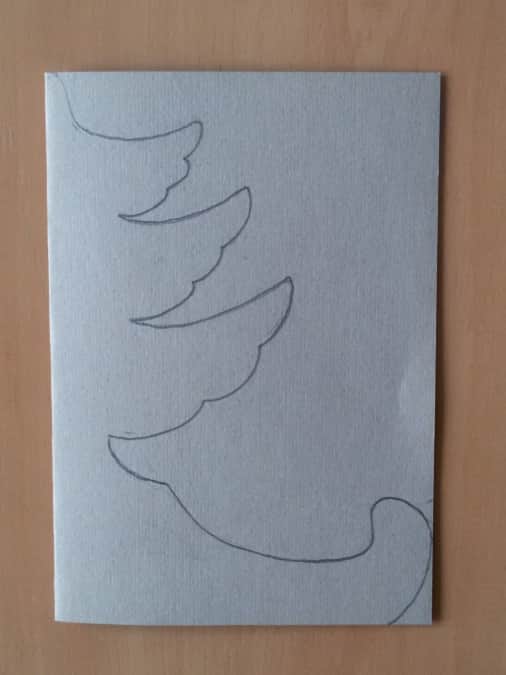
Step 2. Cut out the workpiece along the contour (folded).
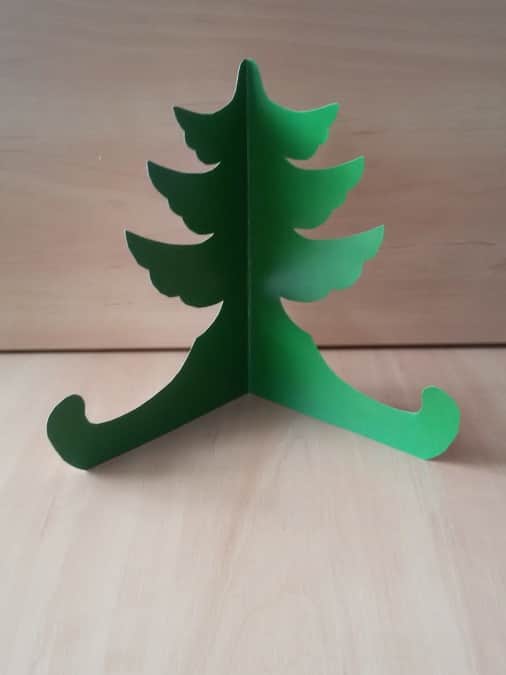
Step 3. Now let's take up the threads. They need to be folded in layers several times and cut into small pieces (1-2 cm each), placing them in a previously prepared container.

Step 4. Now comes a rather painstaking stage of work. Lubricate the surface of the Christmas tree (each branch separately) with a glue stick and glue the skeins onto it. It is better to do this in stages so that dust does not accumulate on the sheet.

Step 5. Only the top 3 sections need to be decorated in this way, since we will decorate the bottom one differently.

Step 6. Let our tree lie for a few minutes and the glue will dry a little. In the meantime, take a bouclé thread or simply roll up several small lumps of snow-white cotton wool.
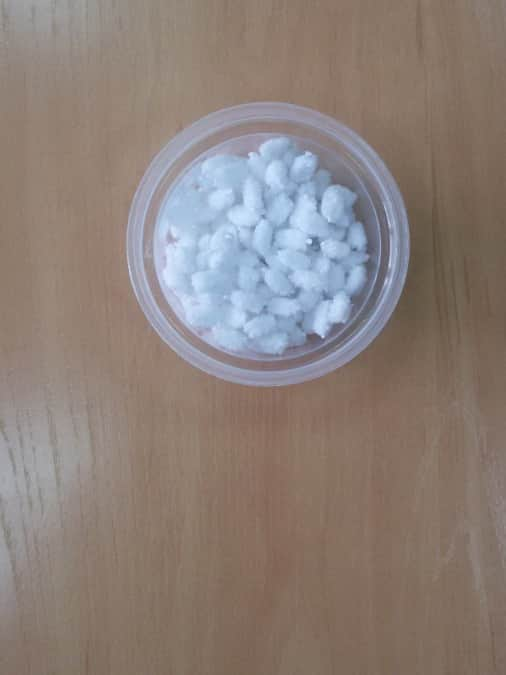
Step 7. These lumps can be glued using a gun or glue stick. The work must be done carefully enough so that there are no glue stains left on the surface.
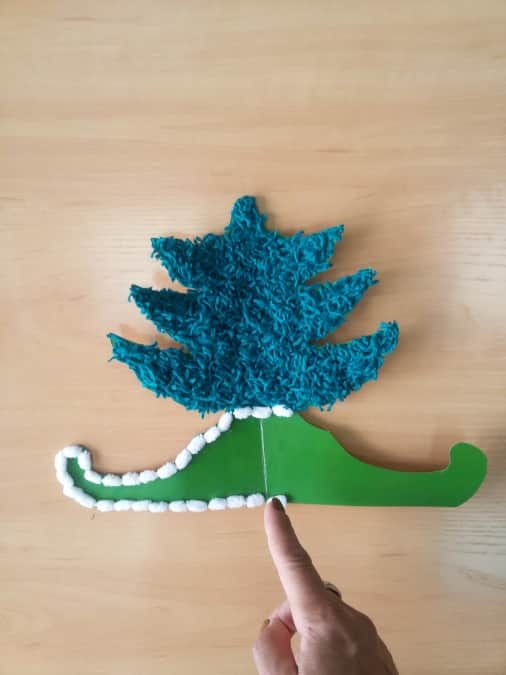
Step 8. Now you need to make tinsel for decoration. For this, weed thread or other similar material is used.

Step 9. Glue on tinsel and other decorations - you get this festive photo stand. An original New Year's gift is ready!

Origami Christmas trees
Origami is a classic style of craft making. In this way, you can make anything from paper: from flowers and animals to houses, airplanes and even submarines. But today we are waiting for the New Year, so we will look at several simple and at the same time interesting models of origami Christmas trees.
One tree and a garland
By itself, one craft may not look so impressive. But if we made 10 or even more models at once and strung them into a garland - it would be truly festive! Moreover, they should be as simple as possible and produced quickly.
So, let's make one tree, and then many such trees will create a real New Year's fairy tale. Here's how to make such a Christmas tree (see diagram):


Well, then everything is very simple. Such Christmas trees can be placed on a New Year's shelf or picked up on strings and hung above a false fireplace or in the hallway, next to a real fluffy beauty, etc. – it all depends only on the imagination and possibilities of space.

And here’s what the instructions for making a Christmas tree from paper without glue look like in the video – simple and clear.
Modular Christmas tree
But here is a variant of a more complex craft, which will result in a real masterpiece. It can be saved as a keepsake until the next holiday. Moreover, assembling such a beauty is not at all difficult, since all the modules fold the same way: you just need to sit a little and try.
Christmas tree for a corporate party in the office: simple and fast
But what about the friendly team that is preparing for the holiday, as they say, in an accelerated manner? Do you need to buy gifts, think over the scenario for the event, and perhaps even put something on the table? To decorate your workplace and hold fun competitions, you can whip up such a model.
To make it, you will need a minimum of materials that are likely to be found in every office:
- green cardboard;
- hole puncher;
- skewer or wooden stick;
- scissors;
- glue;
- decorations (figurines made of colored paper, cotton balls, ribbons and generally anything that is at hand).
A Christmas tree can be made in just a few minutes. We will act like this:
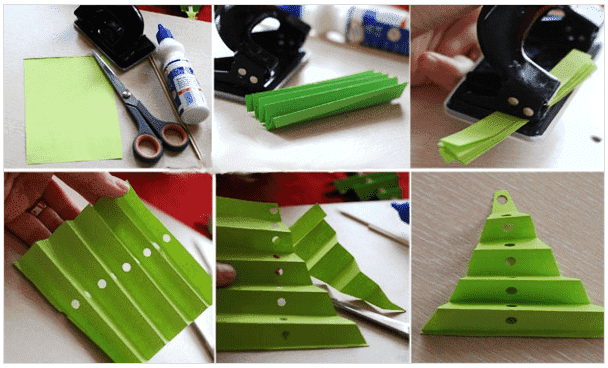
Step 1. First, fold a sheet of cardboard in the form of an accordion with a side of each fold of 1.5-2 cm.
Step 2. Then carefully make a hole exactly in the middle - if there is no hole punch, this can be done with a thick needle or awl.
Step 3. Cut off the side pieces in the form of triangles on both sides to create a Christmas tree shape.
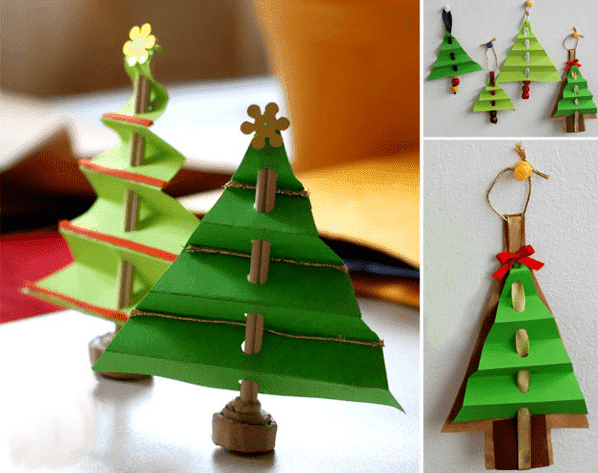
Step 4. Insert a skewer or wooden stick into the holes (in extreme cases, a pencil will do), and then decorate our crafts.
Here's what the step-by-step instructions look like in the photo.
And here's what the finished crafts look like. They can be hung or placed – all the advantages.
Christmas tree made of corrugated paper: options for a gift
Paper is simply an inexhaustible source of creativity. Even from an ordinary sheet you can make dozens of different models of Christmas trees. What can we say about corrugated paper? It is indispensable for such crafts, since it imitates pine needles very well and also looks very attractive.
To make such a New Year's gift we will need:
- white cardboard;
- corrugated paper green and red;
- scissors;
- glue;
- cotton wool and other decorative elements for decoration;
- toothpicks or wooden sticks;
- compass;
- pencil;
- ruler;
- bow.
We will act like this:
Step 1. First you need to make a cone out of cardboard - this is the basis of the future Christmas tree. To do this, draw a longitudinal line 30 cm long on the surface of the cardboard, divide it in half (15 cm each), and in the center, using a compass, draw a circle with a diameter of 15 cm (i.e., radius 7.5 cm). We cut out this circle and make a cone out of it, the same height as 15 cm. You can fasten it with a stapler or glue.

Step 2. Now you need to cover the surface of this cone with green corrugated paper.

Step 3. While the workpiece is drying, let's proceed to the main stage - creating pine needles. To do this, you need to cut 120-130 strips of corrugated green paper, 1 cm wide and 15 cm long.
Then we stack several pieces on top of each other and make slits 0.5 cm wide, as shown in the photo. After that, roll them up using a toothpick or stick. The ends of the strip need to be glued together to create a fluffy pompom.

Step 4. We fluff each lump and glue it onto a cone - that’s all.

Step 5. All that remains is to decorate as your creative imagination dictates - with bows, beads, sparkles. It turns out to be a model of a real Kremlin Christmas tree - very impressive and at the same time simple.

Here is a visual video instruction that will help you understand in detail how to make a Christmas tree out of corrugated paper with your own hands for the New Year or Christmas. Here is presented another model, which, by the way, is even easier to manufacture, and certainly looks no worse.
Christmas trees using quilling technique
Quilling is one of the modern trends in the decorative arts, which, however, has already become widespread among amateurs and professionals. Without exaggeration, we can say that you can make any beautiful model from twisted paper (and this is what is called quilling).
Here, for example, are several options for Christmas trees for New Year cards.
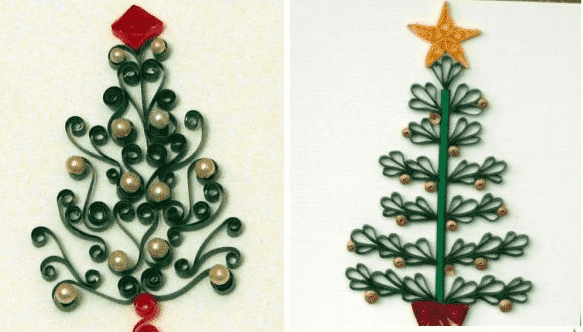


And here are three-dimensional figures, which consist of several modules glued together.


To understand how to make such masterpieces with your own hands, you just need to master the technique of twisting paper strips. From them you can make almost any model of a paper Christmas tree.
Step-by-step instructions in the video can help with this:
Christmas tree from old magazines - for lovers of nostalgia
There may probably be old glossy magazines or even ordinary newspapers lying around the house. To “breathe” a second life into these things, you can simply use them for New Year’s crafts, including making a Christmas tree.
Don’t think that the model will turn out “different”. In fact, it will give even the most beautiful figures made by other methods a head start. Of course, it is best to use colored glossy pages - then the Christmas tree will turn out to be truly festive.

Here is an example of creating one of the simplest crafts.
Happy New Year!
The Christmas tree is one of the main attributes of the New Year. Nobody forgets about it: people buy to decorate them with different outfits - souvenirs and garlands.
relax.by offers its readers 5 ways to make a Christmas tree out of paper, which can be placed not only in the apartment, but also to decorate the desktop or make a nice gift for family or friends. Here is a selection of ways to make a paper Christmas tree, with photos and step-by-step instructions.
Method number 1 - Christmas tree made of paper
You will need:
green paper;
ruler;
compass;
glue;
scissors;
pencil or tube for juices, cocktails.

Step 1.
Use a compass to draw some circles on the paper. Make each new circle 1-2 cm smaller than the previous one. Choose the number and size of circles yourself, depending on the size of the Christmas tree you ultimately want to see. The cut out circles are the tiers of our future Christmas tree.
Step 2.
Fold each circle in half once, twice and a third time: each circle needs to be folded in half three times. To ensure clear fold lines, draw along the edges with scissors.
Step 3.
Straighten the circles and cut a hole in the center of each, which should coincide with the diameter of a pencil or tube - it all depends on what you will use.
Step 4
.
Cover a pencil or tube with green or brown paper.
Step 5.
Now is the time to collect the Christmas tree. Carefully string all tiers onto a base - a pencil or a tube.
Step 6.
Decorate the top of the Christmas tree with a beautiful bead or star. You can also decorate the Christmas tree with sparkles and pieces of chocolate foil.
Method No. 2 - volumetric Christmas tree made of paper
You will need:
green paper;
scissors;
pencil;
glue;
compass;
ruler;
needle;
wire.

Step 1.
Using a compass, draw a circle of sufficient size on green paper - this will be the bottom tier of your future Christmas tree. Next, draw another circle inside the first circle, stepping back from the outline of the first circle a little more than half the radius. Using a ruler, divide the circle into 12 sectors.
Step 2.
Make a cut along the lines, up to the depth of the inner (second) circle.
Step 3.
Roll the sector into a cone, which must be secured with glue.
Step 4.
Prepare the remaining tiers in a similar way, gradually reducing their size.
Step 5.
Use a needle to make a hole in the center of each piece.
Step 6.
Roll the bottom of the wire into a spiral.
Step 7
All tiers of the Christmas tree need to be assembled onto a base - wire. You can secure the tree on top with a cone made from the same paper.
Method number 3 to make a paper Christmas tree
You will need:
green paper strips 5 mm wide;
four stripes of 1 cm;
red and yellow stripes 3-5 mm wide;
toothpicks;
glue (instant and PVA).

Step 1.
Use pre-prepared green strips 30, 20, 15 and 10 cm long. Twist them with a toothpick, then remove and let the strips unravel a little. Secure the end of each strip with PVA glue and give all the spirals a drop shape by pinching and slightly pulling one of the ends of the spiral upward.
Step 2.
Wrap the wide green stripes tightly around a toothpick and glue the tip to them, preventing it from unraveling. This is the trunk of your Christmas tree.
Step 3.
For the top of the tree, make a drop from a green strip 30 cm long.
Step 4.
Start assembling the Christmas tree, securing its elements with instant glue. Glue the barrel parts together and let the glue dry.
Step 5.
Insert a toothpick inside the trunk and glue droplets-twigs. Start gluing with the smallest branches that are attached to the top of the tree.
Step 6.
Make toys from yellow and pink stripes by rolling the paper without using a toothpick. You can secure the ends of the strips before the paper unwinds, or you can make the toys a little looser and give them the shape of small droplets. Glue the balls to the branches you like.
Step 7
Glue the drop at the very top - don't forget about it! - secure the decoration.
Step 8
If you wish, you can make a stand for the Christmas tree. To do this, you need to make nine curls from white paper strips. Glue the curls tightly together and secure the tree to the snowy white stand with glue. For complete naturalness, the stand can be decorated with cotton wool.
Method number 4 - New Year tree made of cardboard
You will need:
colored cardboard;
glue;
scissors;
hole puncher;
a small stick with a diameter approximately equal to the diameter of the holes that are obtained from the hole punch;
decorations.

Step 1.
Take a rectangular cardboard, fold it several times (as shown in the picture) and use a hole punch to make holes in the center.
Step 2.
Then take cardboard and cut it “at an angle” so that the craft eventually looks like a Christmas tree.
Step 3.
Pull the stick through the hole. If it does not hold firmly, then secure it at the point of contact with the cardboard with glue.
Step 4.
Decorate the Christmas tree. Decorations can also be secured with glue.

It is convenient to put up such a Christmas tree (if you make a base for it), and also to hang it if there is no space on your desktop for a Christmas tree made of paper.
Method No. 5 - Christmas tree from a magazine
The most budget-friendly Christmas tree!
The material for such a craft will be one large magazine or several small magazines. If the magazine has a hard cover, it is advisable to remove it.

For each page, do the following steps:
Step 1.
Starting at the top right corner, fold the page at a 45 degree angle.
Step 2.
Fold the sheet diagonally and in half again.
Step 3.
Fold the corner that extends below the borders of the magazine upward.
Step 4.
Follow the same procedures with the remaining pages and in the end you will get an unusual origami Christmas tree.

In addition to paper, a Christmas tree can be made from candies. How? See below.
Christmas tree made from candies
For the Christmas tree you will need:
500-600 grams of sweets in bright wrapping;
thick cardboard;
glue, scissors and double-sided tape;
Christmas tree decor: rain, a small star for the top of the head.
Please note that the color of the candy wrapper does not match the color of the Christmas tree decoration. If you decide to use rain, choose one with short pile so that the candies are visible.

Step 1.
Make a cone from thick cardboard, cut out a semicircle and wrap it. Glue the edges together with superglue, which will hold securely and set quickly.
Step 2.
Cut the bottom of the cone into strips, bend it inward and stick a circle on top, which will help make the base as stable as possible.
If you are preparing a Christmas tree as a gift for a child, then you can hide a small car or a soft toy inside the cone. You just need to think about the opening bottom for the Christmas tree.
Step 3.
Cover the cone with double-sided tape and remove both protective films. Next, glue a row of candies on the bottom. The candies must be pressed very carefully onto the tape, otherwise they will quickly fall off.

That is why it is advisable to choose sweets that are light in weight. If you decide to use heavy chocolates, then glue them to the tree directly with glue.
Step 4. Decorate the top of the Christmas tree made of candies with a light star made of wood or foam, then disguise the top with serpentine or tinsel. Your sweet Christmas tree is ready!
But what would New Year be without a Christmas tree made of tinsel?
DIY tinsel tree
You will need:
tinsel 2 m;
Whatman paper;
PVA glue;
glue "Moment"
scissors;
pencil;
needle with thread;
glue brush.

Step 1.
On a sheet of whatman paper, draw a circle with a radius of 25 cm. To evenly draw such a large circle, make the following device. Tie a pencil to the end of the thread with a needle, stick the needle in the middle of a sheet of whatman paper, pull the thread and draw a circle of the required diameter with a pencil.
Step 2.
To create the cone-base of the tree, you only need half of this circle, so cut the circle in half.
Step 3.
Connect the edges of the halves with an overlap and secure them with glue - for this purpose it is better to use Moment glue. The base of the Christmas tree is ready.
Step 4.
To glue the tinsel to the base, apply PVA glue on top of the cone and carefully glue the tinsel in a circle. Tinsel attaches well to PVA. Cover the entire cone in this manner and let the glue dry. The tinsel Christmas tree is ready!
You can also decorate a homemade Christmas tree with homemade decorations from small cones, nuts, beads, bows, and tinsel in a contrasting color. Buy small toy bells and attach them to the Christmas tree with glue.
To make the tree taller, make a stand for it, for example, from a small flower pot: glue a circle of cardboard to it and secure the tree there.
Interesting master classes in the relax.by Magazine:
New Year is the most fun and children's holiday.
Even adults are not afraid to look funny in red Santa hats and with a bunch of gifts.
What can we say about the kids who, in this joyful chaos, are trying to take part in all the activities!
The main attributes of the New Year are Santa Claus and a Christmas tree.
Traditionally, a large Christmas tree is decorated with toys and tinsel, and round dances are performed around it. What if you make a non-traditional Christmas tree?
A beautiful DIY paper Christmas tree will not claim a central place, but it can decorate a child’s room or become a souvenir gift. Believe me, such a Christmas tree will find its use.
A Christmas tree is made from paper, cardboard, colored and corrugated paper, tinsel and any other available materials.
It’s easy and fun to do: the kids take part in the work with great pleasure.
Two-year-old children, for example, can roll plasticine balls, which later become a toy, or glue a small part to the place indicated by adults.
And the memories of a joint craft will last for several days.
There are at least a dozen ways to make a paper Christmas tree with your own hands, but in any case
you will need:
- Paper (colored, corrugated, thick - whatever)
— Pencil with ruler Glue and stapler
- Scissors
- Sometimes a compass
Model No. 1. Three-dimensional paper Christmas tree
 First, the base of the tree is made - a cone. If the tree is planned to be large, the cone is made from whatman paper (it can be replaced with four A4 sheets glued together). Mark the center in the center of the wide side, draw lines from it to the two lower corners, cut it off (don’t forget to leave an allowance for gluing), cut off the semicircular base, glue it, check that it’s level. On this basis - a cone - you can make several different versions of Christmas trees. You can get a large paper tree if you make a large cone, and a small one - on a small cone. And the different methods of making needles will generally be misleading: it may seem that these are different Christmas trees.
The first version of the cone tree
To make the blank cone look like a Christmas tree, we make needles from colored paper. Traditionally, the needles are green, but you can assume that there is snow or frost on the branches - the choice of color is yours. We outline the rectangles: for the lower needles, the width of the rectangle is 7 cm. We make a trapezoid from the rectangle: the upper side is cut off. The wide side is folded into a triangle and fastened with a stapler or glue, the top side is convenient to glue to the cone.
Volumetric needles can be replaced with circles glued to the top. If you cut out circles of different shades of green, the tree will look more original.
The needles are glued in rows,  starting from the bottom. To make the tree look beautiful, reduce the size of the needles every three rows. That is, we first draw rectangles 6.5 cm, then 6 cm and 5 cm. We decorate the top of the tree with a small cone, the bottom of which is cut off with triangles. If desired, the Christmas tree is decorated with sparkles. You can use ready-made glitter, or finely chop tinsel. Apply glue to the needles and sprinkle glitter on them.
The second version of the Christmas tree-cone
 We build a frame, cut thin short strips from colored paper, and wrap each strip around a pencil. The stripes take on a curled appearance. With a certain skill, you can twist strips of paper with scissors: carefully draw the blade of open scissors from one end of the strip to the other, while simultaneously pulling out the strip. Glue the twisted strips to the cone. You can decorate the Christmas tree with anything: sparkles, bows, balls, stars.
The third version of the Christmas tree-cone

We glue drop needles onto the prepared frame. We make needles from strips of green (or any other) paper, glue their ends together - we get a drop. We glue larger drops at the bottom of the cone, and smaller ones at the top.
The fourth version of the cone tree
 Wide strips of paper cut into fringes are glued to the base. Again, the stripes are wider at the bottom (accordingly, the needles are longer), at the top the stripes are narrower. The color of the needles can be any: green will make it natural, multi-colored - decorative. We cut the strips into small “needles”, not cutting to the end of about 1.5-2 cm. After the glue has dried, the needles can be bent upward - carefully draw the blade of the scissors from the base of the needles to the ends. Such a Christmas tree made of corrugated paper will look beautiful.
Model No. 2. Christmas tree made of paper and cardboard

You will need double-sided cardboard. Fold a sheet of cardboard in half and draw the outline of the Christmas tree. We draw exactly the same outline on another sheet. We cut out both contours, then make slits along the axis to the middle: on one Christmas tree at the top, on the other at the bottom. We insert the parts into each other. We decorate with tinsel, balls (glass or paper), sparkles - whatever you like. The photo shows slotted toys.

A similar Christmas tree can be made from colored paper. It will require 4 sheets. Fold each sheet in half and cut out a triangle. We glue the resulting parts together and cut them at an angle with a needle. You need to tighten them before the glue dries.
Model No. 3. Christmas tree made of colored paper

For this model you will need thick paper. It’s easy to do: cut out a triangle, fold it like an accordion, make a through hole into which we insert a stick-rod. To make the Christmas tree stable, a stick can be inserted, for example, into an eraser. This Christmas tree can become a small souvenir or decorate your workplace. She will definitely create a New Year's mood.
Model No. 4. Christmas tree using papercraft technique
 The diagram clearly shows how such a Christmas tree is made from paper. You need to cut out several circles of different diameters (the bottom of the tree is from circles of larger diameter, the top is from circles of smaller diameter). Circles are drawn and cut, needles are folded. The finished tiers are strung on a rod. We decorate the Christmas tree with sparkles, beads, foil bows - the imagination is limitless.

Model No. 5. Folding Christmas tree

For such a Christmas tree, several circles of different diameters are cut out. The diameter and number of circles depends on the desired size of the Christmas tree. Fold each circle in half 4 times, unfold and straighten the circles. The trunk of the Christmas tree can be made from an old pencil, a cocktail straw, a wooden stick - all this is wrapped in colored paper, the tip is glued. We cut a small hole in the center of each circle (it should be smaller than the diameter of the trunk to hold it tighter). We string circles in tiers onto the trunk, starting from the bottom. A Christmas tree stand can be made from a wooden spool, cork, a plastic bottle cap, plasticine, or glued together from thick paper.
Model No. 6. Paper origami - Christmas tree
This popular technique can be used to make any figures, including Christmas trees. The video will demonstrate better than any words how a paper Christmas tree is made using the origami technique. We offer two options.
Another beautiful Christmas tree made of paper and made very simply and quickly! We just need to take a sheet of colored paper and scissors. This paper Christmas tree will be a beautiful craft for the holidays.
An error has occurred; The tape may not be available. Please try again later.
The New Year family holiday is approaching - the time to receive and give gifts, joy, care, and good mood. This event brings families together, brings peace and comfort to homes. The attributes of the New Year are multifaceted. Perhaps one of the main symbols of the holiday is the furry beauty and keeper of gifts - the Christmas tree. A spruce craft made by a child’s hands is especially valuable. I suggest you spend productive time with your child and “create” together an original paper Christmas tree for the coming New Year.
Festive Christmas tree made of scrap paper
Such a Christmas tree can be made together with preschool children, and younger schoolchildren can be trusted to create it independently. It’s even better if children of different ages take on making this decoration. Joint creativity develops thinking and creativity, and also strengthens relationships.
For work we will need:
- scrap paper in green shades - with large and small ornaments in six colors;
- paper scissors,
- glue,
- double sided tape,
- stapler,
- two sushi chopsticks,
- decoration for the top of the Christmas tree.
First you need to prepare paper. Sort out the colors, alternate large patterns with small ones, bright colors with dull ones. For the “layers” we take a neutral color (for us it’s blue paper).
For the first layer, we take a full sheet of paper, for the second, we cut off a couple of centimeters from the side of the sheet, for the third, another couple of centimeters, and so on.

We fold our blanks like an accordion, find the middle and fold them too. From blue paper we cut out four strips about 3.5 cm wide.

Now we fix the edges of the accordions, opening our “fans” in a full circle. We staple or glue, but be sure to leave holes in the middle for putting on sticks.
We twist the strips into tubes, but do not glue them together.

Now we begin the assembly. Lubricate the middle of the largest (bottom) layer and glue the bases of the sticks. At the very “root” we wrap the “trunk” once with tape, and on top with one of the blue tubes. Glue the edge.

We repeat the same with the remaining layers - we place a corrugated circle, secure it with tape and a tube. After the last, topmost layer, a tube is not needed, you will just need to decorate it with a snowflake made of foil, a decorative paper clip (like ours) or make a star from sculptural plasticine and paint it with shiny paint. The Christmas tree will look even more festive if you spray it with a special shiny hairspray.

This Christmas tree can be used to decorate a window sill at home, a shelf in a library, or can be taken to a kindergarten for a holiday exhibition.
Elegant Christmas tree made of paper by the hands of a child

You will need:
- whatman;
- white sheets of paper A-4;
- double-sided colored paper (2-3 colors);
- mother of pearl beads;
- green rain;
- PVA glue;
- stapler;
- pin;
- scissors.
Completing of the work:
1. You need to decide on the height of your future product and cut out a rectangle from whatman paper of the appropriate size. I was size A-4.
2. Fold the resulting sheet in half and draw half a drop, so that in the end you can make a cone (without a bottom) from the cut-out blank, twisting the paper like a homemade cup for seeds and gluing the edges with glue.

3. The cone must be “transformed” into a pyramid by pressing it to the surface, then perpendicularly again, so that the figure has 4 sides.

4. Cut off the “antennae” of the rain - the more, the fluffier and brighter your Christmas tree will be.

5. From white A-4 sheets we make an “accordion” (you need one piece for each wall). Place the paper horizontally with the longer side.
6. Glue the accordions to the sides of the pyramid, applying glue only to the outer sections of the paper.

7. The result is a figure that doesn’t look like a Christmas tree at all - it’s too voluminous and not collected. To achieve the result, you need to beautifully distribute the accordions and fix the paper with glue at the top of the cone, pressing it down with a clothespin for a couple of minutes.
8. Now it’s the rain’s turn - coat the Christmas tree blank with glue with a brush and sprinkle plenty of “needles” on top. If necessary, repeat again on top of the already attached antennae for thickness.

9. You can decorate the finished Christmas tree in different ways. In the presented version, double-sided pink and yellow colored paper was cut into squares, then it had to be crushed, a pearl attached inside and such a decoration glued to the Christmas tree. We did the same with candy wrappers, only without the beads. It turned out unusual.

My 4-year-old son was my assistant - the child really liked it, he got carried away and even made a sleigh for Santa Claus in the end according to his own design.

In every home, people decorate spruce and pine trees for the New Year. You won’t surprise anyone with a living tree or a plastic one, but you can complement the interior with an original analogue, made from scrap materials with your own hands, and especially valuable - by the hands of a child.
Preparing for the New Year is the most fabulous time for children and adults. Create the atmosphere of a fairy tale, decorate the house, write a letter to Santa Claus, and of course, spend time together with the children. Prepare crafts as gifts for grandparents, relatives, and decorate your parents’ office desk.
Christmas tree made of green corrugated paper
This Christmas tree will be a good decoration and will create a festive mood. Materials required for work:
- cardboard,
- green corrugated paper,
- glue stick or PVA,
- scissors,
- pencil,
- compass,
- hot glue,
- beads,
- glitter,
- Polish for hair,
- large brush for painting.

The base will be cardboard; its color does not matter. Using a compass, draw a circle; the height of the Christmas tree will depend on its size.

Unfold the corrugated paper, cut out a piece corresponding to the size of the cardboard circle, apply glue to the base and glue the green layer.

Now we need to make the future needles of the forest beauty. Cut the paper into strips 1 cm wide, fold them, and cut them. Apply glue to the edge of the paper to prevent the scroll from unrolling. For convenience, you should use a pencil, wrap a cut strip of paper 2-3 times around the rod, this will be enough.

The width of the needles (strips) should increase towards the bottom of the cone so that the craft looks harmonious. For the bottom row of needles, you need to make wider strips so that the needles are larger. You can use several shades of green, alternating light with dark.

Grease the base of each scroll with glue and press well onto the cardboard. Allow time to dry. Then straighten the paper strips. All that remains is to decorate the Christmas tree and give it a festive look.

Warm up the hot-melt gun and insert the glue stick. Apply 1 small drop of glue to one side of the bead and glue. Distribute the decoration evenly throughout the tree.

Spray the tree with hairspray. Dip a paint brush into glitter and apply it to the craft. Then use hairspray again. This will set the shine.

Beautiful origami paper Christmas tree
This master class will show you how to make a Christmas tree out of paper using the origami technique. The simple layout and elegant Christmas tree will appeal to all lovers of clear lines and symmetry.
To work you will need very few materials and tools:
- colored paper;
- scissors;
- Ruler and pencil.
We measure the workpieces.
Cut out squares from colored paper. 2 squares of green and light green colored paper with a side equal to 19.5 cm. Cut out the remaining five squares from green paper with sides of 17.0 cm, 14.5 cm, 12.0 cm, 9.5 cm and 7.0 cm, respectively . If you want to make a larger Christmas tree and have larger colored paper, you can independently set the size of the squares by simply reducing the side length by 2.5 cm.

We fold the Christmas tree blanks.
Fold the green square diagonally.

Without turning the sheet over, bend the corners of the square towards the center.

Turn the square over and fold it in half twice.

Turning the sheet over again, fold it into a smaller base square. This square is the basis of many origami products.


Having unfolded the sheet, fold each side of the square to the middle of the square and bend only the fourth part of the line on the right side as shown in the photo.


Roll up the base square. We place the corners marked with a cross inside the resulting trapezoid.


Making a tree trunk.
From a large light green square we fold the base square in the same way. To make the trunk narrower, we additionally bend the sides of the base square towards the diagonal in one direction.

Having unfolded the square completely, fold each side of the square to the middle from the middle of the square and bend the eighth part of the line on the right side as shown in the photo.

Again we fold the base square and bend the sides to the diagonal. We put the corners inward to make a trapezoid.

The result was a trunk and six parts of the tree crown.

We assemble a Christmas tree from parts.
We insert the tree trunk into the largest green part.


Similarly, like a pyramid, we collect the entire Christmas tree.

So the green paper Christmas tree is ready. It can be decorated and given as a New Year's gift, made two-color or multi-colored, and artificial snow glued to the shelf branches. By increasing the size and number of blanks for crown parts, you can make trees of different heights.

Christmas tree with a surprise made of paper and cardboard

The New Year's mood is spreading around the world, capturing large city squares and small children's crafts. A beautiful Christmas tree made of colored paper will help present a pleasant surprise to friends, parents and neighbors. In honor of the festive mood, the evergreen beauty is ready to change her usual colors to any other fun and fantasy shades.

Necessary materials:
- Thick paper in two contrasting colors;
- A piece of cardboard for a template;
- Scissors;
- Hole puncher;
- Double-sided tape;
- Pencil and ruler;
- Attention and desire to create a surprise.
To grow a paper spruce, choose bright and beautiful shades. We will make a base from one color of paper, and the second will serve as an additional lace decoration.
A miniature craft should have neat and clear lines. Therefore, we begin work by making a template. Using a ruler and pencil, draw an isosceles triangle on the cardboard. The size of the blank depends on the parameters of the intended gift.

Based on this template, we construct the inner part of the Christmas tree, which consists of two triangles connected by a transition 2-3 cm wide. We cut out a solid symmetrical figure.

We cut off the additional Christmas tree cover by 0.5 cm at the top and bottom to reveal the color of the paper of the main sheet. Then carefully use scissors to cut out a pair of spruce paws on each side. Branches can be located at different heights. A slight deviation from strict symmetry will add visual mischief to the Christmas tree. And a few clicks of the hole punch will give our New Year’s tree stylized Christmas tree balls.

We secure the additional paper layer to the main one with double-sided tape. We cut two oblong strips for gluing the additional layer to the main one and one small piece for connecting the tops. If you don’t have suitable adhesive tape at hand, you can connect the parts with glue or a stapler.

Everything is ready, all that’s left is to add a present: a sweet surprise or a New Year’s wish, or maybe something else. Beautiful multi-colored Christmas trees can be placed throughout the house on New Year's Eve so that everyone can accidentally stumble upon an original small gift.

If you find an error, please highlight a piece of text and click Ctrl+Enter.
