DIY paper grass. Craft and application hedgehog in kindergarten, school from seeds, cereals, vegetables, fruits, flowers, plasticine, salt dough, plastic bottle, paper, corn sticks and toffee, coffee beans, toothpicks, leaves
Volume application from paper for younger students
Master - class on needlework. paper application
Application "Village House"
Author of the work: Basanova Svetlana Grigoryevna, teacher of the extended day group "MBOU secondary school No. 16", Chistopol Tatarstan
The master class is designed for children of primary school age, teachers and parents.
Appointment of the master class: interior decoration in the extended day group.
Target: development of artistic and creative abilities by means of manual labor.
Tasks:
Educational: to develop artistic taste, a sense of composition; Creative skills;
Educational: learn to design from paper; to form skills and abilities in working with scissors, glue, paper, napkins; promote the development of fine motor skills and coordination of hand movements; to form and develop skills of manual labor;
Educational: to cultivate independence and accuracy in work.
Materials and equipment: colored paper, cardboard, paper napkins, scissors, compasses, pencil, PVA glue, ruler.

Progress: Oh, this village house,
Where the distance froze outside the window ...
It's like God's grace here -
My heart so desires to fly.
1. For the manufacture of panels, we will prepare a sheet of cardboard. We will decorate the background with green and blue paper.

2. From yellow paper, cut out the silhouette of a house 14 cm high, 10 cm wide.
Now we also cut out strips 4 cm wide from yellow paper. 9 strips 10 cm long, one strip 9 cm, 8 cm, 7 cm, 6 cm, 5 cm, 4 cm, 3 cm, 2 cm, 1 cm long.

3. Then, using a pencil, we fold the tubes - “logs” for our house and glue them from one edge.


4. We start building a house. We apply glue to the silhouette of the house and put the tubes from the bottom up, tightly gluing them to each other.

5. We decorate the roof of the house - cut out two strips of red color 1.5 cm wide and 12 cm long. Fold the strips in half along the shared line and glue along the slope of the roof.

6. Let's make windows in our house - cut out 3 red rectangles 3x2.5 cm and three white rectangles 2x2.5 cm,

glue white on red. Then we make frames from thin strips. We glue the windows on the house.
8. Guess - ka, guys, an unusual riddle:
Green aunt dressed in needles,
It stands alone in the forest on a hillock.
I put on earrings for fun
Having hidden nuts in earrings for squirrels. (Christmas tree)
To make a Christmas tree, we take a sheet of green paper, fold it four times and in half again, draw the outline of the Christmas tree, cut it out.

Let's separate the Christmas trees and glue them together only at the place of the fold.

10. Let's make the sun. From yellow paper we cut out 2 circles with a diameter of 5 and 2.5 cm and 1 red circle with a diameter of 3.5 cm. We also cut out 8 rays - triangles 2.5 cm high.

11. This is what the sun turned out to be.

12. Making clouds. Fold the white napkin in four and cut out an oval. Then we make cuts along the edges of the oval with scissors.

We glue all the layers of the napkin in the center and fluff the clouds.

13. Guess the riddle:
I'm like a cloud
You will find me in the meadow
My coat of curls,
And my name is ... ... lamb
Now let's make a curly lamb. Cut out the head, legs, torso and tail from white paper.

Draw a mouth and an eye on the head. Cut out a rectangle 11 cm x 3 cm, make cuts on both sides.

14. Now, using the rod from the handle, we wind each strip and make curls.

15. We paste ready-made curls on the body. We also make out the head.

16. Glue the finished parts on the cardboard.

17. Guess another riddle:
High and green
She will be bevelled.
Sheep, goats and cows
There is always it ready.
(Grass)
Let's make grass out of green paper. Randomly cut out strips of paper. From one edge along the entire length we make cuts.
Easter is one of the main Christian holidays. Even non-believers try to adhere to Easter traditions. We begin to get acquainted with the customs of our culture from childhood, therefore, in preschool institutions, competitions are often held to make the best Easter crafts. Children really like to do crafts with their own hands, and when you can give this to someone, or decorate a room, the children will be very happy about it.
The main Easter symbols in our area are Easter cakes, colored eggs, as well as a rabbit or a hare. Festive attributes and souvenirs can be made by hand. Parents or kindergarten teachers can help children make interesting crafts. Such activities allow you to develop creativity and motor skills of the hands.
There are many technologies and options for making your own Easter souvenirs. Of course, within the framework of one article it is impossible to make an overview of all possible methods, so we will consider several simple but interesting ways to prepare crafts for kindergarten, as well as for home interior design.
One of the main attributes of Easter Sunday are chicken eggs. They can be designed not only with the help of natural and chemical means, but also in original ways. Below are a few ideas that you can implement with your children.
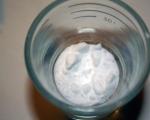
To beautifully decorate boiled eggs, you can use powdered sugar. It just needs to be mixed with a little water. As a result, you will get edible white paint. Show your imagination and apply various patterns to the surface. See the photo below for one of the options.

The next idea is more interesting. Such crafts will definitely stand out among other souvenirs.
For manufacturing, you need to prepare:
- cardboard,
- plain paper,
- Double-sided tape,
- scissors,
From paper materials, cut out the eyes, paws, ears of various animals. Fix the blanks with adhesive tape or glue.

The next option for coloring eggs is best cooked at home.
You will need:
- Buckwheat or rice
- Bandage,
- onion peel,
- Pot with water.
Before boiling eggs, you need to moisten them, roll them in buckwheat or rice, then wrap them with a bandage and boil them in water with onion peel. As a result, original and beautiful patterns appear on the surface.

There is another way to decorate Easter eggs. You need to draw the silhouettes of animals on paper and cut them out or use ready-made templates. Attach them to the surface of the boiled egg, and draw dots around with a marker. You will get an interesting result.

If you show a little imagination, then you can decorate eggs for Easter from various materials. If you have original options, then share them in the comments with blog readers.
Master class on making a three-dimensional Easter card
You can congratulate your loved ones and acquaintances not only with pleasant souvenirs, but also with postcards that you can make yourself. Below we will consider a master class that will help you make a voluminous Easter card yourself.

You will need to prepare the following:
- Markers or markers;
- Scissors;
- colored paper;
- Glue.
Step by step instructions:
1. On white paper, you need to draw a simple version of the church. If neither you nor your child have artistic talents, then you can simply find a suitable drawing on the Internet, attach a sheet of paper to the monitor and simply trace the outlines with a pencil or print the image below. Then circle the outlines with a marker and color the image a little, and then cut out the silhouette.

2. Now you need to make the basis of the future holiday card. To do this, you need to stick paper details on a blue sheet or cardboard: grass, clouds. Then fold the sheet in half.

3. The carved image of the church must be carefully folded in half and unfolded. Lubricate the edges with glue, and then fix the silhouette to the base. Also draw trees on the card.

Another version of the voluminous Easter card.

Small children with your help will be able to cope with this task.
Making an Easter Bunny out of a jar
Making the next craft is a simple process and takes no more than 30 minutes. Such a souvenir is an excellent gift for parents and caregivers, as well as a decorative element for decorating a festive interior.

So let's get started:
- You need to prepare white and pink felt. For one souvenir, you will need pieces 10 × 10 cm in size.
- You also need to prepare a plastic jar. The use of glass containers is not recommended to avoid the risk of injury.
- For making crafts, it is better to purchase quail eggs. Before filling the container, you need to carefully make a small hole in the eggs and pour the contents out of them.
- From white felt, you will need to cut out the ears of a bunny, and sew pink inserts to them.
- Now you need to make small cuts on the lid and thread the prepared ears into them. For reliability, fix them with glue.
- It remains only to fill the jar with empty eggs, draw a muzzle.
A cute craft is ready in just a few minutes.
Patterns and patterns for the Easter chicken from felt and paper
With your own hands you can make a cute chicken for Easter. For children, this craft will be difficult, so parents can independently carry out all the steps of manufacturing, and children can watch and help.

For crafts, you need to prepare the following:
- Felt in different colors.
- Pattern, (you can print below).
- Threads.
- Filler for soft toys.
- Beads.
- Needles.
- Scissors.
- Pins.
- stapler.
To start making crafts, first you need to print a pattern with chicken details.

Then you need to cut out all the necessary details, leaving a supply of paper to secure the element to the felt with pins or a stapler.


Fold the longest part of the bow in half to connect the ends.

Now sew the second part of the bow on the front side, making small stitches.

At the next stage, wrap the middle part around the bow, pull it and fasten it from the back so that the seams are not visible.

Prepare the front of the head and attach two layers of the beak to it. Fasten the first layer completely, and the second only half from the top. After that, the lower part must be raised so that it looks like the chicken has a slightly open mouth. Look at the photo how it should turn out.
Now you need to put filler between the layers of the chicken head and make a few buttonhole stitches, and then completely sheathe with an overcast stitch. After that, fasten the beads with threads, which will act as eyes.

The head is ready, in a similar way you need to prepare the rest of the details of the craft.

It remains only to carefully connect all the elements with buttonhole stitches.

A cute souvenir is ready. It is great for table or interior decoration.
But the next paper chicken craft will be within the power of young children. To do this, print the template below.

Now use the template to prepare the colored paper parts. Glue the beak and eyes, and then connect all the details with a small needle or pin at the bottom. You should get such a souvenir:

Such crafts for kindergarten will be very original.
DIY craft ideas
In fact, gift souvenirs can be made from almost any material. It takes a little experience and patience to implement creative ideas. Below you can see some interesting ideas for Easter crafts.
From an ordinary paper plate, you can make a cute rabbit. The whole procedure takes only a few minutes.

Crafts can be edible. To do this, you will need puff pastry and various figures symbolizing Christ's Sunday.

You can beautifully decorate the festive table with the help of crafts that you can make with your own hands from napkins.

With a little imagination, make rabbits out of small towels.

There may be many options.
Many novice needlewomen, looking at photos with the work of quilling masters, are wondering: how to make such beautiful crafts yourself? Naturally, various MKs come to the rescue, teaching the art of making flowers, animal figurines, portraits and landscapes using the paper rolling technique. But the most important questions for beginners relate to the basics of needlework in general, and not complex compositions. For example, what to make a background for a picture from or how to make an imitation of grass on it.
Today we will deal with exactly how a grass quilling master class is made in the technique, which is suitable even for small children, and adults will be able to come up with new, their own ideas based on it.


Necessary materials and tools
In order to make beautiful grass with your own hands in addition to your paper flowers, it is enough to prepare the necessary materials and then follow the instructions step by step. What you will need:
- quilling stripes of green shades;
- scissors;
- PVA glue;
- toothpick or quilling tool, pencil or thin brush.
Quilling strips can be cut from green or plain white paper, then you still need a long ruler, a pencil and a cutter. Using a sharp cutter, you can independently make strips of any width.
Additional materials:
- paint, markers or colors of different shades of green;
- sponge or sponge for applying paint.
These items will be needed for those who make quilling strips on their own. You can color paper in a variety of ways - after some experimentation with different colorants, you will be able to choose exactly those that suit your work. For example, in the picture, the quilling strips were painted with: emerald acrylic paint, salad acrylic paint, two-color markers, water-based color (from left to right, respectively). As you can see, the best result was obtained when using color.
There are no detailed descriptions and diagrams in this lesson - only basic ideas for implementing ideas. Grass can be absolutely any shape, thickness and color, depending on your preferences and imagination.
Fluffy grass from a wide quilling strip
Cut off a wide strip of paper from a whole sheet. Its width is the height of the grass, but you also need to leave a small distance below so that the chopped fringe does not fall apart.
Using such a template - strips of thick paper or cardboard - we cut a long fringe. This will help make it the same length, and also not accidentally cut your quilling strip ahead of time.
Using a toothpick or a quilling tool, we slightly twist the resulting grass in different directions. This must be done carefully so as not to tear off thin strips and not wrinkle them. We cut off the desired length, glue the blank on a postcard or panel and straighten the uneven blades of grass with our fingers.
The thinner you can cut the fringe, the fluffier and more realistic the grass will look.
Grass in fantasy style
With the help of strips twisted with a pencil or brush, you can create such curls. They will fit well into various paintings and fantasy-style crafts. The tip of the strip, which will be at the top of the blade of grass, needs to be cut at an angle, narrowing it. Sketches with such curls can be supplemented with simple quilling elements that will serve as leaves of an unusual plant.
Dense openwork blades of grass for large paintings
Such grass can be used in voluminous quilling works, or where the emphasis should not be on too small details. Such grass will look beautiful even without flowers: you can plant ladybugs or other quilling insects on it. For this tutorial, you will need a toothed comb or comb.
The end of the strip is bent on the third tooth of the comb and smeared with glue. Next, the loops are thrown over the teeth through one.


In total, you need to throw five loops.
Now we take a strip of a different shade and do the same, but we fix the end on the second tooth and make one more loop.
You should get these parts.
The resulting blanks are smeared with glue along the edges and glued together.
Such a funny grass will decorate any panel, for example, in a cartoon style. And how to make animals and voluminous flowers in the same technique, novice masters can learn from the video and photo tutorials, where the intricacies of paper rolling are described in stages.