Vertical application of shadows. Instructions for applying bird makeup yourself
It’s not for nothing that the eyes are called "mirrors of the soul", because you can learn a lot about a person from them, find him incredibly attractive or repulsive in literally a matter of seconds... It’s all the more important to be able to emphasize your eyes with makeup.
There are many ways to do this, having mastered which you can shine in new images every day. Here are the most popular and versatile techniques that have proven themselves among professional makeup artists.
As you might guess, this technique - basics. Being quite simple in its execution, anyone can master this method without any problems.
And one more undoubted plus: such makeup is beneficial will highlight eyes of any shape:
- Start by applying the lightest shade of eyeshadow all over your eyelid, all the way up to your brow bone. This will be our base layer.
- From the middle of the upper eyelid, apply a medium shade of eyeshadow.
- And at the outer corner, carefully apply the darkest shade used, which will highlight your eyes with its contrast.
- It is very important to apply shadow not only to the eyelid itself, but also to the space under the eyebrows.
Choosing makeup shadows, use shades of the same range; in the classical technique only they are used.
Vertical makeup
This technique is designed for owners of narrow eyes, visually enlarging the eyes, correcting the cut and making the look more expressive. In turn, round or bulging eyes will look bulging if you use this method.
Feature of this technique in vertical application and shading of shadows:
- To begin, cover the area from the inner corner of the eyes to the edge of the eyebrow with white eye shadow or highlighter.
- Slowly moving towards the middle of the eyelid, carefully apply eye shadow of a light shade.
- Apply the key shade to the middle part of the eyelid and the space above it. It will catch the eye more than others, so you can use a bright, contrasting color.
- Apply almost the darkest shade you use towards the outer edge of the eyelid.
- But on the corner of the eye and the area adjacent to it, apply the most saturated and dark of the shades.
If necessary, you can conditionally divide the space of the century not into five, but into four zones.
Horizontal eye makeup
In contrast to the previous method, this technique is recommended for owners large and round eyes.
But for ladies with narrow eyes she doesn't fit, since visually it makes them too wide. Its secret is almost the same as in the previous method, only all actions are performed not vertically, but horizontally.
This technique is considered quite complex, but after several attempts it is quite possible to master it:
- First of all, brighten the inner corners with highlighter, concealer or white shadows.
- Apply eyeliner or a dark pencil along the eyelash growth line.
- Use the middle shade on the area of the moving eyelid.
- For the crease of the upper eyelid, use the darkest shade used.
- Well, apply the lightest one directly under the eyebrow.
Banana- a very popular and beloved technique by many. Relatively simple in execution, it is suitable for any eye shape and gives the look that very desired expressiveness. This method of applying shadows will look especially good on small, round eyes.
Depending on the selected color scheme, this technique is suitable for both daytime and evening makeup:
- The moving eyelid is covered in the shape of a circle with the lightest shade of shadow available.
- The inner and outer corners are painted with the following shades.
- The corner of the outer and inner eyelids and the crease are painted over with the penultimate shade.
- And the darkest of shades “round off” the shape, applying it to the outer corner of the upper and lower eyelids, thereby, as if depicting.
Birdie- very contrasting, bright and rather an evening option. This type of makeup is shaped like a bird’s wing, which is why it’s called that. For close-set and round eyes, this technique of applying shadows will visually expand and expand:
- The inner corner is covered with the lightest shadows:
- For the center of the eyelid we use the next most saturated shade.
- The next shade in tone is applied to the outer corner, and then shaded towards the outer corner.
- And using the darkest color we decorate the outer corner with a tick, visually reminiscent English "v".
Pencil makeup
RELATED POSTS:
 A very interesting technique that allows you to easily and clearly transform eyes of any shape.
But it may take several attempts to get a good result.
Please note some tips, which will make the process of applying makeup as simple as possible:
- For your first attempts, it would be wisest to use the classic form.
- Applying makeup to the outer shape of the eye should only be done with the eyelids open.
- You should always have a good sharpener on hand to sharpen the pencil, pearl powder and a flat brush for beautiful and even shading.
There is nothing complicated in the process of applying makeup:
- You should start by applying a base layer.
- Then the area where the shadows are applied is lightly powdered.
- Next step - basic in this technique. A shape is applied with a pencil along the outer edge of the eye, which is carefully shaded with a brush with powder towards the temples.
- After this, fill the shape outlined with a pencil on the eyelid with shadows.
Correcting imperfections with makeup
However, there are times when the shape of the eyes is not ideal and needs correction when applying makeup.
Dropped corners:
- To adjust the direction of the corners, use rich, bright shadows and a base underneath them.
- Only draw arrows pointing upward; try not to apply makeup with your eyes closed.
- Use matte shadows, avoid pearl and glitter.
No crease:
- You must have thick and lush eyelashes.
- You can draw a false fold with shadows, and then shade it a little.
- Bright shadows at the outer corner will make the look more interesting, as will arrows raised towards the temples.
drooping eyelids:
- Light, pearlescent and shiny shadows are undesirable. But neat, thin, raised arrows are your option.
- Try to apply makeup with your eyes open.
Watch the video about different eye makeup techniques:
Watch the video for a master class on bird eye makeup techniques:
Our eyes are the mirror of the soul, and they should be expressive. It's good that with the help of makeup we can make them bigger/longer/wider, etc. There are many different techniques for applying eye makeup. I want to introduce you to the most famous classic methods for any situation and eyes of any shape. If desired, every woman can master these techniques, because you don’t have to be a professional makeup artist to skillfully select colors and shapes for perfect eye makeup.
1.Classic method
This is the simplest technique for applying eyeshadow, which is great for everyday makeup, and, what is important with the frantic pace of our lives, it does not take much time and effort. Apply as follows:
1) apply the base, lightest shade of eyeshadow to the entire upper eyelid up to the eyebrows;
2) in the center of the eyelid, a medium-colored shade of shadow is applied;
3) apply the darkest contrasting shadows to the outer corner.

2. Classic vertical method
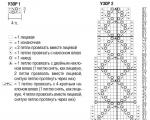
This method is perfect for narrow eyes, as it will visually make them wider. It is not recommended to use for bulging and round eyes: this will make them look even rounder. Its peculiarity is that the shadows are applied and shaded vertically. This is done as follows (see photo):
1) the first zone is highlighted using a highlighter or light concealer;
2) the lightest shade of shadow is applied to the second zone;
3) a transitional shade is applied to the third zone, which is somewhat richer than the previous one;
4) in the fourth zone darker shadows are used;
5) the darkest, most saturated color is applied to the fifth zone.
If you wish, you can do makeup using not all five zones, but, for example, four or three.

3.Classic horizontal method
This method, on the contrary, is suitable for round eyes, because it visually lengthens them. All shadows are applied and shaded horizontally. Apply as follows (see photo):
1) zone No. 1 is highlighted with concealer or highlighter;
2) highlight the eyelash growth line with black or another dark shade of pencil or liquid eyeliner;
Tweet
Cool
Eye makeup is a special and rather complex art, having mastered it, you can change your looks every day and become a real master of transformation. There are many different ways to apply eye makeup. Today I will share a few of them with you.
Classic way
The most common, very simple application technique. The biggest advantage of this method: a minimum of time and effort. This eye makeup looks like this step by step:
1. Apply the base, lightest shade of eyeshadow to the entire upper eyelid, right up to the eyebrows.
2. Use a medium shade of eyeshadow in the center of the eyelid.
3. The darkest contrasting shadows are applied to the outer corner.
Photo of the classic method of applying makeup


Classic vertical method
This method is suitable for narrow eyes, as it will visually make them wider. The use of this technique on bulging and round eyes is not recommended. The whole point of this makeup is that all the shadows are applied and shaded vertically.
1. The first zone (look at the diagram) is highlighted using a highlighter or light concealer.
2. The lightest shade of shadow is applied to the second zone.
3. A transition shade is applied to the third zone, which is slightly richer than the previous one.
4. Darker shadows are used in the fourth zone.
5. The darkest, most saturated color is applied to the fifth zone.
If you wish, you can do makeup using not five zones, but, for example, four or three.

Photo of the classic vertical method


Classic horizontal method
It will be an ideal option for round eyes, as it will visually lengthen the eye. Not at all suitable for narrow eyes. All shadows are applied and shaded horizontally.
1. Zone No. 1 is highlighted with concealer or highlighter.
2. Highlight the lash line with black or another dark shade of pencil or liquid eyeliner.
3. Apply shadows of a medium shade to the moving eyelid.
4. Use the darkest shadows in the crease of the upper eyelid.
5. Apply the lightest shadows under the eyebrow.

Photo of the classic horizontal method


“Bird” makeup application technique
The technique with an interesting name is best used for round and close-set eyes.
1. Apply the lightest shade of eye shadow to the inner corner of the eye.
2. The next most saturated shadows are applied to the center of the upper eyelid.
3. Apply a darker shade of shadow to the outer corner of the eye, then shade it all towards the temples.
4. Using the darkest color, draw a check mark in the outer corner of the upper and lower eyelids, which should visually resemble the English letter V.
Photo of makeup Birdie
.

“Banana” makeup application technique
My favorite way to apply eye shadow, which is where my love for makeup actually began. This technique not only looks very beautiful, but is also suitable for eyes of any shape.
1. Apply the lightest shadows in the shape of a circle to the center of the moving eyelid.
2. Apply the following eyeshadow color to the inner and outer corners of the eye.
3. Apply the following shade to the edges of the outer and inner eyelids, as well as into the crease of the eyelid.
4. Using the darkest color, create a visual rounding by applying it to the outer corner of the lower and upper eyelids.
Banana makeup photo


These were very simple ways to apply makeup that any girl can do.
Guys, we put our soul into the site. Thank you for that
that you are discovering this beauty. Thanks for the inspiration and goosebumps.
Join us on Facebook And In contact with
Today there are so many options for eye makeup that it is difficult not to get lost in this variety.
website I decided to turn to a professional stylist so that he could tell, and most importantly, show what the basic makeup techniques are and which one to choose based on the individual characteristics of the eyes and the reason for going out.
Vertical technique
This technique is most suitable for narrow eyes, as it visually makes them wider. With its help, you can create both daytime and evening makeup, depending on the color of the selected shadows and the intensity of their application. In the first case, colors from the same color group will be relevant, in the second, contrasting combinations are acceptable to create a bright image. The outer corner of the eye should be the darkest.
Horizontal technique
This method of applying makeup will be relevant for owners of round, bulging eyes - it will visually lengthen and stretch them. Shadows are applied and shaded horizontally. Arrows look good with this makeup.
Classical (mixed) technique
With this technique, shadows are applied simultaneously vertically and horizontally. In the classical makeup technique, shades of eye shadow of the same color range are most often used.
Pencil technique
Using the pencil technique, you can visually correct the shape of absolutely any eyes. Based on individual characteristics, a “framework” is applied with a pencil for future shading, which evens out the eye lines. The brush for shading should be quite rigid and dense in structure, its surface should be flat. You can darken the mucous membrane of the eye.
Every woman works on her image every day, choosing the type of makeup that best suits her face. The technique of applying cosmetics can be varied:
- Banana;
- Pencil;
- Birdie;
- Vertical;
- Horizontal;
- Classic.
Classic bird

It’s worth highlighting the bird’s makeup separately. It acquired its name due to its appearance. The color is applied to the eyelids in the shape of bird wings. The bird makeup technique involves a combination of contrasting colors.
Black and silver
Bird makeup in the chosen color scheme is quite easy to create with your own hands at home, having a certain skill. Otherwise, you will have to train on your own to look stunning by the appointed time.

- Line the upper eyelid with a black pencil, drawing an arrow.
- Apply silver eyeshadow to the inner corner of the eyelid.
- At the outer corner of the eye, draw a so-called bird. Perhaps this is the most difficult thing in creating this image for yourself.
- Select a point on the border of the moving and fixed eyelids, approximately in the middle of the eye. From there, start a smooth line running along the border to the drawn arrow.
- Apply black shadows along the created contour of the arrow with a brush and blend towards the temples.
- Complete the make-up by applying black mascara to your eyelashes.
Purple wings
The cold light purple shade of the shadows, framed by a dark one, looks very festive and unusual.

- Apply purple eyeliner to your upper eyelid.
- Apply a cold light purple color over the entire area of the moving part.
- Outline the created shade with a darker one along the border of the moving and fixed eyelids. Then make a “bird” with the same color.
- The created wing should be light in color on the inside and almost black on the outside. An important condition is the smoothness and smoothness of all transitions.
- Blend the transitions thoroughly.
- Emphasize the lower interlash line with a black pencil.
- On top of the applied shadows, draw a small arrow with black eyeliner.
- Complete the look by adding eyelashes.
Pencil bird makeup technique
The scheme for creating this option using the pencil technique is that eye makeup is done using a pencil, not eyeshadow. It is worth saying that the instructions for applying pencil make-up are somewhat more complicated than when working with shadows. Therefore, if you are new to this issue, it makes sense to practice initially.
Cold eyes
The bird makeup technique created with a pencil looks somewhat brighter and more contrasting. When creating it, it is worth having pearlescent shimmering powder on hand. It is this that will help you shade the transitions as correctly as possible.

- Line the upper eyelid with a black pencil, making a small arrow.
- From the middle of the border between the movable and fixed eyelids, draw lines to the end of the arrow, thereby as if drawing the English letter “V”.
- Use a brown pencil to create the appearance of shading towards the temple.
- Cover the inside of the eye with a pink pencil.
- Carefully draw the transition and border between colors step by step.
- Apply pearlescent powder along the border contour with a thin, damp brush.
- Lightly highlight the lower eyelid from the middle.
- Apply mascara.