DIY giraffe made from plastic bottles. Creative hobbies A simple master class on making a money tree
Note. See the pattern sheet for this toy for the frame diagram for the toy you have chosen.
The frames are made of wire 1.5 - 2 mm thick, aluminum or copper. The main thing is that it is flexible enough and at the same time can hold its shape well.
Frame configurations may vary. On each sheet of patterns, where necessary, we provide a diagram of the frame with an approximate indication of its dimensions.
Scheme N1.
The simplest type of frame is used for tails, rotating legs, and also for making snakes, lizards and other reptiles. For example, we need to make a frame according to this scheme:
It's done like this: cut off with wire cutters or simply break off a section of wire of the length specified in the list of materials for our toy (that is, in our case, 5+1+1=7 cm), and round off the sharp edges using a needle file. Then you need to bend the ends of the wire (each 1 cm long) 180 degrees with pliers so that narrow loops are formed. You can squeeze these loops harder with pliers if this end of the frame is inserted, for example, into the tip of a mouse tail. This way the frame will be less noticeable in it.
Scheme N2.
 |
The second type of frame is paired. In this case, we make a frame for two paws at once from one piece of wire. Let's start with the same thing we started with in the first case - cut a piece of wire of the required length. For example, let's take this diagram:
We will need 8+8+3+3+3+3=28 cm of wire (for the toy you have chosen, the frame diagram with dimensions is on the pattern sheet). Having cut the wire to the required length, round its edges and begin making the frame. Let's bend the wire in half. You can use pliers for this, but if the wire is soft enough, you can handle it with your bare hands. Then at the ends we bend sections 3cm long by 180 degrees, and finally, measuring 3cm from the folds, bend both loops 90 degrees. In this case, the resulting loops, if we place the frame “on its feet,” should lie flat on the surface, like feet. We will then insert these loops into the feet of our toy. This will give them the necessary rigidity and allow the toy to “stand firmly on its feet.”
Scheme N3.
 |
Frames of this type are used mainly for the manufacture of various “even-hoofed” toys - horses, giraffes, cows, donkeys and similar animals. In this case, you need to make two such frames (according to the number of legs), and they can be of different sizes. For example, let's take this frame:
To make it we will need 9+1+9+1=20 cm of wire (a diagram of the frame indicating the dimensions for the toy you have chosen is on the pattern sheet for this toy). We act according to the scheme already known to us. We cut off (break off) a section of wire 20 cm long, round off the sharp edges with a file. Then bend the wire exactly in half and wrap its ends 1 cm long by 180 degrees, compress the resulting loops with pliers. That's it, our frame is ready!
Scheme N4
 |
There are also such non-standard animals as, for example, a giraffe or an ostrich. We also cannot leave their long necks without frames. But in this case, the frame must be composed of two parts.
For example, let's make a frame for a giraffe. First, let's calculate the length of the wire that we need for this. For the lower part of the frame, cut a piece 9+1+9+1=20 cm long, for the upper part - 15+ 1+1=17 cm (a diagram of the frame indicating the dimensions for your toy is on the pattern sheet for it). After this, we process all sharp edges with a needle file.
With the lower part of the frame we will perform the same operations as with the frames for artiodactyls, that is, we bend the wire in half, wrap the ends 1 cm long by 180 degrees and compress the loops with pliers.
At the top of the frame, bend one end 1 cm long by 180 degrees, squeeze the loop with pliers. We roll the opposite end of the wire into a ring with a diameter of 0.5 cm, and, attaching it to the bottom of the frame (in the middle), tightly close its edges so that the parts of the frame are firmly connected.
So, the basic principles of making frames are clear to us. These principles can be used in the future for the manufacture of any, even the most complex and non-standard frames.
What could be more interesting for a child than a kind and beautiful toy. And if this toy is made by the hands of a loving mother or another close girl or woman, then it simply has no price.
Today we’ll talk about how to create a toy giraffe, 25 cm tall, using threads of different colors. Our giraffe will be very flexible and beautiful.
What will you need for this?
You need threads of different colors so that they combine the colors of the rainbow, hook No. 2, eyes, stuffing, glue, wire for hands.
Level of preparation for knitting: the most basic, time spent on completing the toy is about 3 hours.
All required thread colors are shown in the photo.
Act one. We make the forelimbs.
Our giraffe will be unusual in that it will look more like a person with arms and legs than an ordinary animal. Therefore, its forelimbs will be slightly smaller than its hind limbs.
In order to knit the “hands”, we need to knit two initial loops, which are called air loops. Next, you need to gradually add loops, when 1.5 cm is knitted, it is important to switch to the pink color of the thread, in total you need to knit 7 multi-colored motifs, 2 cm each.
Next, you need to repeat, making the second hand of the future toy. This is what happens in the end.

Act two. Torso.
The body of our giraffe is made in a similar way as the arms. Two air loops are also cast on, then their volume increases. We start with a yellow thread, only the size of the multi-colored parts to be knitted is no longer 2 cm, but 3.5 cm. The product also uses 7 multi-colored motifs. Towards the area of the arms and neck, the knitting narrows significantly, as shown below.

Act three. Lower limbs.
The lower limbs are tied in the same way as the upper ones. There are just as many motives. However, now the height of each motif reaches 2.5 cm.
Having made two legs of the future toy, we get such a blank.

Next, we need to fill our product with filler, and also sew the upper and lower limbs to the body. But there is no need to rush into this yet. Let's put what we have achieved aside and continue to work further.
Act four. Head
We make the head of the future giraffe as follows: we take red threads, tie two loops together, called air loops, and begin to actively add loops. So we knit 5 cm, then we shorten the loops, we knit 2 more rows like this, and then we switch to the yellow thread. After 2 rows of yellow, add loops. After another 3 cm we finish knitting.
It turns out that this is the head of the toy.

Next we tie the giraffe's ears using red thread. To do this, we knit 12 air loops, then tighten them and get ears.
The giraffe also needs yellow horns. We make them as follows: we knit the top circle and draw the wall down. The size of such a horn is 5 cm.

Act five. Tail.
There are no giraffes without a tail; you can, of course, leave your toy tailless, but it’s better to give it a tail. Moreover, it is easy to do. We take several multi-colored threads and connect air loops with them (approximately 25 VP). Close the loops, add a bow and the tail is ready.

Act six. Eyes.
The easiest thing in ours is to glue the eyes of the giraffe. For this we use ordinary Moment glue or its high-quality analogues. This is what we end up with.

Act seven. Sew on the head and body, add limbs
You can sew the head to the body using simple threads and a regular needle. We also did this without any problems.

Now you need to insert the wire into the body in the places where the front and hind limbs will be located. The wire must be wrapped with adhesive tape so that its sharp edges cannot harm anyone.
Papier-mâché is an original technique that is now widely used in schools and gardens as a method of handicraft. The name comes from French and translates as “crumpled paper.” Learning how to create crafts is not at all difficult, since papier-mâché is not a complicated technique. In addition, this method is interesting to many because it does not require spending a lot of money on materials. After all, to make a beautiful piece of furniture, a toy will only need an old newspaper, or toilet paper, glue, paints and imagination. It is enough to watch the master class once to be convinced of this.
Initially, the papier-mâché technique was used when making dolls with their own hands.
Now this method is widely used for making:
- Teaching aids;
- dummies;
- Masks;
- Toys;
- Theater props;
- Casket.
Professional craftsmen even make furniture accessories and lighting fixtures from papier-mâché.

For beginners creating crafts, there is one simple rule - show maximum imagination and be patient.
Products are created in three ways. First, the paper is soaked in water, thawed for 1 hour, and wrung out. Any glue can be added to it - PVA, wood glue, paste. All ingredients are mixed until smooth. It should have the consistency of sour cream. In some cases, a mixer is used for mixing. From this composition you can sculpt crafts, create three-dimensional products, you can see which ones by watching a master class.
The second method is to glue small pieces of newsprint in several layers to a specific base.

After creating the craft, decoration is done with paints, beads, seed beads, colored paper, and varnish.
As a basis for products, you can use anything that comes to hand - balloons, balls, vases, bottles, plates, wire frames.
Papier-mâché: animals
A master class on creating animal figures is offered by many papier-mâché professionals. But, it is not necessary to have an art education. After all, you can conduct a master class at home with your child. Making animals with your own hands using the papier-mâché technique is not at all difficult.

Giraffe: master class
The frame of a future craft in the form of a giraffe is made from rigid wire. Soak toilet paper in warm water. Some even use paper egg boxes. After mixing the paper with glue, you can start creating a masterpiece with your own hands. An adhesive mixture is applied to the frame and the body of the animal is formed. The technique is similar to modeling with plasticine.
After one part is applied to the wire, you need to let the layer harden. Then apply another layer, forming the tail, ears and face of the giraffe. Let dry. Each layer must be dry, otherwise nothing will work. When the body is ready, you can move on to decorating. Using gouache, paint the body yellow and make spots with brown. Eyes and mouth - with black marker. After the paint has dried, coat with varnish.

DIY sheep
To create a sheep you will need plastic frames from chocolate eggs, cotton wool, paper, paints, and PVA glue. The surface of the frame should be treated with vegetable oil before starting work. This will help you later remove the plastic base without any obstacles. The adhesive composition prepared in advance is applied to the halves of the frame, in a layer of about 3-4 mm. After hardening, the base is removed and the halves are glued together. Accordingly, you need to prepare two blanks: for the body and head.
The legs are made either from paper, by twisting it into a tube, or from wire, which must then be attached to the body and adhesive material applied to each of them. After drying, coat the figure with PVA glue and apply cotton balls on it. The more balls, the larger the sheep will be. The eyes are cut out of paper, the ears are formed from cotton wool and glued. You can clearly see the process by watching the master class.

Plate made using papier-mâché technique
Using papier-mâché, you can make original interior items with your own hands. The master class shows that professionals create plates, paintings, and exquisite kitchen lamps. Making a plate with your own hands is as easy as shelling pears.
For this you will need:
- Shallow dish;
- Newspapers;
- PVA glue;
- Cling film or tape;
- Paints;
- White acrylic paint;
- Brushes.
The newspaper should be torn into small pieces and moistened with water. The plate is wrapped in cling film. The first layer of newspaper pieces is applied to the plate base without glue. Subsequent layers must be coated with PVA or paste. The more layers, the stronger and more durable the craft will be.
You need to know that after every 5-6 layers you need to let the paper dry, removing air bubbles.
The surface of the plate is covered with acrylic paint. In the future, it can be decorated with any color - brown, red, green. Some take napkins with various images as a basis for the design and glue them to the plate after covering them with acrylic. When the base color is applied, the edges of the napkin will not be visible.
Papier-mâché: box
A master class from the best craftsmen proves that even a child can make beautiful crafts with their own hands.
To make a box you need to prepare:
- Cardboard cylinders from adhesive tape;
- Scotch tape (can be replaced with masking tape);
- Glue;
- Sheets of thick and thin cardboard;
- Newspaper;
- Scissors, pencil;
- Primer material;
- Lace or braid;
- Beads, seed beads, artificial stones;
- Gouache, brush;
- Transparent nail polish.
The basis of the box will be cylinders of adhesive tape, respectively used. They can be replaced with cardboard, thick cylinders from photographic paper. Some people use regular cardboard, coated with glue and dried.
Depending on the size, you will need 1, 2 or 3 blanks. The more there are, the higher the box will be. The bases must be glued together with glue or masking tape.
An obligatory step is making the bottom for the box. To do this, place the base on a cardboard sheet and draw a circle from the inside with a pencil, which is then cut out and glued to the base with glue. The lid is made in the same way, only the circle is drawn from the outside + 2-3 mm. The box must have a side. You can make it from cardboard. To do this, a strip 15 mm wide is cut. Using glue, the side is glued to the base.

Having kneaded the newspapers well, you should tear them into small pieces. Now you can start gluing the base of the box. It is necessary to apply newspaper sections in such a way that a base without gaps is obtained. Number of layers – 8-9. After every 3 layers you need to let the craft dry. Uneven edges are trimmed with scissors.
The box does not have to have smooth contours. With the help of adhesive, it is possible to add flowers, make the box into a house, decorating it with a window, bricks and a door, as your imagination dictates.
Toilet paper is soaked in water and wrung out. PVA glue is also added here. It is better to mix the composition with a mixer until it reaches the consistency of sour cream. From this mixture you can mold, like plasticine, any decorative element for a box.
The master class shows that specialists make patterns, ornaments, and drawings. Natural elements look very beautiful in the design - spruce branches, shells, coffee beans and much more. On the lid of the box you can make a beautiful large flower or pattern from the adhesive mixture. After all the elements have hardened, the surface of the box is covered with a primer material. If there are roughness or unevenness on the surface or patterns, all defects can be easily removed using sandpaper or a thin file. After priming, white acrylic paint is applied to the entire surface of the box. As soon as it dries, you can pick up paints and paint the craft. If you plan to decorate with beads, braid, or velvet, all these elements are glued to the box with glue. The final stage is to treat the surface with a transparent nail coating. This is done in order to secure the elements of the box and the paint.
Papier-mâché allows you to make your own crafts that will not only become excellent decorative elements for different rooms, but also wonderful, memorable gifts.
Papier-mâché: vegetables and fruits
After watching a master class on making crafts using the papier-mâché technique once, you can be convinced that the procedure, although lengthy, is not at all complicated.

An excellent decorative element for the kitchen is a papier-mâché plate with artificial fruits, which are also made using this technique. If desired, you can create not only fruits, but also vegetables.
Any real fruit or vegetable is covered with cling film and an adhesive composition (toilet paper, glue) is applied to the surface. After drying, the layer is cut into two parts, the base is removed, and the halves of the craft are glued together with glue. Then the fruit or vegetable is primed and painted with gouache in the appropriate color. Afterwards the surface is covered with a fixative – transparent nail varnish.
DIY papier-mâché for beginners (video)
Thus, you can create artificial vegetables and fruits, animal figures and other decor that are as close in shape and appearance as possible to natural ones.
DIY papier-mâché for beginners (photo)


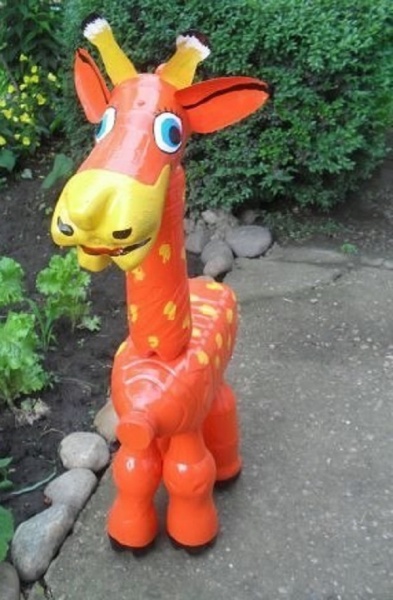
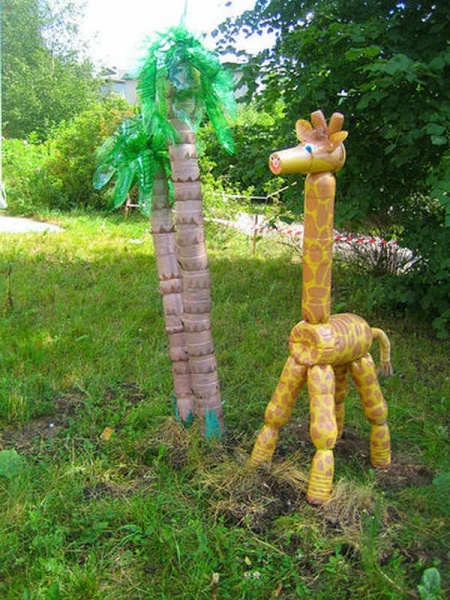
Not everyone can vacation in Africa, but anyone can create the ambience of a sultry continent on their own property. The giraffe is a striking representative of the African savannah; its long neck will be visible from the most remote corners of the dacha. The process of making a giraffe from plastic bottles with your own hands is a fascinating activity and does not require significant waste. The proposed master class will help you design various animal models for your site and home.
Street giraffe
It's hard to argue with the practicality of plastic bottles. Unbreakable material, resistant to precipitation and temperature changes, is an indispensable assistant in budget landscape design. Plastic crafts will successfully overwinter and will continue to delight the eye into the next summer season.
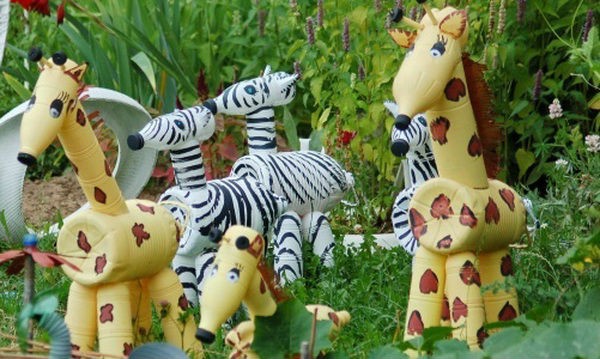
For an attractive giraffe you will need very little material:
- plastic container 6 l - 1 pc.;
- 1.5 l bottles - 8 pcs.;
- plastic container for 1 liter - 1 pc.;
- bottles for decorating small parts - 2 pcs.;
- acrylic paints in colors corresponding to the color of the giraffe;
- glue for plastic;
- scissors and wire.
Comment! It is preferable to choose bottles yellow or brown.
The algorithm of actions includes the following steps:
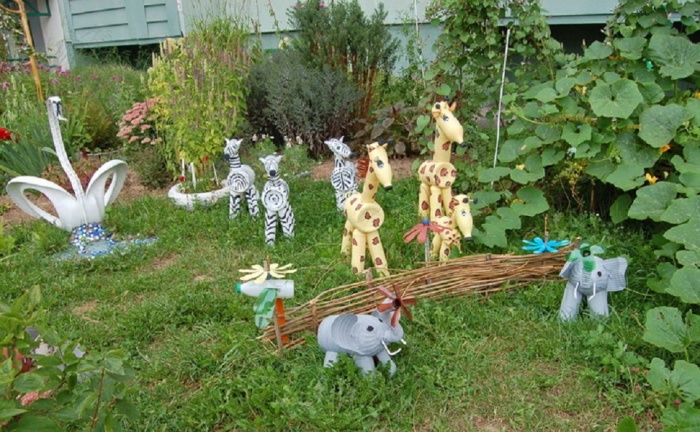
A cute giraffe will look natural next to a palm tree, also made from plastic bottles.
A pet
Creations made from plastic bottles can be a worthy decoration for a room. We'll tell you in detail how to make a small giraffe.

Prepare the following set of materials and tools for work:
- Plastic bottles of 0.5 l - 6 pcs.;
- tissue paper and foam paper in yellow and brown shades;
- suede fabric, tape;
- glue for plastic and PVA;
- heat gun;
- doll eyes.

Let's start transforming waste material into a funny giraffe:


The interesting process of creating a domestic giraffe is completed. But you can not stop there and continue decorating your surroundings. It’s quite quick and easy to make a combined giraffe in the yard for the kids, consisting of plastic bottles and a used tire. All you need to do is bury the rubber tire halfway into the ground. It will serve as the body of the giraffe. The neck and head are made by analogy with the large animal described in the first section.
The other day I decided to remember what papier-mâché is. Well, at the same time, show my son))) As a result, such a toy was born. What does she need?
Wire
Glue+water
First we made a wire frame. Mine was quite rigid so that the finished toy would not turn out to be completely plastic. I didn’t take a photo of the giraffe’s frame, but there is a preparation for the next animal:

As you can see, everything is very schematic. Next, my child and I wrapped this frame with paper soaked in a mixture of glue and water. It is best to take paper kitchen towels; they absorb water well, fit tightly together and dry quickly. Wrapped. At the same time, shaping the future shape of the giraffe: a larger muzzle and a thicker chest. Then I wrapped it all in thread for strength and put it on the radiator to dry. Dry for a day. Here is the intermediate result:

Next, they took the fabric and wrapped it in a random order around the entire animal. You can wrap it more carefully and with wider strips of fabric, then the design will be better visible. But we weren’t chasing beauty, we were chasing the process))) For strength, I again stitched the edges of the fabric with thread so that my son wouldn’t try to unwind it back. I sewed on the ears (we can have them sticking up or down; the giraffe looks either happy or sad), eyes, and outlined the nose. I didn’t embroider the mouth so as not to get attached to one facial expression. I arranged a lush forelock between his horns - and the beast is ready! My son really liked it, he walks around and hits the walls with it))) But I’m glad that, firstly, the giraffe can stand it, and secondly, I don’t feel sorry for it!