How to make a vest from a denim jacket. Denim makeover: an old jacket with a new twist
A denim vest is a wardrobe detail that makes it easy to create an unusual and stylish look. It's great for walking, paired with a T-shirt or a dress. For the office, you can combine a vest with a snow-white blouse. In addition, “double denim” is very popular this season - when the bottom and top of the ensemble are made of denim. Therefore, a vest can be paired with jeans.
Denim vest pattern
A denim vest pattern can easily be created from a dress pattern.
- From the 7th cervical vertebra, set the required length down. Draw the relief of the back.
- Increase the neckline by 2 cm along the line of the shoulders, the cut of the front and back and by half a cm along the line of the middle of the back. Draw a line for the neckline.
- Deepen the armhole of the back and shelves by 1.5 centimeters. From the top of the neckline you need to set aside the length of the shoulder cut - 7 cm.
- Parallel to the middle of the shelf at a distance of 2 cm, draw a line for the edge of the side. Draw the bevel of the side and the line of the bottom of the shelf.
- Set aside 5 cm from the top of the neckline and draw a cut line. This must be done in order to transfer the dart to the bulge of the chest.
The pattern is ready. Now you have to sew an elegant feminine vest.
It can be combined with a tulip skirt or trousers in a classic style. It will also look good with flared jeans or loose-fitting trousers, with banana trousers. Midi, maxi or mini length dresses and skirts are also perfect.
An equally successful ensemble is a denim skirt and short shorts (denim, leather) or Bermuda shorts.
How to make a vest from a denim jacket?
Turning an old denim jacket into a vest is very practical, especially if the elbows of the item are very worn.
- Open the connecting seams of the sleeves. The most convenient way to do this is with a sharp razor blade or small nail scissors. Don't forget to remove the collar. You can trim the neckline and armhole with strips of faux fur of a suitable color. You can also use decorative braid.
- It’s easy to make a short sleeveless vest in the Spanish style. First, determine the desired length of the future product and cut off the bottom. Fold the bottom edge over the “face” of the jacket and work a hem 4-5 cm wide. Divide the folded edge into segments (they should be equal) and make holes for eyelets on their boundaries. They are installed with a special punch or pliers, which are sold in sewing accessories stores. You can also install the eyelets in the studio. Thread a bright bow tie made of colorful thin material through the holes. You can even use a neckerchief.


- The resulting vest can be decorated with a stylish print. Take bleach. If you want to make your product spotted, spray it with white from a spray bottle. If you tie the fabric in several places and wash it with bleach, you will get interesting stains. There is another option - draw any design with a brush.

- Take the back parts from which you cut off the excess (with a new seam line) and stitch - this is the middle seam of the back of the vest (we will make a seam like it is on jeans, using part of the saved top allowance). Don't forget to stitch back the bottom of the strap and the waistband section.
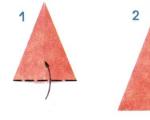
- Fold the structure so that the back is facing you and the waistband is at the bottom (i.e. turn the pants upside down). Draw lines for the neck and shoulders, as in fig. Cut out taking into account allowances. Cut out the shoulders from the front and back at once (cut both layers of the legs at the same time).
- Now make the front cutout. Draw a straight line from the top of the shoulder to the clasp, as shown in fig.
- On the sides, unstitch the seams for the armholes - 30.5 cm (in the figure - 12 inches). The parts near the waist that will remain unaffected are the side seams of the vest.
- Slightly round the cuts of the neckline, neckline and armholes - you should get smooth transition lines, as in the very first picture. finished vest.
- Fold up all open sections (armhole, neckline, front neckline) and do the finishing in the same way as on jeans - with double stitching. Sew the shoulders. All is ready!
Materials used: forum.knitting-info.ru
With a denim vest you will always be fashionable and charming, bright and cute! Try to create this design masterpiece yourself. It is not difficult. Moreover, a new, always relevant item will appear in your wardrobe.
Denim has always been in fashion. Now, in addition to the jeans themselves, denim jackets and vests are especially popular. And if only an experienced seamstress can sew a denim jacket on her own, then every fashionista can make a denim vest with her own hands.
You probably have an old denim jacket in your closet that is not the most fashionable style. So let's give it a second life by turning it into a stylish and fashionable vest! By the way, for mere pennies you can buy a good-quality denim jacket in second-hand stores. In some stores you can find almost new, good branded items, and the prices are significantly lower than Chinese consumer goods in the markets.

In addition to the jacket, you will need: scissors, metal rivets or decorative buttons (whichever you prefer), thread and a needle.
Using sharp scissors, carefully cut off the sleeves of the jacket; if desired, you can leave 1 cm for the fringe.

Sew decorative buttons or insert metal rivets onto the pockets (or any other part of the vest). In general, a denim vest is a space for imagination: you can decorate it as you wish, the main thing is to stop in time and not turn your masterpiece into the height of bad taste. Cut out small squares or rectangles from the cut off sleeves, “fluff” the edges and sew a couple of such patches directly onto the vest, after decorating them with rhinestones or rivets.

To give the vest a touch of romance, use lace, which can be sewn onto the collar, sleeves or pockets. Lace sewn inside the pocket as a patch for a hole you previously made will look impressive.

Now in stores with sewing accessories there is such a large selection of all kinds of decorative elements that it can be difficult to make a choice in favor of just one! To decorate your vest, you should take a closer look at various ready-made appliques (available in sizes for the entire back), ready-made decorative braid with rhinestones, sequins or beads, decorative shoulder straps, ready-made patch collars.


A simple denim vest can be used to create many stylish, fashionable and comfortable looks. Look at the stars: they skillfully combine a vest with almost any clothing.
.jpg)
.jpg)
.jpg)
.jpg)
A vest with jeans looks bold and bright. Add a shoulder bag and a white T-shirt or blouse and you've got an everyday look.

Feminine dress, vest, clutch and heels - go on the date of your dreams!
.jpg)
A light floor-length sundress, sandals, a summer scarf, an oversized bag - in this look you can go shopping or for a walk around the city.
.jpg)
Combining a denim vest with clothes in pastel colors, you will get feminine and delicate looks.

A DIY denim vest (patterns, detailed instructions, decorating tips - that’s what we’ll talk about today) is a fun and rewarding activity. Fashionistas always strive to stand out in a crowd of people, but with the rapid development of democratic companies and mass markets, this has become an almost impossible task. And is there a way out of this situation? Of course have. You just need to go through your wardrobe and take out old things from the closet that you will no longer wear. Today, the spotlight is on old denim shirts, denim trousers, stretched printed T-shirts and out-of-fashion evening dresses.


A little about the material
Today we will talk about not the most delicate and light fabric. It appeared at the beginning of the last century, when, at the height of industrial development, ordinary workers began to experience an acute shortage of clothing that could protect against the negative effects of chemical compounds. In the mid-60s, designers turned their attention to this rough material and demonstrated several collections of trousers. Gradually, the range of outfits and styles has expanded greatly, and now fashionistas are sporting denim skirts, vests, shirts, shorts, sundresses and overalls.


 But few people know that such changes were influenced by far from famous couturiers, although their merits in this should not be underestimated. Representatives of the world-famous “hippie” subculture played a key role. They didn’t want to part with their favorite pants, so they periodically shortened them, transforming them into shorts or skirts. It was they who taught us how to cut up worn-out items so that they would turn them into truly durable and stylish outfits that could last for several more years.

Variety of options
Today, there are plenty of ways to breathe life into worn denim jackets and trousers with holes from outdoor trips. We will begin the description of the master classes with the simplest option.


Cutting the sleeves
Transforming a shirt into an original vest is very easy. Simply pick up the scissors and separate the sleeves from the product. If you want, you can adjust the length and get rid of the collar. Stylists do not recommend processing the edges; it is better if they remain shaggy.


Let's say you have already completed all the steps described above. So, all you have to do is decorate your handmade with an extravagant outfit. Here are some ideas for a makeover:
- Take a worn T-shirt and cut the design off it. This could be an image of a sad cat, the Eiffel Tower, an interesting inscription or an emoticon. In general, the choice of pattern depends only on you and on your desire to say goodbye to your favorite top forever. Now attach the blank to the back of the vest and sew along the contour using a sewing machine. To prevent others from seeing the seam, make a border of beads or stones. Don't want to take out the machine? Apply special glue to the wrong side and press it tightly to your outfit.

- Applications. This simple method of decoration has been familiar to fashionistas since Soviet times.

Advice! This year, floral arrangements have become fashionable. Don't miss the opportunity to make your look feminine and unique!
- Lace inserts. Buy the required amount of material at a specialty store, cut thin strips and decorate the back or front with them, or better yet, both. This will add coquetry and mischief to the bow.

- Spikes. A bit of a shocking method, but it is very good in cases where the vest is made for young girls. Use them to highlight your shoulders, collar or pockets.

- Basque. If you have an unnecessary evening or summer dress, feel free to cut a piece of fabric from it, give it a flounce shape and sew it to the belt. Such contrasting decor will accentuate the waist and make your silhouette more slender.

Jeans patterns
Inspiration can be drawn from fashion magazines and online resources. Now we will describe in detail one of the options that is suitable for everyday use.
- Before getting to work, wash the workpiece well, iron it and spread it out.

- Pick up a small piece of chalk or a piece of soap with sharp tips. Place the back pattern so that the seams of the trouser legs fall on its center.
- Place the front shelves in a mirror manner.
- Circle all the details and start cutting out the future product.
- Now start processing the edges. You can use an overlocker and sew the wrong side with a regular stitch. This will give the outfit an aesthetically pleasing appearance.
- Sew fringe strips onto the armholes.
- Fastenings can include zippers, buttons and hooks.
- Sew side and shoulder seams.

Fashionable handmade with pockets
You probably already guessed that the main element will be the parts cut from the back of the trousers. Take whatman paper or old newspapers out of the closet, we begin the preparatory work:
- In the area of the buttocks, draw an equilateral heptagon. There should be pockets in the middle.
- Long strips are sewn to the workpiece. They will serve as shelves, so it is recommended to make the upper part narrower.
- Attach a narrow rectangle to the model at the back. This will be the back. Use an elegant bow as a decorative element. You can also attach a strap or buckle.


Advice! Since your back will remain almost completely open, wear T-shirts and long sleeves underneath. Tank tops and tank tops are not suitable as they also expose the shoulders.
Important Preparations
Before you start experimenting with boring outfits, you need to carefully prepare. You have no idea how exciting and exciting this process is. Selecting the right decor in stores, looking at display cases with models, looking for inspiration in magazines and the Internet is a real pleasure for those who are tired of the everyday routine and want to immerse themselves in a creative hobby. First, prepare all the necessary attributes:
- Worn things. As mentioned earlier, you can use absolutely everything - from evening dresses to home t-shirts and tops. Naturally, you can’t do without a denim jacket or trousers. You can buy lace, guipure, chiffon and other types of fabric in the store.

- Threads. They must match the color of the main materials. But sometimes you can move away from the usual patterns and use threads of contrasting colors.

- Needles and safety pins (3-4 pieces).

- Scissors, rulers, soft meter tapes.

- AZ size sheet of paper.
- Pencil, felt-tip pen or marker.
- A bar of soap or chalk.

Advice!Today, unexpected combinations are in fashion. Corduroy and velvet are on trend this year. They give the product incredible chic and luxury.

- The selected threads must be strong. This will help preserve the excellent aesthetic qualities of the vest longer.
- Use nail scissors or a blade to carefully rip apart the material.
- If you sew an elastic band to the wrong side of the back, it will emphasize the beauty of your waist.
- When large-sized trousers are used as consumable clothing, it is enough to simply cut off the connecting seams.
- First you will process the parts manually. Only after trying it on will it be possible to connect the elements using a sewing machine.
- Handle decor with care. In some cases, glue is used, and it is important that traces of it are not visible on the fabric.


What to wear with it?
Let's say that you have already created your creation. Now it lies on your desktop and delights you with its beauty. Most likely, the question has already arisen in your head: “What to wear with a masterpiece created with your own hands?” And before we say goodbye to you, our dear readers, we will consider this topic in detail.
- Here's a great combination for every day: a new vest (by the way, no one has a second one), a stylish T-shirt and fashionable glasses.

- A look in the spirit of glamorous urban chic: a loose T-shirt with an animal print, a short denim skirt and a vest.
- A strict black jacket and tapered trousers. Short versions can be combined with chunky flat boots with lace-up soles and studs.

- Long sleeve V-neck, beautiful ballet flats, moccasins, loafers and squadrons. You can also choose ankle boots with a thick platform or boots in a cowboy style (an absolute trend for the coming year).
- Long maxi dress, sandals and floral print accessories.

- A sundress with horizontal stripes and your handmade item is a great ensemble for walking around the city and going out into nature.

- Bright jumpsuit and large wedge shoes.
Buttons and rhinestones
Naturally, you will need decorative elements to decorate your outfit. They can be “peeled off” from an old dress or bought at your local store. The choice of shiny stones must be approached with the utmost seriousness.
For example, it is appropriate to talk about pretentiousness here. Products that are too large will look very defiant, and wearing them on yourself is not a great pleasure. And if you really like this decoration, don’t sculpt it wherever there is free space. It will look vulgar. It is enough to select one or more elements.


Now about the colors. Today, customers are presented with a huge number of options. First, open your closet and determine the number of combinations that will create looks with a vest. Select the predominant shade and boldly go to the store. Now you know exactly what you need.


 There are also metal rivets and buttons. They fit harmoniously into the overall denim picture like nothing else. The latter, by the way, are very difficult to attach, so it is better to give preference to elegant buttons. Here you can reveal all your decorator abilities. Let there be a large skull on the back and a stand-up collar on the front.

A handmade vest is a stylish addition to any woman's wardrobe. This versatile item can be used almost everywhere - during the morning commute to work, in nature, to meet friends, to the beach and on a romantic date. Believe me, you will always look great with her!
A denim vest is a wardrobe detail that makes it easy to create an unusual and stylish look. It's great for walking, paired with a T-shirt or a dress. For the office, you can combine a vest with a snow-white blouse. In addition, “double denim” is very popular this season - when the bottom and top of the ensemble are made of denim. Therefore, a vest can be paired with jeans.
A denim vest pattern can easily be created from a dress pattern.
- From the 7th cervical vertebra, set down the required length. Draw the relief of the back.
- Increase the neckline by 2 cm along the line of the shoulders, the cut of the front and back and by half a cm along the line of the middle of the back. Draw a line for the neckline.
- Deepen the armhole of the back and shelves by 1.5 centimeters. From the top of the neckline you need to set aside the length of the shoulder cut - 7 cm.
- Parallel to the middle of the shelf at a distance of 2 cm, draw a line for the edge of the side. Draw the bevel of the side and the line of the bottom of the shelf.
- Set aside 5 cm from the top of the neckline and draw a cut line. This must be done in order to transfer the dart to the bulge of the chest.
The pattern is ready. Now you have to sew an elegant feminine vest.
You can make a vest from old jeans. As a rule, knees and step areas wear out a lot in this thing, but we don’t need them at all.
You will need the top of the jeans - the one just below the crotch seam and the entire top part with a belt.
- Measure yourself from the base of your neck to your waist, or even lower if you want a longer vest. This measurement is the length of the future product. Measure this length on your jeans, starting from the top of the waistband and down (you'll end up just below the crotch). Don't forget to add another 2cm down for future shoulder seams.
- Carefully open and remove the zipper and the slope underneath it, but do not damage the fastener fabric itself - the front part of the future vest. On the belt, cut off the excess protrusions for the fastener. Open the crotch and back seams. Leave the waistband at the back, letting out only the bottom of the strap that is above the back seam.
- You will end up with 2 ripped pieces - the right and left parts of the trouser legs with the side seam still intact and a common waistband. Cut off the frayed areas (crotch).

- Take the back parts from which you cut off the excess (with a new seam line) and stitch - this is the middle seam of the back of the vest (we will make a seam like it is on jeans, using part of the saved top allowance). Don't forget to stitch back the bottom of the strap and the waistband section.
- Fold the structure so that the back is facing you and the waistband is at the bottom (i.e. turn the pants upside down). Draw lines for the neck and shoulders, as in fig. Cut out taking into account allowances. Cut out the shoulders from the front and back at once (cut both layers of the legs at the same time).
- Now make the front cutout. Draw a straight line from the top of the shoulder to the clasp, as shown in fig.
- On the sides, sew the seams for the armholes - 30.5 cm (in the figure - 12 inches). The parts near the waist - the side seams of the vest - will remain unaffected.
- Slightly round the cuts of the neckline, neckline and armholes - you should get smooth transition lines, as in the very first picture. finished vest.
- Fold up all open sections (armhole, neckline, front neckline) and do the processing in the same way as on jeans - with double stitching. Sew the shoulders. All is ready!
Remaking a denim jacket from an old one allows you to update your wardrobe and create a unique item.
Most of the jackets that you have in your wardrobe, as a rule, were bought two or three seasons ago (and some are much older) and have hopelessly lost their relevance, but not their visual appeal and quality!
What to do with an unfashionable but high-quality jacket? Upgrade, style, update, remodel in accordance with the latest fashion trends.
I went to the Internet in search of fresh ideas. I present everything interesting that I have found to you for free inspiration!
Condition: true to size and no defects requiring masking.
You don’t have any special sewing or cutting skills, but you have a desire to get creative, plus a bunch of unnecessary accessories, old jeans, colored braid.
The most common option is to make a stylish vest out of an old jacket.
Cut the sleeves with scissors close to the shoulder seam, add a couple of abrasions, put a thin strap on top and....

... we have a new interesting version of peplum top! Not as feminine as a typical peplum, but with a certain relaxed and casual feel.

galantgirl.com
An interesting option for converting a denim jacket into a vest - using braid:
The next modification is a little more complicated...

For work, in addition to the jacket, we need a piece of other fabric. 
Carefully cut off the sleeves and cut out new ones along them. 

However, it can be done simpler. For this we will need sleeves from an old sweater.
Preferably the same size or larger than the jacket/vest.

wildamor.com
When cutting sleeves from a denim jacket, leave a good margin (~2.5 cm) on the OUTSIDE shoulder seam. Same thing with a sweater - cut a decent amount from the shoulder seam. This will give you the opportunity to sew them together easily.

As I mentioned above, if the sleeves of the sweater are about the same size as the denim jacket, this will make the whole alteration process much easier, because. they don't need to be adjusted. In this case, the shoulder of the sleeve fits more or less tightly to the arm opening of the vest
However, if they are not the same size, try using sweater sleeves that have larger armholes than the openings in your jacket's sleeves.
Obviously, it will be easier to make sweater sleeves smaller at the armhole than to make them larger (you can do this by simply stitching a straight line down the long side of the sleeve).

Next, turn the vest inside out and attach the sleeve along the armhole opening. I usually line up and pin the center of the sleeve cap and the shoulder seams together/and the side seams first, and then pin the pieces in place around the circle.
Before sewing, turn the jeans right side out and check that the sleeves fit - they look directly at the shoulder / the side seams match.

Sew it together. I like to start right at the armpit area so that where the two ends of the stitch meet is hidden. Sew right behind the seam as you can see in the picture below.
The denim seam serves as a conductor.

Repeat with the other sleeve, turning the vest inside out and then pinning the sleeve to the shoulder.
As for leftover sweater material, you can always sew
A stylish denim jacket with knit sleeves and a hood is the perfect example of crossing an old denim vest and a worn-out knit sweater.
Here's another interesting option:


The belt of the jacket needs to be cut off. 
Cut the jacket to the length you need. 


Sew on the previously removed belt. 

Insert eyelets. 


Decorate with ribbons, cords, scarves.