Crafts from waste materials for school. Useful and original crafts from garbage for the garden
Often we are not aware of how many unnecessary but useful things we can find at home. Most people simply throw away used bottles, cans, rolls, boxes and other “garbage”, without even realizing that they can be used to create original and useful things for interior decoration.
DIY crafts from garbage: 4 decorative items
You will need:
- Leg-split;
- Glass bottle;
- Fishing line;
- Hot glue or “Moment Crystal”;
- PVA glue;
- Alcohol;
- Cotton pads;
- Scissors;
- Accessories (beads, sequins, beads, sparkles, etc.);
- Clear varnish.
Instructions:
- Take any empty glass bottle, wash it thoroughly and dry it. Degrease the bottle with alcohol, then coat it with PVA and wrap it tightly with twine up to the neck (place the turns close to each other so that the glass is not visible).
- Decorate the neck of the bottle with beads or beads. To do this, string the beads onto a fishing line and secure the outermost one with a knot. Coat the neck with PVA, then glue the string of beads tightly to each other.
- Leave the bottle for a while so that the materials set and stick tightly to the bottle. Then decorate part of the bottle wrapped with twine with a pattern of beads, gluing them with “Moment”. The pattern can be anything - flowers, abstract figures, etc.
- Once you have completely decorated the bottle, leave it to dry. If you wish, you can coat the bottle vase with clear varnish to seal the result.
Read also:

You will need:
- Used tin can;
- Thick and laminated cardboard;
- Scissors;
- Stationery knife;
- Pencil;
- Masking tape;
- Ruler;
- Glue gun;
- Acrylic primer;
- Stain;
- Coffee beans;
- Leg-split;
- Decorative handle;
- Interesting picture.
Instructions:
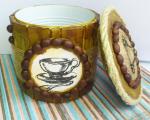
- To create such a sugar bowl, any canned food can will do. Cut out 2 circles from puff cardboard: the 1st should be 2 mm smaller than the diameter of the jar, the 2nd should be 1 cm larger. Cut out exactly the same circles from thick cardboard. Cover the puff circles with masking tape so that the ends are sealed. Glue the puff circles together, then attach thick cardboard circles to them.
- Cut strips of cardboard measuring 2x8 cm and cover them with tape. Use the resulting strips to decorate the jar in a circle. When the job is done, coat the jar with acrylic primer. Wait for it to dry and paint with stain in several layers. When the stain has dried, start decorating the future sugar bowl. Cover the middle of the jar with twine.
- Print out the picture you like, cut out a circle from it and glue it to thick cardboard. Decorate the circle with the picture with coffee beans and wait until dry. Glue the picture to the sugar bowl.
- Decorate the lid of the sugar bowl with twine and grains, and attach a handle.

You will need:
- Toilet paper rolls;
- Paper for scrapbooking;
- Glue;
- Scissors;
- Satin ribbon;
- PVA glue;
- Colored paper;
- Printed numbers;
- Black felt-tip pen.
Instructions:
- Usually, such calendars are made a month before some holiday - New Year, Birthday, February 23, March 8, Christmas, etc. Cut the remaining toilet paper rolls into arbitrary “tubes”.
- Cover the bottom of the resulting tubes with scrap paper. If you wish, you can put gifts inside the rolls in the form of sweets, small souvenirs and cute trinkets, interesting wishes, etc. Cover the 2nd side with scrap paper.
- To make the calendar fun, decorate the rolls with colored paper. Glue numbers onto scrap paper to represent the digits of the month. Glue the prepared rolls together in order and tie with tape.
Read also:


You will need:
- Burlap, velvet or any other fabric;
- Wine corks;
- PVA glue;
- Scissors;
- Corrugated cardboard;
- Stationery knife;
- Glue gun;
- Clear varnish;
- Pencil;
- Ruler;
- Stain;
- Dye;
- Brush;
- Leg-split.
Instructions:
- If after the holiday you have a lot of wine corks left, you can make an exclusive box for all sorts of little things. On cardboard, make a drawing of the future box, taking into account the necessary parameters.
- Cut out the workpiece and assemble it, bending it in the right places to give it shape. Carefully decorate the resulting box with the fabric of your choice.
- Cut the corks so that they can be glued to the frame of the box. Cover the box with cork halves. If you have any voids between the corks, decorate them with cork chips.
- You can paint the finished box any color you like or leave it unchanged. Apply varnish to the product and wait until it dries.
- Decorate the lid of the box with twine.
- If desired, you can make anything from wine corks: floor mats, curtains for the dacha, a photo frame, a stand for jewelry, birdhouses and animal houses, coasters, trays, decorations for the New Year and other holidays.
Read also:
Master classes for children

You will need:
- Can;
- PVA glue;
- Metallized colored paper;
- Satin ribbon;
- Scissors;
- Bamboo skewers or sticks;
- Decorative stickers or pictures.
Instructions:
- Wash the can thoroughly and dry it. Cover the jar with paper and wait until it dries. Decorate your future drum with your chosen stickers. There is no need to completely decorate the jar with stickers, 4 - 5 pieces are enough. spread evenly over the entire surface.
- Open the lid of the jar, insert a satin ribbon and close the lid tightly. Choose your drum sticks

You will need:
- Plastic bottles - 2 pcs.
- Colored cardboard;
- Pieces of fabric;
- Glue “Moment Crystal”;
- Scissors;
- Awl;
- Hole puncher;
- Twig.
Instructions:
- Carefully cut the bottoms from 2 bottles. Using a hole punch, make 1 hole on each half. Make a hole in the first half with an awl and insert a twig. Secure the branch with glue on the reverse side.
- Cut out leaves from paper or fabric and glue them to a branch. Thread a ribbon through the holes and tie it. You can put candies and other sweets into the finished “apple”.


Crafts made from waste materials are not only original, but also economical home decorations. There is no point in spending extra money on materials when you can make extraordinary things from recycled materials that are thrown away.
You can safely involve children in the process of making crafts to develop their fantasy and imagination.
More recently, a new direction has appeared in modern creativity called artdump. Literally from English “dump” is translated as “garbage”. Many artists, sculptors and other craftsmen work on creating works from recycled materials.
The new-fangled trend is spreading for another reason: it protects the environment. Tons of garbage, instead of going to landfills and poisoning the atmosphere, are used to create accessories.

What materials can be useful for creating unique trinkets? The most commonly used inorganic household waste is:
- Paper – old magazines and newspapers, cardboard and products made from it.
- Plastic – plastic bottles, cocktail straws, caps, disposable tableware.
- Metal - tin cans, aluminum caps from beer or carbonated drinks.
- Scraps of fabric.
- Glass – cracked glasses, glasses or unwanted bottles.
- Old CDs.
- Burnt out light bulbs.
Interesting! There are a large number of recycling plants operating in the West. In our country, similar enterprises are also gradually beginning to be created.
DIY crafts made from plastic
Products made of plastic can decorate your home, garden, cottage, vegetable garden and playground.
An excellent material for showing your imagination is plastic plates. Masquerade masks can be made from such recycled materials. To do this, you need to cut out holes for the eyes and paint them to match the appearance of the animal you want to depict. It could be a tiger, cat, lion, ladybug and other animals. Additional elements (ears, mane) are cut out from the plates and glued. Don't forget about the string or elastic band.

Appliques can decorate any room. You can make anything on a plate: voluminous flowers, paper figures, animals cut out of felt. Here the flight of fantasy can be endless. You can make an interesting composition: glue a bird and felt eggs to a plate and decorate a nest of feathers and twigs around them.

A common material from which many crafts are made is the bottom of a plastic bottle. From it you can make:
- Plastic lampshade. Carefully cut bottoms of the same color or different shades are glued together to form a ball. An original lampshade comes out of it.
- Applications made of plastic. The bottoms of bottles make beautiful flowers. By gluing such material to cardboard and decorating it, you can make an interesting decoration for your home. You can find photos showing similar applications.
- Funny pig. The whole bottle will be a decoration and a toy for children. It is painted pink and ears, legs and a tail cut out of plastic are glued on.
Products made from plastic bottles, forks and spoons can be varied, you just have to show your imagination.
Crafts from old CDs
Various shiny crafts are made from discs. Unnecessary disks will be an excellent material for creating original crafts and accessories.

If you have old CDs lying around at home, you shouldn’t throw them away, but rather make interesting crafts:
- Candlestick. A disc is used as a base, and decorative balls are glued along the edge using superglue. When one layer is completely completed, the next one is glued onto it. The best option is 4 layers of balls.

- Christmas tree decorations. To prepare beautiful toys for the Christmas tree, you need to purchase transparent decorations. Cut the disk into small parts and then glue it onto the toy. When it is filled with mosaics, you need to carefully unscrew the top fastening and put golden brocade fabric inside. You can make a lot of these toys, they will look great on the Christmas tree.
- Frame for mirror or photographs. To do this, you need to cut a lot of small parts from CDs. Then a regular flat frame is covered with mosaic.

- Coasters for cups. In this case, discs with an interesting image can be left in their original form, and ordinary ones can be embellished. To do this, take a piece of fabric, from which 2 identical parts are cut out around the disk. The CD is covered on both sides with double-sided tape, to which fabric parts are then attached.
Idea! You can come up with a variety of compositions from CDs, for example, window decorations, animal figurines, chandeliers, bracelets. Australian Sean Avery decorates his yard and home with whimsical animals made from pieces of disks.
Cardboard crafts for children
Various boxes of shoes, candy and household appliances are thrown away every day.
An ordinary cardboard box can be turned into a toy for children. You just need to show a little patience and give freedom to your imagination.

You can watch a master class on making a TV. To make the process even more interesting, it is worth involving the child in it and preparing the following materials:
- medium cardboard box;
- cellophane or cling film;
- scissors;
- scotch;
- drawing paper;
- markers and pencils.
The top flaps of the box need to be cut off, and then turned upside down. Draw a rectangle on the side surface and cut it out. The hole is sealed with cellophane or cling film. The TV screen is ready. You can make a remote control from the leftovers. The homemade TV is ready, all that remains is to paint it.

For television “programs” you need to make puppets. To do this take:
- cardboard or thick paper;
- scissors;
- felt-tip pens or pencils;
- ice cream sticks;
- scotch.
You need to draw your favorite children's characters on cardboard or paper, color them and cut them out. An ice cream stick is glued to the back of the figures using tape. The puppet is ready!

Aquarium with fish. You can make an aquarium from an ordinary medium box. To make it you need the following materials:
- medium cardboard box;
- thick white paper;
- pencils or markers;
- threads and scissors;
- colored paper;
- shells;
- beads;
- plasticine;
- scotch;
- superglue.
Cut off one side of the box. Cover the inside with light blue or dark blue paper, and the bottom with yellow paper. Glue shells and algae made from plasticine to the bottom using superglue. Draw fish and other sea creatures on paper, color and cut them out. Then strings are attached to the figures and glued with tape. You can string beads onto threads and attach them in the same way. The colorful aquarium is ready.

You can make many interesting items for children from cardboard boxes: doll beds, household appliances, airplanes, houses, cars.
Attention! Homemade toys are in some ways much better than ready-made ones, because they develop the child’s imagination and imagination.
Children's crafts from waste materials
Children must be involved in the process of making toys or crafts from household waste. So, the baby will learn to be careful about surrounding objects and will develop his imagination. Interesting gizmos can be useful in kindergarten, at school, or for participating in a competition on the topic “Ecology”.

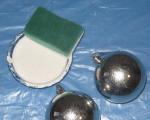
Swimming turtle. It’s easy to make such a toy, and the child can take a bath with it in the bath. Materials you will need:
- flat wide sponge;
- plastic bottle (0.5 l);
- buttons;
- sheet of paper;
- strong threads and needle;
- marker.
The bottom of the bottle will serve as a shell, which must be carefully cut off. Then it must be attached to the sheet and circled with a marker. The legs and head of the future turtle are added to the resulting template. You need to cut out a template of the animal along the contour, then apply it to the sponge and cut it out. Place the bottom of the bottle on the base of the turtle and attach it with a thread, stitching it with a needle through a sponge. The threads wrapped around the shell on top are connected with a small piece of thread and decorated with a button.

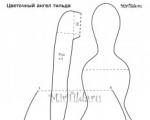
Hare. This craft, made of fabric, will please any child. The following materials will be useful:
- a piece of sleeve from a children's jacket;
- scissors;
- cotton wool or synthetic winterizer;
- threads
The bottom corner of the fabric must be folded in such a way as to create a pointed top. It is cut into 2 parts - these will be bunny ears, which need to be tied with thread. Then the top is stuffed with cotton wool (sintepon), forming a head, and again tied with thread. Next, take a thread or thin ribbon and tie the fabric crosswise, forming the paws of the animal. The thread (ribbon) is tied in a bow at the back. The cute bunny is ready.

Crafts made from waste will become not only original, but also quite economical interior items for your home. To create such jewelry, you will not need to invest a lot of money or use any unavailable materials, because all this is made from recycled materials that people are used to simply throwing away. You can safely involve your children in creative work, because such DIY crafts made from waste are ideal for school exhibitions.
Types of material
Just a few years ago, a new direction appeared in modern creativity, called Art Dump. If we translate this name from English, it means “garbage art.” All jewelry is made from recycled materials. Many famous sculptors, artists and other craftsmen became fans of this trend.
This newfangled activity has gained great popularity also for the reason that it is very beneficial for the environment. After all, every day, tons of waste, instead of ending up in trash bins or directly into the atmosphere, are used to create some new jewelry and accessories.
To make a craft from waste for school, you can use various materials. However, inorganic waste is mainly used for this:


Use of plastic
 Crafts from household waste for school, for the home, garden, cottage, vegetable garden and playground using plastic can be easily made with your own hands. For example, plastic plates are an excellent material for making your fantasies come true. You can make New Year's or masquerade masks from such garbage. To do this, you need to make holes in the plate for the eyes, and then paint the entire surface to resemble the animal you want to depict.
Additionally, you can also attach elements in the form of ears and manes. All this is also cut out from plastic plates, and then glued to the main mask. In order for the finished product to sit firmly on the face, you need to attach an elastic band or string to the plate.
From such waste you can also make various applications that can decorate any interior. The plates will make beautiful fish and voluminous flowers. You just need to show your imagination. A composition in the form of a bird and an egg made of felt, which are glued to a plate, and a nest of real feathers and branches is made around it will look very interesting.
Quite often, the bottom of a plastic bottle is used to make various crafts. What can be done from it:

Various crafts made from plastic bottles, spoons and forks turn out to be unusual and original; you just need to show a little of your imagination.
Old CDs
You can make a variety of shiny crafts from unwanted CDs that will attract attention. If you have such garbage at home, then there is no need to rush to throw it away, but rather give it a second chance to live:

Cardboard products for children
Every day a large number of different boxes of sweets, electrical appliances, and shoes are thrown into the trash. But they can be used to make a new toy for your child. To do this, you need to stock up on a little patience, and also give free rein to your imagination.
TV with puppets
For example, you can make a children's mini-TV yourself. To make the creative process more interesting, it is recommended to involve your baby in it. To make such a craft, you will need some materials:

The top flaps of the box must be cut off and then placed upside down. Draw a rectangle on the side and cut it out with scissors. Seal the resulting holes with a piece of cling film. This is how the screen of the future TV turned out. Those pieces of cardboard that remain after trimming can be used to make a remote control. The children's mini-TV is ready. You just need to finish it off with colored paints or markers.
Now we need the TV to show. To do this you will need to make different puppets. Required materials:
- Cardboard or thick paper.
- Sharp scissors.
- Colored markers or paints.
- Ice cream sticks.
- Double-sided tape.
You need to draw any children's characters from fairy tales on cardboard, color them brightly and cut them out. On the back side of the resulting figures, stick the ice cream stick using double-sided tape.
Aquarium with fish
From a simple, not too large box, you can also easily make an aquarium with fish with your own hands. To make such a craft, you will need the following materials:

On one side, the surface of the box is completely cut off. The inside walls are covered with blue or light blue paper, and yellow paper is glued to the bottom. After this, using superglue, shells and algae, which can be made from plasticine, are glued to the bottom. Next, on plain paper you need to draw sea fish or other sea inhabitants, color them with colored markers or watercolors. The finished figures are cut out, the strings are glued with glue, beads can be strung, after which the fish are hung and secured with double-sided tape to the aquarium.
When making crafts, your children must be involved in the work process. In this way, kids begin to treat surrounding objects with care, and at the same time develop their imagination. Very funny things will become indispensable for exhibitions in kindergartens, at schools, when events are held on the topic of ecology.
Swimming turtle
Making a swimming turtle with your own hands will be quite simple. In addition, preschool children can take this craft with them to the bath. For production you will need:

It is necessary to cut off the bottom of the bottle, which will serve as the shell of the future turtle. After this, the part is applied to a sheet of paper and outlined with a marker. You need to attach the head and legs of the turtle to the finished template using glue. Next, the template is applied to the sponge and traced along the contour. This creates the basis for the future turtle. The bottom of the bottle is attached to the sponge using threads and a needle. The threads can be connected at the top with a large knot and additionally decorated with a button. All that remains is to draw the face with a black marker.
Fabric hare
A child will love this craft in the shape of a fabric bunny . To make such a product, you will need the following materials:
- A small piece from the sleeve of a children's sweater.
- Sharp scissors.
- Sintepon or any other stuffing for soft toys.
- Sewing threads.
- Thin tape.

The bottom corner of a piece of fabric must be turned up so that a sharp tip is formed. It then needs to be cut into two parts, which will serve as the hare’s ears. The ears are tied with thread. After this, the top must be stuffed with stuffing for soft toys, forming a head, and then tied again with thread. To make the bunny's paws, you need to take a thin ribbon and cut the fabric crosswise. Tie the ribbon into a bow at the back.
Cute caterpillar
To make such a craft, you can involve even a three-year-old child in the creative process. To work you will need some materials and tools:
- Empty carton for eggs.
- Gouache of different colors.
- Cocktail tube.
- Sharp scissors.
- Black marker.
 One row of the egg packaging must be cut lengthwise; it will act as the main body of the caterpillar. It should be painted with one color, for example, green, and the head with another, for example, red. Using a marker, draw the caterpillar's eyes, nose and mouth. To make horns, you need to cut small pieces, about 3 cm, from a cocktail tube, and then stick them into the head.
Do not rush to throw waste into the trash bin. After all, this can be an excellent material for making crafts.
Some even manage to make an income from handmade products. And, of course, such crafts will become simply indispensable for school and kindergarten exhibitions.
Attention, TODAY only!
Olga Tyutyunnik
There have always been folk craftsmen who could create entire masterpieces out of nothing. Today, along with household garbage, we throw away so much potential material for all kinds of crafts that it’s just dizzying. A variety of plastic bottles, boxes and containers, corks, straws, cups, disposable tableware and plain paper - all this can be reused. What crafts can you make from waste yourself?
Everything is good
Plastic bottles rightfully occupy first place among household waste, used to obtain all kinds of accessories and decorative elements. They are strong and at the same time flexible, easy to deform.

They decorate adjacent areas, making them into figures of animals, birds and insects, laying out entire compositions, connecting individual elements with tape or glue.
Cardboard boxes are used to make houses for pets and dolls, and from a large box you can make an entire spaceship or a racing car for your child. Disposable tableware is used to decorate wall panels, and old clothes can be woven into a rug.
DIY crafts from waste: how to make a pencil holder from a plastic glass and papier-mâché? To do this you will need a plastic bottle, a paper egg container, art primer and acrylic paints.
Manufacturing stages:
- Trim the bottle to the desired height and cover it with papier-mâché. Don’t forget to add PVA glue to the paper porridge;
- Now you need to make a three-dimensional drawing from the same paper. What it will be is up to you to decide. You can bring to life a plot from a fairy tale, for example, perform Little Red Riding Hood and the wolf, as well as the vegetation inherent in the forest;
- After 3-5 days, when the papier-mâché has dried, you can begin priming, and then paint the pencil holder with acrylic paints. If they are not available, gouache or watercolor will do;
- That's it, the original pencil holder with three-dimensional decor is ready. Just admire it and use it for its intended purpose.
We do it with children
If you have small children in the house, you can involve them in the process of making something
interesting things and them.

For children, crafts made from waste can become part of any play performance. Unnecessary plastic containers from chocolate surprise eggs can be used to make people and animals.
Armed with a marker, plasticine and self-adhesive eyes, you can make a lot of all kinds of little animals.
And even if the baby does not subsequently play with them, he will really like the manufacturing process itself, and you will spend your free time usefully.
Stages of making a multi-colored caterpillar from this category of materials:
- Cut multi-colored knitting threads into small pieces. You need to heat a thick needle or awl on a fire and make two holes in the front and back of several containers, one opposite the other;
- Cover the egg with double-sided tape, remove the top film and sprinkle each one with threads of the same color, trying to fix them as tightly as possible to the tape;
- Now you need to attach a bead to the end of a regular elastic band - it will act as the nose of the caterpillar. Pass the lower end along the entire body of the insect, thus connecting the containers to each other;
- You can strengthen the structure if you also make a knot inside the container in front of the second hole. Secure the last kinder with a button for the tail. All that remains is to attach the eyes to the caterpillars. You can also indicate gender by decorating your head with bows, ribbons or a funny cap.

For children, you can come up with a lot of crafts from household waste.
Surely many dads or grandfathers have a suitcase with tools in which a lot of all kinds of nuts, bolts, screws, etc. are stored.
Together with your child, you can make a whole picture out of them, marking the contours of, for example, a car with a string, and filling the interior space with these iron devices, after painting them with gold or silver paint.