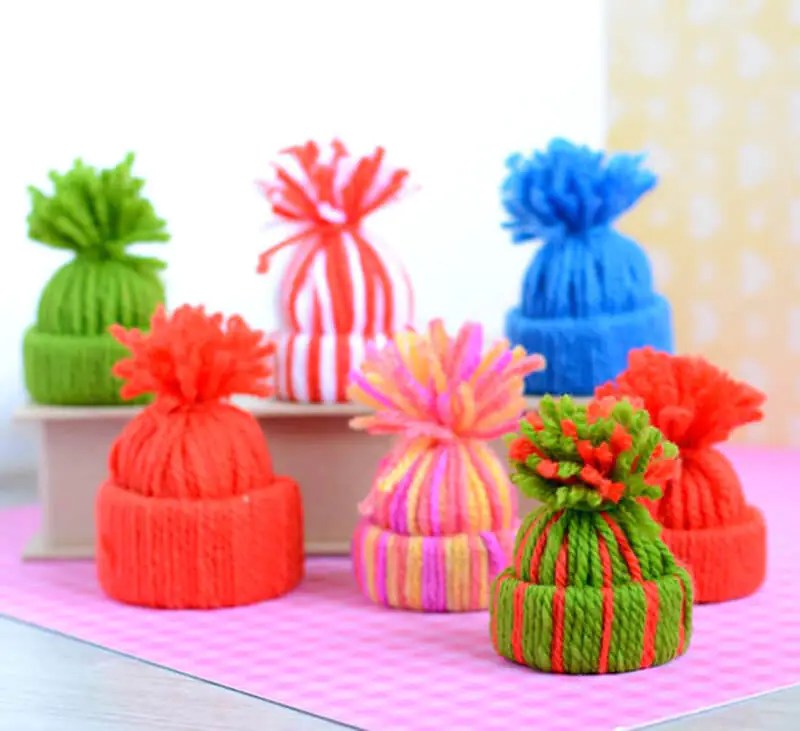
Snowman hat made of thread. Mini thread hat for the New Year tree: master class
All children love new toys. Many girls adore their dolls; they not only enjoy playing with them, but also dressing them up. To some delusional and pears are offered entire collections of miniature clothing: dresses, blouses, boots, scarves, hats and much more. But this usually costs a lot of money. Therefore, many mothers try to help their daughter make clothes for dolls on her own. We propose to make a miniature hat from threads that will suit both a doll and a small plush toy. The labor costs and materials used are very small, and the child will be delighted with the result. A step-by-step master class with descriptions and photographs tells how to make a small hat from threads.
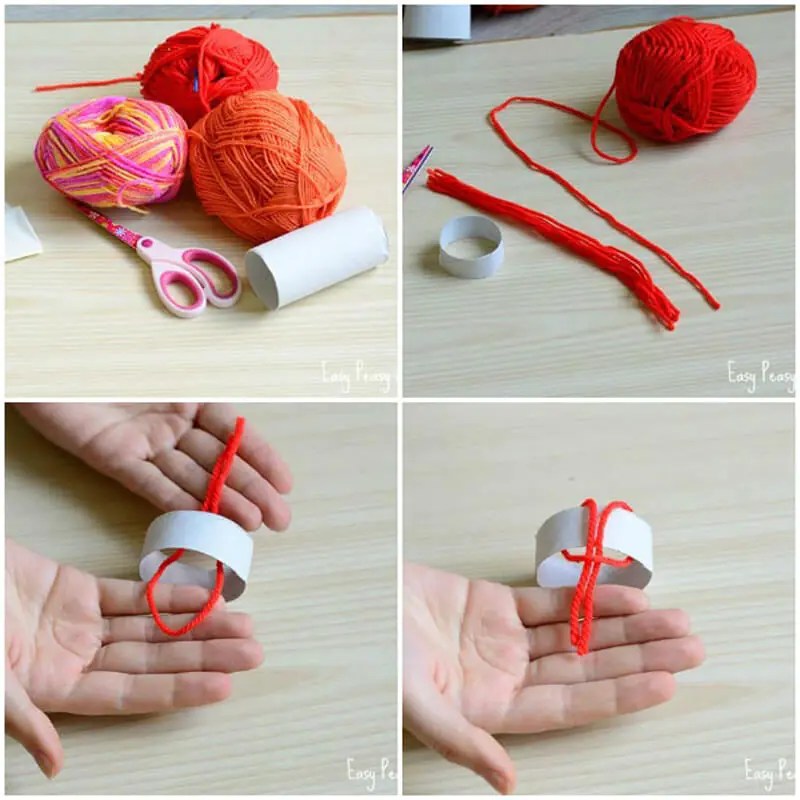
To make this miniature craft, we will prepare:
Knitting;
Cardboard sleeve;
Scissors;
Double-sided tape;
A small finished pompom.

Let's start making our own hat from threads for a toy by cutting off a small ring from a cardboard sleeve (its height is about 1.5 cm). This ring will be the frame of our hat. It can be replaced with a simple strip of cardboard secured in a ring with tape.

After this, you need to cut pieces of the required length (about 30 cm) from the skein of thread.

We will need a lot of such segments. It is from these that we will make a hat.

Now let's start creating the hat. To do this, insert one piece of thread into a cardboard ring as follows.

After this, we thread one end through the resulting loop.

We tighten it. So we secured the first thread on our cardboard blank.

We fix the next thread tightly to the previous one.

In this way we continue to work, securing the threads to the cardboard ring.

We need to make sure that the entire cardboard blank is covered with threads.

Now we tie the upper part of our hat with a small piece of thread.

Cut off the excess ends.

Turn the protruding part over to the other side.

We attach a small piece of double-sided tape to the finished white pompom.

Glue the pompom to the top of our craft.

Our little thread hat is ready.

This miniature headdress can be made in any color scheme. If desired, you can make a two-color hat if you alternate threads of different colors
Hello, dear readers! As the New Year holidays approach, many begin to think about home decor, in particular decorating the Christmas tree. Earlier we already told you how to make a wide variety of decorations for the green spiky beauty, but today we will tell you how to make a hat from threads for a Christmas tree. At first glance, this element seems to be knitted, but in fact, everything is far from it! All the secrets of creating such an incredibly cute cap pendant will be revealed later in the review.
We will end up with a hat like this.
Thread hat: master class.
To work you will need:
- A roll of paper towels or toilet paper.
- Scissors and stationery knife.
- Threads (floss or yarn).
Stages of creating a hat.
We take a paper towel roll (we used a foil roll) and use a utility knife to cut it into rings 8-10 mm wide. Accordingly, how many hats you want to get in the end, so many rings should be prepared.


We cut the threads into pieces 15 cm long. It’s difficult to predict their total number at this stage, so don’t cut too much; if there’s not enough, you’ll cut more.

Take the first thread and fold it in half.

In this folded form, we pass the thread through the ring from the sleeve.

Then we thread the two free ends through the loop.

Tighten the thread.

We create a similar loop nearby and also tighten the thread. We move this thread tightly to the previous one.


According to the above scheme, we cover the entire ring with loops of thread.

This is what you should get:


And you pass them all together through the ring, as if turning them inside out.


Align all the threads with your fingers - place them in a column up.

We cut a thread about 15 cm long, fold it in half, and wrap it around all the upper threads, stepping back from the edge a little more than 1 cm (adjust as you wish). Tighten the loop, draw the loose ends around, and tie it into a knot. We cut off the excess threads with scissors.


We lay the hat on the table, smooth out the protruding ends, and cut it in a semicircle. If the pompom seems long, cut it some more.


Below the pompom we tie a string to the pendant.


And here is the result!


A hat made of threads on a Christmas tree will look simply magical; your guests will not even guess that this product is not knitted at all! Such cute little things make New Year's decor more cozy, warm and homey! Be sure to make these wonderful mini-hats, you will be very pleased with the results.
Hello, dear readers! As the New Year holidays approach, many begin to think about home decor, in particular decorating the Christmas tree. Earlier we already told you how to make a wide variety of decorations for the green spiky beauty, but today we will tell you how to make a hat from threads for a Christmas tree. At first glance, this element seems to be knitted, but in fact, everything is far from it! All the secrets of creating such an incredibly cute cap pendant will be revealed later in the review.
We will end up with a hat like this.
Thread hat: master class.
To work you will need:
- A roll of paper towels or toilet paper.
- Scissors and stationery knife.
- Threads (floss or yarn).
Stages of creating a hat.
We take a paper towel roll (we used a foil roll) and use a utility knife to cut it into rings 8-10 mm wide. Accordingly, how many hats you want to get in the end, so many rings should be prepared.
We cut the threads into pieces 15 cm long. It’s difficult to predict their total number at this stage, so don’t cut too much; if there’s not enough, you’ll cut more.
Take the first thread and fold it in half.
In this folded form, we pass the thread through the ring from the sleeve.
Then we thread the two free ends through the loop.
Tighten the thread.
We create a similar loop nearby and also tighten the thread. We move this thread tightly to the previous one.
According to the above scheme, we cover the entire ring with loops of thread.
And you pass them all together through the ring, as if turning them inside out.
Align all the threads with your fingers - place them in a column up.
We cut a thread about 15 cm long, fold it in half, and wrap it around all the upper threads, stepping back from the edge a little more than 1 cm (adjust as you wish). Tighten the loop, draw the loose ends around, and tie it into a knot. We cut off the excess threads with scissors.
We lay the hat on the table, smooth out the protruding ends, and cut it in a semicircle. If the pompom seems long, cut it some more.
Below the pompom we tie a string to the pendant.
And here is the result!
A hat made of threads on a Christmas tree will look simply magical; your guests will not even guess that this product is not knitted at all! Such cute little things make New Year's decor more cozy, warm and homey! Be sure to make these wonderful mini-hats, you will be very pleased with the results.
And we continue active preparations for the upcoming favorite holiday, the New Year! And this time we bring to your attention an original version of a New Year's tree toy in the form of a winter hat.
Making such Christmas tree decorations with your own hands is very simple, and besides, you don’t need any supernatural materials to make them.
Thread hat
DIY Christmas tree toy Hat
To create a New Year's toy, Thread Hat, you will need the following materials: brightly colored knitting threads, a cardboard toilet paper roll, scissors.
Cut a piece about 2 cm wide from the cardboard tube. Now cut the threads into pieces of about 16 cm and start tying them on a cardboard strip (see photo). The more pieces of thread you tie, the more voluminous and neat the Christmas tree toy will look.
You can use threads of the same color or opposite threads of different colors and textures, thereby creating different patterns.

Now gather all the threads together and thread them inside, as if turning them inside out. Tie the threads at the top so that there are threads left to create a fluffy pompom.
Place a little cotton wool or a piece of padding polyester inside the hat so that the hat holds its shape.

Use scissors to trim the pompom.

Now tie a loop to the finished hat and hang it on the Christmas tree.
These thread hats can be used to decorate not only the New Year tree, but also greeting cards, gifts, clothes and accessories.

You can also make a hat without a pompom. To do this, tie the threads before turning the cap inside out.

As an option, a miniature hat made of threads can be decorated with a pompom made from other materials. For example, it could be a piece of cotton wool, a foam ball, large beads, buttons, etc.

Do you know what can significantly transform your home? Thread hat! This decoration looks very impressive, and can be done in literally 15 minutes, subject to training. And what’s most interesting, looking at this product, it’s not immediately clear how it’s made, visually it looks like knitted one, but where are the characteristic loops then?! But the secret lurks on the surface, and in this review “Decorol” intends to reveal it.
DIY thread hat.
You need to prepare the following materials:
- Thick woolen threads (choose the shade as you wish).
- Cardboard paper towel tubes or parchment paper.
- Sharp stationery knife.
- Scissors.
- Optional rhinestones for decoration.
- Gold paint in a can if desired.

The sequence of recreating a Christmas tree hat from threads.
- Using a sharp utility knife, cut a 9mm wide ring from a cardboard paper towel tube. You can immediately cut off the required number of rings from the tube, from which you can later create the cutest hats. If the edges of the rings are a little uneven, you can correct them by trimming them with scissors.

- From a skein of woolen thread, cut the first piece of thread, 20 cm long. For the first hat, it is better to make pieces of thread with a reserve, and for subsequent ones, adjust their length according to your preference. According to the first cut thread, cut another stack of threads, 15 pieces will be enough for a start, if not enough, prepare more threads at any time.

- Take one thread and fold it in half. In this form, pass it through the cardboard ring, placing it in the center. Thread the ends into the loop and pull the threads tightly. The resulting knot should be located on the edge of the cardboard ring or slightly hidden from the inside.


- According to this elementary pattern, you tie the next thread side by side, next to it another one, then another one, and so on until the entire ring is hidden under the threads.


- Next, all these threads from the ponytail need to be twisted through the ring. To do this, twist them together a little and push them inside the ring with pressure, and pull them out from the back side.


- It's time to create the top of the header. Cut a piece of thread, fold it in half, place it under the top of the hat, thread the ends into the loop and tighten tightly, wrap the ends around the product in a circle, tighten and tie a knot. You can cut off the ends or leave them for hanging. In this example, the ends are cut off.


- Now you need to adjust the crown of the hat, recreating the effect of the presence of a pompom. Take scissors and trim the protruding threads in a semicircle, controlling the length of the threads at your discretion. Fluff the threads on the pompom, you can adjust it with your fingers or lightly shake the product.


- The final touch is tinting. Take a can of gold paint and tint the product a little; the hat will acquire a subtle shimmer. You can skip this point if you wish, as can the decor with rhinestones.
- Now you can admire your work.


Yarn hats without using paper towel rolls (video):
A Christmas tree toy in the form of a hat made of threads is made very simply, if not elementary, but how impressive it looks, don’t you agree?! In addition, this pendant is light in weight, so it will not weigh down the branches of the Christmas tree. Overall, we highly recommend making such a wonderful winter decoration.