Silk for nail repair and strengthening: instructions for use. How to use silk to repair nails: detailed instructions with photos and videos
Fiberglass, cotton, silk and linen... What do they have in common? All materials are used for silk strengthening of nails or silk extensions. But what kind of procedure is hidden behind the spectacular name “silk strengthening” and are there any benefits from this use of silk for nails?
Of course, a soft piece of fabric cannot replace a nail. But impregnation with a polymer substance makes frivolous textiles a serious alternative to acrylic, which has already gained recognition. Silk extensions can be done with both gel and acrylic. Short duration spectacular manicure and quite affordable cost are the main advantages of silk extensions.
A piece of fabric is treated with a special composition and attached to the nail. special composition. A tip is fixed on the resulting frame, varnished or a pattern is applied.
The result – externally, looks very impressive. However, the strength of the “silk for nails” technology is much lower than after gel or acrylic extensions. That’s why masters don’t use silk extensions only. And in terms of quality, silk nails are inferior to gel and acrylic ones.
But the combination of technologies, when silk is an intermediate layer between the gel, promises excellent results. The procedure is carried out step by step, the work is painstaking.

It begins with preparation for nail extensions. The plate is treated with a buffer, the cuticle areas and the side parts of the nail are cleaned with a file. After this, you can begin the “silk for nails” procedure.
The master cuts two strips of silk. The first length covers half of the nail, acting as a free edge above it. Strip number two is one millimeter longer than the first.

Silk strips soaked in adhesive are attached to the nails. The surface of the base of the future nail should not extend beyond the boundaries of the native nail. To shape the nail, a thin layer of sculpting gel is applied to the free nail edge. It is important that the silk does not stick to your fingers while working. To do this, the specialist treats the tip of the finger with a fat-free cuticle softener.

Next, install the next strip, thoroughly soaked with gel. Its location is a millimeter lower than the previous one. A UV lamp is used to harden the gel. The nail is placed in it for twenty seconds. They are formed directly in the lamp with tweezers, giving the nail a slightly curved semicircular shape. This stage of nail silk takes no more than a couple of minutes.
When it hardens, another layer is applied to the nail so that the fabric is saturated, leveled with an orange stick over the surface of the nail, and polymerized again. The nail is almost ready.

You can remove excess materials and use a file to shape the free edge. The surface is again sanded with buff, removing dust, and covered with gel or shellac. If desired, you can choose transparent, plain or colored gels. And again the nail is sent to the UV lamp to “tan”.
Apply to the surface of the nail modeling gel and polymerize with a lamp. Use a file to correct the nail. The surface is sanded and applied top coating. Final chord - application nutritious oil on the cuticle. If it is particularly labor intensive, using silk on nails will take about four hours.

If fiberglass or fiberglass is used as a basis, then the marigolds will glow effectively in ultraviolet light. For a romantic design, silk fiber is replaced with lace. The advantages of silk extensions are the complete camouflage of cracks on the nails. This procedure is quite suitable for restoring broken nails. Even extremely long nails will not break the plate, as with acrylic extensions.

You can choose both linen fibers and silk. Various material structures and colors are available. Any are available for implementation stylish designs building up.
Finished nails do not break or flake. They look natural. Silk extensions will strengthen your nails and smooth out imperfections. By using silk for nails, chewed, injured nails will regain their former splendor, but this is not possible with other methods.

It is good to use silk extensions if the nail fold is overdeveloped or the nail bed is too small. The procedure gives good results for urgent repair of a broken nail.
Silk technology has fewer contraindications than acrylic or acrylic extensions. If your nails are injured or your hands sweat too much, no master will carry out the procedure of gel or acrylic extensions.

But this is not a problem for silk extensions: silk is useful for nails. Natural nails will be able to breathe, as air continues to flow freely to the plate. The silk nail procedure is performed only on tips. Adjustments must be made once a month. Nails grow faster after the first extension, so after the first visit the correction takes place twice a month.

Cut down artificial nails no need. They are removed with a special solvent.

Many ladies spend a large number of time to care for your hands. This is especially true for nails. What beautiful young ladies don’t use to give them required length and create natural beauty. Application of various cosmetic preparations, nourishing masks and restorative therapeutic baths- all this is coming into play.
But there are situations when a nail or several at once can break. However, you shouldn’t despair right away. There is a very simple and effective solution - silk for nail repair. It will help you easily and quickly solve the problem, and you can do it yourself and at home.
Restoring a broken nail
It happens that a crack occurs closer to the middle of the nail plate, and not at the edge. This can not only be uncomfortable, but also cause painful sensations. In this case, removing the nail will be very painful and also unsafe. You need to give the nail time to grow at least a little. To do this, you need to strengthen it and seal it.

Repairing your nails with silk will only take a few minutes. And if you already have some skills in this matter, then the process will speed up much. The result can last for about a week. It will be possible to perform these manipulations again before it becomes possible to trim the nail at the fracture site.
Often ladies use silk fabric to get rid of the fragility of their nails. This is achieved by applying several layers of glue and silk, which makes the plate harder, minimizing its breakage.
Step-by-step recovery process
Now let’s look at the diagram itself on how to repair a nail with silk step by step. Repairs are made using it nail salons, where qualified craftsmen can handle this in a couple of minutes. But you don’t always have the time and money to turn to a professional. In this situation, you can help yourself.

First you need to prepare the tools:
- The main “ingredient” is silk for nails;
- Glue with a special bio-composition. The standard kit usually comes with adhesive that is not very good good quality, so it would be preferable to buy it separately;
- Don't forget about the anti-adhesive compound. It will come in handy if you suddenly glue your fingers together or apply bioglue incorrectly;
- Manicure scissors;
- Files or buffs of different abrasiveness. 120 and 220 grit are suitable;
- Disinfector is a means for disinfecting and degreasing the surface of nails. It prevents severe drying, so the nail becomes normal condition already after half an hour.

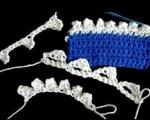
In addition to silk, linen and fiberglass are also used. The first type of fabric is used in in rare cases. This is due to its rough texture, which does not go well with the claw. Fiberglass is slightly more popular than linen, but still inferior to silk fabric.
It is better to purchase the material in rolls on adhesive paper based. In order to achieve desired result, the price of the fabric including glue should not be less than 100 rubles. This will allow you to repair your nail with silk more efficiently.
Let's study step by step instructions on how to use silk to repair a broken “claw”:

- It is necessary to prepare the broken part of the plate. To do this, make a few light movements using a file from the cuticle to the side free edge. This will help smooth out the edges of the crack and get rid of the shine of the surface. Then you need to degrease with a disinfectant;
- Cut the required amount from the fabric roll to cover the resulting crack. It happens that the material suddenly runs out. Therefore, it can be replaced with a regular medical fabric plaster. But it should not be rubberized so that the nail can breathe. Paper from tea bag, which can be used after shaking out the tea leaves;
- Treat the broken area with a small glue strip and place a cut-out piece of “rag” there to fit the size. Place it flat on the surface using an orange stick;
- When the glue is completely dry, remove any excess. To do this, use a nail file to process the resulting tubercle, making the plate smooth. This will hide damage when applying varnish;
- After repair, cover all the fingers with a textured varnish with shiny or small sand particles. This will help hide all the irregularities and strengthen the adhesion of the fabric and glue to the crack. You can disguise the location of the breakdown with a rhinestone or some other designer item.

You should not repair a nail with silk if the breakage causes damage to the skin or bleeding from the wound. This can only do harm. Therefore, contact a specialist immediately.
Scheme for strengthening nails with silk
Using a similar technology, nails are strengthened with silk if the plate is particularly thin. Artificial nails will last longer than natural ones. This is due to the difference in thickness. If you are not a supporter of the extension process, then this procedure will come in handy for you.

To do this, you need to follow these simple steps:
- Remove shine using a nail file;
- Combine the silk piece with nail bed and cut out the required shape;
- Disinfect and degrease the plate;
- Apply a glue strip to the nail and attach the cut fabric;
- Trim the edges with an orange stick;
- After the glue has dried, polish the surface with buff;
- Cover with a layer of varnish.

The procedure must be performed several times a month. This will help strengthen and grow nails that will not break or crumble.
Extensions using silk fabric
Silk is not suitable as the main material in this process due to its softness. But it will serve as an excellent substrate for gel or tips and will help speed up the extension.
- First, you need to process the plate with a file and degrease it;
- Glue on a strip of silk. Once dry, stick the tip to the end of the free edge of the fabric;
- At the last stage, the surface is sanded and the joint is treated with gel or acrylic.

The process of strengthening or building up can be easily done at home, without going to studios or salons.
Where to buy and how much it costs
You can purchase silk fabric for repairs at any specialized manicure store or on the Internet. The cost depends on the form of release - in strips or rolls, as well as on the length. On average, one set costs 100 rubles. At the same time, other tools can be sold either separately or together with silk fabric.

Repairing nails with silk is a quick and easy way to independently eliminate the “breakage” of your favorite claws. The procedure can be carried out at home without having any serious skills in the art of manicure.
Video: Repairing a nail with silk
It is no secret that removing artificial nails after extensions is quite problematic, since the free edge becomes very soft and can break and tear, that is, the procedure for transitioning from removing such nails to growing natural ones is very painful and long-term. In this case, it is worth carrying out the bioreinforcement procedure.
What is bioreinforcement? This is a biocorrection of extensions, broken or weak nails fibrion, in other words, the silk of silkworm spiders.
Since this procedure is quite simple to perform, almost every woman can repeat it at home.
A set with silk for nail repair can be purchased in specialized stores for manicurists and pedicurists.
Due to the fact that silk has a thickness identical to the thickness of a natural nail, everything grows together very smoothly and neatly and makes it possible to use varnishes, gels or other coatings for natural nails.
The uniqueness of silk also lies in the fact that it has the property of merging with the tone of natural nails, making the place of correction completely invisible.
The principle of working with silk for nails
Cut a small piece of material to place on the corners of the nail. The loose structure of the fabric allows the material to be used for strengthening and repairing nails and gives silk the necessary rigidity.
Use a soft buff to go over the natural nail plate. Movements must be careful so as not to scratch or damage the nail. Brush off dust with a soft brush.
Then go over the surface of the nail with a degreaser.
Try not to touch the cuticle, otherwise it will dry out.

Which biogel is better to choose for strengthening and healing nails?
- More details
Now apply bonding agent to the free edge of the nail. It will help strengthen adhesion to the material.
Apply the corrector base in a thin layer over the entire surface of the nail, extending a little onto the skin.
Now place the cut piece of silk on the free edge of the nail. Gently spread it over the surface. Dry for one minute ultraviolet lamp.
As soon as the silk has polymerized in the lamp and acquired the rigidity of natural nails, again apply a corrector base to the entire surface of the nail plate. Then turn your hand over with your palm facing up.
In this position, you need to dry it in an ultraviolet lamp for eight seconds, then turn your hand over and dry it for two minutes.
Take your hand out of the lamp. Remove sticky layer. Using a 180-grit file, carefully file the entire surface of the nail, shaping the free edge. Cover again with a thin layer of corrector base to remove sawdust defects. Dry in the lamp for one minute.
Nail Crack Repair Silk is a reliable product used to repair nails. After all, perfect and long natural nails are the result of painstaking efforts. Because in order to strengthen and improve the nail plate, you need to spend several weeks using various means cosmetology, nourishing masks and baths.
Don't rush to cut off a broken nail. Today, a crack or chip can be repaired by using silk. And with all this, there is no need to contact a specialist. This procedure can be carried out at home with your own hands.
Repairing a broken nail
It happens that a crack in the nail plate does not form on the free edge, but closer to its middle. This can not only cause inconvenience, but also cause painful sensations. IN in this case cutting off a nail will be dangerous and quite painful. Therefore, it would be better to seal and strengthen it for a certain period so that the nail has the opportunity to grow a little.

Using silk for this procedure, you can be sure that the repair will take a few minutes, and the result can be enjoyed within a week. If necessary, you can repeat this procedure until it becomes possible to remove the broken area.
Very often, silk is used by the fair sex in order to grow weak nails. In this case, glue and silk are applied in several layers, which will give the nail plate hardness and protect it from brittleness. Strengthening marigolds with silk occurs in almost the same way as repairing, only in the first case you should make a piece of material in the shape of a marigold. By repeating this procedure several times over the course of a month, you can grow even brittle nails.
How to use silk to repair nails
You can also have your nails repaired in a salon, where a manicurist will perform this procedure in a few minutes. However, it is not always possible to use the services of a specialist on time, and a damaged nail requires urgent restoration. In such cases, nail repair can be done at home.

To get started, you need to acquire the following tools:
- Silk.
- Nails glue.
- Scissors.
- Files of various abrasiveness - 120-220 grit.
So, step one.
First you need to prepare the damaged area of the nail. In this case, you need to make several movements with a soft file, starting from the cuticle to the free edge. This is necessary in order to level the damaged area and remove surface nail shine. Then you need to degrease the nail plate using nail polish remover or disinfectant.
The next step is to cut off the required amount of material to be able to cover the damaged area. Silk can be purchased at any store specializing in manicure and pedicure products. In the event that right moment such material is not at hand, then you can use a translucent medical plaster. You can also use a tea bag - you need to shake out the tea leaves and use thin paper.

The third step is to apply a small amount of glue to the damaged area and place the fabricated strip of silk on top. Using an orange stick, you need to spread the silk evenly over the surface of the nail plate. To make the clutch most reliable, you need to duplicate this action several times.


And the last stage. It is necessary to wait until the glue has completely dried and remove excess from the surface of the nail plate. Then you should file the formed tubercle with nail files, while smoothing the nail plate. This action is necessary so that the damaged nail, when varnished, does not differ from the rest of the nails.

A little advice: after repairing a damaged nail, you can apply a textured varnish with small glitter or grains of sand to the surface. Thanks to this action, you can hide unevenness and roughness, and this varnish will be an excellent bonding addition between silk and glue with a crack.
More detailed information You can also get it by watching the video below, in which the author explains all the stages of repairing a nail with silk.
Long nails visually lengthen our well-groomed fingers and make them more feminine and elegant. On long nails you can create the most complex, most incredible design with monograms, drawings or elegant patterns laid out with nail art decor. Sometimes it takes weeks to grow natural nails, and all this time we maintain the plates in perfect condition, we take good care of them. Unfortunately, even a strong nail plate can break at the most inopportune moment, and thin and fragile nails often break even after regular strengthening procedures at home (baths with sea salt, masks with pepper, sealing with wax, smart enamel). Therefore, it is always useful to familiarize yourself with information on how to repair a broken nail yourself, so that you do not have to shorten the natural plates that have been grown with such difficulty.
Perhaps the most annoying trouble with long nails may be attributed to the appearance of a crack in the free edge area, which reaches the “smile line” and can cause damage soft fabric nail bed, and such an injury can be very painful and takes a long time to heal.
Many women still shorten the broken nail at the root in the old fashioned way and, accordingly, correct the free edge on the remaining nails with scissors. In order not to resort to this radical way To solve the problem, we will use already proven options for repairing cracked natural plates and chips on the gel polish coating or on the extended free edge. In addition to the popular methods of restoring the integrity of the nail plates using gel, acrylic powder or silk for nail repair, you can urgently strengthen the broken free edge with a tea bag.
♦ SILK FOR NAIL CORRECTION IN THE AREA OF A CHIP OR CRACK
According to manicure and pedicure experts, using an elastic piece of silk can not only reliably fix the damaged area of the nail, but also prevent further destruction of the nail plate. For example, if you seal a crack with only manicure glue, the fragile connecting material will quickly collapse even with slight mechanical impact. Silk is suitable for repairing any broken nails at home and you can easily repair damage such as a crack on the free edge or on the covering nail bed plate, a chip on the extended area of the nail or a broken piece of a natural plate, mechanical damage hardened gel polish.
Method No. 1 (using gel polish):

Tools and materials:
· Kit manicure tools(nippers, scissors, files with to varying degrees rigidity);
· UV lamp for polymerization;
· Silk for nail repair;
· Base and top gel;
· Gel polish (the color that was used for the manicure);
· Degreaser;
· Klinser.
Stages of work:
❶ Preparation.
First, let's get rid of the coating on the broken nail - sand the top layer with a hard nail file, and then soften the hard coating with gel polish remover and remove the remains with an orange stick; we correct the cuticle line and treat the nail with an antiseptic;
❷ Using wire cutters, carefully cut out the damaged area of the free edge and lightly trim the corners with a nail file. We treat the nail with a degreaser;
❸ Now apply a base layer to the surface of the nail, do not dry it and carefully apply a piece of silk to the free edge, “finishing” the damaged area;
❹ Place your finger in a UV lamp and after polymerization, apply another base layer, overlapping a piece of silk;
❺ Perform polymerization again, then use a clinser to remove the sticky dispersion layer and use a nail file to correct the shape of the free edge;
❻ Now we apply several layers of gel polish, each of which is dried in a lamp;
❼ Apply top gel, seal the end of the nail and do polymerization, after which we remove the sticky layer from the top coat with a clinser.
Method No. 2 (using glue):

Tools and materials:
· Glue for manicure;
· Silk for nail repair;
· Set of nail files and buff;
· Scissors and tweezers.
Stages of work:
❶ Remove the decorative layer with a special liquid and correct the cuticle line;
❷ Take the silk and cut out a small piece in the shape of a square with scissors;
❸ If there is a chip on the free edge, then remove the excess pieces with tweezers and smooth the edges with a nail file, but it is not necessary to process an even crack;
❹ Now apply glue to the damaged area of the nail, then apply a piece of silk and carefully smooth out the “patch” with an orange stick;
❺ After the glue has completely dried, take a file of medium abrasiveness and shape the free edge, at the same time removing excess glue and leveling the surface of the nail;
❻ Now apply a layer on the nail decorative material. If the repaired area of the nail is too noticeable, you can hide the flaw with glitter or other decor that matches the overall nail design.
♦ ACRYLIC POWDER FOR NAIL CORRECTION IN THE AREA OF A CHIP OR CRACK
To dry acrylic powder while repairing a damaged area of the nail, you can use special liquid(liquid). In addition to acrylic, we will need files, scissors and a base (preferably rubber).
Before the procedure, we soften and remove the cuticle, treat the nail with an antiseptic, and then remove the gloss from the surface of the nail plate soft nail file. We especially carefully treat the area of the plate around the crack (chip) so that it is perfectly even and smooth.
In the photo: repairing a broken nail acrylic powder
♦ USING A TEA BAG
It is very convenient to use a tea bag to cover a crack in the nail plate. To repair the nail, we will need a small piece of the bag, corresponding to the size of the damaged area of the free edge. The thin and translucent paper of the bag covers the crack very tightly and is almost invisible on the restored nail.
In the photo: nail repair using a tea bag, manicure glue and a nail file
♦ TEMPORARY RESTORATION
If there is not enough time to fully repair a broken nail, then you can use the emergency method of strengthening the plate with a strip of tape so that the crack does not increase in size.
In the photo: temporarily strengthening a broken nail with tape
♦ VIDEO LESSONS