We sew potholders: the main kitchen accessory. We sew the necessary and beautiful potholders for the kitchen: from idea to implementation
How to decorate a kitchen and at the same time ensure that all things play a practical role and are used? The best thing to do is to make potholders that always find use and are used daily. With the help of potholders you can emphasize the style of the interior and create a unique design. How to make oven mitts with your own hands for the kitchen - interesting tips.
Many people may ask this question - why sew potholders from fabric with your own hands if you can buy them in a store. There is a simple answer to this. As a rule, fabric accessories now sold in stores are mostly made in China. And many of them are sewn poorly and come apart at the seams a few days after purchase. And it’s better to sew them yourself and be completely confident in the quality and long service life.

Moreover, hand-sewn potholders perform a number of functions:
- They play a practical role - they serve to pick up dishes standing on the stove;
- Decorate the kitchen;
- Create a unified style.
Original oven mitts are especially appropriate if the kitchen is made in folk eco style - Russian, country, Provence. In some interiors, potholders made of fabric are not very appropriate. It’s so difficult to imagine them in high-tech interiors.
Potholder made from old jeans (video)
What kind of potholders can there be?
You can use fabric to make some very interesting oven mitts for the kitchen. At the same time, the style in which they are made and the technique can be completely different. This is where their charm lies: oven mitts can be sewn in different ways and they will also look completely different.
Potholders sewn using the patchwork technique look very interesting. They are easy to make even for a novice craftswoman, and they look very original. Likewise, potholders with appliqués, embroidery, and stencil painting look very interesting.


What materials will you need?
In order to sew oven mitts for the kitchen, you will need:
- textile;
- padding polyester;
- threads;
- needle;
- scissors.
Depending on what decorative elements are planned, you may need:
- floss threads for embroidery;
- beads;
- adhesive application.
You can develop patterns for potholders yourself, or you can download them from the Internet.
Patchwork potholders
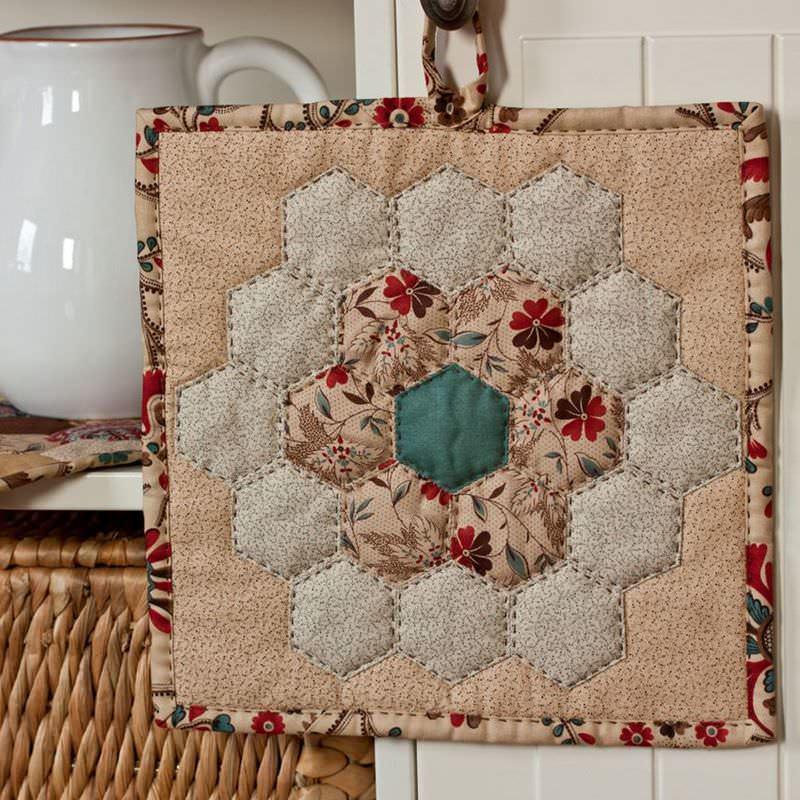
You can make oven mitts for the kitchen using the patchwork technique. To do this, you need to select fabrics that are in harmony with each other in color and pattern.
Important: A win-win option is a combination of plain fabric and fabric with a pattern. You can try combining striped fabric and fabric with a small pattern. Such beautiful potholders look especially good in Provence style interiors.
The easiest way is to cut the fabric into squares and sew a cloth from them. A pattern is applied to the resulting canvas and a potholder is cut out. The inner parts of the potholders and part of the padding polyester are cut out from a plain fabric using the same pattern.

After this, we sew potholders: padding polyester is applied to the piece of patchwork fabric, and then a plain lining is one part of the potholder, on the front side of the hand. In exactly the same way, you need to make the second part of the potholder - the back side. Then both of these parts are sewn together to form a mitten - a potholder. A loop is attached to its edge, after which the edge is edged.
Potholder - mitten (video)
Square potholders
You can sew potholders not in the form of mittens, but in the form of a simple square. Making them is even easier, since there are no curly edges. The sewing principle is the same. You can make them from multi-colored fabric, plain fabric, or in patchwork style. We sew a loop for hanging potholders on the corner.


The application can be:
- flat;
- volumetric.
The applique is cut out from pieces of multi-colored fabric. To do this, you need an initial applique pattern. Next, its individual details are transferred to the fabric and parts of the applique are cut out. All details are sewn onto the front side of the potholder using a decorative seam. And only after this the front part is sewn with padding polyester and the back side.
Important: You can make the task much easier and cut out a ready-made applique motif from fabric. To do this, take fabric with a printed large pattern. The motif you like is cut out, duplicated with non-woven fabric and sewn to the front side of the potholder.
We sew voluminous appliqués in much the same way. Only the applique is not sewn to the end at first - pieces of holofiber are placed under the applique to add volume. As soon as the applique acquires volume, it must be sewn to the end. Potholders made of fabric with 3D appliqués are especially beautiful. And they are not at all difficult to make.
Master class on how to sew a pot holder (video)
Painted potholders
It’s not at all difficult to sew such potholders with your own hands. Take pieces of any plain fabric you like. A design is applied to it using a stencil. You can make stencil patterns yourself with your own hands or download them from the Internet. In principle, any drawing you like in a magazine can be turned into a stencil.
The design is applied to the fabric with acrylic paint with a brush or sponge. To prevent paint from leaking under the design, the stencil must be firmly attached to the fabric - this can be done with tape. When the pattern on the fabric has completely dried, you can sew together parts of the fabric potholder for the kitchen.
Original ideas

You can turn your homemade potholders into a real work of art. It is enough to sew a couple of dolls from fabric and attach them to the front side of the potholder. Such a potholder becomes mostly a decorative element of the kitchen.
You can do it differently - the parts of the potholder are knitted and the individual elements are sewn together. In this way, you can make potholders for the kitchen in the form of vegetables, fruits, figures of people, animals, and fish. Such potholders become a real decoration of the kitchen. Especially if they are complemented with embroidery.
You can make various figures of animals, vegetables, berries from fabric, duplicate them with synthetic padding and sew oven mitts for the kitchen. They will create a special mood and positivity in the kitchen.
Sew a potholder - heart (video)
Sewing potholders with your own hands is not difficult. Tastefully selected fabric, a couple of interesting ideas and ready-made things that can make the kitchen cozy and original. Handmade potholders can make any interior unique.
DIY kitchen mitts (photo)


In any kitchen, an oven mitt is a must. And if it also fits into the overall interior, and what’s more, it’s made with your own hands, it won’t have any price at all!
Yes, any housewife herself will be very pleased not only to admire her work of art from the outside, but also to use it in operation.


In addition, today there should not be any special questions about how to sew an oven mitt for the kitchen, because... you can find many patterns and make them very different!

In order to save money, many housewives do not even think about spending money on things such as oven mitts. And rightly so!

Why buy them if making them yourself is not at all difficult, and for this you will need almost any available material, like old gizmos that have been lying around for a long time.

The main thing is that the material is dense so that your hands are protected from hot dishes and spilled liquids.

If you don't have a sewing machine...
How to sew a pot holder if so? And I don’t have any special sewing skills. But at the same time, you have a great desire to do something with your own hands, and even so that it is exclusive and original.

For example, among the simplest options, you can choose a rectangle, a heart, a circle. Of course, the fabric that is more suitable is one that will not fray at the edges and is easy to wash. But as a gasket you need batting/sintepon.

You can make a pattern for a potholder for the kitchen on a cardboard sheet. Then transfer it to the fabric in 2 parts and duplicate it on the interlining material, which you fold face to face with the parts and baste.

In this case, you still need to leave a small piece so that it is convenient to turn it out. You can use any seam for stitching that you know and can do in practice, or simply whichever one you like best.

Then the product should be turned out and the shape carefully trimmed. You can help with this with a pencil. The edges that remain unstitched should be folded inwards, insert the hook tape there and sew with some version of the decorative seam.

It should be continued around the perimeter of the tack. If the step is maintained, any, even a simple seam will look original. We bring to your attention various patterns of oven mitts for the kitchen.

Patchwork in your kitchen!
Today, patchwork is a way of expressing individuality, which indicates that a person is very diligent. After all, to create it you need not only to know some execution techniques, but also to stock up on great patience. Therefore, it is recommended that creative people, patient people, and perfectionists take it up.

The basic rule for creating really interesting patchworks is to prepare templates. They are made on thick paper/cardboard or thin plastic.

It is advisable to select the fabric so that it has the same structure, is easy to cut, and does not deform. It is better to take cotton, calico, linen, tapestry. It is first washed and ironed.

The parts must be connected after cutting and assembly on flat surfaces for adjustment. The seams are ironed before each cutting.


There are 2 types of techniques for making patchwork:
Traditional, in which a single piece of fabric is the second layer.

Quilting, which results in stitched fabrics. Inside they are a layer of padding polyester.

There are many cases where, on the very first try, a person comes up with an original, extremely beautiful patchwork that inspires new achievements. Using identical fabric scraps, products can turn out very different and each will be original in its own way.

Patchwork parts can be sewn or joined using a crochet hook or thin thread. By the way, if you have no particular desire to tinker with fabric, but at the same time you have good knitting skills, you can make a knitted potholder!


Get inspired by interesting ideas, see photos of oven mitts for the kitchen!

Photos of potholders for the kitchen


Practical accessories and decorative elements are an integral part of the design of your favorite kitchen. Stylish accents add originality to the interior and help you get a rosy pie out of the oven and not get burned when you need to remove a heavy pan from the heat. It’s easy to find pot holders with patterns for making your own from fabric on the Internet. Sewing a product according to a finished sample is not difficult. You will need devices and materials that every housewife has, not just needlewomen.
Potholders are an item as common as they are irreplaceable. They are sold in every supermarket. You can buy a pair of factory-made twins or a whole set of different shapes and sizes. Sometimes you want to sew something with your own hands and make the kitchen truly homey. Before you start, it’s worth getting acquainted with the features of the product.
Fabric selection
A textile accessory that will be in regular contact with hot and heated surfaces must withstand high temperatures. Kitchen aids made from thin cotton fabrics, silk or synthetics are not suitable. The first ones quickly burn out and lose functionality. The latter melt - there is a high risk of burns and the spread of unpleasant odors. Best suited:
- Linen. Dense natural fabric made of durable threads has a distinct texture, is pleasant to the touch, and does not slip. A small inclusion (up to 20%) of synthetic threads is acceptable, which prevents the fabric from creasing.
- Cotton. Various fabrics are used - chintz, satin, calico. Each of the materials is used to apply full-color drawings. You can create a composition from linen or choose towels and other textiles as blanks.
- Felt. Dense felt material is suitable for making a designer product and can be used to fill the inside of the potholder. In the era of the heyday of handmade goods, buying multi-colored felt is not difficult. In the workshop for sewing clothes and accessories from felt, there are always scraps and trimmings for patterns.
It is important to know! The linen surface is suitable for satin stitch embroidery. Uniform weave linen is used for cross stitch. Needlewomen can show their imagination and realize an original idea.
Linen products are ideal for sewing decorative items

Stylish cotton helpers in the interior

New Year's felt mitten is suitable for decoration and daily use
It is important to know! Additionally, you will need finishing tapes, blanks for appliques and other accessories - the decoration of the potholders is thought out in advance.
Internal filling
Structurally, the kitchen assistant is a “sandwich”. Between the two layers of face fabric and lining there is a filler. This is usually a denser natural material. It is better to exclude synthetics from the list of “consumables” for sewing potholders for the kitchen with your own hands. Use as filling:
- Drap. It is characterized by high density and low thermal conductivity. The risk of getting burned is minimal. It is recommended to choose a material as thick as for a demi-season coat. The “winter” version is too dense and low-elastic. A standard amateur sewing machine will not cope with the fabric, and sewing it yourself is difficult due to its thickness.
- Felt. Suitable as a filler and a blank that is not placed in a sandwich. Reliably protects hands from burns and is not afraid of contact with hot surfaces. It is considered as the best option - it can be sewn with a regular sewing machine and can be processed with your own hands.
- Batting. With its help, we create cozy mittens and sew oven mitts for the kitchen with our own hands - the patterns for quilted products are similar to other models. Care must be taken when contacting hot surfaces. If the fabric does not hold up, the batting will burn through and there is a risk of burns.
It is important to know! The optimal filler thickness is 2-3 mm. Thick, rigid material reduces “maneuverability” - it is more difficult to confidently pick up a hot sheet from the oven or grasp a pan.

The filler adds volume and protects hands from burns
Forms and purpose
Potholders come in different shapes and sizes. They differ in their functional purpose, which determines the design and cut. When moving hot sheets, pots and other utensils, housewives use two techniques - “grab” and “grab”, or rather “grasp”. According to practical needs, there are three main types of tacks:
- Mittens or mittens. They are put on the hand and are intended for removing baking dishes, casseroles, and sheets from the oven.
- Squares. A functional oven holder for utensils on the stove - it’s convenient to remove hot lids, grab the handles of pots, and handle a wok or multicooker bowl.
- Butterflies. Structurally, they consist of two halves sewn together. Convenient for grasping the handles of frying pans, jars during sterilization and other round objects without a handle.
- "Model" samples. They are distinguished by a variety of shapes and sizes - hearts, sun circles, cat paws and many other options. They often perform a decorative function, but can be used for their intended purpose.

Mittens are needed at any time of the year, especially if they are cats

Butterflies decorate and brighten up cooking

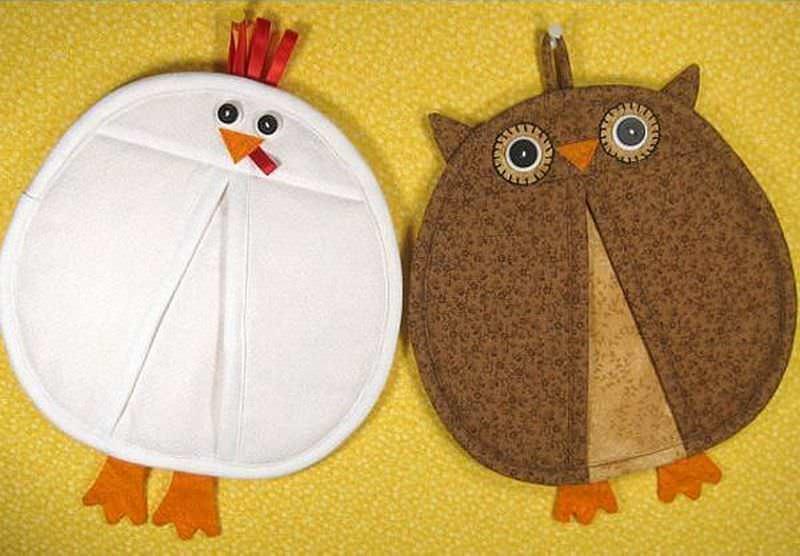
Sometimes owls are an original idea for the interior
How to sew a product according to a pattern
Experienced needlewomen do not need oven mitt patterns to sew with their own hands - the patterns are simple and do not include complex details. Beginning handmade fans should use a “pattern”. Available materials are suitable for production, starting with your own hands.
Step-by-step instructions for sewing a mitten
The mitten is used more often than others - dishes cooked in the oven are incredibly popular. You can’t do without a comfortable potholder made of a dense and non-slippery material. Sew the mitten as follows:
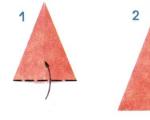
- They make preparations. To do this, place your palm on a sheet of paper, put your thumb aside, and trace the outline.
- The resulting template is smoothed out, “rounded” a little and another one is made with an indentation of about 2.5-3.5 cm. Allowances are needed for free putting on and taking off from the hand.
- Draw the base - do not narrow the mitten, it is important that the palm passes freely.
- Transfer the outline onto the fabric using chalk or a soft pencil - make two mirror blanks on the front material, lining and filling.
- One or two “sandwiches” are assembled when sewing for the left and right hands. If this is your first experience, be sure to pay attention to compliance with the mirror rule, as well as the location of the pattern or design.
- They take off the mitten and try it on.
- All parts of the structure are sewn manually or by machine from the wrong side.
- Cut the folds so that the mitten looks natural, without creases on the front side.
- Overcast the edges of the lining, filling and front part.
- Iron the accessory and decorate it - with a decorative ribbon along the edge, sew on a loop to make it convenient to hang on a hook.

Pattern example - classic mitten

At the first stage, all the details are cut - the front part, the filling and the lining.

All parts are sewn together, clearly matching the patterns

Make cuts at the corners

Sew on decorations
They follow the same principle if you have any difficulties with how to sew a pot holder for the kitchen with your own hands. The instructions are suitable for circles, squares, and other simple shapes. The final design and choice of finishing elements depend on personal preference, taste and self-confidence.
Video master class - sewing potholders using the patchwork technique
Photo master class - “Owl” potholders


How to create “model” accessories in the interior
A hand-sewn potholder can become the embodiment of the design fantasies of a housewife. To create an original model, you do not need special talents or knowledge of the intricacies of sewing. You can’t do without accuracy, patience, and most importantly, ideas. The interior is decorated with:
- Samples of original shapes - from butterflies and hearts to stars, owls and the ubiquitous seals. Mandatory attribute – hearts. You need to use every opportunity to confess your love to your loved ones.
- Thematic sets. You can make your own set of mittens, potholders of any shape and towels. Linen and cotton fabrics with a repeating pattern or ornament are great for implementing the idea.
- Knitted items. If you don’t know how to sew an oven mitt, but have crocheting skills, a knitted accessory will decorate your kitchen.
It is important to know! The color of different sides of the potholder may vary. The working part is made darker, and the back is made lighter.

Thematic set in the same style - a beautiful solution

A bright set brings rich accents to the interior

Lacy accents decorate the food preparation area
Beautiful potholders - photo for inspiration
If you have figured out how to make a pot holder with your own hands, you should pay attention to interesting ideas. To create beauty around, all you need is the desire to make the space cozy and truly homely.
Decor elements
Fabric pot holders become real works of art and part of the decor if, in addition to the idea, they contain an original finish. Kitchen accessories are complemented with the following elements:
- A variety of finishing tapes - straight, wavy, patterned, wide and narrow. They are used to trim the edges of products, sew around the perimeter or form a pattern - it all depends on the model and imagination;
- Lace - this light and elegant decoration is often and undeservedly forgotten.
- Volumetric stripes - they are used to decorate mittens, ordinary squares and oven mitts of non-standard shapes.
- Appliqués – on the front side you can create a separate plot that will tell a lot about the character and interests of the hostess.
- Hand embroidery always attracts attention and fits harmoniously into the interior, regardless of style.


Square holders
Potholders sewn according to the master class are always in a visible place and attract the attention of guests. This requires not only keeping them clean and tidy, but also paying attention to style, color scheme and matching the overall design of the kitchen.
This household accessory inspires many craftswomen to get creative with their own hands - embroidering motifs, crocheting trim and performing skillful appliqué becomes an important task in creating coziness, harmony and a unified style of the kitchen.
DIY potholders: materials, tools and skills
One of the main advantages of making potholders for the kitchen with your own hands is that you do not need to have any special skills or applied art techniques. We sewed and hung the accessory, for example, over a stainless sink in the kitchen.


Can you sew on a button yourself? Then you can easily sew a “Mitten” potholder! Can you crochet a ring of 5 loops? Then your potholder will also be very creative!
Are you inspired by the possibilities of handcraft? Then this master class is definitely for you! The shade of the interior is not important, even if the kitchen is red.
External material
The best materials for kitchen accessories, regardless of what idea, diagram or photo is taken as a basis, are all natural fabrics:

Round potholder "Patchwork"
- Cotton;
- Chintz;
- Other.
One way or another, self-sewn oven mitts for the kitchen with your own hands will come into contact with food - synthetic fibers have no place here. Moreover, synthetics will not withstand the high temperatures that a mitten (or other form of product) will constantly experience - synthetic threads melt and smolder.

A similar requirement applies to crocheted and knitted products.
Internal filling
Each master class or photo on independent sewing and making potholders for the kitchen, by default, assumes the volume of the product - that is, the presence of filler between the pattern pieces. It, like the main material, must be wear-resistant and natural.
Best suited:

- Drape;
- Felt;
- Batting.


Tack form
Functionality and practicality are the primary properties of potholders, and therefore the goals of any master class.

Therefore, before directly sewing such a product, you need to decide on the shape, each of which varies in the degree of ease of use:

- Mittens;
- Squares;
- Long rectangles (for pots) - will be faithful assistants in cooking;
- Hearts, leaves, berries, fruits, etc. – this is more of a tribute to aesthetics, embodied in the photos of the predominant number of master classes on the network.
Decorating a product with your own hands is the greatest scope for creativity in this matter:
- Crochet;
- Application;
- Using a cross stitch pattern or making a decorative stitch.

In an independent master class on sewing a kitchen accessory, you can use anything, but, again, not for the sake of practicality and ease of daily use.
Step-by-step sewing master class
The first step to a convenient and indispensable oven mitt in the kitchen is a correctly made pattern.
- Prepare a sheet of paper or just a piece of fabric from which the product will be sewn, and place your hand on top, bringing four fingers together and putting the thumb aside;

When sewing according to a pattern, use the “working” hand, on which the pot holder will be put on in the future: for right-handers - the right one, for left-handers - the left one.
- Using a smooth and neat line, outline the entire palm yourself, retreating 2.5–3.5 cm from the edge of the brush for allowances. Having traced the brush, remove your hand and refine the template - make the line clearer and even, smooth out the contours, make the roundness symmetrical.
- Cut out a template from paper (or fabric) - now you need to prepare 4 completely identical parts according to the pattern. We cut it twice from fabrics, and twice from filling or lining fabric for volume and softness of the product;

For greater durability and accuracy of the accessory, we recommend cutting out 4 blanks from the main fabric to firmly secure the filling inside and sew the product firmly.
- The most interesting stage has arrived - we are assembling a “sandwich”, the future mitten in the kitchen:

- Now, according to the master class, all that remains is to sew the assembled product - the “Mitten” potholder is sewn along the contours of the assembled “sandwich” with an indentation of 5–7 mm from the edges;

- Places where the indentation is too wide, carefully narrow it with scissors and turn it inside out, hiding the seam line inside;

- Iron the finished product and decorate it in any way you like; if desired, model a loop or hook for convenient placement in the kitchen.

In order to simplify the work, this master class can be completed at this stage of making a kitchen accessory. All step-by-step instructions are below in video format.
Any stitch, even the roughest or most contrasting, looks quite appropriate on traditional mitten-shaped potholders. In addition, the seam can be stylishly played up, for example, by crocheting a frill.
A more complicated and skillful algorithm for sewing potholders for the kitchen requires a little more effort. However, it turned out very well for us.
Do-it-yourself pot holder: interesting ideas
Quilted
Master classes on creating quilted items everyday life Indeed, voluminous quilted potholders give the kitchen a special coziness and feeling of home.


Making such a potholder with your own hands is much easier than it might seem. To do this, cross-quilt two “sandwiches” as in the master class above - fabric-filler-fabric. And then, from these cuts, make 2 mitten blanks and sew them together (see photo).
Patchwork
Patchwork technique(“patchwork”) also looks very advantageous in any kitchen style. However, it should be borne in mind that the process of creating such a product:


- It is more difficult to sew than using whole pieces of fabric;
- Requires more time;
- A clear scheme;
- Having certain skills in cutting out parts and sewing them together.
Loop or crochet

You can experiment with a loop or hook for fixing potholders– why not equip your accessory with a progressive snap closure or a bright cord as an eyelet.
Let's sum it up
Knitting potholders yourself is another way to add a special touch to your own kitchen.
The optimal choice when choosing patterns, patterns and models for a master class on sewing mittens for the kitchen is a hook and non-voluminous, dense patterns, so that a beautifully sewn pot holder remains practical.
It is the various techniques of sewing, knitting and weaving that make it possible to implement non-standard shapes of potholders in the kitchen and knit the most ornate and whimsical products, which children really like. By the way, a great option for family leisure is to crochet a kitchen accessory together!
No matter what type of kitchen you have, it won't be easy to work in without one small but important accessory - an oven mitt. And so that this product is not only convenient, but also decorates the interior, I’ll tell you how to sew a pot holder yourself, and what you need to take into account.
To buy or not to buy potholders?
The list of advantages and disadvantages of potholders is inappropriate: as for me, these products have one undeniable advantage that overrides everything - they prevent you from burning your hands.


But one standard question may arise: “why try to invent a bicycle if you can go and just buy it?” Of course, you can buy a ready-made version in the store, but will it be better than something you created yourself?
The answer is simple and consists of at least 3 components:
- hand-made potholders are even more practical than store-bought ones;
- they will help in unifying all accessories under the banner of a single style;
- this same element will add a bit of exclusivity - after all, you won’t find potholders decorated exactly like yours even during the day.
I think that when the advantage of tacks and the need for their creation has been proven, it’s time to move on to more offensive actions.
Making potholders - getting started

In addition to its direct functions, a potholder can serve as a present. This is where the rule “the best gift is a gift made with your own hands” comes into play. But regardless of the purpose for which you are making this accessory, it is important to remember some points.

The individual design of the potholder makes it a popular holiday gift, and the price of such a gift is minimal

Main features of cutting and sewing
Making potholders is both easy and difficult. Easy because you don’t need any special skills, hard because you need to take into account a lot of nuances.
I'll make your job easier by listing the main ones:

- To ensure that your potholders meet all the requirements for heat resistance and strength, you should give preference to natural cotton fabrics.
Remember that synthetic fabrics are easy to melt and catch fire, so you should avoid using them.
- To prevent you from burning your fingers, keep in mind that the oven mitt must have a certain thickness that protects the skin from heat. Suitable dense fillers include: cotton wool, padding polyester, batting or felt.


- To save on materials, you can use blouses and sweaters that have lost their appearance.


Selection of materials
As mentioned earlier, the most effective potholder can be created using natural materials for the front frame:


- chintz;
- cotton.

Don't forget that you have the opportunity to carefully consider the shape and appearance of the potholder.
In the process of decorating it, you can use all your imagination to the maximum by using:
- beads;
- small beads;
- appliqué;
- embroidery threads.


Creating potholders step by step
Sewing a stylish pot holder is quite simple - believe me, you don’t need any special skills. By following the sequence of steps, you will get a good result the first time.

Mittens
Instructions for creating a potholder:

- The first is the pattern. It's very easy to do. To do this, just place your palm on a regular A4 piece of paper, fold your hand as if you were going to put on a mitten and trace its silhouette, retreating from it at least 2.5-4 centimeters.


- Using the resulting template, cut out 2 pieces of the front material and the inner one. For the front side, choose a bright, beautiful fabric that will decorate the kitchen, but for the internal filling you should give preference to soft and pleasant-to-touch fabrics.


- Next comes the processing of filling the mitten. Having chosen a dense non-synthetic fabric for it, cut out two flaps from it according to the already outlined pattern.
- And now the most interesting and important stage begins.
You need to put all the parts in the correct order:
- first, two flaps with the colored side facing each other are laid out on a flat surface, intended for the front framing of the potholder;
- after that, we apply cut-outs from the filler on top and bottom of the finished parts;
- and at the end we put on both sides (again, top and bottom) along the flap intended for the inner lining.
- To prevent all the parts from fidgeting on the table during the sewing process, they can be secured with safety pins.
- Now you can proceed directly to sewing. Sew all edges of the potholder with a distance of 5-7 mm from the edge.
- When you have a tack turned out like this, trim off the excess fabric along the edges, not getting closer than 3 mm to the seam.

- Now make tiny cuts in all the rounded areas (between your fingers, for example). This will allow our mitten to turn out better.

- There is very little left to do - turn the product outside and decorate it with decorative tape or braid. And again, it is better to choose natural materials.
This is the easiest option for creating potholders with your own hands. If you are confident in your abilities, you can complicate the task slightly and make it quilted. Its tailoring is in many ways similar to the previously mentioned model.

- Before cutting out the flaps according to the patterns, you need to stitch the fabric elements selected for the front finishing with a diamond, a check, or as you please. Please note that the threads must match perfectly with the color of the facing fabric.
- Fold the quilted flaps right sides together as indicated in the instructions above and repeat the above steps.
Square
When creating a mitten-shaped potholder has been mastered, all horizons are open to you and sewing a square potholder will seem like a cakewalk.
And yet I will suggest a way to make it:

- To begin, prepare 2 beautiful flaps for the front side and the same amount for the inside (from batting, for example).

- Create a pattern that is a square with dimensions of 20 by 25 cm (I give standard sizes, you can measure others).

- Using the pattern, cut out 4 pieces of fabric.
- Lay them out like this:
- the first layer is the filling fabric (the same batting);
- place a piece of decorative material on it, face up;
- Place the same decorative fabric on top, but face down;
- and finally cover the pattern with a layer of batting.

- Without changing the sequence of the flaps, sew the workpiece on three sides.
- Next, prepare a loop from a beautiful piece of fabric (can be of a different color) with dimensions 8x15.
- The loop is applied to the fourth unstitched side, after which it is processed with a sewing machine.
- The potholder turns outward.
- The fourth side of the potholder is stitched in the same way as the previous 3.
For added practicality, you can always sew an additional outer pocket to the potholder. Using this pattern, you can sew an accessory of any shape, be it a star, a circle or a rectangle.
Circle in patchwork style

I offer you another interesting option for creating an oven mitt for the kitchen.

- Create a pattern with a circle of arbitrary diameter.
- Using the template you made, make a blank from the internal filler, and one solid piece for the outer side of the potholder.
- Cut out several scraps of randomly patterned fabrics.

- Connect all the previously created flaps together, using a sewing machine, stitch them into a single fabric.
- Press all seams thoroughly.
- Connect the circle of scraps to the corresponding piece of filler. Next, apply another layer of filler, and a piece of decorative fabric on top of it.
- Sew the entire potholder in a circle, carefully trim the remaining threads and pieces of fabric. Enjoy the results.

Instead of results
Oven mitts are one of the necessary items in the kitchen. In addition, with their help you can add a special chic to the interior. Now you know how to sew such an accessory, you are convinced that it’s easy!

If you have any questions while sewing, ask them in the comments. Watch the video in this article - it contains a lot of useful information.