Spinner at home. Making a spinner out of paper How to make a spinner out of paper
Has your child succumbed to the popular fashion for spinning spinners? Is he asking for a red one, a yellow one, and also a luminous one in the form of a minion? In general, so that it’s not like everyone else? Then you can make a toy with your own hands. Moreover, such a labor lesson will keep both you and your baby busy. And if you still don’t know what a spinner is, there we answered all the popular questions about this modern, arch-modern fun.
We have put together three ways for you to make a spinner, two easy and one more difficult (you'll need your dad's help here). But we are sure that both tools and materials should be found at home or in the country. Each instruction is supported by a video tutorial found on YouTube for clarity. So, how to make a spinner out of paper, plastic lids and wood?
Method 1. Spinner made of paper and cardboard.
Simple, cheap and not at all ugly - a paper spinner for beginner spinner makers. An older child can handle it on his own, a little one may need a little help, and the result can be proudly taken to kindergarten or school - where creativity is always held in high esteem.
What you will need:
- Cardboard, marker and caps (or a ready-made template from the Internet)
- Scissors
- Nail scissors or awl
- 3 coins
- Pen refill
- Paints or glitter for decoration
Instructions:
- Download a ready-made spinner template from the Internet. Or draw it yourself by tracing plastic bottle caps on cardboard. You need to cut two pieces of cardboard in the shape of a spinner.
- Cut out four more smaller circles. You can circle a coin of a lower denomination.
- Glue three coins of the appropriate size on the sides of one of the cardboard blanks.
- Glue the other half on top of the blank with coins.
- Using nail scissors or an awl, make a hole in the center of the spinner.
- Cut about 1 centimeter off the shaft from the handle.
- Punch holes in the center of two small circles.
- You can paint the finished spinner blank in any color or decorate it with sparkles, rhinestones or stickers with your child’s favorite characters. Everything is your choice and completely unique!
- Insert a piece of dowel into one of the small circles and glue it around the edges of the hole.
- Insert the circle with the rod into the center of the spinner and glue the second circle on the other side.
- Glue the two remaining small circles on top of the ends of the rod. Ready! A fidget spinner made of cardboard, without a bearing and with complete imagination in terms of design, will definitely keep a child occupied for some time.
Source: PLASTILIN
Method 2. Spinner made of plastic caps.

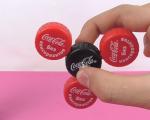
This spinner will require a little more materials and diligence, but it will also last much longer. In general, a spinner made from Coca-Cola caps is something like crafts made from matchboxes for older generations. Dear consumables and soul-warming results with minimal costs for an actively functioning (that is, rotating) thing.
What you will need:
- Plastic bottle caps
- Kinetic sand or plasticine
- Glue gun
- Nail and lighter
- Glue stick
- Scissors
- Toothpick
Instructions:
- Place kinetic sand or plasticine into three bottle caps almost to the top. The main thing is to make the blades heavier.
- Use a glue gun to fill the remaining space in the lids to the top.
- Make a hole in the fourth (without sand) lid (you can use a heated nail).
- Glue three lids with sand to the central lid with a hole.
- Cut two pieces about 1 centimeter from the glue stick.
- Break a toothpick in half. Place a piece of rod on one end (the toothpick should not stick out) and thread it into the center of the spinner.
- Place the second piece of the rod over the tip of the toothpick on the other side. Ready! If you are very eager, such a spinner can also be decorated creatively - painted with paints (for example, acrylic) or pasted over with something positive. Or you can leave it as is, choosing interesting combinations of caps from bottled drinks.
Source: Feature of the Day
Method 3. Wooden spinner (with bearing)

Let's move on to the most labor-intensive method of making a spinner. You can’t do without parents here, but the result can be safely laid out on the desk along with purchased toys. Again, in terms of design, freedom for self-expression is provided. For those dads and children who are friends with a jigsaw, know how to find bearings on the shelves of hardware stores and know which side to hold the drill on.
What you will need:
- 2mm bearing
- Plywood sheet (5 mm)
- Stack of coins
- Scissors
- Pencil
- Hand jigsaw
- Sandpaper
- Template (or cardboard and marker to create it)
- Clamp
- Drill
Instructions:
- Glue the template onto a sheet of plywood and mark the locations for future holes in each of the circles.
- Drill holes in each of the three circles on the sides to make it easier to cut them out later.
- Insert a jigsaw into the holes and cut them out.
- Cut out the workpiece itself from a sheet of plywood and sand it with sandpaper.
- You can paint the spinner any color you like.
- Insert the bearing into the central circle; if it does not fit well, you can drive it in with a hammer.
- Glue together a stack of coins for the inner circles. Start with a five-ruble coin (put it under the circle), then two-ruble coins and on top again a coin with a face value of five rubles.
- Do this for all circles. You can decorate it on top as you wish. Ready! Just think about the benefits of a homemade anti-stress toy: you had a good time together with your child, worked hard and saved money on buying another plastic trinket. And it spins great!
Spinner conquers the galaxy at the speed of light. Millions of people twist, spin and toss the toy, which has become a favorite accessory at work, home and school. For those who suddenly returned from a business trip in the forest, we explain: a spinner is the coolest anti-stress gadget for children and adults. The toy is made from a variety of materials: metal, plastic, wood, and so on. In previous materials, the gaming portal Game2Day talked about, and.
However, despite the fact that prices for spinners start from a few dollars, many users still search the Internet for how to make a spinner with their own hands. Today we will tell you how to make a spinner yourself at home without unnecessary complex gadgets. Let's start with something simple: make a spinner out of Coke caps and cardboard. And then we’ll try to complicate it and make a spinner from a bicycle chain. Well, then let's see what human imagination is capable of.
What does it take to make a spinner? Prepare cardboard, paper with a pencil, a compass with a ruler, several round bearings, a stationery knife and a simple knife, as well as a lot of glue: liquid, hot and superglue.
Making a spinner from paper and cardboard
A hand spinner made of paper or cardboard is made simply: create a drawing (four equal-sized circles with places for bearings), cut out the parts from paper, and paste them onto cardboard. Cut the holes for the bearings a little smaller so that the metal part fits tightly and does not pop out. And then we simply glue three circles together around one at equal intervals.
Wooden spinner
Do you own a jigsaw and drill? Great! You can make an eco-friendly and pleasant-to-touch wooden spinner. There are plenty of drawings on the Internet, download and print them on paper. We apply the blank to a wooden board, carefully trace it with a pencil and cut it out along the contour. It would be a good idea to sand the resulting toy with sandpaper and coat it with varnish or wood oil. You can even age the spinner using a lighter. The holes for the bearings can be made with a drill (drill halfway, turn it over and drill further). The thickness of the board must match the thickness of the bearing.
Spinner made of plastic caps
The spinner can be made without bearings. Take 6 plastic lids (can be of different colors, it will be more beautiful). We make small holes in the center of two lids. We glue them with a flat surface facing each other, but so that the holes are not filled with glue. Fold three lids around the resulting figure, distributing them at the same distance. We glue them to our double lid on the sides at equal heights. Then we take a wooden stick and push it through the hole in the center. We cut it off, leaving 3-4 millimeters on both sides so that it sticks out slightly from the lid. Fill the stick with glue and wait. That's it, you can spin it! You are your mother's engineer!
Spinner made of bearings
We will need three bearings, one of which should be slightly smaller than the others. Use a knife to pry off the protective liners from the small bearing and place them in a row so that the large ones are at the edges. We take three plastic clamps and tighten them around the future spinner. Firmly, so that you can lift the spinner by one of the clamps. We take two more clamps and tighten them across (on the sides of the small bearing). We cut the clamps and whoosh, magic!
A three-beam spinner will require seven bearings, a tube of superglue and hot glue, a wooden stick, acetone, salt (!!!), napkins and a utility knife. We remove the protective liners from the four bearings and clean them of oil residues using acetone. Then we lay out all seven bearings on the table so that one is in the middle and the rest around it (bearings without liners should go through one). We glue them to each other on top with superglue. We DO NOT glue bearings with liners! As soon as the glue dries, remove the excess and glue the spinner at the junction of the pieces of iron. Sprinkle salt there to fill the gaps and coat the spinner all around with hot glue. We wait until everything freezes and go show off to our friends.
What else can you make a spinner from?
Ohohonyushki! Well, we have questions today. A spinner can be made from anything. Seriously. You can even make a spinner out of a Lamborghini. Want to watch? Please!
For tough men - a brutal spinner made from bullets. Melted and poured into a special form. You can walk around the area fearlessly. There is!
But this spinner is the complete opposite of the previous one. Want to make a toy out of Gummy bears? Here you go.
The young chemists perked up... Gallium spinner, how do you like this? They say that this material literally melts in your hands. But one thing is clear, it is very fragile, but beautiful: it resembles silver. You can troll werewolves.
One of the most expensive spinner options is gold. For what? We don't know. Maybe someone has more than enough school medals. Or teeth inherited from a great-grandfather. In general, if you have nowhere to put one of the most expensive metals on the planet, make yourself such a spinner. Maybe it will go under the hammer for even more money.
And these spinners are especially for boys and girls. Bright, colorful and completely safe. They are mostly made of cardboard, and the drawings can be downloaded from the description of the video. Offer to make one during labor or crafts classes. The teachers will definitely like it, maybe they’ll even let you do tricks in class
The next set consists of three spinners: from a bicycle chain, which can be made in a very short time; a very cool spinner with LED lights that glows in the dark, and the third option is made from LEGO.
The most luxurious spinner made of copper. Handmade, but looks like it was made in a factory by hardworking Chinese. Or Filipinos. In general, see for yourself, if you happen to have such tools at hand - go for it!
There was already a spinner made from Gummy bears. It's time for another edible toy. A candy spinner made by an American blogger. Is it weak to repeat? A barberry spinner will turn out great!
Another glowing spinner with LED lights. You can put production on stream and supply local clubs instead of hand stamps. Why not a startup? Enjoy it for your health.
Sakura has bloomed. Silver rain is falling. Making a spinner shuriken. During the process, you can come up with more than one haiku, you know.
If you have nowhere to put your iPhones, make one into a spinner. Seriously, it spins cool and looks expensive. You just can’t call on it... me too, it’s called quality. Just think, they drilled a hole in the middle!
Glamorous spinner for girls with sparkles. You can also decorate it with beads.
A classic metal spinner for cool tricks and spins. Reliable, simple. You just have to get a lathe first.
You can come up with as many more models for spinners, if not more. The main thing is that there is enough imagination and available tools. Good luck and may the crookedness in your arms go away while you spend making the new spinners. Surprise us with your variations in the comments, happy spinning!
In this master class I will show you how to make an original paper spinner with step-by-step photographs. This toy has long been of interest to both children and adults. But purchased options are quite expensive and not always safe. Therefore, if your baby asks to buy him a fashion accessory, offer to make it with you from paper. The end result is an inexpensive and very entertaining craft.
How to make a paper spinner
To make a paper spinner you will need the following materials:
- two sheets of square paper with a side of at least 21 cm
- scissors
- pencil
- thick cardboard (from the box)
- colored cardboard
- bamboo skewers
- hot glue gun
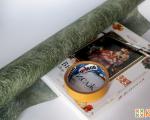
This picture shows a set of proposed tools along with a ready-made spinner.

First you need to mark a square sheet of paper so that you get 9 small squares. This can be done using a ruler and pencil, or by marking the sheet by eye. To do this, fold the left side by one third.

Then fold the other side.

Unfold the workpiece. The result was two planned lines.

Draw parallel lines in the same way.

This is what I ended up with.

Now unfold it.

Make the same blank from a sheet of paper of a different color.

Now cut the blanks into squares.


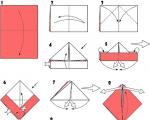
Now we fold the workpiece along the second diagonal.

Take the two left corners and fold them towards the center.

Fold the figure in half.

We bend the right corner inward.

The result is a module like this - a blank.

We are making a number of similar modules. In total you will need 4 modules of each color.

Now open the module of one color and insert a module of the second color there, with a sharp angle inward. At the same time, we make sure that the upper sides of the modules match.

I bent two corners of the blue module inward. Thus, I fastened the two modules together.

From the side it looks like this.

In the same way, we assemble a figure from all the remaining modules.

Don't forget to alternate colors.

The module is almost ready. All that remains is to connect the ends together.

I connect the two ends of the module together.

It turns out this is the figure.

Now this figure needs to be reduced to the center. Grab both sides of the workpiece with your hands and bring them to the center point.

Do the same with the opposite two sides.

This is the final figure.

Now all the corners of the modules need to be bent and glued.

Cut out two circles from thick cardboard (from a box). We cut out two round blanks of the same size from colored cardboard.

Cut a small piece from a bamboo skewer.

Using an awl, we widen the hole in the spinner. Insert a bamboo stick. It should move freely in the hole.

Using an awl, make a hole in two cardboard circles.

A spinner is a new type of toy for children, designed to develop fine motor skills and entertain children. Not every parent decides to purchase such a toy for their child due to its high cost. Therefore, today on the Internet you can find many options for making toys yourself. We suggest you consider how to make a spinner without bearings at home with your own hands!
What is a spinner?
 This type of toy is perfect for both adults and children. What is the advantage:
- Relieves irritation, nervous and mental tension. Has a calming effect on the nervous system;
- Helps you switch from one task to another;
- Used to quit smoking;
- It is especially recommended to take with you for those who like to chew pens, nails or pencils.
Also, in addition to all of the above, it is recommended that children of preschool age purchase fidget spinners. Little ones are very attracted to the rotating movements of this toy on a horizontal plane. By taking such a toy with you while traveling, you won’t have to listen to your child say that he has nothing to do.
Also, the toy can be used not only as entertainment, but also as development, since fine motor skills of the hands develop during play. This type of toy is especially recommended for those children who have not yet begun to speak clearly.
Once you understand how to play, over time you can learn several interesting tricks with a spinner.
While making toys at home, you can also involve your children. They will be interested in making it with their own hands, showing their imagination and skill. It will not take much time to create various types of accessories, nor will it cost much money. As you already understand, there are more advantages to making toys at home than disadvantages. Then we suggest you consider how to make a spinner without bearings.
Do it yourself
In order to easily make an accessory at home, you need to prepare all the required tools and materials.
So, let’s look at what available materials you can use to make a toy:
- coins;
- Lego;
- wood;
- plastic covers;
- paper and cardboard, etc.
Equipment you may need:

- a template diagram of the toy itself, which is easy to find on the Internet and print;
- stationery sharp scissors;
- writing instruments;
- glue or glue gun, depending on what type of spinner you want to make;
- decorative elements.
Now it becomes clear that you can make a toy with your own hands from any available material, the main thing is to show a little of your imagination and that’s it, the miracle device will be ready.
In order to make an accessory for a child as correctly and accurately as possible, you need to find a toy template. You can do this on the Internet; just print it out in full size. If you draw beautifully, then making a spinner model will not be difficult for you. Moreover, with a little imagination you can come up with a new design for it.
How to make a spinner without bearings for children, and to be more precise, how can you replace the bearing?

As usual, in order to make educational toys at home, people buy special devices - bearings, but they are considered unsafe, especially for children.

How can you replace the bearing in a spinner:
- With coins. To do this, use two ruble coins, in the middle of which you need to make a small hole for fastening, but in order not to damage the soft fingertips, you need to drip instant glue from the outside of the hole.
- You can also install a wooden stick or a piece of plastic in the middle, making sure to wrap them with electrical tape.
- Plastic soda caps are a good option for bearing replacement.
Manufacturing options

- brilliant fiomiran double-sided color of your choice;
- white cardboard;
- one ruble coin;
- stationery scissors;
- awl;
- wire is 1 cm long;
- any plastic figurine with a hole in the middle - 2 pcs;
- glue;
- double sided tape.
After all the required materials have been prepared, we begin to describe the step-by-step work.
We place the white cardboard on the table and build a rectangle with sides: length 7 cm and width 2.5 cm. Then cut it out. Now you need to make rounded edges on both sides of the rectangle. For convenience, you can use a 5 ruble coin. Now we take ruble coins and, stepping back half a centimeter from the edge, outline them. We cut out the rounded part and the circles from the inside.

Now we take the part and make a similar second one. Cut the tape into small strips and glue them together.
We lay foamiran on the table and apply the finished figure to it and make similar ones, only from foamiran. Moreover, we do not cut out the inner circles of these blanks.

To the cardboard figure we glue a cut out foamiran figure on one side. Then, on the other side, we glue ruble coins on both sides and only then attach the second beautiful piece made of foamiran.
We wait a little until the product dries. Then you need to make a small hole in the middle. For this we will use a simple awl. We do it carefully so that the resulting hole is not wide.

We take the wire in our hands and attach a figure to one of the sides, which must be secured with “Moment” glue. We thread the workpiece through, and attach the second figure to the other end of the wire.
That's all, the spinner for the child is completely ready. We check how it scrolls and you can play.
Lego spinner

From Lego
You can use the construction set not only for playing with children, but also to build a modern toy from it. So, what is needed to create it:
- double three-module connecting pin - 3 parts;
- nine-module beam - 2 parts;
- axis for connection;
- two bushings.
Once all the parts have been prepared, you can safely begin assembling the accessory. We attach connecting pins to the beam, one after another. They will act as a weighting agent. We fix the second beam on top of the installed pins.

In the middle between the beam and the middle pin we place the connection axis. We attach bushings to the ends of the axle. This way the axle will not fall out of the structure and will help them rotate. You can find diagrams for assembling a spinner from a construction set on the Internet.
Toy for children made of paper or thick cardboard

A modern children's toy can be made even from simple paper or cardboard. Every person can find such material at hand, and the manufacturing costs are minimal. This type is suitable for children, as it is considered completely safe for them.
- thick cardboard and a ready-made spinner template;
- scissors;
- awl;
- coins of 2 rubles;
- used pen refill;
- paints for decoration.
How to make a spinner without bearings from paper:
- We transfer the printed template onto cardboard and cut in two blanks. Then you need to circle the finished coins on cardboard; you need to make 4 of them. Cut out cardboard parts.
- Now you need to pick up one of the blanks cut out according to the spinner template and glue coins to its edges; for this it is best to use coins of no more than 2 rubles. Then we glue the second spinner blank. The toy is almost ready, just a few things left to do.
- We cut off a piece 1.5 cm long from the handle shaft. We make a small hole in the remaining two cardboard circles. A similar action must be done with the finished part.
- We insert a finished cardboard circle onto one end of the rod and secure it with glue. Then we thread it into the finished spinner base, and secure it on the other side with a second cardboard circle. We fix the remaining circles in the center of the toy.
- For decoration, you can use sparkles, paints or other elements.
This type of toy can be made in 5 minutes without bearings, and we described how to do it above.
From the lids
 Making a toy out of soda caps is not difficult at all. The main thing is to prepare all the required tools and materials. This spinner is also considered safe for children.
- any soda caps;
- children's plasticine;
- glue “Moment”, preferably a glue gun;
- awl;
- toothpicks;
- scissors.
It is best to choose prepared lids of the same size. We take three pieces in our hands and fill them with plasticine, they should be heavy. Moreover, the lid should not be completely filled, so we leave a little space in each of them. Turn on the glue gun and heat it up. Fill the remaining space with hot glue in a neat layer. In this way we secure the plates inside the lids so that it does not fall out when using the toy.
It is best to choose a fourth cover of a different color so that it does not blend in with the three main ones. Using an awl, make a small hole in the middle. As you already understood, the central cover acts as a bearing. The spinner without bearings from the caps is almost ready (see how to make it above), all that remains is to assemble it.
Then you need to carefully glue the prepared lids with plasticine with hot glue. From the new core for the glue gun, you need to cut two parts, each one centimeter long.
Using scissors, cut the toothpick into two equal parts. We will use only one part, put one piece of glue stick on one of the ends, and carefully thread the sharp end through the central cover of the spinner. The second piece of glue stick must be carefully inserted onto the second end of the toothpick. That's it, the modern toy is completely ready.

Coin making
Making a children's toy out of coins is as easy as shelling pears. To make it, we will prepare the following tools and materials:
- coins of 2 rubles - 8 pcs;
- glue "Moment";
- colorless nail polish;
- glitter for decorating the nail plate, decide on the color yourself.
All components for the work have been assembled, now we proceed to the manufacture of a modern accessory from coins without bearings:
- First of all, you need to glue all the prepared money together. You should end up with four piles. The main thing is not to use too much glue. Otherwise, it may come out over the edges, and removing it will not be easy at all.
- Now you need to see what the spinner looks like. To do this, let's turn to the template and draw up coins on a simple sheet of paper, as they should be located. Now carefully, using glue, glue the prepared coins together.
- We put the finished spinner aside and wait for the glue to dry completely. The glue has dried, now we move on to decorating our accessory. To do this, apply a thin layer of colorless nail polish on the front side and then immediately sprinkle with glitter and wait for it to dry completely. On the other side of the homemade spinner, we do a similar action, only we use glitter of a different color.

To prevent the glitter from completely falling off, you need to apply another layer of varnish on top of it. We wait for it to dry completely and everything is ready.
Making a modern accessory with your own hands is not difficult. As you already understand, they make it from almost all available materials, the main thing is desire, and everything else will work out. By showing a little imagination, you can make your own individual spinner, which can serve as an excellent gift for your boyfriend or girlfriend. Now you know how to make a spinner at home without bearings.
If you look around, most likely you will see a person who is constantly spinning some kind of propeller in his fingers. This item is nothing more than a spinner or fidget - a kind of spinner, which consists of a bearing and a petal housing.
The spinner was developed by Katherine Hettinger, who decided to create a useful exercise machine for her daughter with myasthenia gravis. At first, the woman made toys from adhesive tape and paper, and then began producing fidget spinners. Back in 1993, she received a patent for her invention, but no companies were interested in making it. The patent for this toy has long expired, so every second person in the world can produce it.
Spinners are far from being the same type; they vary in size, shape, color, and some can even glow in the dark. They vary in price; some models can cost several hundred dollars.
What is a spinner
What a spinner is, both a small child and a respectable adult in an expensive car can tell. The spinner has no age restrictions, since its design is designed in such a way that it simply does not have sharp corners or the smallest details.
This device is a gyroscope that is incredibly stable in space. With its help, interesting tricks are performed that invariably attract the attention of people around.
Spinners are produced by a huge number of companies that are trying to surpass their competitors. They are trying to release the most unusual model, for which you won’t have to pay a tidy sum. It is worth noting that no company in the world has pre-emptive patent rights to produce spinners.
Playing a spinner is as safe as possible, since it does not require additional devices or any specialized places to play. The spinner never leads to injuries, it not only does not spoil the psyche, but also weakens obsessive states and autistic manifestations.
It is worth noting that this device operates solely on physical strength; it does not have batteries or a motor. The spinner is easily set in motion with a snap of the fingers. In order to start the propeller, you simply need to hold the axle between your middle and thumb, and start the blades with your index finger. In some cases, it is possible not to pick up the toy, but simply place it on the table, which greatly increases the speed and time of its rotation.
What is included in this device? The spinner consists of:
- covers - inserted into the middle of the bearing and helps to hold the entire structure;
- housing - the part that rotates around the bearing;
- bearing - the main part, which is a ring stuffed with metal balls.
The rotation time of the spinner is very important, so the most expensive devices are based on high-quality bearings. Although the cheapest option will spin for about two minutes, and the most expensive spinners will spin for more than ten minutes.
How to make the spinner spin longer without replacing the bearing? You just need to try to clean it of dust particles and debris that create friction and prevent the structure from rotating for a long time.
You need to clean the spinner using:
- acetone;
- brake fluid;
- oil paint thinners;
- isopropyl alcohol;
- dishwashing liquids;
- soap
In order to quickly dry the bearing of this spinner, it is recommended to use a hair dryer.
There are a huge number of spinners of various types:
- single - consists of one blade and a bearing, they are mobile and powerful because they can rotate for up to five minutes;
- three-spinner – is a trefoil clover, in the center of which there is a high-quality bearing;
- quad spinner - looks like a cross or a mill with four petals, however, it weighs quite a lot and cannot satisfy everyone with its size;
- wheel - this type speaks for itself, since it looks like a cart wheel;
- exotic - a rather expensive option, since the spinners are made of zirconium or tungsten and are designed in the form of weapons of super heroes or even medieval instruments of torture;
- created using a 3D printer - they can be printed and assembled in about an hour, so they are in demand, and they are also quite cheap.
The spinner is rightfully the best toy of 2017, which invariably attracts attention and is a welcome gift for a special occasion.
When purchasing it, you should take into account factors such as aesthetics and vibration, ergonomic or rotational properties, durability and rarity, precision of processing and its quality. These relaxation toys are made from plastic, wood, different types of metals, and leather.
What is a spinner for?
It is not yet clear exactly why a spinner is needed. Some people use it as a toy, a finger trainer, or just a sedative. Agree that it is much more harmless to spin the propeller of a spinner while standing in a long traffic jam than to click a pen or bite your nails. It is also a reliable means of focusing on any information or task.
By the way, a spinner is a rather interesting simulator that can teach the basics of juggling.
So, what is a spinner and what is it for, and what benefits can the use of this kind of toys bring:
- will develop fine motor skills of the hands;
- will help develop hands damaged during injuries or accidents;
- relieves stress and anxiety;
- will help to relax while a person quits smoking;
- improves mood;
- will develop the right hemisphere of the brain;
- releases accumulated negative energy;
- will increase a person’s response to external stimuli;
- will speed up your thinking processes.
The negative aspects of this device include the possibility of injury or swallowing balls from the bearing. In general, spinners are often declared to be a successful marketing project.

How to make a spinner without bearings at home
Having found out the cost of the option they like, many people begin to seriously think about how to make a spinner without bearings at home.
It will be quite possible to make a hand trainer without using expensive bearings. On the Internet it is quite possible to find drawings of such homemade spinners from scrap materials.

This spinner without bearings is made of paper, for this you should prepare:
- two sheets of thick A4 paper;
- ruler;
- compass;
- a simple pencil;
- toothpicks;
- glue for paper and for parts.
How to make a spinner without bearings for children
How to make a spinner without bearings for children can be found on our website. In order to make this kind of structure for kids, all the same elements are used as for an adult.

However, it is worth checking that all parts and related materials are, of course, environmentally friendly and safe. For example, for very young spinner users, you can use finger paints and environmentally friendly glue.
When making a design with and for a child, be sure to blunt the tip of the toothpick. Bearings are never used, since the baby can swallow balls from them.

How to make a spinner without bearings and caps
How to make a spinner without bearings and covers? Just try using cardboard and use glue stick caps for the template.

In order to make the main bearing, you need to use a hairpin, a toothpick, and a ballpoint pen.
You should use a compass and ruler to measure all dimensions as accurately as possible. Not only the appearance, but also the properties of the spinner, including speed and rotation time, will depend on whether the measurements are taken correctly.
How to make a spinner without paper bearings
Many young people ask questions about how to make a spinner without paper bearings.

- draw a rectangle 9X2 centimeters;
- draw diagonals to determine the center;
- fold this drawing several times;
- cut out about eighteen rectangular pieces;
- place two identical coins on their opposite edges;
- circle the coins, giving the edges a rounded appearance;
- glue all the cut out parts together with paper glue;
- to make it heavier, glue it to the edges of the coin with special glue for parts;
- measure 2 centimeters using a ruler and compass;
- draw and cut out eighteen circles that will become the central bearing;
- punch a point in the center that will be slightly larger than the diameter of the toothpick you are using;
- insert a toothpick into the center;
- put nine two-centimeter circles on it on both sides;
- carefully glue the joints of the toothpick and the mug, in no case without sealing the hole itself;
- let the future spinner dry and give it an aesthetic appearance with scissors;
- practice spinning the structure while softening the friction of the spinner;
- paint this homemade product in your favorite colors or stick on your favorite logos.
How to make a spinner without bearings from caps
Many people are interested in how to make a spinner without bearings from caps. Of course, the ideal option would be to make a homemade spinner using one or more bearings.

When using bearings, you should find the correct main element, wash off the grease from it and remove dust particles. If you make a spinner yourself without bearings from caps, then you won’t have to perform these actions.
You should prepare several caps from plastic bottles in advance; the best option would be to use three pieces. They will need to be glued to each other on the sides using Moment glue.
In the middle you will need to drill a small hole into which the ballpoint pen will fit. It is worth cutting off a three-centimeter piece from the empty rod, which is inserted into the hole.
It will be possible to rotate this structure by holding it with two fingers.
How to make a spinner without bearings from Lego
To understand how to make a spinner without bearings from Lego, you should follow simple instructions. To assemble the structure you need to prepare:
- a flat and maximally long cube with holes;
- kernel;
- two round stoppers with a cavity inside;
- several flat, round cubes for your fingers.
After all the parts of the future spinner are prepared, you should stretch the rod through the hole of the long cube, and then limit it on both sides.

Then you need to easily and quickly tighten the round platforms intended for the fingers. The side edges of the spinner should be balanced and positioned symmetrically. That's all, you can start relaxing with the help of a turntable.
How to make a spinner without bearings from coins
The Internet is replete with instructions and diagrams on how to make a spinner without bearings from coins. The simplest option would be to make a simple spinner from caps with coins glued to the inside or outside of them.
You can take coins worth five Russian rubles, and then make holes in them using a drill or soldering iron. Then you should insert three-centimeter pieces of a ballpoint pen into them.

How to make a spinner with your own hands from a plastic bottle
Another popular request on the Internet is how to make a spinner with your own hands from a plastic bottle.
To do this, you should select a bright plastic bottle and cut a strip 10-11 millimeters wide from it. This is done in order to cover the bearings, which are 8 millimeters wide.

You should also take thick plywood, three nuts and three self-tapping screws for 19, as well as four washers. Make three holes in the plywood into which you need to insert a nut, a washer and tighten the self-tapping screw.
Bearings should be placed between them, aligning them as much as possible, and millimeter washers should be placed under them. The bearings should be pulled together from a plastic bottle and the structure should be heated with a hairdryer.
After drying, carefully tighten the structure, and then unscrew the nuts. In a few minutes it will be possible to use the spinner.
How to make a spinner with your own hands from wood
To understand how to make a spinner from wood with your own hands, you need to read the instructions or watch an instructional video.
It is quite easy to make for those who have a little knowledge of a drill and a jigsaw. Choosing the right wood is essential, but novice fidget spinners can try creating a masterpiece using thick plywood.
You can come up with a drawing of the future spinner yourself or find it on the Internet. Then you need to attach your drawing to the plywood, trace it, and then cut it out using a jigsaw (preferably an electric one).
The workpiece should be cleaned with sandpaper, a hole is made in it with a jigsaw or drill, since then it turns out much smoother. A little trick for a novice craftsman: you should drill the hole halfway, then turn the plywood over and do the same on the back side.
Do not forget that the thickness of the plywood should not be thicker than the width of the bearing. If the wood is thicker, it should be trimmed and sanded.
This spinner can be opened with varnish or oil, and also aged using a lighter.
How to make a spinner with your own hands in 5 minutes
How to make a spinner with your own hands in 5 minutes? You should use available materials, for example, bearings and different types of glue; leather, sequins, and beads are used for decoration.
The most original spinners, which can be made with only five free minutes, are made from shell casings, a bicycle chain, copper, and even from an iPhone that its owner does not need.

Kids will quickly be able to create a beautiful and bright spinner from ordinary thick cardboard. Children and parents will have a great time constructing such a toy, and will also save money on a good book or something useful. Schoolchildren can propose making such a product from cardboard during craft lessons, and the teacher will support this initiative.
It is also possible to create a spinner solely from bearings or not use them at all. In general, there are a lot of options, and what exactly your spinner will be will be determined by a flight of fancy.
How to make the spinner spin faster? You just need to remove excess grease from the spinner bearings. To do this you need to go through several steps:
- drip high-quality lubricant;
- change a bearing that has served for quite a long time;
- change the plastic spinner to a metal one;
- place a high-quality plug on the structure that will protect it from dust, moisture and dirt;
- clean the spinner several times a week using a hairdryer or a can of compressed air;
- do not try to remove and clean the bearing on cheap models, this is simply unrealistic and not provided by the manufacturers.