Pillow decor with knitting needles. Decorative knitted pillows for sofas, toys, covers: a diagram with a description, a photo
Crocheted pillows are not only attractive and individual, but also saving for already outdated and somewhat worn sofa cushions. If you are new to crochet, pillows are the best way to learn the technique. Here you do not have to do complex calculations, since with a properly selected pattern, there will be no problems with knitting. For the manifestation of imagination, several options for pillows should be presented, each of which will appeal to both a beginner and an experienced knitter. The article will provide detailed photos, diagrams and descriptions of several models.
We knit and care properly
Since a crochet crocheted pillow requires some care, points for further use should be discussed.
- Firstly, the yarn for pillows should be chosen according to the concept of their purpose. For children's options, it is better to choose cotton or special children's yarn, which often includes bamboo. For sofa cushions in the living room, it is better to take acrylic - it is easier to wash it. If pillows are knitted for comfort and warming the lower back, of course, the choice is in favor of an admixture of wool.
- Secondly, knitted pillows, due to their “naturalness”, will have to be washed more often, so it is recommended to knit products with a zipper along the seam. It turns out that for such a knitted pillow, you will have to additionally sew a cover or pillowcase, where the filler will be laid out.
- Thirdly, crocheted sofa cushions should become an element of decor, so the color and shape are selected accordingly.
 Craftswomen prefer knitted cushion covers, which can be used to "update" the old sofa elements. This can happen when changing the interior design, when the sofa does not change to a new one, but the color already “falls out” from the overall picture. This crochet pillowcase is conveniently removed and washed as it gets dirty. To do this, it is enough to sew a zipper along the seam. Wash the covers by hand or in the washing machine on a delicate wash program. Dry by spreading on a towel.
Pillows-napkins
 If you have round-shaped sofa cushions, you can use the schemes of standard round-shaped napkins. Two napkins are also knitted here, when sewing together, an additional zipper is used. You can resort to a complete transformation and additionally sew a “lining” on the pillow, which will be in a contrasting color, which will give the product individuality, because the openwork will stand out against a plain background.
Some especially enterprising craftswomen completely replace obsolete products with new ones. They simply rip open the old sofa cushions and use the filler further. They also knit pillows in the form of a napkin, combine them with a plain background and form them using the same filler.
Below is a selection of such products with detailed patterns for self-knitting. 


curvy pillows


 When standard forms get bored, it is recommended to knit figured analogues. In order not to spend a lot of time on complex variations, it is enough just to resort to simple geometric shapes. For example, you can tie a star or a hexagon. If you want and need to tie the cover along the seam, it is better to make button fasteners - this will greatly simplify the process of sewing the zipper into the curly edge.
The following also offers a selection of figured pillows with patterns for knitting. Some of them will allow you to knit a denser fabric, through which the background lining will not show through. Others, on the contrary, offer an openwork figure, which is beneficial and softly suitable for a certain interior.
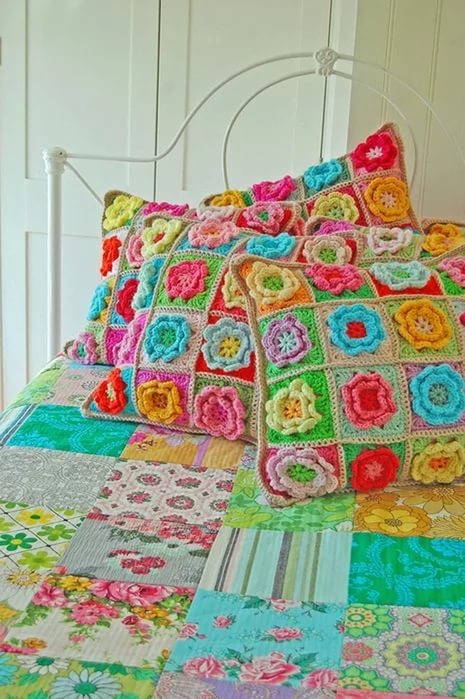
Pillows from motifs
Attractive and very interesting pillows made of motifs and the use of different colors. They reflect the brightness of the character of the owners of the house, as well as their positive attitude. This combination can be used for knitting children's products. Pillows from motifs connected in one scale or one color look no less attractive - they will complement the existing style of the interior.
Grandma's square in pillows
 Crochet pillows from "Grandma's Square" is an excellent alternative to the famous rugs or carpets. There is nothing difficult in knitting, and the advantage is the ability to get rid of numerous yarn residues. For knitting a square, a standard pattern is used, and the combination of colors is optional. The following is a selection of such pillows, on the basis of which you can come up with your own version, taking into account the existing interior.


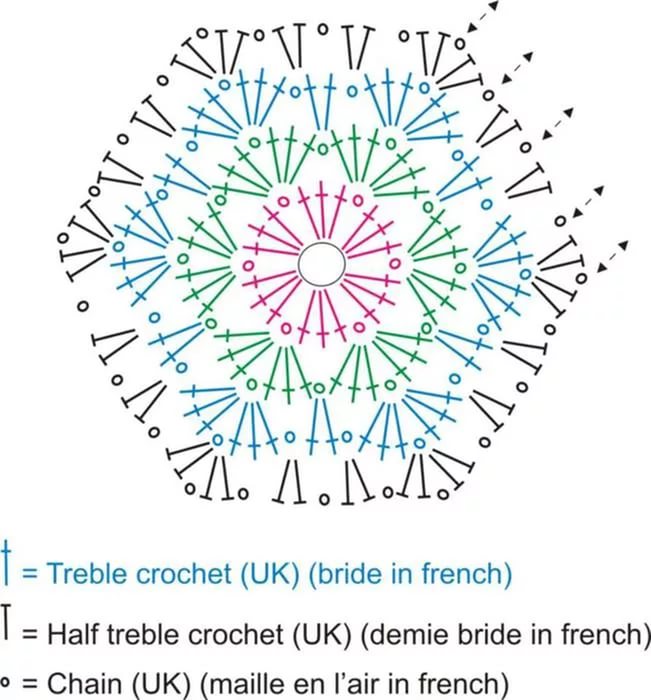
African flowers in pillows
 Similar to the grandmother's square, there is an interesting pattern of the African flower. This motif also allows you to quickly get rid of the remnants of yarn and knit a colorful cover for an existing outdated pillow. Below is a selection of crocheted products, as well as a scheme for the independent embodiment of a masterpiece from motifs.
If you do not want to crochet colorful pillows with all the leftover yarn, you can use models where products are connected using only certain colors that match the existing interior design in the room. Often these are sofa cushions in minimalist or hi-tech styles, where only a contrasting combination of several colors is used, but comfort is created by adding textiles to the interior.


Pillows in love
Craftswomen who love to crochet love to present interesting souvenirs to their loved ones for anniversaries and just a Valentine's Day. A useful gift is a pillow that will be not only beautiful and soft, but also themed. Two options can be distinguished here - this is a heart and a sensational female breast.
Pillows on the sofa in the form of hearts

Heart-shaped sofa cushions are an easy-to-make, but very warm and important gift for a loved one. Hearts are also different - in this case, you will show that you put all the love and warmth from your heart into knitting a gift. In addition, knitted hearts are perfect for the interior of a children's room for girls. You can add various ribbons, rhinestones, beads and other girly charms to your work.


crochet chest


As a gift for a man or best friend, you can crochet a chest, for which a detailed master class is offered.
- To begin, knit two canvases of light yarn with single crochets - this is the base of the pillow. The breasts will be knitted with the same yarn. Having connected the base of a suitable size, sew it on three sides from the wrong side - you can use a needle or a hook.


- Start knitting the chest. To start with a pink thread, dial 3 air loops and lock them into a ring.

- Knit the first row - knit 10 single crochets. Knit 2 more rows without increases.
- Next, knit 3 more rows with single crochet, making increases in each previous column. Switch to a light thread.

- With a light thread, continue knitting without increments for the next 2 rows. Next, knit 5 rows, increasing in them through each single crochet.

- Knit 7 more rows already without additions. Cut the thread so that it is long enough to sew the chest to the base. Tie the second chest in the same way.

Sew the breasts to the base, after filling them with cotton wool or padding polyester. For originality, you can tie a bra - this way the pillow looks less defiant, but at the same time very pretty.


 It sounds amazing, but such pillows are in demand not only because of their originality. The pillows are comfortable - the head fits neatly and steadily between the breasts. And what? - Not a bad alternative for men!
pillow toys 
From crocheted breast pillows, you can smoothly move on to toy forms. Crocheted toy pillows attract children and adults like them for their convenience - this is both a convenient thing on which you can just relax, and at the same time an interesting toy. Choosing knitting a certain form should be based on the age and preferences of the child. If you want to knit a pillow for the interior, be guided by the general design concept and color inclusions.
simple toys


 If we consider crochet toys, we can find a very interesting detail - most of them are presented in the form of simple circles and oblong legs, the combination of which in the finished result gives a toy incarnation. The following is a similar selection, on the basis of which you can use simple knitting patterns and please your child with a new “acquisition”.
turtle toy

Since crochet toys are popular, the simplest version of knitting, which is offered with a description and patterns, should be presented - this is turtle knitting. Independent knitting of a turtle is carried out in the following sequence:

The following is a selection of crochet turtles. Such products are convenient in further use for their intended purpose, so they are suitable for both children's rooms and sofa additions. 


Pillow snake 
For children, there is nothing better than a 2 in 1 product - both a toy and a pillow. One of these innovative ideas is the crocheted snake pillow - it is easy to knit from leftover yarn. Also, the snake toy is suitable for the manifestation of one's own imagination, because the use of shades of threads or patterns allows you to profitably complement the children's room. Knitting such a pillow occurs in the sequence:
- Close 5 air loops in a ring.
- Work the first row with 10 single crochets.
- Then, in the next 10-20 rows, make the same additions of columns - it depends on the size of the future snake, so adjust the work yourself. The additions are made evenly - in each row, from 7 to 13 columns should be added.
- Having reached the desired head size, knit 2 to 5 rows without additions.
- Next, make reductions, similar to the addition done earlier. Only half of the added loops are reduced.
- Continue knitting for the desired length of the snake without a tail.
- Having reached the desired length of the snake without a tail, proceed to decrease - in each row, make decreases of 3-6 loops.
- Having knitted up to 4-5 single crochets, finish knitting.
Thus, you have a complete selection of knitted pillows with patterns and descriptions. Now you can choose for yourself a more interesting option, as well as come up with something original. Feel free to show your imagination, because knitting is the best way to designate your "I".
Designed by Patons Design Studio
Gorgeous, delicate and colorful knitted blanket. The quilt consists of individual motifs knitted in different colors. Each motif is knitted from the center.

Dimensions
square with sides 148 cm
materials
Yarn Patons® Decor™ (75% acrylic, 25% wool, 100g/190m)
Color A (white) - 3 skeins
Color B (light brown) - 2 skeins
Color C (blue) - 3 skeins
Color D (green) - 3 skeins
Color E (mustard) - 2 skeins
Color F (gray) - 2 skeins
Color G (pink) - 2 skeins
Knitting needles circular and hosiery 5 mm
Knitting density
19 sts and 25 rows = 10x10 stockinette stitch
Description
Instructions for knitting a motif: starting from the center with color 1, cast on 4 loops on stocking needles.
1 circle: add 1 loop from each loop, 8 loops on the needles. Distribute the loops on 4 knitting needles, connect in a circle and mark the beginning of the circle.
2 circle: knit persons. P.
3 circle: *1 person. p., 1 p. from the broach. Repeat from * to the end of the circle. There are 16 loops on the needles.
4 circle: knit persons. P.
5 circle: *1 persons. p. (put a marker near the last loop - loop marker), 1 p. from the broach, 3 persons. p., 1 p. from the broach. Repeat from * to the end of the circle. There are 24 loops on the needles.
6 circle: knit persons. P.
7 circle: 1 persons. p., 1 p. from broach, * knit faces. n. to the next. marker loops, 1 p. from broach, 1 person. p. (loop marker), 1 p. from the broach. Repeat from * to the end of the circle, finish the circle with 1 st from the broach. There are 32 loops on the needles. Cut the thread of color 1.
8 circle: attach the thread of color 2 and knit *1 persons. p., 1 out. n. Repeat from * to the end of the circle.
9 circle: 1 persons. p., 1 p. from the broach, * knit to the next. marker loops, 1 p. from a broach of 1 person. p. (loop-marker), 1 p. from the broach. Repeat from * to the end of the circle, finish the circle with 1 st from the broach. There are 40 loops on the needles.
10 circle: knit persons. P.
11-14 circle: knit as 9 and 10 circles 2 times. There are 56 stitches on the needles.
15 circle: knit as 9 circle, cut off the thread of color 2. There are 64 loops on the needles.
Round 16: Attach color 3 and work as round 8.
17-23 circle: thread color 3 knit as 9-15 rows. Cut the thread of color 3 at the end of the 23rd circle. There are 96 stitches on the needles.
24 circle: thread color 4 knit as 8 circle.
Rounds 25-31: With color 4, work as rounds 9-15, cut off color 4 at the end of round 31. There are 128 stitches on the needles.
32-34 rounds: With thread color A, knit as 8-10 circles. Close all loops.
Motive 1 (make 6 pieces): knit according to the instructions for knitting a motif where color 1 is A, color 2 is G, color 3 is E, color 4 is c.
Motive 2 (make 6 pieces): color 1 - C, color 2 - D, color 3 - A, color 4 - F.
Motive 3 (make 6 pieces): color 1 - D, color 2 - C, color 3 - B, color 4 - E.
Motive 4 (make 6 pieces): color 1 - F, color 2 - E, color 3 - C, color 4 - D.
Motive 5 (make 6 pieces): color 1 - B, color 2 - G, color 3 - F, color 4 - C.
Motive 6 (make 6 pieces): color 1 - G, color 2 - F, color 3 - C, color 4 - B.
Sew motifs according to the location on the diagram. On circular needles with a thread of color A, starting from the upper right corner in and further down to the lower right corner, cast on 260 loops, knit 6 rows in stocking stitch. Close all loops. Repeat the same for the left side. With yarn A, starting from the upper left corner and moving to the upper right corner, cast on 270 loops and knit 6 rows in stocking stitch. Close all loops. Repeat the same along the bottom edge.
http://knitweek.ru/modeli/odeyalo-v-stile-pechvork.html#pp/0/

Design by Caron Design Studio
A bright blanket with a geometric pattern is knitted from square motifs, each of which is made in a different color scheme.

Dimensions
122 x 152 cm
materials
Caron® Simply Soft® yarn (170g/288m, 100% acrylic)
Color A (red) - 2 skeins
Color B (orange) - 3 skeins
Color C (blue) - 1 skein
Color D (beige) - 3 skeins
Color E (chocolate) - 3 skeins
Circular knitting needles 5 mm
Knitting density
1 motif (square) = 15x15 cm
Description
Note: knitting a blanket begins with the lower left square, the next ones are knitted with a set of loops on one side of an already knitted square.
Instructions for knitting a square:
Cast on 55 stitches and knit as follows:
1 row (out.): 27 persons. p., 1 out. p., 27 persons. P.
2nd row: 26 persons. p., decrease (remove 2 loops on the right knitting needle, without knitting, 1 person. p. and stretch through 2 removed loops), 26 persons. P.
3rd row: 26 persons. p., 1 out. p., 26 persons. P.
4th row: 25 persons. p., decrease, 25 persons. P.
5th row: 25 persons. p., 1 out. p., 25 persons. P.
...
11 row: 22 persons. p., 1 out. p., 22 persons. p. Continue knitting in the same way until 1 loop remains on each side and 1 central loop. Knit in 3 loops together.
Square 1: With thread A, cast on 55 loops and knit according to the instructions 1-9 rows with color A, knit with color B 10-39 rows, with color D from the 40th row to the end.
Square 2: with thread D, cast on 28 loops along the upper edge of the first square, then cast on 27 loops and knit according to the instructions: * 1-5 rows in color D, 6-7 rows in color C, 8-9 rows in color D, 10-15 rows in color E. Repeat from * to the end of knitting a square.
Square 3: With thread A, cast on 28 loops along the upper edge of the second square, then cast on 27 more loops and knit: * 1-3 rows in color A, 4-5 rows in color D, 6-9 rows in color E. Repeat from * to the end of knitting square.
Square 4: With thread B, dial 28 loops along the upper edge of the third square, then another 27 stitches and knit: 1-5 rows with color B, 6-7 rows with color A, 8-15 rows with color D, 16-17 rows with color C. Repeat from * to the end of knitting a square.
Square 5: Cast on with color A and work from 1-25 rows with color B, from the 26th row to the end with color D.
Square 6: With thread E, cast on loops and * knit from 1-3 rows, then with color A, rows 4-5, with color B, knit 6-9 rows. Repeat from * to the end.
Square 7: With yarn D cast on the required number of loops and knit 1 row with yarn A, *rows 2-3 in color A, rows 4-5 in color D. Repeat from * to the end.
Square 8: With thread E, pick up loops and knit with color E 1-19 rows, with color D 20-39 rows, with thread C, knit to the end.
Square 9: With thread A, pick up loops and knit rows 1-9, with thread B 10-39 rows, with thread D from the 40th row to the end.
Square 10: Knit like square 2.
Next, on the right side of square 1, cast on 27 loops, then cast on 28 more loops and knit as square 7. With thread A, dial on the upper edge of the just connected square 27 loops and 28 loops more on the right edge of square 2 and knit as square 1. Continue knitting in the same way according to the layout of the squares.
http://knitweek.ru/modeli/odeyalo-s-geometricheskim-uzorom.html#pp/1/
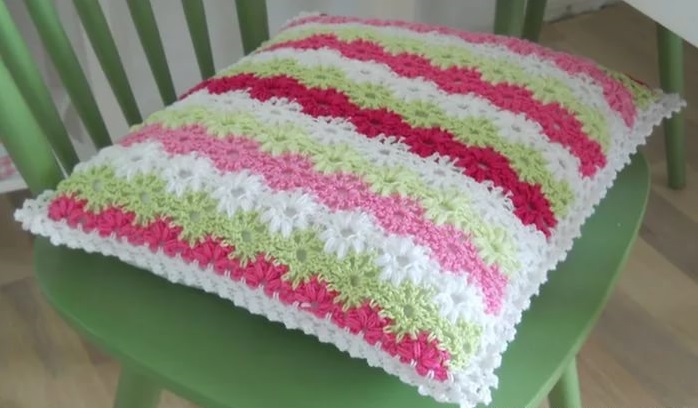
Colored sofa cushionSquare with a side of 36 cm
materials
2 skeins of Bernat Mosaic (100 g/191 m, 100% acrylic), 5 mm circular needles, 51 cm long
Knitting density
18 p. and 24 p. = 10 x 10 cm stockinette stitch
Description
Knit 2 parts in the same way. 1 square: cast on 45 stitches. **1 row: knit persons. P.
2nd row: 21 persons. p., * 1 decrease (remove 1 p. without knitting, 2 p. together and stretch the resulting loop through the removed one), put a marker, 21 persons. P.
3 row: out. P.
4 row: knit persons. p. to the marker, 1 decrease, knit faces. n. to the end of the row.
5th row: persons. P.
6th row: knit as 3rd row. Repeat rows 3 to 6 until 3 sts remain on the needles. On the next row, make 1 more decrease and fasten the thread **.
Second square: from the front side of the square, dial 22 sts to the corner and then dial another 23 sts - 45 sts. Knit from ** to ** as for the first square.
3rd square: cast on 22 sts along the edge of the second square to the corner and then cast on 23 more sts. Knit from ** to **.
4th square: Cast on 22 sts along the edge of the third square to the corner and then cast on another 23 sts along the edge of the first square. Knit from ** to **. * Cast on the edges of all squares 45 sts each - 180 sts, place markers in each corner and then knit in a circle:
1 circle: 1 p. from broach, * knit persons. p. to the marker, 1 p. from the broach, 1 person. p. (marker), 1 p. from the broach. Repeat from *, finish 1 p. from broach, 1 person. P.
2 circle: out. n. Repeat the last 2 rows to a height of 5 cm and finish with the 1st circle. Close all loops.
Ending: sew 3 sides of the squares, fill the pillow with filler and sew up the 4th side. Or you can sew a zipper.
http://knitweek.ru/modeli/tsvetnaya-divannaya-podushka.html#pp/1/
Knitting a pillow with knitting needles is possible even for a beginner needlewoman. It is also a great opportunity to practice knitting complex patterns with knitting needles. Indeed, when knitting large products, it is important to observe the same knitting density. And if you have not yet reached this level, then train on simple things: hats, covers, caps - that's it.
What model of pillow with knitting needles to choose?
The pillow cover can be one-sided, that is, you only knit the front part of the pillow with knitting needles, while sewing the back side of a dense fabric. The front part can be connected with complex patterns: braids, arans, and the reverse side is simply a front surface. If you choose an openwork, airy pattern for the pillow, then you need to sew a fabric cover as a lining.
Recently, pillows made of knitted yarn or T-yarn have been very popular. A pillow knitted from knitted yarn looks spectacular, even if you choose a simple pattern: front, back surface. But, the knitted yarn is quite thick and it will not work to knit a small pillow.
 interesting selection on the site Plaids for newborns and toddlers
Choosing the shape of the pillow cover:
- a rectangle that folds in half is sewn tightly on 2 sides, and a zipper or buttons are sewn on the third side;
- two squares that are sewn tightly on three sides, a zipper or other fastener is sewn into the fourth side;
- The cover closes with an overlap (on buttons).
How to get started?
You need to take measurements from the pillow, even better not from the pillow, but from its pillowcase. Add 1 cm to the measurements on the sides where the seam is planned and 1-1.5 cm on the side where the clasp for the knitted pillow is planned. If the cover will be fastened with an overlap, then the length of one side should be 30 percent more.
Determine the density of knitting
Take a yarn of suitable thickness and knitting needles. We hope that you already know how to select knitting needles for yarn. If not, follow the instructions on the yarn label. Knit a 10*10 cm swatch with the pattern you chose for the knitted pillow. Wash the sample, dry it and take measurements, count the number of loops you need to dial for the cover and start knitting. When your case is ready, do not forget to fly off the WTO of the finished product.
Knitted pillow, models from the Internet
Pillow with Norwegian patterns from Bernat, knitted
If you want to decorate your home for the New Year, then this pillow is just right!
We invite you to add a touch of Scandinavian style with this lovely knitted pillow with Norwegian patterns. New Year mood guaranteed!
Bernat Super Value (100% acrylic; 197gr/389m):
- main color (MC) Cherry Red (red No. 53436) 1 skein.
- secondary color A Winter White (white No. 07407) 1 skein.
Spokes 5 mm.
Pillow 45.5.
The size of the finished product is 45.5 x 45.5 cm.

Colored pillow with knitting needles
This original sofa cushion is made of sectional dyed yarn in bright saturated colors. It is recommended to use yarn that is resistant to abrasion and soft to the touch.
Pillow size: 36 cm square.
Materials: 2 skeins of Bernat Mosaic yarn (100 g/191 m, 100% acrylic), 5 mm circular needles, 51 cm long.
Knitting density: 18 p. and 24 p. = 10 x 10 cm in stockinette stitch.
Knitted pillow with fantasy harnesses
A cute pillow with knitting needles, knitted from cotton yarn of medium thickness. The front part is decorated with three fantasy harnesses, knitting each of which takes 16 loops. The back of the product is tied with a 2 x 1 elastic band. The seam closes the twisted flagellum.
Pillow dimensions: 40.5x40.5 cm.
Materials: Bernat Handicrafter Cotton yarn (100% cotton, 50 g/73 m) 7 skeins, circular needles 4.5 mm.
Gauge: 20 sts and 26 rows = 10 x 10 cm in stockinette stitch
Description of the pillow with knitting needles
Harness pattern (knit on 16 p.):
1 row: 1 person.p., 3 times (2 p.p., 2 p.p.), 2 p.p., 1 person.p.
2 row and all purl: 1 purl, 3 times (2 persons, 2 purls), 2 persons, 1 purl.
3rd row: cross 8 sts to the right (remove 4 sts on an additional knitting needle at work, 1 knit stitch, 2 purl stitches, 1 knit stitch, then knit 1 knit stitch from the extra knitting needle, 2 out.p., 1 l.p.), cross 8 p. to the left (remove 4 p. on an additional knitting needle before work, 1 l.p., 2 out.p., 1 l.p., then with additional knitting needles knit 1 person.p., 2 out.p., 1 person.p.).
5, 7, 9 rows: knit as 1 row.
10th row: knit as 2nd row.
Front end
Cast on 94 stitches and knit:
1 row: 15 persons.p., 2 out.p., cross 2 p. .p., 3 times run 1 row of the tourniquet pattern, cross 2 p., 2 out.p., 15 persons.p.
2 row: knit according to the pattern.
Then continue knitting according to the pattern and after 40.5 cm from the typesetting edge, finish knitting in the 4th row of the tourniquet pattern, close the loops according to the pattern.
Rear end
Cast on 86 stitches and knit in rib 2x1 (k2, purl 1) to a height of 40.5 cm, cast off as shown.
Assembly
Cut 6 strands of yarn 244 cm long each, put the threads together and twist them to the right side, then fold the bundle in half and twist again. The length of such a tourniquet should be enough for 2 sides of the pillow. Run another tourniquet in the same way. Next, sew 3 sides of the cover, insert the pillow and sew the last side. Sew harnesses along the seam, see photo.
Knitted pillows with a relief pattern
You will need:
- yarn (40% polyamide, 30% viscose, 15% silk, 15% cashmere; 75 m / 50 g) - 250 g light gray, 250 g plum, 400 g anthracite;
- knitting needles No. 7;
- 2 zippers 35 cm long, 1 zip closure 50 cm long;
- 2 inner cushions 40 x 40 cm, 1 inner cushion 40 x 60 cm.
Knitted pillow with buttons
Dimensions 48 cm x 48 cm.
Materials: DROPS ALASKA yarn (100% wool, 50 g/70 m) 10 skeins of white color, circular knitting needles 5 mm, 6 buttons.
Gauge: 17 sts x 22 rows = 10 x 10 cm in stocking st
Cast on 86 sts and work 2 rows in garter st, at the same time in the last. to the row evenly add 24 p. Continue next. way: 2 p. garter stitch, 12 p. according to the scheme M.2, 82 p. according to the scheme M.1, 12 p. according to the scheme M.2, 2 p. garter stitch. Knit according to the pattern to a height of 48 cm and then work 2 rows of garter stitch on all loops, at the same time in the 1st row evenly reduce 24 p. Then knit according to the M.2 scheme on all loops, except for the 2 extreme ones knit them in garter stitch.
After 96 cm from the inlaid edge, put a marker and then, at a height of 102 cm, make 6 loops for buttons: 2 sts in garter stitch, 5 sts according to the scheme, close 2 sts, * knit 12 sts according to the scheme, close 2 sts, repeat from * a total of 5 times and finish: 5 sts according to the scheme and 2 sts in garter stitch. Following. in a row, cast on new 2 sts over the closed loops and continue knitting according to the pattern to a height of 104 cm. Run 2 rows of garter stitch on all loops and close them = 105 cm.
Fold the finished part of the pillow so that the typesetting edge is aligned with the set marker. Sew side seams and sew on buttons.
Beige pillow with knitting needles
Pillow dimensions: square with a side of 45.5 cm.
Materials: Caron® Simply Holiday yarn (100% acrylic, 85 g/137 m) 2 skeins, circular needles 5 mm.
Gauge: 18 sts x 24 rows = 10 x 10 cm in stockinette stitch
Front end
Cast on 85 sts and knit 1 row of faces, then continue:
2nd row: 33 persons.p., knit out.p. to the end of the row.
3 row: 13 times (3 persons.p., remove 1 p. as out.), 1 out.p., 15 times (1 person.p., knit 1 person.p. from the bottom row), 2 persons. P.
4th row: knit as 2nd row.
5 row: 13 times (3 persons.p., remove 1 p. as out.), 1 out.p., 2 persons.p., 14 times (knit 1 person.p. from the bottom row, 1 person.p. .), 2 persons.p.
Rep rows 2-5 until piece measures 45.5 cm, ending on row 2 or 4 of st. Close loops.
Rear end
Cast on 83 sts and knit:
Row 1: Knit 3, * slip 1 st as purl, knit 3, repeat from * to end of row.
2nd row: purl
Repeat last. 2 rows for a height of 45.5 cm, finish on the 2nd row and cast off.
Assembly
Sew 3 sides of the front and back pieces, insert the pillow and sew up the 4th side.
Knitted pillow with a pattern “leaves”
There is no description for this pillow, there is only a scheme of leaves, a decorative strip on the side of the cover.
Knitted pillow with zigzag pattern
Size: 30 x 40 cm.
You will need: Lanagold fine missisipi yarn (49% wool, 51% acrylic, 300 m/100 g) -100 g in different shades, yarn "Spark" (100% acrylic, 250 m/100 g) -100 g of beige, 9 buttons with a diameter of 15 mm, knitting needles No. 3.5, finished pillow 30 x 40 cm.
Knitting density: 20 p. x 30 rows = 10 x 10 cm.
Main pattern: the number of loops is a multiple of 9.
1st, 2nd, 3rd and 4th rows (beige thread): facial loops.
5th row (colored thread): 2 sts together. with an inclination to the right, 2 persons. p., from 1 person. knit 7 (persons., nakid, persons., nakid. persons., nakid, persons.), 2 persons. p., 2 p. together persons. tilted to the left.
6th, 8th, 10th rows (colored thread): purl loops.
7th row (colored thread): 2 sts together. with an inclination to the right, 9 persons. p., 2 p. together persons. tilted to the left.
9th row (colored thread): 2 sts together. with an inclination to the right, 7 persons. p., 2 p. together persons. tilted to the left.
Repeat rows 1-10.
Cast on 83 sts (81 sts of pattern + 2 hem) and knit with the main pattern for 250 rows (25 repetitions of the pattern). Next, knit 4 rows of beige thread with facial loops, knitting holes for the fastener. To do this, close the middle
3 sts of each rapport, and in the next row, cast on new ones in their place. Sew side seams, sew on buttons. Put the cover on the finished pillow.
White plaid and pillow with knitting needles
A chic kit, but there are only diagrams for it from.
Knitted pillow with braids
Pillow with "braids" knitting needles - patterns with a description of knitting. Gorgeous pillow with a pattern is very soft and gentle, will create comfort in your interior.
You will need: Tweed yarn (50% wool, 48% acrylic, 2% viscose, 280 m / 100 g) - 300 g white, knitting needles No. 6, hook No. 4.5, pillow 40 x 40 cm.
Attention! Knit with a thread in 2 additions.
Knitted round pillow
Plaid and pillow knitting in the Enterlak technique
Dimensions: plaid 130 x 120 cm; pillow 38 x 38 cm.
You will need: 9 skeins of white and 5 skeins of green Puppets Eldorado 6 yarn (100% mercerized cotton, 265 m / 50 g); 500 g of Schachenmayr CATANIA FINE (100% cotton, 165 m/50 g) salmon; knitting needles No. 4.5; hook number 2; pillow of the right size.
Attention! Knit in 2 threads: 1 white thread + 1 salmon thread or 1 white thread + 1 green thread.
Knitting density: 17 p. and 28 p. = 10*10 cm.
Knitted pillows with fantasy patterns
Juicy, dazzling and unusually positive colors! Lemon, yellow, lime, take your pick. Pillows with beautiful fantasy braid patterns look just great. Such a bright accent in your interior will always please the eye!
Raspberry pillow knitting
Decorate your sofa with a bright and bold Hibiscus Twist cushion, it's an easy way to add color to your living space. Designer Lucinda Ganderton' deftly combined two different textures: a beautiful knitted Aran pattern in natural, bright wool yarn and a pretty knitted fabric with a floral print.
Gray pillow knitting
You will need: Sandnes fiesta yarn (55% cotton, 45% acrylic, 80 m / 50 g) - 250 g gray, synthetic winterizer, knitting needles No. 5.
Pillow size: 38 x 38 cm.
Facial surface: faces. rows - persons. loops, out. rows - out. loops. Wrong surface: persons. rows - out. loops, out. rows - persons. loops. Knitting density: 16 p. \u003d 10 cm.
The product consists of 2 parts.
Front detail: dial 66 sts on the needles, knit as follows: 1 chrome. p., 8 p. persons. smooth, * 2 out. p., 3 persons. *, repeat 6 times, 2 out. p., then knit 24 p. persons. smooth, 1 chrome. n. In out. rows, knit all the loops according to the pattern. Starting from the 9th row, knit braids according to the pattern. Then knit 18 rows evenly and braid again. After that, knit 8 more rows and cast off.
Back Detail: Cast on 60 sts on needles and knit 38 cm faces. satin stitch. Close the loops.
Assembly: complete all seams from inside. side, leaving a hole in the last neck. Then twist on faces. side, stuff with padding polyester and sew a seam to the end with blind stitches.
Knitting pillow, knitting pattern:
Round pillow for the floor with knitting needles
Size: approximately 50 cm in diameter and 20 cm in height.
Materials for knitting pillows:
- Yarn Lana Grossa Vivo (100% cotton; length = approx. 40m/100g) 8 balls each in green (col 8) and brown (col 7)
- spokes 12.75 mm
- pillow with a diameter of approximately 70 cm.
Openwork pillows knitting
White openwork pillow knitting
Materials:
- 100 g of white cotton yarn,
- burgundy taffeta 80 x 200 cm,
- zipper 30 cm long,
- square pillow with a side of 40 cm,
- sewing thread burgundy.
- Needles: No. 4.
- Hook: No. 3.
Knitting density: openwork triangle with a leaf should have a base length of 39 cm and a height of 19.5 cm
Pillow - pumpkin knitting
For work we need:
- orange yarn about 200g. This pillow used Vita Baby 400m \ 100g, in 2 strands.
- green yarn. Very little
- orange knitted fabric (if you will make the lining)
- stocking knitting needles No. 5
- circular knitting needles No. 5.
Knitted pillow, models from our website
Knitting pillow. The work of Oksana Usmanova
Plaid and pillow knitting
You will need: 2,200 g for a blanket and 300 g for one cover of white yarn (50% wool, 50% acrylic, 125 m / 100 g). Straight needles No. 6, hook No. 5, darning needle.
Orange cat - knitting pillow
Orange cat-pillow - a master class from Shadrina Irinka Apelsinka. This original pillow - a toy is knitted.
On knitting needles No. 4.5, dial 80 loops with red yarn. Yarn in 3 threads. Knit with front stitch (facial row-facial loops, inside row-purl loops) 10cm. This will be the cat's butt.
It was possible to knit two parts: front and back, but it is much easier this way, the seam will be on one side only.
Pouffe - pillow knitting
Cushion sizes: S – L.
Cushion circumference: 150-185 cm (when filled), diameter: 50-60 cm, height: 28-40 cm.
Materials: 800-1600 g of yarn (100% extra wool, 50 m / 50 g) of the Drops Eskimo type from Garnstudio; knitting needles No. 15, dense knit fabric of the same color as the yarn for the cover, filler (1-2 duvets can be used as filler, folded and placed one on top of the other).
Knitting density: 5 p. and 16 p. garter stitch with a thread in four additions = 10 x 10 cm.
Knitted pillow - sheep. Anna's work
Hello! My name is Anna. I love to crochet children's (and not only) toys. As a gift for the New Year 2015, I knitted such a pillow toy for my eldest daughter. In this case, it's a pajama cover.
The body is knitted with knitting needles No. 6 from “Grass” yarn in the form of a pipe. It is convenient that the fabric stretches. The rest of the body is crocheted with acrylic yarn No. 3.5. As a filler I used a special filler for toys. The muzzle is embroidered.
The back of the toy is tied with a satin ribbon so that the cover can be tied. The description was found on the Internet, taken from some Japanese, apparently, magazine. It was not all clear, so in the course of work I constantly had to redo and adjust something, so ... probably the author's toy is already.
Pillow knitting, video master classes
Pillow knitting knitting yarn Biskvit
In this video we will knit a cushion cover from knitted yarn with knitting needles with a honeycomb pattern.
The cover will fit a standard 40x40 square pillow.
The number of spokes is 7mm.
In total, it took 2.5 skeins of knitted yarn.
For knitting you will need: Biskvit yarn
- Weight 350 grams
- Composition 100% cotton
- Thread width 7-9 mm
- Length 100 meters
The video should load here, please wait or refresh the page.
Guest, to come in
Do you want your work to be seen?
thousands of knitting enthusiasts
PUBLISH YOUR WORK
I had a homemade pillow without a pillowcase for quite a long time. And it's a pity to throw it away and have nowhere to adapt it. The idea came to mind that you can knit a cover for her and give a pillow to a cat! 🙂 She loves all sorts of soft beds! I chose the most simple pattern. So, let's see step by step photos of how to knit a pillowcase on a pillow with knitting needles!
We will need:
- Pillow
- Yarn
- spokes
- Hook
- decorative beads
This pillow could not find its purpose! Inside it is stuffed with foam rubber and synthetic winterizer. In general, knitting a pillowcase on a pillow with knitting needles is much easier than it seems!
The size of my pillow is 40 * 45 cm. In order to save yarn, I purchased the cheapest skeins for 19 rubles / piece. I needed 12 skeins of dark green and 1 skein of light green thread for tying and buttons. I decided to knit in 2 parts from bottom to top in width.
Cast on 95 stitches
Front side
- We remove the first loop and knit 18 loops with front stitch
- Next, knit 19 purl loops
- We continue to alternate 19 loops of facial / purl. We knit the last loop on the wrong side, regardless of the pattern.
purl
- We knit according to the pattern. Do not forget that the first loop is always removed, and the last loop is knitted on the wrong side.
We should get 5 "blanks" for the squares. We knit such a number of rows that we get an even square and change the pattern, starting from the front side.

We continue knitting to the end of the length of the pillow.

We close the loops! We knit 2 loops together and re-shoot the resulting loop on the working knitting needle. Again we knit 2 loops together. We continue to the end.

We tie our half. We need a skein of the required color and a hook. We knit the work with a single crochet.

Here's what we get! 🙂

By the same principle, we knit part 2. We finish the square with an elastic band 2 through 2. Don't forget about the buttonholes! I knitted 6 loops according to the elastic pattern, then cast off 6 loops and continued knitting according to the pattern (7 loops). Then again closing 6 loops and so on. In the wrong side we throw our closed 6 loops on the knitting needle. The front row must be knitted according to the gum pattern. Do not forget that the length of the second part should be approximately 1 full square longer than the first. In general, it is better to look at work. We should get a full overlap on the first part of the button cushion. We close the loops and tie the work.

These are the holes for the buttons we should get.

Don't forget to tie the buttonholes. Next, we connect the two parts from the wrong side with a light green thread with a single crochet.

We should get such a cover.


We knit buttons
We take a hook and the necessary yarn. We collect 6 air loops.

We make a ring. To do this, we need to knit a working loop through the first loop with a single crochet.


There should be a column like this.

We begin to knit our ring with single crochets.

Insert the hook into the center of the ring and pull up the thread. We get 2 loops. We stretch the working thread through them.

We've got this ring.

We make a rise for the second row.


We knit another circle only with a double crochet!


Here we knit 3 loops at a time.

Fashion is changing, the shape and design of furniture are changing, but regardless of the time today, as a hundred years or a couple of centuries ago, pillows delighted their owners and their guests.
Children and adults, sofas, rectangular, round, oval, in the form of a roller ... Probably, it is difficult to find something that creates a cozy atmosphere and sets you in a peaceful mood than decorative pillows. At the same time, it doesn’t even matter what they lie on, on a luxurious bed, sofa or on stools in the kitchen.
However, perhaps one can say with special warmth - it is knitted or crocheted pillows that differ in charm.
It can be a warm and fluffy version or a strict classic square made of dense cotton yarn. You can talk a lot about this, but the purpose of this article is not to praise such an interior item as a pillow. We want to tell you how you can completely independently add individuality, charm, as well as warmth and comfort to the interior of your house or apartment.
What you need for knitting
Let's start with the fact that you can knit it both with a crochet and with knitting needles. At the same time, for some reason, crocheted pillows are much more common. At the same time, using ordinary knitting needles, you can create no less beautiful and unique products. As they say, there would be a desire.
Here we allow ourselves to start with knitted pillows.
You will need yarn, knitting needles and a crochet hook.
Yarn
In order to knit a pillow, you can choose any yarn. It can be thick cotton, linen, wool mixture or modern threads with various "special effects". Which threads to give preference to depends only on what kind of pillow you want to knit: a simple one or decorate it with beautiful decor.
When choosing a yarn, the purpose of your product is also of great importance. If it plays a purely decorative role, then almost any yarn can be used. If you plan to actively use a self-tied pillow for its intended purpose (in a stroller for a child, under your back in a chair - it doesn’t matter), you should think about the strength and practicality of the threads from which you will tie it. The ideal option in this case would be cotton or linen - they are both durable and natural. If we are talking about a pouffe pillow that will lie on the floor, then it will be possible to tie it with synthetic threads from those that can be washed without problems and do not wear out.
Having rummaged through your “bins” and brought to light the yarn left over from other works, you can achieve two goals at once - a pillow with knitting needles is a beautiful and original accessory that you will receive, at the same time getting rid of many different-sized hanks with the remnants of threads.
spokes
You can choose any knitting needles, by yarn number. The main thing is that you feel comfortable working with them.
Hook
It will also be needed when you make out the seams on your pillow. It is also advisable to choose by yarn number.

The simplest pillow can be knitted by knitting the required number of loops on the knitting needles, and then knitting a simple rectangular fabric, the width of which is equal to the width of the future pillow, and the length is twice the length of the product plus a small margin for seams. You can knit with any pattern you like. Even the usual stocking or garter stitch. If you knit a little more, you can make a valve with loops and additionally stylize your pillow with large buttons. It will turn out quickly, already quite simple and pretty.
Replace a simple pattern with embossed braids or diamonds, calculated to sit beautifully in the center of your pillow, or asymmetrically for a more original pillow.

Decorate the seams on the pillow with a crochet hook, and if you are not familiar with it, then with a regular buttonhole stitch, using a fluffy or just a thread of a contrasting color.

Pillow shapes
In addition to square or rectangular, you can knit a pillow-roller. At the same time, you can also knit it as a straight fabric, which is then sewn in an appropriate way and decorate the ends of the product in an original way. You can knit in the round using circular needles or a set of five double-edged knitting needles.
In the first case, the pattern you have chosen for the product will be located across. If you decide to knit a pillow in the round, the pattern will lie along such a pillow cushion. A plain pillow-roller will look something like this.

You can knit it striped, with inserts of yarn of a different texture, or simply from melange yarn.
In this article, we show you what knitted pillows can be. Perhaps, it is rare that a product that can be made by one's own hands can boast such scope for the imagination of craftswomen.

However, even more opportunities open up if you call for help with a crochet hook. In addition to the design of the seams in cases where the pillow is made with knitting needles, a hook in skillful hands is capable of incredible things.
Thanks to the hook, the knitted pillow can be of almost any shape.

Any yarn can also be used. As an example, we will allow ourselves to tell you how to knit a pouffe pillow with your own hands.
You will need yarn and a matching hook.

Start knitting with a chain of 4 air loops, close it in a circle. Next, knit the rise from two or three air loops instead of the first column. If you want to get a denser pillow, knit it with single crochets. Double crochets will make a less dense option.

Then we knit in the round, knitting two columns in each loop of the previous row. When you get a circle of the desired diameter, continue to knit without adding more loops. This will give you the cushion edge. What height it will be - it's up to you.

Having knitted your ottoman to the desired height, we begin to decrease the columns - we knit them not in each loop, but through one. It can be a small sofa cushion of a round shape, or a rather high pouffe, on which it is convenient to put tired legs during the day. And after completing two or three multi-colored pillows, you will get original accessories for the children's room, which, without any doubt, your kids will like.
Knitted pillows of various shapesHere are such funny sofa cushions that can be knitted from the remnants of yarn. Information on how to knit such pillows with detailed descriptions of the work process, as well as many other ideas, you can find on our website.