Dresses and silhouettes how to cut. Women's straight silhouette dress
[Sewing] Free cut dresses: A-silhouette, A-line... Selection MKA-line dress (or it is also called A-line dress) is one of the most popular models in recent times. This is not at all surprising. A beautiful silhouette, a free comfortable cut attracts many lovers of comfortable clothes.
A-line dress has an amazing property: with a fairly large volume, however, it does not visually increase the volume of the figure, but rather hides them. Therefore, many women who want to hide some excess on the sides from their eyes are very fond of him))
Articles you may find helpful:
And also women in position love the trapeze dress. After all, such a dress is very comfortable for them and at the same time looks beautiful, despite the increasing volume of the body. In it, a pregnant woman will be comfortable at any stage of pregnancy.
And, of course, the trapeze dress and slender girls do not ignore. Comfort and femininity are valued by everyone.
As a result, we conclude: a trapeze dress is a universal cut that suits all figures without exception!
Its versatility is also in the fact that this cut is applicable for any season. For the summer - from light fabrics without a sleeve (or with a short sleeve) ...
For the autumn-winter season - from cozy warm materials with long sleeves. 
As you have already noticed, the cut of the A-line dress can be used in its pure form, or it can be additionally modeled. Frills and ruffles can be sewn along the bottom. You can make the bottom asymmetrical, sew on additional details, change its shape and volume. There are many options for fantasy.
For tailoring a trapeze dress, it is best to use soft, well-draped fabrics. They lie down in soft waves on the figure, which allows you to give the figure a harmony and visually stretch the silhouette.
Although, from fabrics that hold their shape well, chic options are also obtained. The properties of fabrics can produce various interesting effects. Cotton, taffeta and brocade can be successfully used for a-line dress. 
Modeling a trapeze dress is not at all difficult. On the Internet, there are a huge number of different simple and complex options for patterns of these dresses.
But still, if you are a supporter of an excellent fit on the figure, I recommend modeling an a-line dress from your individual bodice base. Then you will be clearly sure that you will not have any defects in the fit near the neck or armhole. Agree that it is unpleasant to see, after all your efforts in cutting and preparing for fitting, some “waves and bubbles” here and there. The pattern should be yours (!), And not downloaded somewhere, do not understand who ...
For a trapeze dress, it is not at all necessary to use the entire base of the dress. You can simply use the construction of the bodice to the waist.
And the modeling steps themselves are quite simple. The video tutorial tells what you need to pay special attention to when modeling. And in the future (in other issues) we will also sew a trapeze dress together.
How to sew a trapeze dress? We sew without a pattern
Trapeze dress. Building a drawing
We sew a dress-trapeze for the summer (Olga Nikishecheva)
We sew a trapeze dress for the summer from a jacquard fabric with an original pattern. The silhouette of the dress is simple but elegant. There are only two constructive seams. You can sew such a dress in an hour.
How to sew a dress with flounced sleeves
You can use any T-shirt pattern as the basis of the dress.
Trapeze dress tailoring. Part 1. Step by step MK
Simulation of children's dress A-line
Modeling of a children's dress a-line. For height 120cm, front length (from neckline) 58cm, side cut length (from armhole) 58cm, back length (from neckline) 85cm.
Elegant A-Line Dress without a pattern
How to sew an elegant dress. How to tailor a dress without a pattern. The dress is asymmetric, shorter in front, longer in the back. How to tailor a sleeve. How to put a sleeve in an armhole.
A simple pattern and tailoring of a summer sundress-trapeze
Bottom processing. Idea for summer dresses and sundresses
A-LINE DRESS by Korfiati
A-line dress according to the pattern of A. Korfiati. I love this style and this pattern, I have already sewn 2 dresses, I am satisfied and gently keep the patterns.
How to sew a dress with a wide cut for any figure? Cutting coquette
How to sew a dress for pregnant women? How to sew a dress for full?
How to sew a dress with your own hands?
Based on this pattern, you can sew simple, cute products. And most importantly, they are very comfortable. After all, in essence, this is a T-shirt adapted for other options.
This pattern is perfect for oversized products. You can even make it even wider and even freer if you wish. To do this, you just need to focus on the cut of a larger T-shirt.
Now it is very fashionable to wear things in a sporty style. Even well-known designers, based on the simplest cut, produce very cool dresses in a sporty style. Here, too, this simple pattern can come to the rescue. Both fast and cute. 
And as a home dress, it’s a great thing in general! Homes also need to look beautiful. In such a dress, you will always look great, while convenience and comfort are guaranteed. And, best of all, such beautiful clothes will cost you very budget. 
It is best to sew such dresses from knitted fabrics.
For casual sports style dresses, thicker knitwear, such as jersey, is usually used. And for home clothes, you can use different types of knitted fabric, depending on the season. For the summer period, when it is very warm, you can use a cotton knitted fabric of low and medium density. And for the autumn-winter season, when you want to dress warmer, dense knitted fabrics are also perfect.
In general, there are a lot of options for using a simple pattern based on a T-shirt!
Show imagination. Combine fabrics, change the shape of the collar or sleeve. Play with length and volume, and you will always have interesting dresses and tunics that you can sew in an hour.
We suggest you look at one of the options for sewing a simple dress based on a T-shirt. You can sew the same together with us, or you can simply use it as a basis for further modeling. Come up with your own interesting dress or tunic, and sew an even more beautiful and interesting dress. Dare!
Chiffon tunic without a pattern? Moscow seam. Chiffon processing
How to sew a chiffon tunic? DIY beach dress in 10 minutes
step by step sewing video for beginners
They amaze with their diversity. But how to choose your ideal style, which will not only hide the flaws of the figure, but also emphasize its dignity? Trapeze dresses are a unique solution for women of any age and physique. It is about them that we will talk today.
What is an a-line dress?
The name of the style of this dress speaks for itself. After all, its pattern is made in the form of a trapezoid, the narrow part of which is directed upwards. This design solution allows you to visually adjust the figure, giving it a feminine shape.
Today in stores you can find various variations on the theme of a-line dresses. It can be both classic styles and casual models. But all of them are united by practicality and ease of use. Therefore, if your collection does not yet have a trapeze dress, it's time to get it. After all, in it you will always look fashionable and modern.
A-line dress is also loved by pregnant women. After all, its free cut does not restrict movement and gives the image elegance. And this is exactly what you need in the period of expectation of the child.
Material for sewing a fashionable dress
The style of this fashionable dress can be made from almost any fabric. However, the most popular models of world designers are made from linen, thick knitwear, cotton or staple. The choice of material depends not only on the time of year, but also on the whole image as a whole.
It’s good if your collection includes trapeze dresses made from different fabrics and designed for different occasions. After trying on this piece of clothing once, you can no longer refuse it.

Styles for slim girls
It would seem that owners of ideal proportions do not need to choose trapeze dresses. However, do not immediately write off this model from the accounts. After all, with the help of a flared dress, you can perfectly diversify your wardrobe and impress others.
A-line dress with sleeves or sleeveless for slender girls can be either short or mid-knee length. In this case, it is worth focusing on the details. For example, pick up bright high-heeled shoes that will emphasize slender legs. A-line dress goes well with wide-brimmed hats and massive jewelry. But remember that only girls with a thin physique can try on such accessories.

A-line dress for full
Pear-shaped style will be an excellent choice for full ladies. After all, a trapeze dress hides figure flaws and visually slims. At the same time, you should pay attention to monophonic models and large prints. If you cannot boast of the ideal proportions of the legs, then choose a model that is mid-knee length. However, in this case, heels will be a mandatory component.
You can also try on long trapeze dresses. But do not choose too wide a cut. The hem of such a dress should be no more than shoulder width. Otherwise, you will get the image of a very obese lady.

With what to combine a fashionable dress?
The choice of accessories for this dress model will depend not only on the situation, but also on the material from which it is made. So, linen trapeze dresses go well with jewelry made of wood or natural stones. At the same time, shoes with both flat soles and wedges are welcome.
A-line dresses made of thick drape or knitwear, which are customary to wear in the demi-season period, are usually worn with high boots or ankle boots. From outerwear, you can give preference to a raincoat or an elongated fur coat.
If you purchased a summer dress made of staples or thin cotton, then you can safely combine it with sandals and bright jewelry. The main thing is that the whole outfit looks harmonious in color and style.
Today, lace trapeze dresses, which are lined with light fabric, are very popular. Wearing such a model, you will get a very gentle and romantic look. In this case, it is worth giving preference to pastel and any light colors. Indeed, this season, calm colors have received the greatest popularity.
A-line dress: do-it-yourself pattern
Today, many girls sew clothes with their own hands. A-line dress, the pattern of which is very simple, can be created at home. To do this, you need a piece of fabric equal to the length of the future product. Of all the measurements, you will need only the circumference of the chest. According to the scheme, which is presented below, you should make a markup on your piece of fabric.

You can independently adjust the width of the dress, as indicated in the diagram. But do not forget about the darts in the chest area. After all, it is they who make the style of the dress feminine, and not like an ordinary bag. If you are interested in a pattern of an a-line dress with a sleeve, then you can take measurements from any T-shirt that fits you well. This method is well suited for beginners in the field of sewing.
If you are using knitted fabric, then your sewing machine must be equipped with a special foot for stretch fabric. The seam should be processed along the line of the shoulders and along the entire length of the product. If the fabric crumbles a lot on the cut, then it needs to be processed on an overlock.
As you can see, a trapeze dress, the pattern of which is very simple, can be created in just half an hour. At the same time, you will receive a unique product that cannot be found in any designer collection in the world! You can decorate the dress with a brooch or other accessories, depending on your image.
Greetings to all ladies who love beautiful elegant clothes and are ready to create their own wardrobe! The dress is gaining another round of popularity, despite the dominance of trousers, in this respect, the most versatile model that will suit almost everyone.
The 3/4 sleeve style straight dress is very versatile and will come in handy for a variety of occasions. Its simplicity is its advantage. It is concise and elegant. Pockets in the side seams make it more comfortable and interesting. The double-seam sleeve creates a good and comfortable fit on the arm.

For this model, you can choose different materials. It all depends on what result you want to get. Made of dense materials, such as cotton or jacquard, the dress will look more statuary and hold its shape well. From soft fabrics such as silk or wool, it will not look so strict.
BASIC DIMENSIONS FOR THE PATTERN
Bust - 96 cm
Waist - 78 cm
Hip circumference - 102 cm
MATERIALS FOR WORK
Fabric 150 cm wide and 160 cm long
Interlining
Hidden zipper length 22 cm
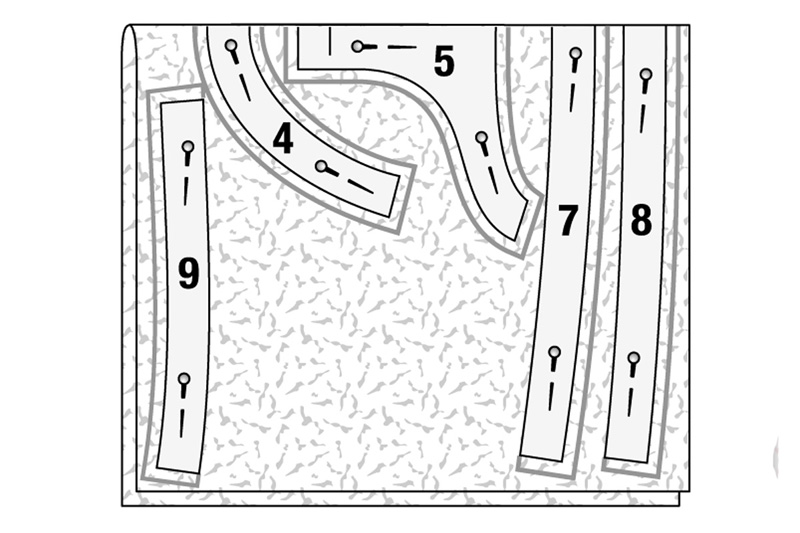
PATTERN DETAILS
1 - Shelf (one part with a fold)
2 - Back (two parts)
3 - The front of the sleeve (two parts)
5 - Pocket burlap (four parts)


The pattern is given without seam allowances. For all sections, add 1.5 cm each, along the bottom of the sleeves - 3 cm, along the bottom of the dress - 4 cm.
WORK DESCRIPTION
1. Sew the center seam along the back. Process cuts and iron.
2. Sew on a hidden zipper. See.
3. Stitch shoulder seams. Process them and iron them on the shelf.
4. Cut out the facing on the basis of the top of the shelf as a separate part and duplicate it with interlining.
5. Treat the neck with a piping as shown in.
6. Stitch chest darts on the shelf and iron them down.
7. Run the side seams, leaving free space for entering the pockets.
8. Run pockets in the side seams. To help .
9. Process the allowance on the bottom of the dress and iron it on the wrong side. .
10. Stitch elbow and front seams on sleeves. Process and iron.
11. Process the lower sections of the sleeves and iron the allowances on the wrong side. Sew by hand with a hidden seam.
12. Stitch sleeves into armholes. Process allowance.
The dress is ready!
The pattern of this model is quite simple and on its basis you can sew a lot of interesting products by combining even several diverse materials.
Women's dress of a straight silhouette with three-quarter sleeves is suitable for ladies of all ages. For young girls, you can make it from bright fabrics with beautiful decorations. For ladies of a more mature age, these may be more calm, discreet options that will look very.


Fashionable women's dresses are diverse, but there are basic models that have become classic, which always remain relevant. This dress is just one of them. It will be a great addition to any wardrobe. By the way, if you make it short, then it may well play the role of a tunic.
Subscribe to the news and stay in touch to learn more useful and interesting things!
Find out even more interesting things:

Poplin summer dress for girls
Hello dear readers! Many parents like to sew clothes for babies with their own hands, and if you are one of them, then I hope that the proposed model ...

Wolka hood pattern
How many good things in the world happen by accident. For those who are not yet familiar with the new trend in the headwear line, this will be a pleasant...
Crepe 1.80 m wide 150 cm for all sizes; rep ribbon 0.95 m wide 2.5 cm for all sizes; 1 small flat button; interlining G 785 0.50 m wide 90 cm; interlining formband; sewing threads.Besides:
Silk paper for transferring the pattern from the pattern sheet; pencil, paper scissors; tape measure; tailor's pins; tailor's chalk; a piece of cardboard; glue stick; scissors for cutting and small scissors for needlework; burda carbon paper, gear wheel for pattern translation; sewing machine needle and hand sewing needle.Pattern:
Rounded scallops along the lower edge of the front, back and sleeves, red grosgrain ribbon along the entrances to ...
dress pattern
...pink in color, so it's easy to find on pattern sheets. Lay the silk paper on the pattern sheet and pin. Translate the details of the pattern in your size along the appropriate contour lines and do not forget about markings and inscriptions. Pay attention to the lines and data for the 120 V model. Details 11 and 12 are templates for the scalloped hem of the dress and sleeves. Glue the re-shot scallops to the cardboard and cut them out.Tip: the cutting process can be greatly facilitated if parts 3-5 and 7-10 are retaken twice and parts 4, 5, 7 and 8 are glued along the middle lines.
Pink extra pattern on pattern sheets A and BA: Items 1, 2, 4 and 5
B: details 3, 7-12
Sizes 34-44
Layout plan
…shows how to arrange paper pattern pieces on fabric. Pin the details of the paper pattern.
1 Front with fold 1x
2 Folded back 1x
3 Sleeve 2x
4 Turning the front neck with a fold 1x
5 Turning the neck of the back with a fold 1x
7 Turning the lower edge of the front with a fold 1x
8 Turning the lower edge of the back with a fold 1x
9 Sleeve facing 2x
10 Burlap pocket 4x
Step 1. Open front and back

From one edge of the fabric, measure 75 cm and put marks with pins (front side). Then fold the fabric right side inward, aligning the edges at the marked line. Place the details of the paper pattern 1 and 2 on the fabric to the folds. Pin it. Mark the allowances around the details of the paper pattern with a tailor's chalk: 1.5 cm for all seams and along the cuts. Cut out the details.
Step 2. Cut out the rest of the details

Lay the remaining piece of fabric right side up. Place the details of the paper pattern on the fabric according to the layout plan and pin. Details indicated on the layout plan (lower left) with dotted lines, cut out a second time symmetrically (see advice on the left). Mark the allowances around the details of the paper pattern with a tailor's chalk: 1.5 cm for all seams and along the cuts. Draw a bias binding for the air loop © directly on the fabric: 6 cm long and 2 cm wide. Cut out the details.
Step 3. Interlining G 785
Fold the interlining in half lengthwise with the adhesive side inward. Place parts 4, 5, 7 and 8 on the interlining to the fold, put on part 9. Pin. Along all cuts, except for the upper cuts of the facings (parts 7, 8 and 9), draw allowances 1.5 cm wide. Cut out the details. Iron the gasket to the details from the wrong side: details 4 and 5 - to the corresponding parts from the main fabric, details 7, 8 and 9 - along the lower sections of the front, back and sleeves.
Step 4. Seam lines and markings

Fold the parts duplicated by the gasket in half again with the right side inward / right sides, pin the paper pattern parts again. Transfer the contours of all pattern details (seam lines) to the wrong side of the cut details using a gear wheel (cutter) and carbon paper. For pockets on part 1, the alignment lines and cuts, on parts 2 and 5, the lines of the middle of the back along the folds from the top to the transverse marks, transfer to the front side with large running stitches.
Step 5. Interlining formband

Iron the interlining formband from the wrong side along the cuts of the necks and armholes of the front and back so that the chain seam on the interlining is aligned with the marked seam line on the cut details.
Step 6. Darts

Before, fold along the line of the middle of each chest tuck with the right side inward. Pin off the lines of the tuck, sew from the side cut to the top of the tuck. Make a notch at the beginning of the line. At the top of the tuck, do not backtack, but tightly tie the threads of the stitch. Press the tuck depth down.
Step 7 Pocket Entrances

Iron strips of padding measuring 16 x 3 cm to the front over the markings of the pockets. Pin one burlap of each pocket to the front right side to the front side, aligning the marked lines of the pocket. Lay a line around the marked line of the pocket at a distance of 2 mm, at the ends of the line, lay the line across. Before cutting between the seams, make oblique notches in the corners close to the stitches. Turn the burlap of the pocket to the wrong side through the slot, iron the entrance to the pocket.
Step 8: Sew Ribbon

Cut the ribbon into 2 equal pieces. On each segment, mark the middle. Pin the middle of each ribbon at the top end of the pocket (corner). Turn the tape from the corner down and pin along the entrance to the pocket. Iron the corner. At the lower end of the pocket, tuck the ends of the tape along the alignment lines obliquely to make a corner. Iron on. Place one end of the tape under the other end. Sew the rep tape along the pocket entrance to the edge. Stitch the straight outer edges of the tape without fastening the pocket burlap. Leave the ends of the stitches hanging down.
Step 9 Pockets

Lay the other burlap of each pocket over the already sewn pocket burlap, right side to right side. Pin the pocket burlap along the marked seam line. Go ahead. Overcast seam allowances. At the ends of the pocket, stitch the corners of the rep tape to the edge, fastening from the wrong side of the pocket burlap. Bring the ends of the threads of the lines with a needle to the wrong side and fasten.
Step 10. Shoulder seams, air loop

Before lay on the back with the right side to the front side, cut off the shoulder sections. Go ahead. Iron the seam allowances and overcast. Do the same for the shoulder seams on the neckline. Iron the seam allowances. Overcast the inner cuts of the facing. Fold the bias tape for the air loop in half lengthwise with the right side inward. Lay a line at a distance of 5 mm from the fold. Do not cut the stitching threads short, but thread the darning needle through the eye and tie tightly. To turn the needle out, pull the eye forward through the handle.
Step 11. Turning the neck
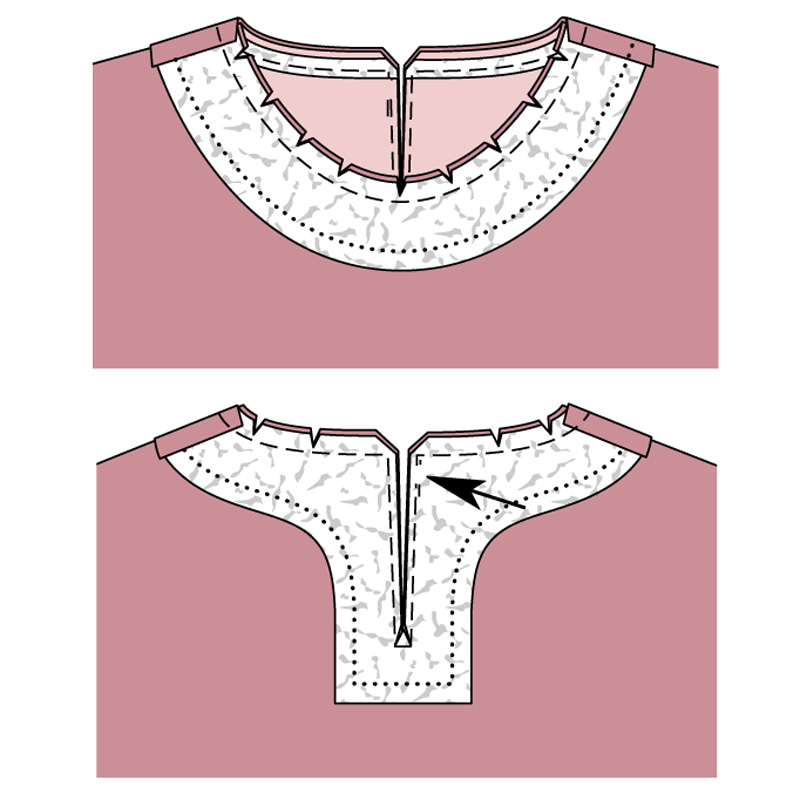
Lay the neckline on the dress right side to the right side, aligning the shoulder seams. Chip the cut marks and neck lines. Sew along the marked neck line and around the opening mark at a distance of 3 mm, leaving a 1 cm section open in the seam along the right edge of the opening at a distance of 5 mm from the neck line for the air loop (arrow). At the bottom end of the slit, sew a few stitches across. Cut the allowances along the cut of the neck close to the line, make notches in the areas of rounding. Cut the back and facing between the lines, make notches in the corners.
Step 12: Finish the neckline and back slit

Form an air loop from the roll. Insert the loop between the back and facing, pull the ends through the open sections outward. Sew up the open section of the seam. Turn the neck facing upwards and stitch over the seam allowances of stitching close to the seam to the maximum possible length. Turn the facing to the wrong side, iron the neck. Sew the inner edge of the facing to the allowances of the shoulder seams. Sew a button to the left edge of the back slit according to the loop.
Step 13: Marking the Scalloped Edge

Along the lower sections of the front, back and sleeves, mark the scalloped squares with a pencil. To do this, lay out the details with the wrong side up. Apply templates with scalloped edges along the marked lines of the bottom: on the front and on the back, using template 11, draw 12 scallops, respectively, on the sleeves using template 12 - 6 scallops each.
Step 14. Side seams, sleeve seams, facing seams

Before lay on the back with the right side to the front side, chop off the side sections (control mark 3). Go ahead. Fold the sleeves lengthwise with the front side inward, pin off the sections of the sleeves (check mark 4). Go ahead. Iron the seam allowances and overcast. Similarly, perform the side seams on the facing of the lower cut of the dress (control mark 6). On the facings of the sleeves, chop short sections right side to the right side, stitch. Iron the seam allowances.
Step 15. Stitch the facings

Overcast the upper sections of the facings. Pin the bottom edge of the dress to the bottom edges of the front and back, lining up the side seams. Lay the line along the marked scallops. Stitch length: 2-2.5 mm. In the corners between the scallops, do not lay the line exactly into the corners, but sew one stitch across. Pin the facings of the sleeves to the lower sections of the sleeves with the right side to the front side, aligning the seams of the sleeves with the seams of the facings. Stitch along the scalloped edges.
Step 16 Finish the Bottom

Trim seam allowances close to the seams. In the corners and rounded areas, make notches close to the stitches. Turn the facings to the wrong side. Sweep out the scallops. Iron the edges. Sew the inner edges of the facings by hand with loose stitches.
Step 17: Roll up the sleeves

To gather the hem of each sleeve from to, lay stitches on both sides of the marked seam line for sewing in the sleeve with large stitches. First, pin each sleeve only to the bottom of the armhole with the right side to the front side, aligning the seam of the sleeve with the side seam, as well as transverse marks 5 on the sleeve and on the armhole in front. Then align the upper transverse mark on the collar of the sleeve with the shoulder seam and pin off. Fit the sleeve along the rim to the size of the armhole, pulling the fabric onto the threads of the gathering lines. Chip the sleeves with the armhole, evenly distributing the assembly. Pull up the sleeve.
Step 18: Stitch in the sleeves

Sew sleeves from the side of the sleeves, starting the lines from the seams of the sleeves. Remove basting and gathering stitches. Iron the stitching seams of the sleeves gently from the side of the sleeves, ironing the assembly. Overcast the allowances of each seam of the sewing in of the sleeve together. Iron the seam allowances for sewing in the sleeves on the sleeves.
Photo: U2/Uli Glasemann. Illustrations: Karin Niering. Text: Marianne Simon.
The material was prepared by Yulia Dekanova
A pear-shaped figure is very feminine, but sometimes it brings some difficulties to the owner when choosing a finished dress due to the difference in the girths of the hips and chest. You shouldn't get upset. First, let's figure out which style to choose. We narrow the bottom and focus on the upper part: a boat-shaped neckline, a large collar, a neckline, a bright print in the upper part of the dress, the bottom can be slightly flared, do not forget about the use of contrasting inserts that run along the dress and visually model the figure, as well as a little high waist, heels and matching tights will make you slimmer. We try to avoid decor in the hips, patch pockets, draperies, transverse stripes and large prints.
photo from the site, http://www.chieflady.com/
For an example of modeling, we will choose a simple sheath dress created on a pattern-based adjoining silhouette. The style is interesting in that the model lines forming the silhouette demonstrate the female figure of just the lower type in the best and most advantageous way. Dark inserts running along the side seams will help to visually hide the width of the hips, and the white silhouette, expanding upwards, will bring to the fore the built silhouette. But, here you can’t be too smart with excessive narrowing of the skirt, and if the difference between the girths of the chest and hips is large, it is better to expand the skirt a little to the bottom.


photo from http://www.stylishwife.com/
Modeling. On the details of the back and front pattern, draw model lines of reliefs passing from the armholes to the bottom of the dress through the waist darts, on the back, transfer part of the solution to the middle line of the back, for the greatest fit in this area. Open the chest tuck in the armhole, read more about transferring the darts. It remains only to outline the allowance for the slot. If the difference between the circumferences of the waist and hips is large and the solutions of the tucks for fitting are more than 3-3.5 cm each, the tuck must be divided into two, otherwise ugly creases in the waist area will appear in the finished product.

In the second version of modeling, we propose to expand the skirt to the bottom, make it the so-called A-shaped silhouette, you can also make the dress cut off at the waist.

MODELING OF A DRESS FOR THE "INVERTED TRIANGLE" BODY TYPE
Your strong point is narrow hips and long slender legs. We focus on them. The whole decor, bright prints - down on the skirt. We reduce the width of the shoulders, raglan sleeves will help us here, or the absence of sleeves at all in summer clothes, a dress with a shoulder strap on one shoulder, a Greek silhouette, a loose tunic, a dress with a tulip skirt can become a lifesaver and be loved in your wardrobe. You can afford to wear puffy wide skirts, peplum skirts or trousers, straight-cut dresses, but not too voluminous and wide, with vertical seams or trim.
 photo from sites http://refinedstylefashion.com/ https://ru.pinterest.com/pin/454089574910263523/ http://stylowi.pl/
As an example, let's analyze the modeling of a simple dress pattern suitable for a given type of figurus. It features a fitted, sleeveless bodice and a tulip skirt that adds volume to the hips. The dress is cut off along the waistline, on the front panel of the skirt there are two opposite folds, on the back panel of the skirt a cut is made.
 photo from the site http://snowqueen.ru/
Let's start modeling by applying the basic pattern of the adjacent silhouette of embossed lines to the details of the back and shelves (if you want a better fit or knitted fabric is chosen, you can use the base pattern of the adjacent silhouette). We will arrange the thallium tucks on the front panel of the skirt into folds - cut the skirt part from the end of the tucks vertically down, push the parts apart so that in the upper part we get a gap of approximately 6-8 cm to form deep counter folds. At the bottom, the volume of the skirt will be kept in its original form.

MODELING OF A DRESS FOR THE "HOURGLASS" BODY TYPE
The type of figure "hourglass" is the most feminine, it is he who is rightfully considered the standard to follow and we try to bring our figure closer to it, at least with the help of clothes. Lucky women with this type of physique. The main advice is to focus on the waist, so you will further emphasize your femininity and sexuality. Necklines, bows, pencil skirts, stilettos - this is your win-win look.

photo from sites http://www.asos.com/ https://ru.pinterest.com/NatalieYoung29/

Let's model such a simple dress, in two versions.

photo taken from websites
The model is quite simple at first glance, but with the right choice of fabric and accessories, it is very effective. For modeling, we need a pattern for the base of the adjacent silhouette and a sleeve pattern. The dress is detachable along the waist line, the skirt is expanded to the bottom. Darts for fitting the chest are transferred to the neck: in the first version - darts from the neck are stitched with an allowance outward, a small sleeve with a fold, in the second version - darts on the chest are distributed into folds coming from the neck, there are no sleeves.
Modeling. Step 1 - on the details of the back, the tuck for the roundness of the shoulder can be neglected, because. the neckline of the back is deep enough and widened, but the amount of the opening must be taken from the length of the shoulder so as not to upset the balance. For the convenience of modeling, we will translate the tuck on the shelf into an armhole. Cut the details of the skirt pattern lengthwise from the darts down.

Next, step 2 of the simulation. Let's outline a new neckline according to the sketch. We will transfer the thallium tuck on the shelf to the neck, and we will also transfer the tuck from the armhole there. Read more about the translation of tucks. When designing a detachable adjacent silhouette, the pattern of the shelf detail must be lowered by 1 cm around the waist, this will give a better fit and prevent it from pulling up when finished. Skirt. We connect the parts of the pattern, obtained after cutting the details of the skirt, so that the darts open to the bottom. We will correct the side sections and the bottom of the product.

Sleeve modeling. A pattern for the base of the sleeve can be taken on our website. First, shorten the length to the required. With the help of vertical cuts going from the edge to the bottom of the part, and the subsequent separation of the parts of the pattern, design an oncoming fold.

In the second version of the dress, the tucks on the shelf are translated into folds coming from the neck. Modeling will be discussed below.

MODELING OF A DRESS FOR THE "OVAL" BODY TYPE (APPLE)
Oval shape (apple). In the era of Rubens, women with this type of figure were the ideal of perfection. The silhouette is visually close in shape to the letter "o". The strategy in the right choice of clothing will be to emphasize, accentuate the waist, this can be done by choosing a dress that expands slightly towards the bottom, as well as using belts, decorative inserts that make the waist visually narrower, the top of the dress should be slightly expanded, for example, use a V-shaped neckline, collars . Sheath dresses, wraps, low waist, A-line dresses will suit you.
 photo from sites http://yourmothershouldknow.tumblr.com/ https://ru.pinterest.com/buyerselect/ https://ru.pinterest.com/nordstrom/ http://dresses-photo.ru/ http:/ /jenskie-hitrosti.ru/
Let's take this dress as an example. It is interesting because it has a contrasting decorative line running along the dress. Visually, this very stretches the silhouette and slims. In addition, the dress is loose at the waist and slightly expands towards the bottom, which is undoubtedly a plus for this type of figure. Clear cut lines and a choice of fabric that holds its shape create the right image and collect the figure as a whole. To model this model, we will use the basic pattern-base of the adjacent silhouette, for a better fit.
 photo from the site
Rectangle female figure. For modern models is the most typical. Therefore, when buying ready-made clothes, there are usually no problems, but sometimes you really want something special! That's where our modeling tips and patterns come in handy!)) Women with this body type do not need to try to look like Marilyn Monroe or Sophia Loren, this is not your style. Dresses and clothes in the image of Twiggy, Kate Moss, Nicole Kidman and Coco Chanel herself, that's what we are striving for.
 photo from sites http://ouiliviamoraes.com/ http://my.goodhouse.com.
Modeling takes place on the basic pattern-basis of a dress with a straight silhouette, without tucks. To begin with, we will get rid of the tuck on the back, on the shelf we will complete the depth of the fold, setting aside a distance of 12-15 cm from the middle of the part. Please note that one counter fold is laid at the top of the dress, while at the bottom there are two of them - one-sided, the depths are laid towards the side seams. The lines of the side seams are designed in such a way that an oval silhouette is formed. This model should be long above the knee, otherwise there may be excessive narrowing at the bottom.
Well, our lesson has come to an end, we have learned how to create simple dress patterns based on a basic pattern, such that beginners can handle modeling and tailoring, we talked about the types of figures. I think now you can please yourself with a new thing. Good luck and be creative!


