Sew a tilde doll night angel in a cap. Sleepy angel (Tilda Splyushka) master class
If my MK is at least somehow useful to you, then I will be only glad! So,
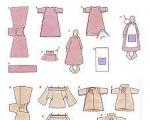
These pictures are collected from Tone Finanger's magazines, they helped me understand the essence of sewing clothes for Scops Owls

My main rule in choosing the color scheme for pajamas is to combine 3 colors, exactly three, because... two colors look a little boring, and four or more look tacky. The same rule includes all finishing materials: bias tape, buttons, lace, ribbons, as well as finishing stitches. For example, in the color scheme, in addition to flesh, blue, blue, white/ or red, pink, white/ or yellow, green, white, etc. should take part. As you noticed, white is present in all variations, this is because Scops Owl has white wings and a pillow; they should not be the fourth color in the composition.
So, we have decided on the fabrics, now we are cutting out the pajamas.
This is the original pattern:

It has undergone some changes, this is what the fabric looks like after the scissors work:

I sew pants: 1. I iron the edge of the bottom of the pants using a non-woven strip on a paper base or a web, then I sew on the lace. 1.1. I attach the finishing elastic, 1-1.5 cm away from the lace. 1.2. I sew the trouser legs, process them with a zigzag (it is better, if possible, to do this with an overlocker) 1.3. sew the two halves together.

Turn it right side out, iron it, dress it. We connect the front and back seams of the pants and the body (in one line), secure with pins, form even folds and fold the edge, stitch along the entire perimeter with a hidden seam.

2.1. I sew lace onto the edge of the sleeve. 2.2 I use a large seam to sew the place where the folds will form. 2.3 I make gathers evenly.

3. I sew the shoulder seams. 4. I sew together the two halves of the collar, turn them inside out, iron them, and make a stitch along the open edge so that the two fabrics do not move relative to each other during further stitching.

5. I combine the middle of the collar and the middle of the back of the pajamas, folding the edges of the front, stitching the collar, stepping back from the corner 4-6 mm, then finishing it with a zigzag.

additional picture:

6. I turn the edges of the front inside out, iron them, and make a finishing stitch along the edges of the front and collar.

On the lower part of the front I draw a simple picture with acrylic paints on fabric. I give it 3 hours to dry naturally, then iron it for 3-5 minutes without steam on the reverse side of the design.

7. Connect the upper and lower parts of the front. I process the seam with a zigzag and sew it with a finishing stitch.

8. I sew in the sleeves
8.1.instead of the design, you can sew pockets, I do it like this: using an iron and non-woven tape, I bend the edges of the rectangle, pin it to the front of the pajamas and attach the pocket.


9. I sew the two halves together, finishing the side seams with a zigzag. In the armpit area, I make the indentation from the edge minimal so that there are no folds in this place. I finish the edge of the bottom with bias tape.

10.1. I cut out Angel wings from dublerin, 2 parts from fabric, leaving a seam allowance of 5 mm. Using an iron, I glue the dublerin to one of the fabric parts, sew the two halves together, leaving the bottom open. I turn it inside out, hem the bottom with a hidden seam, and make a finishing stitch. 10.2 these are ready-made wings and a pillow for Scops Owl.
Today, sewing toys with your own hands is a fairly common activity. The interior doll, Tilda Splyushka, aka Sleepy Angel, is extremely popular among them. The process of making it takes some time, but the result is truly worth it. We hope that we can provide you with significant assistance, and that the descriptions of the master class on doll sewing techniques will be useful to you.
So, first you need to collect all the necessary materials:
· Base fabric for dress/nightie/pajamas
· Fabric for the wings and body of Scops Owl
· Braid or lace (dress decoration)
· Special threads for doll hair
Eye embroidery thread or acrylic paint
Beads or bells
· Filling for the doll (holofiber, single-layer padding polyester 40x150 cm or other material you have)
First, take the pattern of the sleepy angel, print it or transfer it directly from the monitor to paper, and cut it out. You can use any paper sheets, but it is worth saying that the thinner they are, the easier the work process will be and there will be no difficulty in attaching it to the fabric base, but a pattern made of thick cardboard will last you much longer.


We will sew the body and wings from flesh-colored fabric, the nightgown and cap from colored fabric, and the collar, panties and pillow from white.


Let's start sewing:
1. Before you start working with the fabric, you need to steam it with an iron. The temperature regime should be used in accordance with the type of fabric you have chosen. For our Splyushka doll, we chose cotton, which we ironed thoroughly and folded in half and attached to the prepared paper patterns. At the same time, it is important to remember the need to leave small indents so that there are no problems with allowances between parts.
2. We outline the body of the future doll with a regular pencil or fabric marker, and do the same with the arms and legs.
3. It is important to cut out all the details, calculating the distance to create seams (0.5 cm will be enough). After which you can sweep away the parts; this move will greatly simplify the work when stitching the material on a machine. But if you are confident in your abilities, you can immediately scribble – clearly along the drawn line.
4. Now we must remove the threads that were used to baste the fabric. Then we cut out all the details using zig-zag or regular scissors, making small cuts in the bends (so that the fabric does not wrinkle or stretch).


5. It is most convenient to turn out the legs and arms of a sleepy angel using a wooden sushi stick or a regular pencil.


6. At this stage, all the parts are prepared and turned out. Now we’ll iron them and fill them with finely chopped pieces of padding polyester or holofiber. Again, you can’t do without a pencil; with its help, it won’t be difficult to push the shreds of synthetic padding in as tightly as possible to avoid the appearance of “cellulite” wrinkles on our beautiful Scops Owl.


7. All parts are prepared and you can begin to connect them logically. You should start with the body, turning the seam allowance over and inserting the legs inside. Use pins to secure the legs and arms before sewing. You need to sew on the parts using a hidden seam, with a thread matched to the color of the selected fabric.


After sewing on the arms and legs, we will have such a cute Tilda.


Now you need to sew a nightgown, pillow and wings. No one should have any problems with the pillow - just sew 2 pieces of fabric according to the pattern, turn them inside out and fill them with holofiber. You can decorate it with lace or a bow on top.
The wings are also not difficult to sew - the main thing is to make small cuts in the bends so that the finished wings do not look tight.
And the shirt is sewn according to this pattern:


First, you need to sew 2 main parts in the shoulders, then sew on the sleeves, bend the edges of the fabric a little and stitch or place them on a glue web, and lastly, sew on the collar.
We sew pants for a sleepy angel this way


We mirror our small pattern onto the fabric - that is, we fold two halves into one large piece. Then we sew along one of the side folds, then we sew the trouser legs and finally sew them at the top. We fold the edges of the panties, lay them with adhesive web and iron them, or simply sew them on a machine. It is better to fasten the pants to Splyushka by sewing them along the top edge carefully with matching threads.
We make the hair from ordinary yarn - you can completely sew it to the head with a needle, or you can wind it in a skein, cut it in the middle and stitch it several times on a machine with threads of the same color. Then sew the Scops Owls in the head in a circle or along the seam. We sew the cap on top. We put a pillow in Splyushka’s hand (you can have a heart, a small book, something else at your discretion), and we carefully sew the other one just below the nose, simulating a yawn (you don’t have to sew it on, depending on your taste). Be sure to blush your cheeks and draw (embroider) eyes.
We get this Sleepy Angel.


The wings can be sewn with some thread - large stitches.
Don't be afraid to experiment! Come up with original color combinations and embody all this in different models of everyone’s favorite Sleepy Angel.
Here are some examples of Tilda Splyushka, perhaps they will help you with your choice:


Crafts not only help you relax, but are also a great way to express yourself. Try your hand at creating wonderful Tilda dolls!
Sew a Sleepy AngelToday we start sewing Tilda's Sleepy Angel.
If possible, we print the pattern. If not, hold a sheet of thin paper to the monitor and trace the pattern (if you have an LCD monitor, you need to be very careful). Cut out the details of the torso, arms, legs.
Take beige or white fabric, fold it in half (face inward) and trace the details, taking into account a 0.7-1 cm seam allowance. I took gabardine for the body, it is, of course, rough and thick for Tilda, but the fabric creeps less in the seams when heavily padded.

We remove the patterns, pin the fabric and cut out the parts with seam allowances.

Since I sew a toy by hand, I usually mark it so that the fabric does not move. But this is not at all necessary.

We sew the parts, leaving holes in the body - at the bottom, at the arms and legs - at the top. Next, we prepare the parts for turning out: we cut off the excess allowances (leave very little) and make notches on the side of the allowances in concave places (neck, nose, feet, fingers).

Now we slowly turn out and straighten all the parts (you need to be especially careful and careful with your nose and fingers), it’s better to turn out the arms and legs using an unsharpened pencil.


Since the stitching process takes some time (sewing neatly is not always easy, and not everyone has a sewing machine), I suggest taking a break for a while.
we need to stuff all the details of the Sleepy Angel and assemble his carcass into a single whole.
We will fill it carefully and carefully, with small portions of filler. I ripped open an old pillow for this (I bought myself a new one yesterday). We will especially carefully fill the protruding parts - nose, feet, palms and fingers...

It’s better to help yourself with a knitting needle and an unsharpened pencil:

We stuff the body tightly. In the handles, we stuff only the palms tightly, the rest - lightly (so that they bend well). We stuff the legs tightly, but only a little more than half the length (in the photo I have this level indicated by a knitting needle):

We tuck the bottom of the body and carefully sew it up with a hidden seam:

Then we sew on the handles. The top of the handles must first be tucked in and their length should be equalized. For some reason, it’s easier for me to sew handles not with a hidden seam, but with an “over the edge” seam. First on one side:

Then on the other:

This is what it looks like from the front:

After securing stitches, the thread can be hidden in the body - brought out, for example, into the central seam. After pulling it a little, we cut the thread. The tip will hide inside!

Now it's the turn of the legs. We bend the top (allowances) of each leg, equalize the length, secure with needles:

We sew each leg to the bottom seam, starting from the corner, with a hidden seam (on both sides):

This is what the sewn legs on my Splyushka look like:

Well, the carcass of our Scops Owl is ready:

He doesn’t have eyes yet, but he’s still somehow embarrassed without clothes.

In the “Ivanovo Fabrics” store I discovered a striped fabric with the cunning name “yew”. To the touch - something between chintz and calico. I settled on it. I hope everyone else has also decided on the fabric for their pajamas. And the beginning is simple - we cut out all the necessary details. The main part, collar and cap were cut from fabric folded in half; I cut the sleeves separately:

In general, I noticed that all Tildiks’ clothes are sewn according to the same “scenario”: we sew the shoulder seams,

we sew in the sleeves,

sew the side seams. (I use basting as usual.)

I folded the bottom of the pajamas and the sleeves using a web (a very useful thing, I think everyone knows how to use it):

Turn it inside out:

And then I did everything wrong, i.e. not as intended. Having made sure that the pajamas with a sewn-on collar would definitely not fit on my Splyushka’s head (it turned out to be thick and dense), I decided to cheat and sew on the collar after putting on the pajamas. Therefore, having slightly cut the upper allowances of the pajamas, I pulled it over Splyushkin’s head:


And then I managed to sew on the collar (pre-sewn, turned inside out and ironed) using a hidden seam:


There was another option - to sew the collar right away, cut the front fabric, put on pajamas and then carefully sew up the cut on the body, but I didn’t want to spoil the stripes... So I did it like this:

All that remains is to sew the cap, turn it inside out, iron it and put it on the doll’s head.

What about buttons? Hmm... I have an eternal problem with them! Well, I don’t have any (if only a little bit)! It's a shame, of course! But with all my great love and adoration for all sorts of small and beautiful buttons, I still haven’t acquired a good collection... And the assortment of our stores leaves much to be desired... Well, I’ll go get some buttons, so we’ll take a break for today...
Buttons... Oh, how difficult it is to find the right ones... For some reason there are no small ones in the store! I chose from what I had and found a little more than I wanted and it was 2-3 times thicker! But still... I bought and sewed on 3 pieces:

What happens next again is not the same as in the book. There, apparently, the hair is first sewn on, and then the cap is put on top. My cap turned out to be a tight fit even on my bald head (I altered it twice). That’s why he somehow fell and didn’t want to hold on to Scops owl’s head. I was planning to sew a cap! I sewed it with a hidden seam:

I decided to add hair under the cap. I just recently bought yarn, I think it’s quite suitable for Tilda:

I did my hair like this: I wound several turns around my finger, cut off a strand and sewed it to my head:


Like this, strand by strand, it went around the entire head.


The result was these funny pretzels:

But for some reason my husband didn’t like the “pretzels”, and it was decided to cut the strands at the bottom...
When I showed my husband what I had done, there was an explosion of laughter and... the ridiculous “And... can I return everything back?...”! Because the result was... exactly a cross between the comical Pierre Richard and the mischievous Einstein:

And I liked it! I already love my Splyushka, and I won’t redo it... And there’s very little work left.
We embroider (draw with acrylic) eyes. I made French knots with black floss. She hid the tails in her head.

For those who are not yet familiar with such knots, but really want to, I suggest you first familiarize yourself with the master class presented in the magazine “I embroider with a cross”:


We are making a pillow for our angel. For her, I took regular white calico. On one side of the pillow I embroidered red stripes with floss threads, and inside, along with the stuffing, I put a piece of sponge on which I dripped lavender oil:

Making wings. I didn’t bother too much - I took a white napkin for cleaning, folded it in half and stitched it along the perimeter with red threads, stepping back 4 mm from the edge, and then just cut everything out along the contour:


Sew the pillow and wings to Scops Owl. My wings are attached to a pin (my husband wanted removable ones). And I sewed the pillow to the angel’s left palm and to his pajamas:

Let's blush our cheeks. And bending the angel’s right arm, we carefully sew it to the face, as if the angel was yawning:

This is how my angel Splyushka turned out:

Now I'm really looking forward to the photos of Scops Owls, which were sewn at the same time! For a joint gallery, send photos to me by email ( [email protected]) indicating the author, and if there is a blog - with a mandatory link to it. I think that in 3 days, it will be possible to create a gallery!
Many children give their parents trouble at bedtime. I have already written about what happens in our family, and today Maria will conduct a master class on making Tilda’s Doll - Scops Owl, which will help with the difficult task of falling asleep. Word to her!
What do I do to put my little son to bed... He has a hard time getting to bed. So I decided sew him a Scops Owl to have a friend to go to bed with.
As always, patterns of Scops Owl or Sleeping Angel I found it on the Internet. I changed it a little and got ready to go.


So that sew Scops Owl need to:
gabardine fabric for the body,
flannel for pajamas,
fleece for slippers and pillows,
wool threads for hair,
two buttons for decoration,
holofiber or padding polyester for stuffing,
needle and thread to match.
Stage 1. Sew a Sleeping Angel.
1. From gabardine we cut out 2 parts of the body, 4 parts of the arms and 4 parts of the legs.
We sweep them together

and sew it together.


2. Making cuts

and turn out the details.

3. We stuff the parts with holofiber and sew them together with a hidden seam.

You should end up with a “uncle” like this!

Stage 2. Clothes for Scops Owl.
1. Cut out clothing pieces from flannel.

We cut out all the details in 2 copies.
2. Sew the shoulder seams together.

3.Sew on the sleeves.

4.Sew the side seams. At the same time, you can process the bottom of the shirt.

5.Sew together the details of the cap and collar.

6. We sew the parts of the panties on both sides,

then sew the crotch seam.

I hemmed the top of the pants so that I could insert an elastic band there.
We process the bottom of the panties.
7. Turn out all the parts.

8. Sew the collar with a hidden seam.
Well, you can dress our Scops Owl!

Stage 3. Hairstyle for Tilda Sleeping Angel.
She embroidered Scops owl's eyes, hiding the threads under her hair.
To make the hairstyle, I took white woolen threads.
I sewed the threads onto a flannel base, then it will not be visible under the hair and cap.
1. Wind the threads around your hand and cut them on one side.
2. Distribute the threads onto the base,

and then sew them tightly to the base.

3.Attach the base to the head of Scops Owl and sew it with threads over the edge along the entire head.

4.The hairstyle for the Sleeping Angel is ready.

All that remains is to make your hair the length you want, i.e. simply cut Scops owl's hair and sew the cap to the head with a hidden seam.

Stage 3. Slippers.
I decided that my Splyushka would show off in slippers.
1. I cut out the soles of slippers from cardboard, and the details of future slippers from fleece. Sole parts - 4 pcs., upper parts - 2 pcs.

2.I sewed the parts of the sole, leaving a hole on one side so that they could be turned out.

3. I turned the sole inside out,

I inserted cardboard inside and sewed up the hole with a hidden seam.

4. Then I sewed on the top of the slipper and turned the slipper inside out with the seam facing inward.

5. Slippers are ready!
6. I put them on Splyushka’s legs and sewed them to his legs so that they wouldn’t come off and get lost.

7.Then I thought that the slippers were missing pompoms. I made the pompoms from white fleece circles. I cut out circles and tied them together with thread, stuffing them with padding polyester.

Stage 4. Pillow.
I decided to make a pillow from white fleece.
1.Cut out 2 squares from fleece.
2. I sewed them together, leaving a hole for turning and stuffing.
3. Turned it inside out, stuffed it and sewed up the hole with a blind stitch.
4. I sewed a pillow to Splyushka’s left hand.

This is how I got Splyushka!!!

Rear view
 front view.
Then I realized that he was missing something... Ah, a button on his shirt! I sewed on 2 white buttons.
Well, now my Scops Owl is completely ready!

We can safely put him and my son to bed!”
With such an Angel-Splyushka, your sleep will be sound and calm, interesting and exciting. And in the morning, the interpretation of the dreams that the Sleeping Angel gave will bring only joyful and positive emotions.
Sweet dreams!
P.S. I remind you that partial or full use of blog master class materials is possible only after agreement with the author. Thanks for understanding!
Why don't you be the first to know about everything? Subscribe to blog updates right now!
A very popular variation of the Tilda doll is Tilda the sleeping angel or Scops Owl. This adorable yawning doll will be a great decoration for your bedroom.
You will need:
- flax for the doll's body;
- soft fabric with a small pattern for an outfit;
- white fabric for wings;
- filler;
- flezilin;
- hair for a tilde doll or threads that can replace them;
- bell.

Making the doll's body.

Unlike the ones we published earlier, the body of the sleeping angel is sewn entirely from linen. Fold the flax in half and place the patterns on it as shown in Figure 1.
Sew the parts of the body, right and left arms, and legs in pairs. Then fill the resulting parts with filler. Carefully sew the arms and legs to the body as shown in Figure 2.
Eyes can be made in two ways: French knot or beads. Paint your cheeks and sew in your hair.
The body of the Tilda sleeping angel doll is ready.
Making a dress.

From the fabric for the dress, cut out the front, back, two sleeves and collar. Sew the front and back along the shoulder seams. The seams need to be smoothed out. Then sew on the sleeves as shown in Figure 3. Then fold the dress in half along the shoulder seams, inside out, and sew the sides (Figure 4). The bottom of the dress can be glued with a special adhesive tape or quilted with a finishing stitch (Fig. 5). Sew the collar as shown in Figure 6. The dress is ready. Put it on the doll.
Details.

Cap cut from the same fabric as the dress. Sew the side seams, turn the bottom inward. Sew on the bell. Carefully attach the cap to the doll's head.
Wings turn the doll into an angel. They can be made in two ways.
Method 1. Glue the fabric with non-woven fabric. Cut out two wing pieces and sew them together. Turn the seams inside out and straighten them out. Sew the wings along the contour with a finishing stitch.
Method 2. Cut out two parts of the wings, sew and turn them inside out. Lightly stuff the wings with stuffing. Quilt the feathers.
Sew the finished wings to the doll. You can insert a string between the doll and the wings to hang the doll.
Pad. The pillow can be cut from any fabric. Sew the parts, turn them inside out and stuff them with filling. The pillow can be decorated with embroidery or lace at your request. Attach the pad between the doll's body and arm. Attach the doll's second hand near the mouth.
See also our photo master class on, I think you have seen for yourself that it is not at all difficult to create a Tilda sleeping angel with your own hands.

Tilda Splyushka with her own hands.