What thread is better to crochet a bag. Crochet knitted bags - diagrams, descriptions and photos of knitted bags
Knitted openwork bags are an accessory that will always look spectacular and will never go out of style. We offer you a small selection of knitted bags with diagrams and descriptions. A crochet bag will help complement your stylish look and create a unique and expressive accent.
This collection presents the most interesting and beautiful models of bags, their knitting patterns - everything so that you can realize your thirst for creativity.
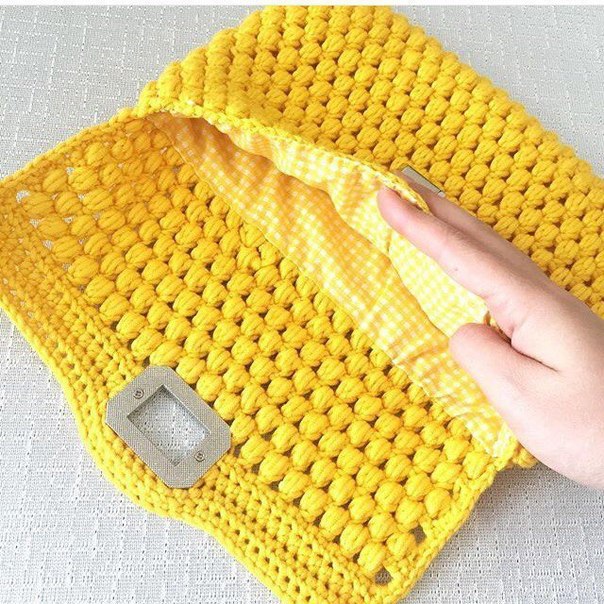
Charming clutch bag made of knitted yarn knits easily and quickly. The clasp can be made hidden on a magnet.


Knitted zip clutch
The clutch can be used as a cosmetic bag or as a wallet.


Knitting a clutch from threads of two colors crochet

This beautiful clutch is crocheted of two colors of yarn. For knitting a clutch, we used yarn of two colors that blend well with each other: emerald green and beige. The clutch is fastened with one small button-button, which is decorated with tassels. The clutch is knitted in one piece. The clutch is knitted with a dense pattern that holds its shape well. The strap for the clutch is made of wooden beads strung on a strong thread. You can find a knitting pattern for a clutch later in the article.


Spacious bag with bamboo handles


Bright and beautiful bag for young fashionistas


Openwork crochet bag
Such an openwork bag is suitable for an evening or cocktail dress.

Knitted roomy bag for every day

Bag made of square motifs

The colorful bag is crocheted from square motifs. For knitting this bag, the remnants of yarn of different colors were used. For this bag, you will need to knit only three large square motifs. The size of each motif is 42 by 42 centimeters. The bag is crocheted No. 3. Tie a wide strap for this bag to add comfort when carrying it on your shoulder. This hippie style bag is great for summer weather. This bag goes well with denim.


Original summer bag size 25x25 cm. Crocheted

Crochet bag pattern


Fashionable braided bag from UGG with knitting needles

A bright bag is knitted from motives, the brighter the yarn, the more positive you will get a handbag.


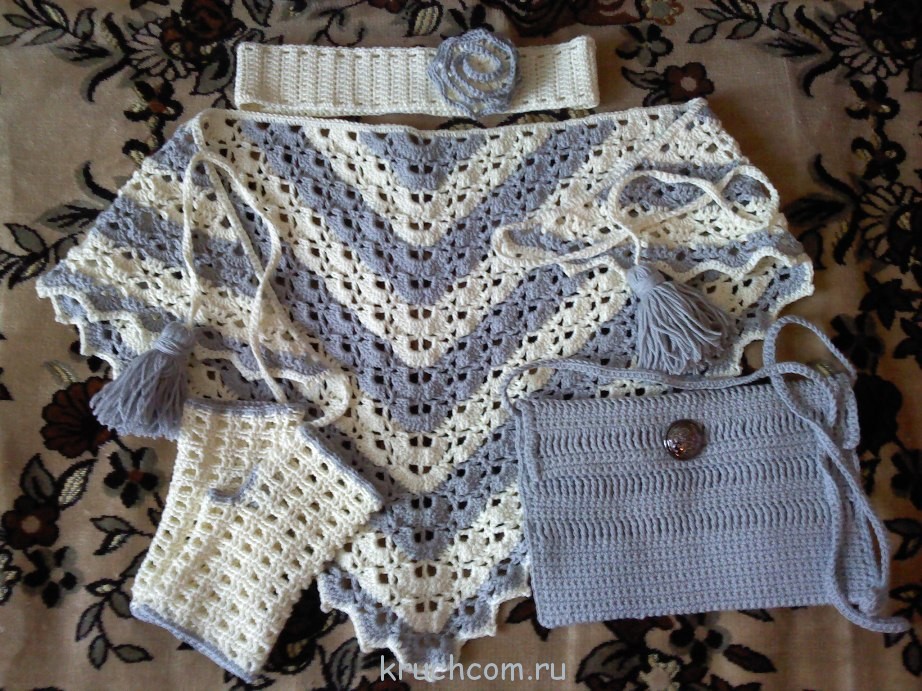
Competitive work No. 52 - Spring set: bactus, mitts, headbands and a handbag (Shcherbakova Ksenia)
Hello! My name is Xenia. I learned to crochet at a craft lesson at school. Since then, I have not parted with the crochet. I can't imagine life without my favorite hobby 🙂 I knit for myself, my relatives, friends, and I take orders.

This bag will be a great storage place for toys or balls. And maybe you come up with your own version of how to use it to good use.
Finished product dimensions: height - 38 (48) cm, width at the top -132 (140) cm.
You will need: Novita Tuubi yarn (50% cotton (scrap), 50% acrylic, 500 m / 150 g) - 2000 (2200) g gray, hook No. 10.
Knitting density: 5.5 st b / n \u003d 10 cm.

Do you like this oversized shopping bag? it is crocheted and decorated with a pattern of cones. Stylish and easy.
The size: 41 x 41 cm
You will need: 450 g light green Paradiso Lana Grossa yarn (100% cotton, 65 m / 50 g); hook No. 4,5,1 pair of handles.
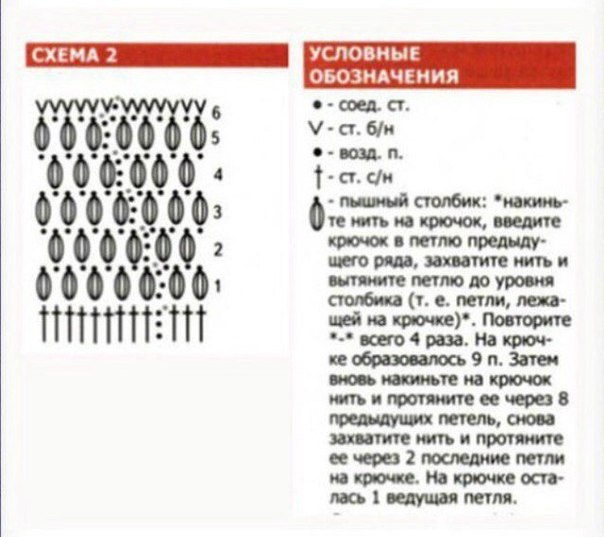
Single crochet: each round, row start with 1 air. lifting instead of the 1st tbsp. b / n, finish 1 connection. Art. in the air lifting point.
A knitted mesh bag is a real gift for everyone who is fond of handmade fashion. Knitting such an accessory is a pleasure.
A touch of 70s vibes and a lot of positive vibes: bright crocheted shorts and a matching bag are made for summer.
Shorts size: 36 (38/40)
To knit shorts you will need: 100 g of beige and 50 g of turquoise, green, purple, red and gray Elastico yarn (96% cotton, 4% polyester, 160 m / 50 g), hook No. 3.5
Bag dimensions: 32*32 cm
To knit a bag you will need: 50 g each of beige, turquoise, green, purple, red and gray Elastico yarn (96% cotton, 4% polyester, 160 m / 50 g), hook No. 3.5

A trip to the store with such a bag will bring real pleasure, it is roomy, bright, soft and, of course, exclusive. This can only be in a single copy, and therefore priceless.
Knitted bag size: 53*36 cm

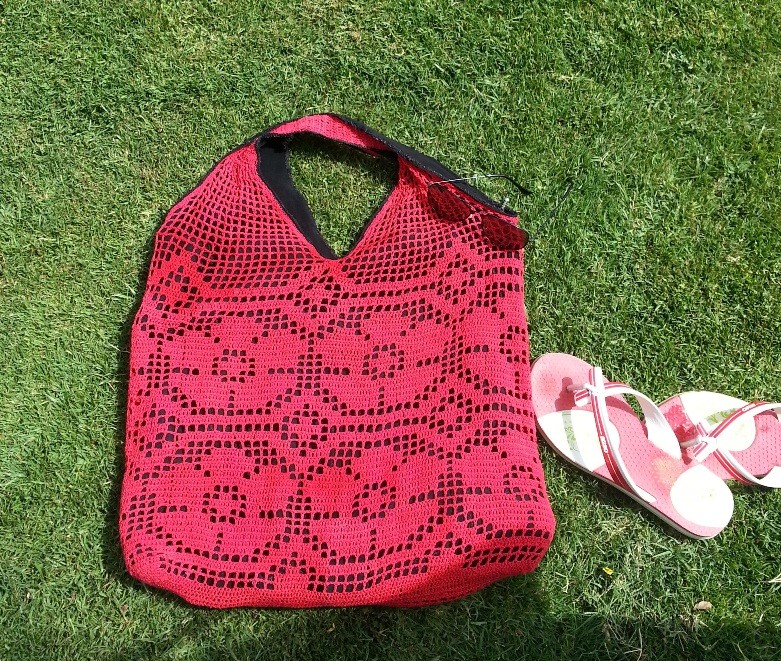
Competition entry No. 34 – Beach bag “Memories of summer”
My name is Anna Verbovaya.
I live in Ukraine, in the beautiful old city of Kyiv. I like to create and implement various interesting ideas - clothes, accessories, bags, napkins, tablecloths, bedspreads, blankets, toys and souvenirs.
I've been knitting for as long as I can remember. For me Knitting is not just a hobby, it is something more. Knitting is a way of life.

Competition work No. 31 - Knitted bag in broomstick technique
Hello! My name is Anastasia Selenina. I am 18 years old and I have been knitting for about 2 years. I am studying biology at the University of St. Petersburg. Often in lectures, while I'm listening and taking notes, I have time to knit. I really love crocheting!


Competition work No. 26 - Knitted bag - bunny
Hello, my name is Polina Vasilchenko. For my daughter Nastya, I decided to knit just such a bag - a bunny.
Knitted bag - bunny.
Materials:
Yarn Medium Weight Yam (1 skein -198 g / 333 m) white - 1 skein, a little pink yarn. Hook No. 6 or number required to obtain a sample of the desired density. Filler, 2 black round buttons 16 mm in size - for the eyes, 1 button no larger than 12 mm Sewing needle and thread. Yarn needle. Tape - 1m. (I knitted: Semenovskaya yarn (Chelsea) - 50 gr (100m) - 2.5 skeins, hook No. 5)

Creator of wonderful knitted toys.
We will need!
* Hook number 3 or 3.5
* the threads are quite thick, green
*scissors
* Needle and thread of the right color
* a pair of eyes (optional, can be replaced with buttons)

abbreviations:
c.p. - Air loop
Art. b / n - single crochet
Body:
The body consists of two parts, one upper, the other lower.
To start, we knit a circle from the center:
ch 2 , in the second loop from the hook 8 st.b / n
1 row: 2 st.b / n in each st (= 16 st.)
2 row: in every second st, 2 tbsp. b / n (= 24st.)
3rd row: in every third st, 2 tbsp. b / n (= 32st.)
4 row: in every fourth st. 2 tbsp. b / n (= 40st.)
Check if the diameter of the circle matches the width of the cell phone,
since this circle will be the bottom in our case, and if it is small for your phone, then the phone simply will not fit there.
If the diameter of the circle is not large enough, you will have to knit a few more circular rows, adding st.
13 circular rows, knit st. b / n in each st. previous row.
It turned out to be a glass.


We knit the second part in the same way as the first, but instead of 13 rows we knit only 11 rows.
Be sure to check if the phone enters completely into the “body”.
Eyes:
2 row: in every second st, 2 tbsp. b / n (= 18 st.)
3rd row: in every third st. 2 tbsp. b / n (= 24 st.)
4 row: in every fourth st. 2 tbsp each, b / n. (= 30 Art.)
5-6 rows: art. b / n (without additions)
knit the second eye in the same way.

Legs:
Ch 2, 6 sts, b / n in the second loop from the hook
1 row: 2 st.b / n in each st. (= 12th century)
2-3 rows: art. b / n without additions
4th row: every second st. do not knit.
The resulting ball is filled with synthetic wool (from an old pillow), or if this is not possible, then an unnecessary sock can be cut into small pieces and stuffed with it.
We finish the leg: we knit a chain of 8-10 ch.
Tie all legs in the same way.

We made it:
Two-part body, 4 legs, 2 eyes.
We sew the body so that the longer part is at the bottom, we sew it in the middle at the back, in front we leave a hole into which the phone will be inserted, for the frog it will be a mouth.
We sew the eyes on the top of the head, and the legs are one on the upper part of the body, the other on the bottom.
For a rope: we collect a chain from v.p. of a suitable size (approximately 120-150 vp) and tie it with st. b/n.
We sew the rope to the crown, between the eyes.
The frog is ready, glue the eyes, embroider the nostrils, and make out his face.
Treat yourself and your KIDS.


A bag is an essential attribute of a woman's wardrobe. However, the choice of accessory largely depends on the style of clothing, the chosen color scheme and the aesthetic preferences of the woman herself. Unfortunately, most of the models offered by modern manufacturers are not original and cheap.
In this case, knitting can be a real salvation. In the article, we will look at a few simple master classes, thanks to which we will learn how to crochet a beautiful bag without much difficulty.
Benefits of knitted handbags
Despite the apparent complexity of the knitting process, you can assemble the original thing in just one day. At the same time, even novice craftswomen may not be limited to the choice of very simple models. Often, knitting a bag does not involve a large amount of work, so finishing a semi-finished product can be done in just one to two hours.
Knitting patterns are always very easy to read, even if they are presented in a foreign language. The designation system for various types of loops, even in Japanese, even in English magazines, is the same.
Therefore, even novice needlewomen will be able to easily understand how to assemble this or that model of a handbag.
A simple master class
How can I quickly crochet a bag for beginner needlewomen? In this master class, we will look at one of the easiest assembly methods with a detailed description of the process, thanks to which even beginners will submit to the art of crocheting.
But before starting the process, it is worth finding out how certain types of loops in knitting are designated:
- in. n. - similarly designate an air loop;
- Art. b./n. - a single crochet.
How to crochet a bag?
This will require the following materials:
- 200 g of light-colored yarn;
- lining fabric;
- decorative ring;
- hooks No. 4 and No. 7.
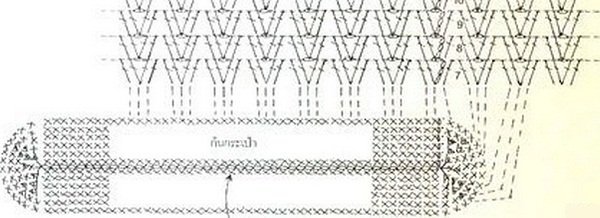
Conventionally, the whole process can be divided into four stages: assembly of the side parts, handles and decorative tape.
A detailed description will allow you to understand most of the intricacies of the knitting process, so that all subsequent work will be much easier for you:
- Side assembly:
- with a smaller crochet, dial 40 in. p. and at a height of about 12-13 cm, finish knitting;
- then in the transverse direction, assemble a chain of 45 in. n., while knitting should be Art. b./n.;
- having knitted one row, continue the second with the same laugh, but with yarn of a different color;
- row by row, alternate the color of the threads and finish knitting at a height of 60 cm.
- Assembling the decorative tape:
- it is desirable to collect the tape from beige or light gray yarn;
- to start, dial a chain of 10 c. p., then continue knitting st. b./n.;
- Part connection:

- the first step is to connect the edges of the upper parts;
- after that, a leather insert is sewn to the bottom of the product (if desired, it can be knitted according to the principle described above);
- then a decorative ribbon is sewn onto the semi-finished product, into which a decorative ring is inserted;
- at the final stage, a lining is sewn into the bag.
How to crochet bag handles in this case? To do this, they simply knit a cord of dark yarn, while its length can vary from 40 to 60 cm. In the photo, the length of the handle is 50 cm.
Master class on assembling "string bag"
The proposed knitting pattern will allow you to assemble an original string bag from the remnants of yarn. The more multi-colored threads there are, the more interesting the product will turn out. This version is just perfect for beginners, because the scheme itself is not replete with complex patterns and finishes. Despite this, you can literally assemble an original and practical thing in just 3-4 hours.
What is required to assemble a household string bag?
- Approximately 200-250 g of multi-colored yarn;
- Hook No. 2 for assembling the main parts;
- Hook No. 2.5 for knitting handles;
- Main scheme.
Master class on assembling a bag-shell
The proposed schemes and a description of how to quickly crochet a shell bag are very simple, so any novice craftswoman will cope with the task. The product itself is assembled according to the fat bag method, while the handles can be made either from decorative chains or from beads, as shown in the photo.
If the product is assembled in a more compact size, the bag can easily turn into an exquisite clutch that will suit a romantic outfit. If you assemble a product of large sizes, you will get a practical and roomy beach bag.
By and large, this option is almost universal and for its assembly you will need:
- 150-200 g of blue yarn;
- Hook No. 2 for assembling a bag;
- Hook No. 2.5 for knitting lilies;
- Scheme.
Beautiful bag of colorful squares
How to tie a multi-colored and original bag?
This master class will allow you to “attach” the remains of multi-colored yarn, which is a pity to throw away, but it is not enough to assemble the whole product. But since this bag is knitted from separate colorful squares, you will be able to make a non-standard, but very stylish accessory.
So, for knitting we need:

- 70 g each of pink, orange, green and mustard yarn;
- 40 g each of beige, red, purple, purple and yellow yarn;
- hook No. 4 and No. 5;
- leather ribbons for pens;
- beads for finishing handles.
Knitting process:
- According to the scheme, tie 26 multi-colored squares;
- Tie each of the elements with 2 circular rows of the same color;
- The third and fourth row can be tied with yarn of a different shade or color (optional);
- To prevent the squares from blooming, make one row around the perimeter from st. b./n.;
- To assemble the bottom of the "composite" bags, it is better to knit the loops with a double thread.
Crocheting is not only a hobby for retired grandmothers, it is a skill and even an art that is becoming more and more popular. Crocheting is not only practical, but also creative, and it's also a great way to do something useful on cold and rainy days while sitting in front of the TV. In this article, you will find instructions on how to create a simple bag using only basic crochet techniques. This scheme can be easily modified to make a bag of any size and style.
Steps
Simple clutch bag
- For this work, you just need to know how to knit an air loop (conventionally denoted “ch” or “ch”) and a single crochet (“st.b / n” or “sbn”).
-
Decide which bag you want to knit. This scheme can be modified to make a small clutch bag, tablet or laptop case.
- If you plan on carrying a specific item in your new bag, measure it ahead of time (like your laptop) or measure your bag to the right size and style so you already have an idea of the basic dimensions and shape.
-
Pick up yarn. If this is one of your first crochet pieces, you'll be better off with plain twisted cotton or soft acrylic yarn. It is also better for you to take a plain yarn in order to easily count the columns and immediately see the quality of their execution.
Pick up a hook. Choose a crochet hook. Almost all yarn makers will list on the label what size hook is appropriate for that particular yarn, so for now it will be easier for you to stick to these recommendations.
- The general rule in this case is: the larger the hook, the thicker the yarn should be.
- If you want to complete the product faster, pick up a large hook and thick yarn. In this case, the columns are larger, therefore, you will gain rows faster.
-
Tie a test piece. As in any other business, it will not be superfluous to make a sample of the final product. You may be itching to start knitting your bag, but spending a little time knitting a small square (about 10x10 cm) will save you time later on.
- By knitting a test sample, you will measure the density of knitting (how loose or dense the columns are) and find out how many columns fit in a centimeter of knitting.
-
Cast on a chain of air loops, which will be equal in length to the width of the bottom and top of your bag. Since this is a beginner piece, you will be knitting a rectangle or square (the bottom and top of your bag will be the same width, and the sides will be the same height).
- More complex works can be of various shapes - for example, in the form of an isosceles trapezoid, in which the upper part gradually narrows. To make a bag of this shape, you will need to learn how to reduce the number of columns in the rows.
- For a small or medium bag, a chain of 30-60 air loops should be enough for you.
- Be sure to remember how many air loops you knitted in this initial chain. It will be easier to write down this number, and if your chain is quite long, insert markers every 10-20 loops so as not to lose count.
-
Turn the knitting over and knit a row of single crochets (1 sc in each ch of the initial chain). Once you cast on the initial chain of stitches, its length will determine the width of your future bag, so in order to start a new row, you need to knit in the opposite direction, and not continue this chain. You will need to turn the knitting every time you get to the end of the row.
Continue picking up rows until the knitting is the same height as your bag. Now that you've gotten your hands on single crochet and turning, just keep doing the same steps until the bag reaches your desired height.
- You will need to fold the top of the bag in half (the top edge will fold down like a pocket flap). Keep this in mind while knitting and do not make the product too short.
- If you want the bag to be 30 cm high (when the lapel is down), and the lapel is about 16 cm, then you need to tie the product with a height of 76 cm.
-
Fasten off the yarn. Once your piece reaches the desired height, you will need to cut the yarn and fasten off. To do this if you crochet is quite simple.
-
Fold the knitted fabric into the bag and sew the edges. Fold the bottom of the canvas so that you get an envelope.
- Check if you have folded the product wrong side out: if you like how one side of the knitted fabric looks, fold the product so that this side becomes the right side.
- Take a thread of a suitable color (the same yarn with which you knitted the fabric is best, unless you like the look of stitches in a contrasting color, of course) and sew the sides of the bag together. Stop at the height at which you would like to wrap the free lapel.
tote bag
-
Repeat steps 1-5 of the previous section. Instead of a simple clutch, you can try making a tote (or a bag). Since in this case you will need to knit two separate canvases and then sew them together, the bag will be more spacious, so it will be suitable for shopping or will be a good purse.
- The first steps when making a tote bag are the same as when knitting a clutch. You must be able to confidently knit the basic stitches and loops, choose your yarn and hook carefully, and decide how the final product should look. Once you've mastered these steps, you're ready to start knitting your new bag!
-
Decide if your bag needs a flap closure. You will knit two canvases and sew them together. If you don't want a flap at the top of the bag, the two canvases will be exactly the same. If you want to make such a lapel, the canvas, which will become the back of the bag, will need to be made higher.
- For example, if you want a bag that is 30 cm high with a lapel, one canvas should be longer - knitting it 45 cm high, as a result, you will get a 15 cm lapel.
-
Dial a chain of air loops. Carefully counting the loops, pick up a chain of air loops until its length is equal to the width of the top and bottom of your future bag. You will knit either a rectangle or a square, it all depends on the desired shape of your bag.
- If your chain is quite long, insert markers every 10-20 sts so you don't lose count.
Repeat crochet basics. This bag will be a good job for beginners. If you have not read how to crochet, be sure to read the article.


