How to make paper wedding rings. How to make a paper ring durable? Videos master class
Paper rings are the best way to showcase your creativity, handicraft skills and support for the anti-pollution movement. Rings like these are sure to be the talk of the day when you show them off to others for the first time. Finally, their plus is that such rings do not look like a third-grader's craft at a labor lesson, even despite the relative simplicity of execution.
To you will be required:
- Paper (newspapers, unwanted books, magazines, old notebooks or A4 paper used for printing - whatever; and even if you don’t like the pictures or the inscriptions on the paper, then you can cover the ring completely with the right color, and the paper will basically not be visible );
- Glue that dries to a translucent finish (but white school/stationery glue will work as well)
- Fine-grained sandpaper (we will smooth the surface of the ring with it);
- Cylindrical solid part slightly smaller in diameter than your finger;
- Regular scissors or nail scissors (optional);
- Ornamental or clerical knife;
- A small neat brush for applying glue;
- Pencil;
- Clear or colored nail polish or furniture polish.

1. Design your ring. Anyone, as long as it is comfortable for the fingers. Start by tracing the inside of the ring that you or the recipient of the newspaper ring is wearing. Or measure your finger with a soft sewing centimeter or a strip of paper. This contour does not have to match exactly, because later you will sand it anyway.

3. Next, already draw the front design of the ring. The more details, the more interesting, but they will also mean more work exponentially, so the best option is unique, creative and interesting, but simple designs.
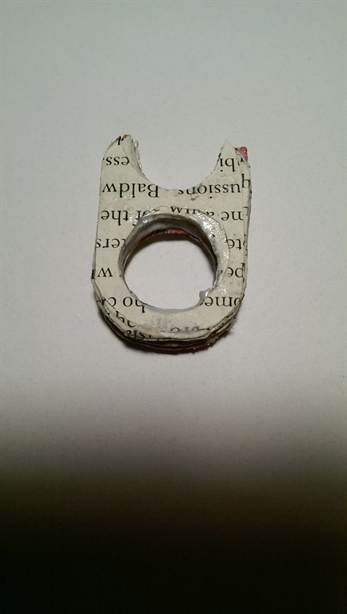
4. The design is completely ready - cut it out of paper with scissors or a clerical knife on a cutting board. If with scissors, remember that you cannot cut the ring from any side: inside the round part you will only have to cut it from the puncture in the center. This will be a template for a large number of the same details.

5. The next step will take you a lot of time and patience, but put in a little optimism and you will have a ring like no one else has. It is necessary to circle the template many times on paper folded three times - the details must be even, so do not cut out more than 3 layers in a stack at a time - and then cut out the details. If you are lucky, you will be able to find on sale a special ornamental hole punch with a hole diameter equal to the diameter of your or someone else's finger - this will greatly simplify the work. Continue until you get a ring of the desired thickness/height.


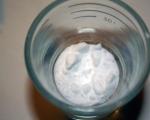
6. We glue. We evenly apply a little glue to each part: really quite a bit so that it does not drain from the sides; besides, the glue, most likely, will soak several layers of details in a row, so carefully clean the brush after dipping it in glue. As evenly as possible, we glue a stack of one part to another. At the end, you will have a stack of wet adhesive paper on your hands, so try not to move it. Let the glue dry for 24 hours. It will be tempting to get on with the work as soon as possible, but complete drying is essential to the strength of the ring. Also, do not put paper in the microwave, on a radiator or oven: this is not only dangerous for appliances, but the paper may burn (or turn brown) or harmful substances from the glue begin to evaporate into the air in the room.


7. Ideally exactly, for sure, it will not be possible to cut out the details or glue them. Therefore, in order to make the ring look better, and so that it doesn’t cut / rub you anywhere, we use a fine-grained skin. From all sides and edges of the ring.

8. Now we cover the finished ring with transparent or colored (translucent or opaque) nail polish or furniture polish. But do not apply varnish to the inside of the ring and the edges around it, as the composition will stick due to friction and heat even after drying. Ready!


IMPORTANT: remember that ink for newspapers, magazines and books probably contains harmful substances. To avoid these substances entering the body through the skin, you can initially make the ring a little wider, and paste over its inside with a thick cloth or white paper in a couple of layers, for example.


Once upon a time, rings were used not only as decorations. They determined the status of the owner, and also performed the function of a seal or signature. The tsars of the Russian Empire, who wore them on all fingers, experienced a special weakness for rings. Today on store shelves you can find rings of various shapes made of precious and non-precious materials, and both girls and guys like this jewelry. Original jewelry attracts special attention, because it looks stylish and gives a certain zest to the image. In this article, you will learn how to make homemade craft rings from improvised materials.
To make a paper ring, you will need:
- an old book or magazine;
- PVA glue;
- scissors;
- stationery knife;
- fine sandpaper;
- clear nail polish
- brush;
- compass;
- ruler;
- pencil.
1. On plain paper, draw a sketch of the future ring. Pre-measure the width of your finger and draw a circle of the appropriate diameter. You can circle your ring. Do not draw too complex a sketch, start with simple elements.

2. Tear an old book or magazine into separate pages. Attach the ring template and circle. You will need a lot of such elements, so you can fill in a few pages, and then start cutting.
3. Cut out the figure around the perimeter with scissors, and the round part with a clerical knife.
4. The thickness of the ring depends on the number of cut elements.
5. Now the blanks need to be glued together. Lubricate the surface with PVA and apply the next template on top. Apply evenly so that there are no shifts or creases.

6. Press down the paper ring with a press. The finished product should dry naturally. Do not keep it near an oven or other heat sources as the ring may become deformed or discolored.

8. Coat the surface of the jewelry with clear varnish to protect it from moisture.
If desired paper ring can be repainted in a different color. Your jewelry is ready, after the varnish has dried, you can wear it yourself, or present it to someone close to you. The advantage of a paper ring is that it does not emit toxic substances, so it can be made even for a child.
Once upon a time, rings were used not only as decorations. They determined the status of the owner, and also performed the function of a seal or signature. The tsars of the Russian Empire, who wore them on all fingers, experienced a special weakness for rings. Today on store shelves you can find rings of various shapes made of precious and non-precious materials, and both girls and guys like this jewelry. Original jewelry attracts special attention, because it looks stylish and gives a certain zest to the image. In this article, you will learn how to make homemade crafts-rings from improvised materials with your own hands.
To make a paper ring, you will need:
- an old book or magazine;
- PVA glue;
- scissors;
- stationery knife;
- fine sandpaper;
- clear nail polish
- brush;
- compass;
- ruler;
- pencil.
Unusual rings with your own hands, master class:
1. On plain paper, draw a sketch of the future ring. Pre-measure the width of your finger and draw a circle of the appropriate diameter. You can circle your ring. Do not draw too complex a sketch, start with simple elements.
2. Tear an old book or magazine into separate pages. Attach the ring template and circle. You will need a lot of such elements, so you can fill in a few pages, and then start cutting.
3. Cut out the figure around the perimeter with scissors, and the round part with a clerical knife.
4. The thickness of the ring depends on the number of cut elements.
5. Now the blanks need to be glued together. Lubricate the surface with PVA and apply the next template on top. Apply evenly so that there are no shifts or creases.

6. Press down the paper ring with a press. The finished product should dry naturally. Do not keep it near an oven or other heat sources as the ring may become deformed or discolored.
7. After the product has dried, sand it with sandpaper.

8. Coat the surface of the jewelry with clear varnish to protect it from moisture.
Watch the video: do-it-yourself origami paper ring
If desired, the paper ring can be repainted in a different color. Your jewelry is ready, after the varnish has dried, you can wear it yourself, or present it as a creative gift to someone close to you. The advantage of a paper ring is that it does not emit toxic substances, so it can be made even for a child.
Jewelry rings and bijouterie no longer surprise anyone. However, for creative people, making unusual stylish jewelry is not difficult. This article describes several ideas on how to make rings with your own hands of an unusual shape.
Stylish decorations
We are not talking about those rings that are made by folding sheets of paper using the origami technique. These rings are more suitable for children. But for girls and women who are distinguished by creativity and a sense of style, “literary” rings will become wonderful decorations. Not only do they look great, but they are also water resistant. Any shape and color can be made.

The founder was the Briton, who made the first ring on a paper wedding anniversary. The ring turned out to be so attractive that it gained immense popularity all over the world. For lovers of reading, such rings will become not only a beautiful decoration, but also a symbol of love for books. Rings are created by cutting blanks from old books, gluing sheets and varnishing. If desired, you can draw a picture.
Such paper rings can be made not only from books, but also from a stack of multi-colored magazines, brochures, printed pages of documents, old notebooks. By the way, after graduation, you can make yourself a gift from the notes and make a ring that will become a “trophy” and will always remind you of this time. It can even become a talisman for the successful completion of the business that is being started.
From a book that made a special impression and changed the worldview, you can also make a ring. It will always remind you of what you have read. Everyone puts their own meaning in such paper decorations.
book ring
Let's make a fashionable ring from a book with our own hands. A master class with step-by-step photos and a description of the manufacturing process will help to make it.


Trace the ring on paper with a pencil and come up with the design of the future ring.

Cut out the drawn template.

We put the sheets in piles of three. Trace the template and cut it out. This process is long, but it is necessary to make the ring even. Sharpen the tool you are going to cut with.

To make the product more interesting, or if you do not plan to paint it, cut out several elements from colored paper.

Now in turn, one by one, you need to glue all the elements together. Glue should be applied quite a bit, the layer should be even and thin.
After gluing all the elements, put a not very heavy oppression on top so that the ring is tight. This must be done very carefully so that this stack of elements does not warp. Let the glue dry. It will take a long time to dry, at least a day. Once again, do not touch it, so as not to spoil it.

After complete drying, we clean the bumps and grind the edges of the ring from all sides.

There is very little left. From above we cover the product with varnish. In the middle of the varnish is not needed.

We wait until the varnish dries, and the ring can be worn.

To prevent harmful substances from printing ink from entering, several thin strips of white paper can be glued inside.

You can come up with your own design or color the proposed ring options in an interesting way.


Fancy shapes and colors
Another most suitable material for the realization of unusual ideas is polymer clay. The material is plastic, it is easy to mold any detail from it. The coloring is great too. And even if there was no suitable clay color, you can always mix plastic of different shades and get the desired result.


Beautiful original plastic rings do not have to be complicated. Sometimes it is enough to decorate a simple laconic detail with an interesting element, and the product turns into a masterpiece.
Let's learn how to make an unusual plastic ring using step-by-step photos describing how to make it. Even a beginner can do it.

To create a ring, you will need green polymer clay, wire, a rolling pin and a clerical knife.
We roll out a strip of polymer clay of such a width as the finished ring will be. We form a ring of the desired size. Wrap wire around it. You can do without wire, but in order for the ring to be stronger, it is better to strengthen it after all.
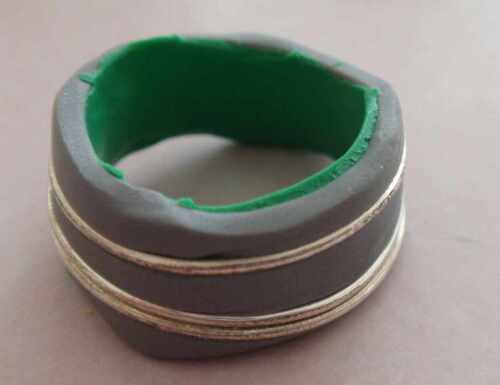
From above we wrap the base with another strip of clay.

We smooth out all the bumps.

Now roll out a thin strip and cut off equal small pieces. Then roll each piece into a ball.

We attach each ball in random order on top of the ring. We press a hole in the ball with a stick, a ballpoint pen or a toothpick so that it enters the base of the ring a little, but not through and through. Thanks to this technique, the balls will take on a fancy look and attach well. We make the surface without a ball textured. To do this, you can “walk” on it with a toothbrush or dip it in sugar and press it a little.
If you use sugar, then after baking, you will need to thoroughly soak the ring in water so that the sugar crystals dissolve.

If you want, you can gently apply pearlescent eye shadow with a brush, this will give a slight shimmer to the ring. Or use other dry decorating sparkles.
Then the ring should cool down. Then we cover the product with varnish for polymer clay. In such a simple way, we have created an interesting ring.

This idea can be improved and supplemented. For example, in the middle of the ring, attach a large stone, and put the balls around it. You can make balls of two different colors and lay them out in a checkerboard pattern. There can be a lot of options. Fantasize, come up with interesting decorations and be original and stylish.

Any thing made with your own hands is unique and inimitable. It will become a special value for those people to whom it will be presented. Preserving the warmth of the heart, a homemade souvenir is stored for a long time and carefully. We suggest you make a paper ring with your own hands as a gift for your daughter, younger sister or niece.
How to make a paper ring - materials
So, for work you will need:
- roll from paper towels or toilet paper;
- colored paper;
- stationery glue;
- scissors;
- clothespins.
How to make a paper ring - master class
To make a paper ring, follow these steps:
Remove the clothespin when the glue is completely dry. So, you have learned how to make a paper ring according to the first option.

According to the second option, how to make a paper ring, it is necessary to cut many identical blanks from an old newspaper or book with a hole for a finger in the middle.

Then, applying a thin layer of glue to each blank, we glue all the layers until a ring of the desired width is obtained.

After that, we grind the craft on the sides with sandpaper. At the end of the work, the upper and lower parts of the ring, as well as the sides, are covered with a thin layer of decoupage glue. To dry, it is better to put the ring on a pencil.