Children's carnival costumes from improvised materials. DIY carnival costumes
Nadezhda Avisova
Master class project. Making costumes from scrap materials Part 1.
Project participants: a pupil of GBOU secondary school No. 1159 of Moscow Volodina Ksenia, 6 years old; Xenia's mother - Olga Aleksandrovna Volodina; educator Makukhina Anna Alekseevna, senior methodologist Avisova Nadezhda Petrovna.
Target: creation of new products from previously used waste material and waste.
Tasks: - to teach preschool children the ability to find and use
any junk material, any waste to create new things (clothes and accessories).
Problem: need production from any improvised funds and junk suit material to participate in the creative competition "Best Designer suit"in the nomination" Fashionistas and fashionistas - our kids, their costumes are very good!"
Relevance. Nowadays, the accumulation of various household waste is a big problem, most of which are plastics and synthetic materials that are not subject to biological destruction processes and are for a long time (for centuries) in the environment. Therefore, their new use is very important for the state of the environment, in general - for humanity.
materials:
milk bags, plastic bags, leftover yarn.
Related tools:
scissors, hole punch, crochet hook.
Preliminary conversation with all the children of the group on topic: "Garbage and its second life".
Presenting the main problem to the children and offering to participate in the project with the aim of further participation in the competition.
Selection of participants.
Meeting with parents of children - future participants of the competition. Statement of the main problem in front of parents. Choice materials and development of a work plan.
Process manufacturing of new products.
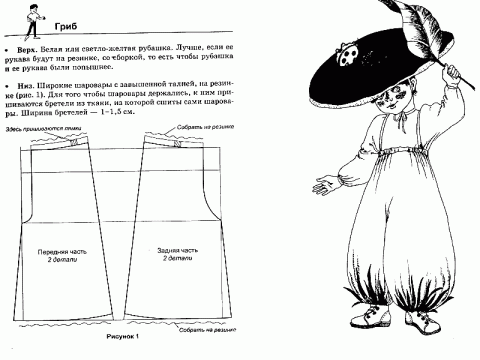
1. Dress with a fringe.
Used materials and equipment:
leftover yarn, plastic bags, hook, scissors.

From the remnants of the yarn, knit the frame-base of the skirt in a circle with a pattern in the form of holes (it is obtained by alternating air loops and single crochets) of the desired volume and length.

Cut the packages into strips of the desired length and along the perimeter of the frame - skirts into each hole and then alternate, thread the strip and tie in a knot to secure.

It turns out a puffy skirt with a fringe of polyethylene stripes.

Dress the belt of the skirt with tying with package strips according to the volume of the waist and then continue knitting in a circle "yarn" from packages.


We knit the top of the sundress.


We form a similarity of a T-shirt-bodice on the straps.
We decorate the top of the bodice with fans, knitting 5-6 loops without a crochet in one loop, and sew on flowers. We connect the straps by connecting them on the back with a flat seam.


Used materials and equipment:
blanks from milk packages,
plastic bags,
crochet hook, scissors, hole punch.
Empty milk bags (from Koshkinskoye milk, previously washed and dried, smooth, cut into two parts of the desired size and then process around the perimeter with a hole punch.

You will get 2 identical parts of blanks with holes.

For the handbag, we needed 3 blanks.


To do this, a plastic bag is taken, smoothed with hands so that there are no wrinkles, the excess is cut off and strips of the desired width are cut, wound into a ball, like ordinary yarn.
Get multi-colored "balls" from plastic bags.

Finishing of the handbag is also carried out from plastic bags.
We decorate as fantasy tells.

The handle for the bag is crocheted the same from plastic bags.
3. Hat.
Used materials and equipment:
plastic bags, crochet hook.
The hat is crocheted from bags according to the volume of the head.

Pre-packages are prepared for work. To do this, they smooth it, cut off the excess and cut it into strips, and then wind it up in the form of threads into a ball.


When the circle is reached
size, the additions stop and fit tightly in a circle, gradually acquiring the shape of a bowler hat.


When the depth reaches the required size, knitting stops and we make out the fields of the hat.
The fields of the hat are arranged as follows.
We knit 2 loops from the base into each loop and then we knit the resulting fields of 2-3 rows without additions, depending on the desired size of the fields, the last row can be tied in a contrasting color and decorated with braid or "ribbon" from a bag in a contrasting color and (or knitted flowers).


Ready costume can be worn and used to participate in the competition, which was done.

On the eve of the New Year holidays, all institutions for children and enterprises hold fun festive events, which, according to a good tradition, are customary to wear carnival costumes. This article will focus on several creative options on how to make an original New Year's costume with your own hands.
Children are looking forward to the magical time of miracles - the New Year. After all, this is a holiday that brings a fairy tale, goodness, new hopes and a bunch of cherished gifts to the lives of all people.
On New Year's holidays, kids really like to transform - dress up in costumes of their favorite fairy-tale heroes and cartoon characters. Parents are always happy to try to help their children in this. They are ready for the night sewing New Year's costumes with your own hands, if only their child would truly enjoy the festive atmosphere that reigns around him.
As original examples of what modern carnival costumes for children, we want to present you with several master classes on making New Year's children's outfits that any parent (even those far from needlework and creativity) can repeat.
Christmas costumes for kids

To make the baby look festive and interesting, it must be dressed up in a costume of a funny little animal or a cute character from a kind children's fairy tale. We present you several options New Year's costumes with patterns that you can make with your own hands for both girls and boys under the age of 1 year.
DIY New Year's bee costume

To create such a charming costume, you need:
- Sew a vest from any material in yellow and black (you can use fleece, fur, satin);
- Buy an ordinary black hat and attach pompom bee antennae to it, or buy ready-made ones (they are very cheap and sold everywhere). If you have a talent for knitting, you can use the pattern for a hat for this costume:


- For children who are not even six months old, you can make a costume in the form of a jumpsuit.

A hat for it is made according to the same pattern, but for sewing a jumpsuit, use a pattern.
DIY New Year's gnome costume

So carnival the costume is suitable for a boy up to a year, and a girl. It will consist of three main parts:
- shirts
- cap
How to make them:
- The cap does not have to be sewn, it can be glued from cardboard. But for the baby, it is still worth choosing a soft material so that the baby is comfortable. Making a cap is very simple - roll a piece of fabric into a cone and sew it with a sewing machine.

- A beard in the form of a triangle can be cut from any fabric (it is better to use felt). Fur is then sewn onto this blank. If you wish, you can sew the beard to the hat so that it does not fall off the baby.
- Make a coat for the dwarf. Any fabric can be used. A child's blouse is suitable as a pattern. Circle its contours on the fabric, cut out the resulting blank and sew the upper part of the little gnome's costume.

DIY Christmas costumes for girls

Every girl on a New Year's party wants to feel like a beautiful princess or Santa Claus's helper. With her costume, the little fashionista wants to personify winter, New Year's holiday and magic. If you have a daughter and you want her to be happy with her outfit at the matinee, we suggest you make one of the simplest, but very beautiful costumes.
DIY Christmas snowflake costume

To make such an airy snowflake costume, you will need:
- White lining
- Medium hard tulle or organza
- Elastic band (its width should be 2 cm, and the length should be 5 cm less than the girl's waist)
- White T-shirt
- hair hoop
- White ballerinas
The process of creating a skirt and an openwork necklace for a future snowflake is very simple:
- For a skirt, we prepare a “flared sun” pattern - we cut out a circle from the lining fabric with a hole in the center for the waist. We tuck the bottom of such a skirt and hem it on a sewing machine.

- We cut out the upper part of the skirt with tulle or organza. We cut out exactly the same blank as for the first part. We make a smaller tulle pattern for a necklace that will be sewn to a T-shirt.
- Now we sew the two parts of the skirt and sew them to the elastic.
- We make a crown for a snowflake: glue artificial fluff or fur on a regular hoop. We also prepare cardboard snowflakes for it. We recommend topping each snowflake with sparkles for beauty.

- We sew white artificial fluff to white ballet flats.
DIY Christmas tree costume
It is quite easy to make a New Year's beauty costume for a girl for a matinee. You will need the following materials:
- Green lining and satin fabric
- Garland that runs on batteries
- Decorative gold ribbon
- hair hoop
- Cotton wool or synthetic winterizer
- Golden shiny fabric for making a star on a hoop

From green fabrics we make blanks that we sew together. How to make these blanks is shown in the picture:


- We draw with soap on the patterns the places where the lights from the garland should be. We cut them and insert thin wires into them that will hold the lights.
- From the wrong side, thread the garlands and turn the dress inside out. It remains only to sew a decorative golden ribbon between the garlands.
- We wrap the hoop with the same ribbon. We attach a star in the center. It is easy to make - you make a pattern for a star, fill it with cotton wool or padding polyester, and then sew it together.
Do-it-yourself New Year's candy costume for a girl
New Year for many children is associated with sweets and tangerines. That is why, more than ever, for a carnival evening or a matinee, you can make a candy costume for your child. However, it is important to understand here that just by sewing sweets on a dress, the girl will not look like a candy.
In her appearance in this case, she will hardly differ from the princess in any way. We suggest you make this original outfit:

To make it you will need:
- Pink satin fabric
- Tulle white and green
- Ribbons, beads and other decorative elements
The sewing process will be simple:
- From a piece of pink satin, sew a bag without a bottom and sew different ribbons on it (in our case, the decor was sewn diagonally):

- Sew the same ribbons in the form of straps to a blank of pink satin;
- From each color of tulle, cut two strips. One of them should be wider than the second, since we will sew a skirt and ruffles around the neck from these fabrics;

- All sections of tulle need to be stitched and sewn together on a sewing machine. Then we sew each element (skirt and collar) to the pink satin;
- An important detail in this costume is a hat, which will look like a candy wrapped in a candy wrapper. To do this, you need to cut a rectangular strip from cardboard, glue it according to the volume of the girl's head. Glue decorative paper to the blank. To create the appearance of candy, make a bundle of paper by tying it with a regular ribbon or foil.

Do-it-yourself New Year's costume of an asterisk
Do do-it-yourself New Year's costume for a girl very simple, since you don’t have to cut out and sew anything complicated. For its manufacture we need:
- Any fabric in gold color
- Black dance leotard and leggings (this will be the basis of the costume. Instead of these items of clothing, you can take any elegant dress)
- Colored paper, cardboard and foil

Having prepared all the necessary materials for work, we proceed to the manufacture of an asterisk costume for a girl:
- First, we cut out many stars of different sizes from colored paper and sew them to the bathing suit and leggings with one simple seam using a needle and thread.
- We sew a skirt of golden fabric.
- We make a kokoshnik of a star. To do this, according to the presented scheme, we cut out a star from ordinary cardboard, glue it on both sides with golden paper, insert rays of decorative material between the rays and sew on the ribbons with which we will tie the head.

By the same principle it is possible to make carnival cat costume.
New Year's fairy costume do it yourself
To make the daughter look at the matinee like a real kind sorceress, you will need the following material to make her costume:
- Pink satin and organza
- Braid, zipper and various fasteners
- Thick paper for creating wings

To sew a dress, for the upper part, take any girl's T-shirt as a pattern, and to create a skirt, the instructions that we gave for making a snowflake costume are suitable. To make fairy wings, follow this algorithm of actions:
- Fold a piece of paper in half
- On one half draw the wings.
- Paint the wings and decorate them with sequins, feathers, beads and rhinestones


DIY Christmas costumes for boys
Any boy is a cheerful mischievous, striving to be like his favorite super-hero or fairy-tale character. The choice for creating costumes for boys is very large. We present several options with patterns for you in this article.
DIY New Year's monkey costume

Get any brown fabric, you can with fur, you can without. At matinees, children usually run and jump, so you don’t have to worry that the child will freeze and use a regular satin as a basis. From it you can sew shorts and a vest with a monkey's head. Sew eyes and a mouth out of buttons and felt onto the head. We attach the pattern of these costume details:

Difficulties may arise in the manufacture of the tail of the monkey. To make it, you need to sew it like a normal belt. For a realistic look, thread the wire and synthetic winterizer into it, and then sew it to the shorts. Under the suit, have the boy wear a white T-shirt or turtleneck. It is made according to the same principle. bear carnival costume.
Snowman: do-it-yourself New Year's costume
The snowman is a winter character beloved by children who personifies magic, joy and celebration. Being a snowman at a New Year's party means being the center of attention.

There are several ways to create this costume. The simplest but most interesting snowman costume, in our opinion, is this:
- We sew a large father's white T-shirt to the boy's regular T-shirt so that there are a few simple seams around the waist and on the shoulders. Be sure to leave a space between the T-shirt and the T-shirt, which must be filled with cotton wool or padding polyester, so that the upper half resembles a snow globe.
- We sew the seams at the waist and on the shoulders with a Christmas tree rain, which in itself is voluminous, and therefore will look good.
- We sew a wire to the bottom of the T-shirt, which will add volume to the snowman, and we attach a Christmas tree rain along the seam.
- Now the resulting costume needs to be decorated - sew large black buttons to it.
- From paper, preferably immediately colored, we make a nose. We turn the paper into a cone, attach an elastic band to it.
- A hat for a snowman can be made from a bucket of popcorn. We recommend pasting it with a shiny oracal, and decorating the edges with rain.
Such carnival costume suitable for women n, and for men.
Do-it-yourself New Year's pirate costume

Any boy is a robber at heart, and, most likely, having repeatedly watched the cartoon "Pirates of the Caribbean", which is beloved by everyone, the guys so much want to be at least a little something like the legendary Jack Sparrow. Making a costume for this hero is, of course, difficult. But we found a good and simple option on how to make a pirate outfit for your baby with your own hands:
- Finding a vest and striped leggings is not a problem. If you can’t find such things, then sew black or blue ribbons on an ordinary white T-shirt, and white ribbons on any old black trousers of a child.
- Make an eyepatch - cut a circle out of fabric and sew black bandages onto it. On its front part you can glue a skull and a bone cut out of paper.
- Make a pirate hat. You can see the scheme of its manufacture in the photo below:

- Put on rubber boots on your feet, and put makeup on your face to complete the look.
DIY New Year's Ninja Costume

At first glance, it may seem that a ninja costume is difficult to make, but in fact, everything is very simple:
- Find an old tracksuit (it will be the basis of the carnival outfit. It is desirable that it be black. A black T-shirt and pants will be enough);
- Black nylon stocking (put on the head - you need to cut a hole in it for the eyes);
- Slippers (slates);
- Black fabric (cut off three strips, two of them should be 20 cm wide. We wrap the legs in slates with them. We use the rest of the fabric to make a wide belt for the torso).
Video: How to make a New Year's costume?
Any sniper can easily make several types of shaggy Gilly camouflage. Since the manufacture of Gilly is not particularly difficult, it is desirable to have several options for such camouflage.
- - Full camouflage kit (jacket with pants);
- - Cape-poncho;
- - Hoodie.
The most simple cape to make is the poncho, which is both comfortable and versatile. The most difficult option to manufacture is a complete set consisting of a jacket with pants. Everyone is free to choose a disguise to their liking. However, both in the manufacture of a complete set and in the manufacture of an incomplete set, there are common points.
First you need to select the right materials.
- We start with a grid-painter. The more you have, the better, as part of the mesh will have to be spent on experimentation to find the best color for masking. Usually, a cut of 3-4 meters and a width of one and a half meters is quite enough for the manufacture of a costume and preliminary selection of color. The initial color of the grid does not really matter, but the cell size should be limited to the range of 1-2.5 cm.
- The second material needed is jute thread. To obtain it, it is best to use brown bags, in which potatoes are usually stored. It is not recommended to buy a bobbin of jute thread, as it is much stiffer and thicker than the one you will get from the bag. If we also take into account that the thread will become even stiffer after dyeing and drying, then it will be very difficult to work with it. Therefore, it is better to buy 5-6 bags of jute and dissolve them into threads.
- Finally, paint. When choosing a dye, be sure to look at what fabric it is used for. You should choose those that can dye both cotton and synthetic fabrics. The selection of colors will be discussed below. The color is selected by trial and error. It is recommended to have the following colors:
- - several shades of green;
- - olive;
- - black;
- - soft brown (natural colors of clay, sand, etc.);
- - yellow.
- To stitch the individual parts of the camouflage suit, you will need about a hundred meters of ordinary white nylon thread with a thickness of about 1 mm.
- In addition, you will need 25 meters of a nylon cord having a thickness of 3-5 mm. It will be needed for ties and strengthening (reinforcement) of the suit along the edge.
How to prepare materials:
After all the materials are available, they need to be prepared for use. The main stages are as follows: the bags are unraveled into threads, the mesh is cut, after which the cut parts are sewn together. Then comes the staining in the selected color. All this should be done carefully, since the camouflage of the sniper depends on how well the clothes are made.
Let's say the sniper has already chosen a camouflage suit option: a hoodie. It is a cross between a complete set and a poncho cape.
In order to sew it, you will need the following details:
- - The front part ("face");
- - Back ("back");
- - Hood;
- - Sleeves.

The face and back are cut in the same way.
These are rectangles that are as long as a person's height minus 1.5 - 2 head lengths, and one meter wide. The length of the part is equal to the distance from the ankle to the shoulder.
From the edges, the parts are sewn to 1/3 of the width, so that in the center there is
head hole.

The numbers in the figure indicate:
4 - Neck.

Two sleeves should be made.
These are rectangles measuring 40 X 70 cm. Since such a camouflage robe will have to be worn on a variety of clothes, perhaps even on a padded jacket, allowances should be made to the maximum. Having cut out the sleeves, they are put off until the time they paint.
The hood is sewn, so one square with a side of 20 cm and 3 rectangles measuring 20x40 cm are cut out for it. Then the parts are sewn according to the scheme. The finished hood should be of such a size that it almost completely covers a bucket of 10 liters.
On the image:
Item 1 has a size of 20x20 cm.
Parts 2, 3, 4 are the same, 20x40 cm.
All prepared parts of camouflage clothing are not yet sewn together, this must be done at the very end.
Then you need to prepare the threads. To do this, carefully dissolve the purchased bags. To do this, the seams in each bag are cut off or unraveled, then the bag begins to unravel along the thread. If you work daily for about five hours, then it takes about five days to dissolve one bag. After the bags are unraveled, you should have 5-6 skeins of jute available, one skein from each bag.
Coloring and drying of materials:
After cutting the mesh and dissolving the bags into threads, you can start experimenting with coloring. Here the scope for imagination is unlimited! The main thing to remember is to dye according to the instructions for the dye, it is printed either on the package itself or inside it.
Before you dye everything, take the time to check what color different dyes will give on different types of fabrics. For example, using green dye for synthetics on jute threads, you will get a beautiful dark olive color. And the synthetic nylon thread will receive exactly the color that was declared on the package - green.
Once, as a result of experiments, you have established what and how you will paint, you can begin the main painting. First, divide the skeins into several groups, according to the number of camouflage colors. For example, if the manufacture of a camouflage coat involves the use of four colors, say, light green, olive, brown and the main dark green, then the available seven skeins should be distributed as follows:
2-3 skeins will be dyed dark green, 2 skeins light green, 1-2 skeins brown and 1 skein olive.
If dark green is chosen as the base color, then not only 2-3 skeins of jute are dyed in this color, but also the details of the costume cut from the net, as well as nylon thread and nylon cord. What needs to be dyed in the base color is divided according to the type of material (cotton or synthetics), and dyed one by one. Painted parts are dried for 1-2 days. At this time, paint everything else in other colors.
After painting the details, you should rinse them very well, otherwise, even after a light rain, your camouflage will shed, staining you and your clothes in various shades of green, brown and olive.
Drying of threads should be done in the shade, without direct sunlight. Since natural jute thread has an inexpressive brown-brown color, the same as withered grass, two or three skeins can be left without coloring.

Weave camouflage:
When all the details and materials have dried after painting, you can start weaving camouflage. Since this is not an easy task, you first need to properly prepare the workplace. In order for the upcoming work to be not a burden to you, you will need the following:
- Machine. It provides a convenient approach to cut parts and quick access to materials (cord, jute, nylon thread).
- Comfortable chair. Choose the one that suits you the most.
As a working machine, you can use an old drawing board (if you have one). Install it at an angle, half lowering the mesh from above. The second part of the mesh hangs down at the back. The second version of the machine, on which the manufacture of a camouflage coat will also be quick and convenient, is an installed ironing board. Having laid out the mesh parts on it, you should proceed to the preparation of "lohm". In this case, we call a bundle of 4-5 threads of the same length, folded in half, "lokhma". Since such “lokhmas” are what disguises us, their manufacture should be approached with all responsibility. There are certain points in the manufacture that should be considered.

The length of the threads for camouflage should not be too short and not too long.
Too short "hairs" will lead to the fact that the sniper's camouflage coat will look more like a cactus.
Too long "lokhma" will not only make you look like a bobtail, but they will also cling to everything that comes in your way.
Practice has shown that it is best to cut the threads into pieces 40-55 cm long. When folded in half, such threads will give a bunch of optimal length: 20-27 cm.
Lokhmy of this length will perfectly "blur" your outlines on the ground.

Method of weaving camouflage. Although Gilly's camouflage clothing is weaved in a standard way, there are several peculiarities in the process of weaving. So, with the “chess cage” weaving method, “lokhma” of one (base) color is first prepared and woven like a chessboard into the corners of mentally drawn squares with a side of 9-10 cm. Then threads of the second, third and other colors are woven. The second way will be somewhat different. In this case, "lokhma" of all available colors should be immediately prepared, then they are woven into the grid according to a special pattern.
Like every business, Gilly's camouflage weaving has its tricks. For example, if you are using a fine mesh with a 1 cm cell, do not try to cram hair into each cell - this is not only very difficult, but also impractical. The optimal step for weaving is 2-3 cm.
Weave follows from the bottom up. First, you weave the bottom row, then comb the woven "hairs" down, weave the second row, also comb it down. And so on until the very end. The sleeves should start to weave from the wrist, the hood - from the back of the head, the jacket and legs - from the bottom up (that is, from the legs). Shoulders weaving from the neck.
Thanks to such tricks, the sniper's camouflage coat becomes very shaggy. By shaking your camouflage a few times, you will be sure that the shags will fall the way you need.
A few notes about weaving:
Making a camouflage robe with the first weaving method (chess cage) is faster. By weaving the “lokhma” alternately, you will quickly weave Gilly. The second method can be considered more correct, it gives a uniform distribution of "shags" of various colors over the entire surface. On the other hand, a costume made in the first way gives more color options. By rearranging the “shags” so that a different color appears on top, or simply shaking your goblin suit, you can get the color that best suits the color of the area. The second method of weaving gives greater uniformity of color and greater shaggyness.
Below are the main color options for Gilly's camouflage suit:
Woodland:


leafy green:


What should be paid special attention to:

Gilly sleeves are the fastest and easiest to weave.
They are not sewn before weaving. After finishing work, they are sewn from the inside to the details of the body, in a straight line, acting as an armhole. After everything is sewn together, a general blank is obtained in the form of an irregular cross with a hole in the middle (for the head). The blank is folded in half, so that the edges of the sleeves, back and face coincide on the sides. The edges are sewn together with a dyed and dried nylon thread, from the hand to the thigh, approximately to its middle.

No. 1 - a seam that connects the front and back;
No. 2 - a seam that connects the sleeves to the back and front;
No. 3 - fastening seams.
The most difficult to weave is the hood. Once sewn together, it takes on volume and is difficult to weave on a flat board. For weaving, you should use a simple improvised tool - an ordinary bucket. Putting a hood on it, you can easily weave "lokhma" into the cells of the hood. For convenience, a dyed nylon thread should be passed along the edge of the hood, which will not be a tie, but will only play a handy role. When the hood is braided with “tufts”, it, like the sleeves, is sewn from the inside to the neck (the unsewn part in the middle).

To make sewing more convenient, it is recommended to make a mannequin. We take two bars with a square section of 2x2 cm, make a hanger in the form of a cross. The design should be slightly higher than you (about a head), and have a span of "arms" of one and a half meters. The bars need to be sanded so that the "shags" and all the camouflage do not cling to it. The head should be made of plywood nailed to the top.
After that, the torso with sleeves sewn on the shoulder is thrown over the mannequin, aligned as accurately as possible, and then sewn along the edge (see figure).
In the same way, the hood is pretended and aligned along the edges and in the center, and sewn from the inside out. The main thing to remember when sewing on the hood: the seam is made along the collar, in the direction "front - back", 10-15 cm long. Since the length of the hood along the bottom will be greater than the length of the neck, the hood is partially lowered onto the back, aligned and sewn .
When everything is sewn, we arrange a strict check for our costume. If we find holes (areas without “lohm”), we immediately fill them with threads of the desired color.
That's all, Gilly's camouflage suit is ready.
But that's in theory. In practice, you can do a lot more with it. For example, continuing the side seams to the bottom, make cuts, add ties to the sidewalls and wear the suit like an OZK jumpsuit. In this case Gilly will be worn over the head. You can put a tie down the neck so that the camouflage does not fall off, but in this case you can open the shoes, which will attract attention.
In this way, you can make a Gilly suit of a wide variety of configurations. The most practical is the poncho cape, which is similar in design to a military cape. The only difference is the material: the tarpaulin in Gilly's poncho is replaced with mesh with "tufts" woven into it.
Making such a shaggy poncho does not take much time. For a poncho, you will need a piece of mesh measuring 1.5 m X 2 m, reinforced along the edges and in the middle with a nylon cord. After the tufts are woven, loops are made in the corners from the same nylon cord. This variant of Gilly can be used as both a camouflage cape and a camouflage net. Very good for hunting ambush. In the same spirit, you can make a full camouflage suit.
Things to remember when storing and operating Gilly:
Such camouflage should be stored in a closet, hung on a coat hanger and carefully straightened and smoothed out the "hairs". With proper storage, "shags" do not become "curls", do not cake or curl.
A wet suit (for example, after rain) should be dried well.
And one more thing: in a Gilly costume, they ambush, and do not run through the forest. If you need to move in it, do it carefully and slowly.
If for some reason (lack of experience, time, material) you cannot sew Gilly's camouflage suit for yourself, then you can purchase it from our store.
A little fantasy, a little... unnecessary things and even potential garbage and... the dress is ready!
Think it's impossible? If a person wants to create something unusual and beautiful, nothing can stop him.
Believe in yourself and make a stunning outfit from what you can find on the mezzanine, in the far corner of the closet, or just at hand!
What are improvised materials
Any materials are suitable for the dress, except for heavy and potentially dangerous: Glass bottles and used batteries should not be used.
Black paper outfit will not leave anyone indifferent (photo)
But forgotten fabrics and worn items are perfect:
- any knitwear - T-shirts, T-shirts, nightgowns;
- shawls, scarves, shawls, pareos, tablecloths, curtains and tulle;
- shirts;
- jeans and more.
The rag legacy left by grandmothers and mothers is an unthinkable value, especially considering the fact that the fashion for models and fabrics of those years has returned. again at the peak of popularity.
From vintage fabrics you can create wonderful traditional Russian, which in the new season are shown by leading couturiers around the world.

Eco-design is now at the peak of popularity
Paper and its derivatives plus PVA glue equals an extravaganza of color, taste and style. Look for yourself:
- glossy magazines;
- world and metro maps;
- wallpaper;
- wrapping paper and wrappers;
- landscape and colored paper for crafts;
- cardboard (corrugated, coated, foil);
- banknotes (out of circulation or photocopied, but real ones are also possible) and there will be a dress!

Money can also be used for creative purposes
Not only everyday or exhibition outfits are made using original materials. Many designers have surprised and continue to surprise the public with cakes, medical gloves and even condoms. However, this is definitely not worth going out into the street. For everyday life, it is better to choose another designer.
Natural materials - a storehouse of ideas:
- dry leaves;
- dried flowers;
- cones;
- twigs;
- shells;
- colored stones, etc.

Delicate rose petals - a godsend for the bride

Carnation petals are useful for creating a festive look.
Even small wooden planks can be used both as decor and as an element of a corset or a base for a skirt.
Plastic bags (garbage, for groceries, shoe covers), bottles and caps for them widely used by designers promoting respect for nature.

Evening dress from black bags
Air balloons- a great basis for a festive dress.
Old soft toys- this is not only valuable faux fur, but also a synthetic winterizer that can be used to decorate the volumetric elements of the dress.
All of the above can be used individually or in combination with each other. So the decor with natural materials is perfectly attached to paper or cardboard, and looks even better on them.

Even a kitchen whisk can become a “victim” of fashion.
Under an extravagant outfit and shoes, it is worth choosing a non-trivial one. All about stylish look here.
Why might you need such an original outfit
These toilets are for:
- creative competitions;
- work, if you are a children's animator, you need to advertise something;
- graduation balls;
- themed costume parties;
- amateur theatrical performances, including school and student.

Newspaper masterpiece
Dresses from improvised materials are needed for beauty! To protest against the irrational use of natural resources and demonstrate their creativity.
If it was decided to reanimate old clothes, they can be worn daily. You can even take a chance and sew an outfit for a celebration, for example.
Look for dresses for a special occasion.

Breathe new life into old jeans
Outfit from a piece of fabric (pareo, scarf)
- the fabric starts up the back, passes under the armpits, the ends cross in front, rise up, wrap around the neck, and tie at the back.
- the middle of the piece is placed under the armpit, the ends: tied on the shoulder on the opposite side or twisted on the opposite side of the armpit, lifted to the shoulder and fixed there.
All options can be improved by adding a belt, and fasten the ends with a decorative hairpin.
According to the proposed schemes, it is possible to make a multilayer model using two or three cuts, placing the middle of the pieces opposite each other.

Scheme of a dress from a silk scarf
T-shirt and laser discs
An old T-shirt and a bunch of unwanted laser discs can be turned into a party star costume with a flick of a needle. Necessary tools - awl, scissors, needle and thread.
A hole is made in each disk with an awl heated on gas.
It is desirable that the T-shirt be below the level of the hips. The top is updated. Sleeve options:
- cut along the seam, and sew discs (with two holes) on the shoulders in the manner of shoulder straps;
- cut into strips about 1 cm wide. The ends can be tied in several rows in pairs in a checkerboard pattern, forming a mesh;
- attach a disc in front, side and back;
- go around the edge of the sleeve with spandex thread (stretchy) and pull it off. Get a flashlight.

Great choice for a club
A great idea for the club is from a T-shirt and a skirt made of mother-of-pearl discs.
If the sleeves have been cut, you can do the same with the main part of the T-shirt. The incisions can be lowered from the neckline to the chest line, from the line under the bust to the waist or just below.
It is important to make cuts along the vertical threads. The fabric will be wrapped in tubes that can be left free, you can “weave” discs into them.
Lay out carefully 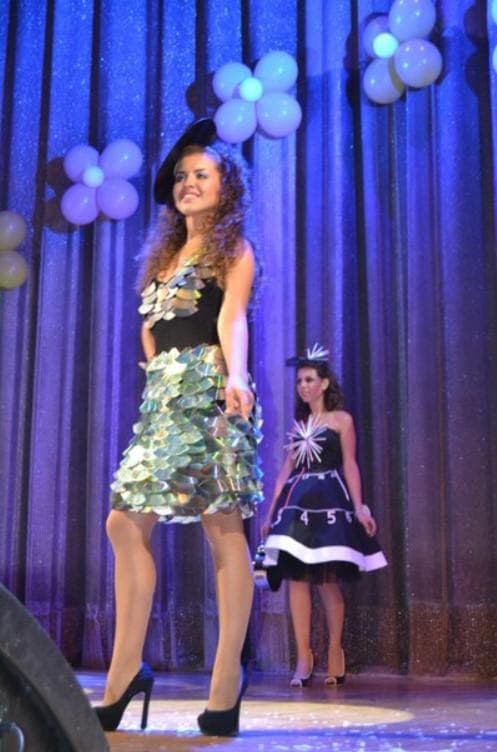 T-shirt and start sewing on the “scales” of the disks, starting from the bottom edge. Try to fasten them symmetrically around the entire circumference of the shirt. The stitching can be slightly changed if the front discs are initially placed slightly higher than the rear.
Sew the second tier so that the upper disk covers the lower one, you can combine the middle of the upper laser with the point of contact of the lower ones. The third and subsequent tiers are sewn in the same way.
As an option - to build on the side or behind. Discs can be assembled on threads or on a separate piece of matter (a scarf, a plastic mesh).
Part of the discs can be covered with pieces of colored garbage bags, you can replace or supplement with circles cut from plastic bottles.
Old gloss in a new look
The toilet for the party is sewn with your own hands on the basis of an old T-shirt, newspaper and glossy sheets (brochures, women's or men's gloss).

Option for creative youth
Tools and materials: sewing machine, zipper along the length of the product to match and the same threads, scissors.
Separate the glossy sheets and sort them by color, 9 sheets each, for black - 3 sheets. Fold each of them into a triangle, bending the corners towards the center along the long side. Bend the edges at the base of the triangle, stepping back 3-4 cm.
Lay out the fabric of the skirt from the triangles:
- collect the first row, sew;
- lay the second one on top so that the upper triangles cover half of the lower ones;
- sew the second row so that the line captures the bottom one;
- Repeat until you get the desired length of the canvas.
The width of the row of triangles should be no less than the circumference of the hips plus 4 cm.

Here are some more models for "newspaper" creativity
Roll the black sheets into a strip, fold it in half and stitch it to the skirt. Got a belt.
Fold three newspaper sheets with an overlap, draw an outline of the top on them (you can make decorative folds) and cut it out. Cut the shirt in the middle of the back, put a newspaper bodice on the front side, which should be stitched to the fabric.
Connect the skirt and bodice. Sew a zipper around the edges.
Air balloons
Mostly long balls, from which figures are made, will go into business. Having typed the bodice, form the skirt. To connect individual elements, use threads, the interlacing of the balls themselves, and adhesive tape.
Use oval balloons for decor, a train or a skirt.
It is not necessary to inflate the balloons to the end. A slightly inflated oval ball can be turned into an original button by pulling the pipette to the knot and fixing it there with another knot. Glue a smaller ball in the center.

Balls are a godsend for daring fashionistas
Garbage bags
Collect a bodice from one or two packages. The skirt can be assembled:
- into a straight skirt, connecting two bags at the side seams. From above, you can attach diamond-shaped flaps, gluing them sequentially according to the scheme of fish scales, starting from the very bottom;
Create as you wish. You can triumphantly appear in it, for example, at a party of young designers.
Fallen leaves
The base is an old T-shirt. The main material is whole dry leaves.
The leaves are attached to the bodice with threads. Decor - wreaths of leaves as straps - one or two.
A similar element can be put on the bottom of the skirt or on the belt. The lower part is recruited from the leaves, starting from the bottom row with an overlap.
The peculiarity of the product is that the leaves dry quickly, wither and become brittle, so you need to make such an outfit on the eve of its show. The optimal storage conditions are a dark, cool room with periodic spraying of the leaves with water.

Autumn leaves
Video
This video will tell you about the variety of dresses from improvised means.
Dare and you will do it! Look at the crafts of other craftsmen, look around and do better. There would be a woman, and she would make an outfit for herself.
Adults, unfortunately, are losing their naive childish faith in miracles and the ability to immerse themselves in a fairy tale or even turn reality into a fairy tale with the power of their own imagination.
Adults - yes, but not children! And if on ordinary days they can still afford to doubt something like that, then the time of the New Year holidays leaves no chance for doubt.
And, by the way, adults are also infected with this universal anticipation of a miracle, especially if they take an active part in preparing for the New Year's children's holidays. And children (especially girls) are waiting not only for gifts and holidays, but also for the New Year's masquerade, when you can try on the outfit of a fairy-tale hero, turn into a princess or a wizard for a while, become a dashing cowboy or an omnipotent Golden Fish. By the way, many images can be brought to life by making children's New Year's costumes with your own hands. Here, for example, what outfits for girls are moms and grandmothers able to make?
Malvina costume
 <<>>
<<>>
If you are good at sewing, you can start sewing Malvina's beautiful fluffy dress, and in addition to it, make pantaloons with lace trim. However, there is a simpler option that will suit even those mothers who do not know how to sew and cut, but want to make a costume with their own hands.
So, the dress. For a Malvina costume, almost any elegant pastel-colored dress is suitable. But it is best if it is blue or pink. An option with knickers for those who do not know how to sew - pajama pants in a suitable color. Just insert the elastic bands at the bottom of the legs and sew a lace or tulle frill along the edge. If you don’t want to mess with panties, then make a puffy skirt for the dress from a cut of organza, tulle or chiffon, which will be white or the same color as the dress, but will cover the legs below the knees. Embroider the dress with ruffles of lace or stripes of the same organza, or nylon ribbons. And, by and large, the main part of the costume, made by hand, is ready.
Hairstyle. If there is an opportunity to buy a ready-made wig with blue hair - great! This means that another problem has been solved. The second option (suitable for a girl with long hair) is to do without a wig, and make a hairstyle from the child’s own hair, winding doll curls. The main accessory of Malvina's hairstyle is a huge butterfly bow, which can also be made with your own hands from satin, nylon, chiffon, organza and attached to the headband. It is desirable to decorate the belt on the dress with the same bow, and place the bow at the back.
Shoes. Any white, pink or blue shoes, as well as Czech shoes that you will turn into Malvina's doll shoes with your own hands, if you simply attach bows made in the image and likeness of what Malvina flaunts on her head to them. That's all. Add white stockings or tights to the costume and make your Malvina the appropriate makeup - blue shadows, rosy cheeks, pink lips. Your Girl with blue hair is ready to go to the masquerade ball.
Golden Fish Costume

Consider that the Golden Fish costume is already ready for you if the girl’s wardrobe has any elegant dress in yellow, orange or even red. And if there is a golden dress, then the fish will turn out just perfect. You will have to do only two things with your own hands: a headdress and a cape (cape). By the way, to heighten the effect, the dress of your Golden Fish can be sheathed along the hem with gold Christmas tinsel, and if the style of the dress allows, then also decorate the bodice and sleeves.
Now the cape. In principle, if you have a golden dress, there is no need for a cape. But if there is such a need, then sew it from any golden fabric. Cape can
make it long (on the floor), and short and fluffy, like a cape. This element of the costume will not require special skills from you, and almost any mother can make it with her own hands.
Headdress. Here you have two options. Firstly, if you go the simple way, then the easiest way is to make a crown out of wire and gold tinsel. First you put the tinsel on the wire, and then bend this wire in the form of a crown.
The second way will be more difficult, but the image with its help will be more recognizable. In this case, you will have to make a cap in the form of a fish out of cardboard or whatman paper with your own hands. To do this, you need to draw two silhouettes (in mirror image) of some cute cartoon fish and paint them with ordinary gouache, depicting eyes, gills, fins, a tail, and, of course, scales. By the way, the fish needs to be drawn in the crown, and its tail can be decorated with a golden Christmas tree rain. Now you need to fold both fish with each other (painted sides out) and glue both parts along the upper contour, making a kind of pioneer (or army) cap out of the fish. You put a cap on a child's head, fasten it with invisible hair and admire the outfit of the Golden Fish, which, by the way, you made with your own hands.
Little Red Riding Hood Costume

Let the idea of this costume seem beaten or even outdated and worn out to you, but your child, believe me, has a completely different opinion. For him, everything in this world is new, and the image of Little Red Riding Hood, which appeared back in the seventeenth century, is just as relevant for your daughter (granddaughter) as it is for you at her age. So, without particularly bothering, try to make a Little Red Riding Hood costume with your own hands.
The main element of the costume is a red cap (panama hat, beret). All other parts of the costume can also be found in your child's wardrobe or rented from relatives or friends. A white blouse is in the wardrobe of any schoolgirl. But not only a blouse is suitable, but also a turtleneck or a long-sleeved T-shirt. Vest of any dark color (blue, black, burgundy, green). Finding this element of the costume for you is also not difficult, like almost any fluffy skirt. By the way, to complete the image, you can sew lace along the hem of the skirt or even sew an underskirt, the edge of which will peek out from under the hem of the top.
The apron is the last important detail that you may have to sew with your own hands. And, of course, a wicker basket will complete the Little Red Riding Hood costume. You can put a bouquet of artificial flowers in the basket or even put cookies and sweets that Little Red Riding Hood can treat her friends to.
Bee costume

A very popular New Year's costume for girls of any age. For both babies and schoolgirls, the basis of the costume will be a short dark-colored dress or trousers with a turtleneck. Your task is to embroider this costume with yellow stripes of fabric. As an option - a yellow skirt and a striped T-shirt. Another option is black trousers and a yellow turtleneck trimmed with black stripes. By the way, fashionable colors in the style of "beeline" can be found on knitted gloves or golfs. If you have these, or you suddenly acquire them on occasion, then they will become
a great addition to the Bee costume. And, by the way, you can knit yellow-black striped leggings or mitts with your own hands in a couple of evenings.
The hardest part is making the wings. To do this, you will need a strong but soft wire, such as aluminum. Fold the wire into a figure-eight and fasten it at the crosshairs and at the ends. Then find a suitable translucent fabric (tulle, nylon, organza or even tulle) and wrap the wire with this fabric. White nylon tights are also suitable for this purpose, in which you need to cut off the legs and cut the upper part of the tights into two parts along the front and back seams. In extreme cases, wings can even be made from thin paper.
The New Year's costume of the Bee is completed by a rim with pom-pom antennae. These headbands are easy to purchase at the store or even make your own by attaching the same wire with pom-poms or large beads at the ends to a regular headband.
Snow Maiden

The outfit of the Snow Maiden, despite the current popularity of Disney characters, will always be relevant, especially among those who are not enthusiastic about secondary roles. In order to make a Snow Maiden outfit, you need to get a blue children's dress, which can be easily turned into a New Year's outfit: we sew snowflakes on it, we trim the bottom of the sleeves and the hem with faux fur or white fabric.
We select a hat in that outfit. To the hat, you can sew a white braid made of cotton wool. If, after all that has been done, you still have white fur, you will get a beautiful muff!
Angel

One of the most touching New Year's reincarnations is the image of an angel. What will we need? Without a doubt, it is worth stocking up on white fabric, sequins, feathers, rain, rhinestones and everything that you could not fit on a Christmas tree.
The basis of the costume is a white airy dress. Wings for our angel can be bought at any market for a symbolic price. If you are ready to create wings with your own hands, then you need to cut them out of cardboard, spread them thickly with glue and sprinkle with feathers.
A halo should be made on the head of a little angel. To do this, you can resort to using a wire wrapped in serpentine or rain. The most suitable hairstyle for an angel, of course, will be charming curls.
Pippi - Longstocking

Does your girl have the opportunity to braid her pigtails? Put on a colored sarafan.
Braid two braids with ribbons of different colors. On one you can build a bow, and on the second an untied bow (but so that the pigtail does not unravel).
On the face very carefully apply large freckles.
You put on long, striped stockings of different colors on your legs, and a toy monkey in your hands.
The image is ready.
Snake costume - a symbol of 2013

The upcoming 2013 is the year of the Snake, so the snake costume will become the most relevant at the New Year's celebrations. We suggest you try to make a snake costume with your own hands.
How to make a snake costume with your own hands - step by step instructions.
(information provided by the site 2mira.rf)
Step 1. We prepare materials. Buy green fabric. For a snake costume, it is better to choose a fabric that stretches - it will fit better on the figure. You will also need: red fabric or felt for the snake's forked tongue, yellow or white fabric, and black oblong buttons (all of which will come in handy for creating the snake's eyes). Oblong snake pupils can be simply embroidered.
Step 2. We carry out basic measurements. We take measurements from the future owner of the snake costume. We need to know: the diameter of the child's head, the height of the head - from the top of the head to the collarbones, as well as the height of the child (based on the height, we can calculate the length of the snake's tail).
Step 3. Getting ready to cut out the suit. Fold the fabric in half.
Step 4. We create a pattern: a hat and a tail. Mark the silhouette of the snake costume on the fabric. In fact, we should get a deep hat with a long tail behind. The window for the face can be cut out immediately, or you can leave this work for later.
Step 5. Shape the suit. We sew the head of the costume along the edge - we get a hat. Trying on a suit. If it sits well, you can sew the edges of the snake tail, and then stuff the resulting pointed “sausage” with synthetic winterizer. The tail of the snake can be left unsewn (then it will lie on the back like a narrow cloak).
Step 6. We finalize the details. After the main work is done, it remains to finalize the details. Cut out the snake's eyes and tongue from fabric or felt (you can also use fleece). It is better to attach them to the costume when it is put on the child. So you can arrange the details in their rightful places: the tongue is above the child's nose, the eyes are above the eyebrows.
Step 7. Decorate the costume. If desired, the snake costume can be decorated with sequins or made of shiny material. You can run a chain of black diamonds along the back (cut the black felt into squares) - this will remind you of snake scales.
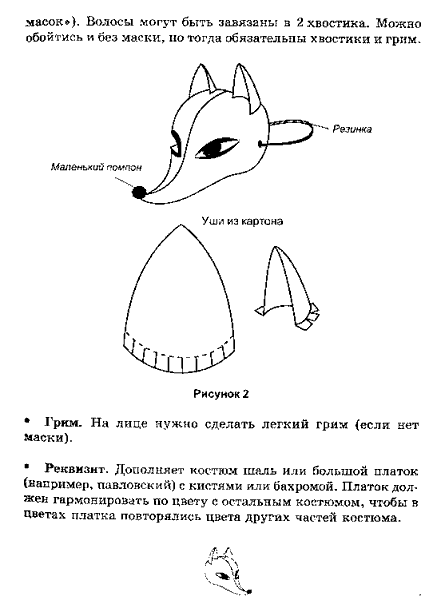
Suit "Fox"


Suit "Snowflake"


Suit "Asterisk"


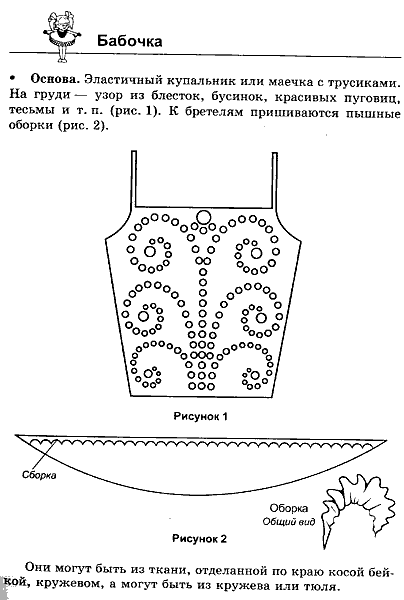
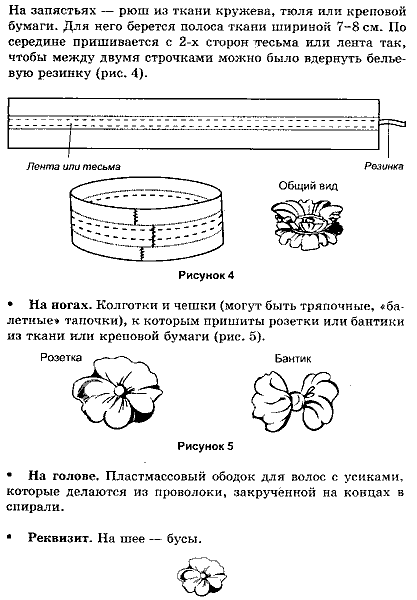
Suit "Butterfly"


cowboy costume

There is nothing easier to make a cowboy costume for your son. This image among boys remains popular to this day.
So, we take a suede fabric and sew a vest out of it (or take a ready-made one). Now on the vest you need to make a fringe. Take a light shirt, preferably even white.
Jeans choose quite well-worn and frayed. We tie a bright scarf. By the way, you can also attach a fringe to jeans.
The easiest way to buy a cowboy hat is in a store or borrow it from friends if you don’t have one. We complement the image with suitable shoes and accessories: lasso, cowboy pistols.
Costume "Indian"


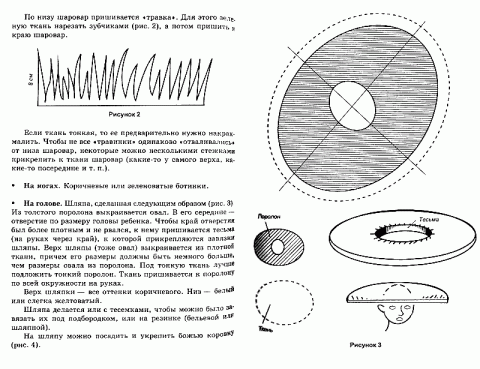
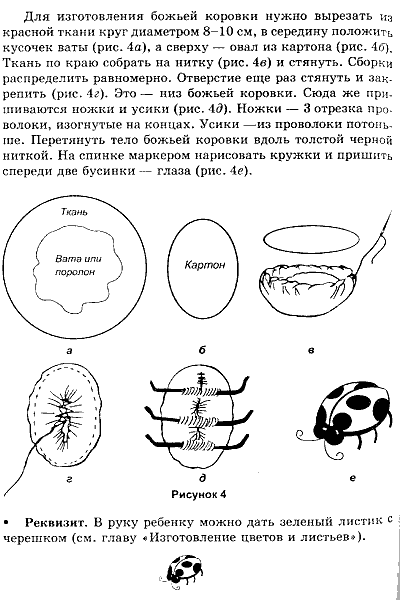
Suit "Mushroom"