Drawn eyes for toys. DIY eyes for toys from various materials: detailed master classes with photos and job descriptions
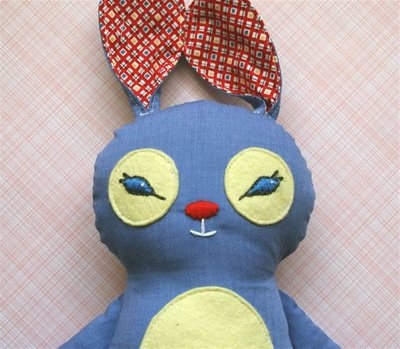
Master class by Oksana Velikanova. I have been asked many times to tell you how I draw such eyes for my stars, and I have prepared a small master class on this topic. I want to warn you - I do not have an art education, I in no way claim that I am doing everything right, but I just want to show how I do it.
So, for our work we need the following:
Cotton or linen fabric,
- stuffing filler,
- cord (ribbon) for suspension;
- acrylic paints for fabric,
- brushes.
Pattern toy asterisk:
1. Fold the fabric in half, right side inward, transfer the asterisk pattern onto it, sew the parts on the sewing machine, not forgetting to leave an unsewn area for eversion.
2. We cut out the part, leaving very small allowances, and in the concave sections we leave the allowances wider and cut them close to the line.
3. We turn the part inside out, fasten the cord for the pendant (I use linen yarn instead of the cord).
4. We stuff our asterisk very tightly, so that it is hard enough to the touch, and sew the hole with a hidden seam.
5. Now the fun begins. With a pencil, draw the contours of the eyes, outline the eyebrows, nose and mouth.
6. I use the most affordable acrylic paints for fabric - Decola. There is simply no other in our city)
7. We paint over the entire protein with white acrylic paint, wait a bit until the paint dries. About the brush - I use a regular #2 squirrel brush in all my work.
8. We mix paints for the cornea - depending on what color you want to make it. For gray-blue eyes, I mixed white, blue and literally a little black paint.
9. We draw the corneas, making sure that they have a round shape, taking into account the areas that are not visible under the eyelids.
10. By adding some black paint to the color we mixed for the cornea, we get a darker shade and apply it to the top of the cornea under the upper eyelids and continue down a little along its edges.
11. Now we draw the pupils, they must also be round. I never use pure black for this, I mix it with a little brown paint. With the same color, draw small shadows under the upper eyelids and continue them down a little along the very edge of the cornea.
12. Now we draw white paint on the brush, draw the brush several times over the paper so that the brush leaves a barely noticeable mark, and draw a light semicircle along the lower part of the cornea. The eyes are transparent. At the same stage, you can paint small rays with a darker paint, using a very thin brush, No. 0-000.
13. Now we apply glare to the eyes - with white paint we put dots on the border of the pupil and the cornea, as in the photo. Here are the eyes and come to life.
14. By mixing white paint with a small amount of black, we get a light gray color, which we need to draw eye shadow on proteins. Then we slightly dilute the brown paint with water, put it on the brush, draw it over the paper several times again so that the brush leaves a soft mark, and mark the edges of the eyes, eyelid folds, eyebrows, lips on the fabric.
15. We begin to tone the face with short strokes. Due to the fact that we diluted the paint with water, the brush is wet and the paint spreads a little over the fabric, the strokes have slightly blurry edges.
16. With a thick, undiluted brown paint, we apply accents to the eyebrows, the fold of the lips, the upper eyelid, along the lash line. We draw eyelashes with a thinner brush, adding a little black paint to the brown.
17. We tint the seams of the toy with a slightly diluted brown paint with short movements perpendicular to the seam, first in one direction, then in the other direction. Closer to the seam, we try to apply more layers of paint, then it will turn out darker.
18. That's all, an asterisk can be hung on a Christmas tree.
Homemade dolls have become increasingly popular in recent years. Many try to master this craft on their own. Of course, the desire to make a beautiful, memorable thing is quite natural. By learning how to make expressive eyes for toys, the novice artist will be close to making his work memorable. After all, it is the eyes in the first place that are the determining factor in the uniqueness of a home-made creation.
Human fantasy knows no bounds, so there are a lot of the most incredible ways to make do-it-yourself eyes for toys. For this, not only different materials are used, but also a large number of dissimilar technologies. Here are just a few of them:

Any of the options requires good preparation and diligence from novice masters. Can't be successful without it
knitted eyes
A lot of dolls are made from soft materials, including knitted ones. For such a toy, crocheting eyes is the best option. The knitting pattern may differ slightly, but most often they do this:

Having mastered the scheme of how to crochet eyes for a toy, you can easily revive any doll made of soft material. To do this, the connected eyes are sewn onto the doll's face and the contours and eyelashes are tied. They can be embroidered with black floss.
In addition to woolen thread, felt or leather eyes are often used for soft toys. Three colors of material are used, where black and white are mandatory. According to the templates, three mugs of different sizes are made. One big one is the color of the eyes. The second is smaller - for the pupil and very small, white - for the glare. For greater reality, artificial cilia are glued.
Buttons are a popular material
 One of the most popular options for making eyes for dolls is ordinary buttons. Since ancient times, people have been using them to bring toys to life. If the problem needs to be solved as quickly as possible, then it is enough to sew on two buttons of the same color and the product will become “sighted”.
Applying additional processing of this material, many achieve excellent results. Eyes made of false flat and spherical buttons turn the toy face into an almost living one. The technology for making such eyes is not very complicated, but it requires perseverance and accuracy. A description of how to make eyes for dolls with your own hands and a master class will help you achieve the best result.
On the forums of needlewomen, you can find a description and master classes on how to make and sew eyes for toys with your own hands from various available materials. We'll cover some easy options.
It is more convenient to crochet eyes for toys with your own hands. This option is best suited for sewn and knitted toys and dolls. Of the advantages of this method, needlewomen note:
Crochet mugs with black cotton thread required size, then tie them with a blue or green thread, imitating the iris. At the final stage, white highlights are embroidered and the eyes are sewn in place. A master class on making knitted eyes can be viewed on YouTube.
Drawn eyes
This option is suitable for dolls made of fabric. For work you will need:
- A template cut out of fabric, which you can print from the Internet.
- Sewing pins.
- Paints for fabrics of different white, black, blue, green, violet colors.
- Markers for fabric.
- Thin brush for drawing.
- A glass of water.
- Napkin for wiping the brush.
 In order not to spoil the doll, it is best to draw the eyes according to the template. Choose the shape and size of the eyes you need and draw them on a piece of white matter. You can draw only one eye, and cut out the second according to its size. Further templates are attached in place and secured with pins. You can try several different location options and settle on the most suitable from your point of view.
At the second stage, the templates are circled with a felt-tip pen, after which they can be removed. Inside the eye, markings are applied that separate the protein, pupil and iris with arcuate lines. After that, the brush is dipped in water, and then in white paint and draw at the bottom eyes concave stripe of white paint. After that, the brush is wiped and the colored paint for the iris is picked up on it. The color can be blue or green. Paint displays a colored arc of the required width.
On the border of white and blue colors, a thin purple stripe is drawn and shaded with light strokes until the paint has had time to be absorbed. The next step is drawing black pupil. Let the paint dry. A few highlights are applied over a dry layer with white paint to “revive” artificial eyes. At the final stage, a felt-tip pen for fabric outlines the contour of the eyes, draw cilia and eyebrows.
Embroidered eyes
 They are also called "rococo eyes". Before starting work, you need to prepare 2 black beads, a needle with a narrow eye, black, white and blue floss threads. Beads are sewn to the location of the eye. around each of them they form a rococo roller, wrapping the thread around the needle up to 15 times (the number of turns depends on the size of the bead and is selected empirically).
Then the contour of the eye and eyelashes is embroidered with a black thread with a stalk stitch. It's easy and doesn't take much time. When eyes are ready, embroider in several places small highlights with white thread. The result is quite realistic eyes that will suit the doll and soft toy.
Eyes made of plastic
This is a somewhat more labor-intensive manufacturing method, but plastic eyes are suitable for any kind of toys and dolls, they look very naturalistic. To make them, you need to prepare:
- a set of colored plastic for needlework;
- acrylic paints;
- colorless nail polish;
- a piece of sandpaper;
- sharp knife with a thin blade.
A master class on making plastic eyes describes the manufacturing process as follows:

The master class is completed by making eyelids from strips of beige knitwear. They need to be made by placing a little padding polyester inside the strips to get volume. The edge of the eyelid can be decorated with false eyelashes, putting them on glue. Eyelashes are glued only on the upper eyelid.
The simplest options
 If the dolls are made for yourself, and not for sale, you can do without master classes, but as material for the eyes use the simplest materials that can be found in every home. Small pieces of colored leather are suitable, from which eyes are cut out of the desired size and shape. On the doll they are glued with high-quality glue.
You can pick up and use two identical buttons. Some craftswomen sew sequins of suitable colors on small toys instead of eyes - blue, emerald, black, blue.
Eyes for toys can also be bought at a special store for needlewomen. The price for them starts from 70–80 rubles per package, which can contain up to 100 products. As a fastener pin is used, screw or adhesive base. As you can see, it is not at all expensive and will not require any effort or time from you. You can order eyes for toys and on the Internet.
For my dolls, most often, I make eyes myself, from any material at hand, be it textiles, plasticine, plastic or even peas. So today we are with you do gypsum eyes .
Let's prepare for work gypsum construction and a plastic blister from under the tablets.
We smear the blister cells with sunflower oil or vaseline with a cotton swab, at the same time we even out the dents on their walls, if any.
Let's prepare a simple device for pouring a solution from a plastic jar of yogurt.
By cutting off the hard part of the upper edge, we get a plastic shape that can be easily squeezed with your fingers.
Immediately dilute the liquid solution in the same container. Pour into a jar, about a third of the water and pour plaster with a slide. Let it absorb moisture a little, and then stir it with a stick to make a mixture similar to sour cream. Do not add more water or gypsum. With this solution, we fill the prepared cells for future eyes.
After pouring, it is necessary to knock on the mold so that the solution can completely fill all the voids in the container. With any stick or piece of cardboard or a plastic ruler, carefully remove the excess solution. And let it dry for about a day.
As a result, we received blanks from gypsum for future eyes. It remains only to paint them
But before we start painting the peephole, let's make one more simple device. On a foam plate, which can be made from ceiling tiles, we stick double-sided tape on one side, then remove the protective film on the other side.
And on the surface of the adhesive tape we glue the blanks of the eye.
We prime the surface of the blanks with thick white acrylic paint two or three times to hide the small shells that have formed in the plaster.
We start painting the peephole with the iris, i.e. the part that is around the pupil. We dilute the color we need and dip one end of the cap from a disposable syringe, suitable for the size of the iris. And then we stamp on blanks. For us, the most important thing is that the contour of the circle is printed well. If somewhere there is a gap, then paint with a brush.
Then paint the inside of the circles with a lighter paint.
We apply small dots-glare to the pupils with white paint.
We cover the eyes with varnish, in my case it is for nails.
We glue the finished eyes into the eye sockets of the doll's face with glue.
So, we have learned make eyes out of plaster which can be applied to both dolls and toys. And we will talk about this in my next posts. And in order not to miss this interesting moment, do not forget to subscribe to the funny news of the site.
I was with you Natalia
How can a non-artist draw eyes on a doll)

Hello,
this is not quite a master class, since I have never been an artist at all))
When I first started sewing pumpkin heads, the main problem for me was to draw the eyes, which, as you know, are the mirror of the soul. I really wanted this mirror to reflect a beautiful soul, so there should be no mistakes here.
I'll show you how I reinvented my wheel) Puppeteers, who are also artists at the same time, always aroused only delight in me. Now they can safely close the page, everyone else is welcome)))
We will need:
- doll head already sewn and stuffed
- paints for fabric of different colors, white and black are required and two more colors at the request of the doll))
- brush
- felt-tip pens for fabric
- good mood
I buy paints for light fabrics and only for white paint I make an exception, it should be for dark fabrics, otherwise the glare will not be visible at all.
So, first we try to draw eyes on paper, if this does not work out, we find the eyes that we like on the network, enlarge them on the monitor to the size we need and redraw them by attaching a sheet of paper to the screen.
Drawn, cut out.

Now we try on the eyes of the doll, we find the position we need, I pin it with needles.

We trace along the contour, I have a magic self-disappearing felt-tip pen, if you are a novice sorceress, you can use a magic simple pencil))

Now we draw a squirrel, I try to draw evenly and accurately along the bottom edge, as it turns out along the top)

now a stripe in the middle of green paint

And now the magic will begin))) On the border of white and green colors, we draw a thin, but such a thick strip of brown.

And now quickly, until the paint has dried, we make frequent small strokes towards the green color, like this

Now we draw the second eye in the same way and are very pleased if it turned out more or less the same.

paint over the pupil with black, draw eyelashes, I drew eyelashes with a specially trained felt-tip pen for fabric, in the photo there is a difference between paint and a felt-tip pen, in nature it is almost invisible.

Now we need to revive the eyes a little, let's make highlights. Here it is important to know, glare, you do NOT need to do it symmetrically, when the light is reflected in our eyes, then these are glare from the same side, why should the doll be different?
I make one larger highlight on the border of black and green and two smaller highlights on the opposite side.

it remains to finish the mouth, freckles and eyebrows, I draw all this with a brown felt-tip pen, the younger brother of a specially trained black one))
I draw black eyebrows only for black-haired beauties.

After the doll is ready, I blush a little and powder my face))
These eyes will turn out if you take blue and blue paint

and lilac with purple

And this is how it will be with light brown and dark.

I will be glad to your comments and remarks, Thank you for your attention))
Today we’ll talk about how you can decorate the eyes of a toy with embroidery, buttons and felt. In addition, below you will find interesting ideas about adding a soft toy, sewn with your own hands, with various accessories.
Click on the photos of the eye design options for toys to enlarge.
Making toys with your own hands is becoming an increasingly popular art. Moreover, all the necessary materials for sewing or knitting are easy to find in ordinary stores. But with such a seemingly trifle as the eyes, difficulties often arise. After all, it is not easy to find something similar to them in the store. In this case, it is useful to learn how to make eyes for toys with your own hands. This will solve the problem perfectly and will not take much time.
We sew beautiful eyes for toys from plastic spoons
For large soft toys and dolls, plastic eyes from spoons are perfect. You can make them very simply and quickly.
To work, you will need two plastic spoons, acrylic paints, double-sided tape and sandpaper.
You will only need the oval scoops of the spoons, so they need to be carefully cut off from the handles. On convex surfaces, you need to lightly walk with sandpaper so that the paint adheres well to them.
We attach the future eyes to the cardboard with double-sided tape and apply white paint. From above we draw the contours of the irises - green (blue or brown) ovals.
Draw black pupils, black outline of the iris. With white paint we apply small strokes-glare. We draw the eyelids in flesh color. The eyes are ready!
How can you crochet your eyes correctly?
Knitted eyes are perfect for knitted toys, but they can also be used for other soft toys.

- Yarn of three colors - white, green and black.
- Hook
- sewing needle
Our master class begins with knitting with black yarn: you need to dial 3 air loops, close them into a ring and knit 9 half columns with nikads from them. Then we attach a green thread and knit in the next row 2 half double crochets in each of the previous row.

Then we knit with white thread according to the following pattern: air loop, 2 single crochet, half double crochet, half double crochet and double crochet, double crochet, double crochet and half double crochet, half double crochet, 2 single crochet, connecting column, fasten and cut a thread of sufficient length to form a highlight on the pupil.
With small lines we embroider highlights on the pupils. The eyes are ready!
We make quick and easy eyes for felt toys with our own hands
Such eyes are perfect for handmade dolls. To work, you will need sheet felt, artificial cilia, glue "moment", scissors, a sheet of cardboard, a pencil.
First you need to draw the eyes. Their shape may be different, depending on the type of toy.
The drawn eyes need to be cut out and tried on on a toy, if necessary, adjust the size or shape. At one of the eyes, we cut out the pupil so that the cardboard patterns become templates. On the outer contour, cut out blanks from white felt. According to a small template - the inner parts of blue or green.
We glue the pieces together. Cut and glue highlights from white felt. The contours need to be circled with a thin black felt-tip pen. Glue on the eyelashes. The eyes for the dolls are ready!
Made of plastic and epoxy resin.Black blanks of pupils with white glare dots need to be molded from plastic and baked.

We dilute the epoxy resin according to the instructions in the package. To give the eyes a beautiful shade, add a little ink from the gel rod to the solution, you can take any suitable color.
Then we take empty blisters from under the tablets. We put the pupils in the recesses and fill them with epoxy. It is very convenient to do this with a syringe. A toothpick will help move the pupil slightly. It is necessary that there are no bubbles in the resin.
Leave the eyes to dry for about a day. Cut out the cells from under the tablets so as not to capture anything extra.

Eyelashes can be done upon request. Ready-made ones can be found in stores, or you can make them yourself using fishing line, thread, yarn, etc.
Create black eyes from yarn and glue for dolls
This is another easy and straightforward way to make eyes for a toy from improvised materials. Yarn is needed in two colors - black and a color suitable for the iris (green, blue, brown, etc.). It will take quite a bit. Therefore, you can take any leftover threads from knitting or ask someone who knits.
You need to choose a transparent glue "moment". We lay out the main yarn in the form of a circle, on top - a small black circle. We squeeze the glue onto the yarn with a drop of a suitable size and let it dry. Excess yarn must be cut with scissors.

In addition, the eyes can be made from suitable round or oval buttons. You can paint the buttons with acrylic paints. Instead of buttons, you can also take beads.
On some toys, fabric or leather eyes will look good, which can be made like felt eyes in the master class above.
Video on the topic of the article
For those who want to analyze the topic in more detail and draw new interesting ideas, we have prepared a selection of video master classes:


