Graphic dictations for the older group of kindergarten. Graphic dictations in the classroom in kindergarten: how to teach a child not to be afraid of a school notebook
Convenient and versatile training of the mind of children. The usual training goes as follows: an adult tells how to draw on a sheet in a box, and children implement it by translating words into lines.
There are many drawings on the Internet - simple and more complicated - drawn at right angles, along straight lines. Orientation is simple: know “right-left”, “up-down”, and count more precisely.
Types of graphic dictations
- small fence
- Items
- Items with complex steps
It is useful to teach three types of graphic dictation. Be sure to accompany the words with a show. Sit side by side so that the drawing is not upside down for the child.
small fence
The pattern pattern is repeated in the line.
Everyone knows too. But I would like to draw your attention to the fact that here it is useful to introduce the concept of a step. Drawing in straight lines at an angle of 90, we tell the children:
- Now we will walk through the cells. The cage has four corners. Drawing a line from one corner to another corner, we take one step. We step up, down, right or left, where I say. If I say: two cells up, then you draw a line from a corner to another corner, and from that to a third corner. So you take two steps.
It turns out the well-known pattern of repeating elements. At the initial stage, the child needs to be helped, prompted, asking: to the right is where, up is where. When you have confidence in drawing a graphic dictation by cells, complicate your life.
- Suggest: you now dictate how to draw further. This complication works well when working in a group. There is additional interest and awareness of what to do in the next moment (beginning of forecasting).
- When a couple of elements are drawn under dictation, we suggest: continue on your own to the end of the line.
The second complication is diagnostic. It is clearly visible whether the child pays attention to the already drawn sample, how many mistakes he makes, whether he sees them and corrects them. It is very good when children see mistakes and try to correct them: self-control has appeared - the most important quality for a future student.
Items
I won’t even describe it - everyone knows it. The Internet is filled with examples. A closed loop is drawn. I will note one useful complication for symmetrical drawings: we draw half from dictation, and we finish the second mirror of the first, like a Christmas tree in the picture. Suitable robot, butterfly and others. The main thing is that they are symmetrical. The perception of symmetry in modern children is not up to par. Symmetric circuits will be useful for elementary school students in grades 1-4 in mathematics lessons. For variety.
Complex graphic dictations
The guys in the preparatory group quickly master simple graphic dictations and do not mind complicating the drawings themselves. Therefore, we move on to more complex options with oblique lines (not 90 degrees, more or less). A complex graphic dictation is not for every high school student. It is all the more valuable when the preparers cope with them.
Items with complex steps
 How to draw a line from dictation where you want to connect the corners obliquely, diagonally? It's actually not that easy. This work is akin to orientation in a coordinate system, already this is very useful.
We need a difficult step. Suppose you want to draw a line from point A to point B.
In the first case, instructions
We put point A. From it we make a difficult step: 2 cells up, 2 cells to the right. We put the second point. Connect the start and end points with a straight line. The necessary line "obliquely" turned out. We call it that because when does the word "diagonal" appear at school? It is even easier when the connected points are inside the same cell (option 2 on the sample)
The third version of the instruction.
We take a difficult step: 4 cells up, 2 cells to the left.
From experience, working out complex steps with future schoolchildren is more useful individually, especially if the child confuses right / left. At first, for many children, dictation with complex steps is difficult. It is necessary to advance slowly, gradually, so as not to turn them away from such a useful thing for schooling.
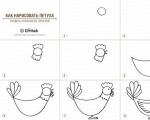
Examples of complex graphic dictation
Here are three options for graphic dictations with a complex step: a crocodile, a dog, a chicken with a description of the dictation. Similarly, drawing on the cells of any other drawing is performed.
Going to school is an important moment in the life of a child and his parents. The better the child will be prepared for school psychologically, emotionally and intellectually, the more confident he will feel, the easier it will be for him to adapt to the period in elementary school. Graphic dictations for preschoolers help parents and teachers systematically prepare the child for school and prevent such typical learning difficulties as underdevelopment of spelling vigilance, restlessness and absent-mindedness. Regular classes with these graphic dictations develop the child's voluntary attention, spatial imagination, fine motor skills of the fingers, coordination of movements, and perseverance. Drawing by cells is a very exciting and useful activity for children. This is a playful way to develop a baby's spatial imagination, fine motor skills of fingers, coordination of movements, perseverance. Graphic dictations can be successfully used for children from 5 to 10 years old. Performing the tasks proposed in the tasks below - graphic dictations, the child will broaden his horizons, increase his vocabulary, learn to navigate in a notebook, and get acquainted with different ways of depicting objects. How to work with these graphic dictations: In each dictation, tasks are given for children 5-7 years old. Graphic dictation can be performed in two versions: 1. The child is offered a sample of a geometric pattern and asked to repeat exactly the same pattern in a notebook in a cage. 2. An adult dictates a sequence of actions indicating the number of cells and their directions (left, right, up, down), the child performs the work by ear, and then compares his image of an ornament or figure with a sample in the manual using the overlay method. Graphic dictations are supplemented with riddles, tongue twisters, tongue twisters and finger gymnastics. In the course of the lesson, the child develops correct, clear and competent speech, develops fine motor skills of the hands, learns to highlight the distinctive features of objects, replenishes his vocabulary. Tasks are selected according to the principle "from simple to complex". If you begin to study these graphic dictations with your child, complete the tasks with him in order: start with the very first simple dictations and gradually move on to more complex ones. For classes, you need a checkered notebook, a simple pencil and an eraser so that the child can always correct the wrong line. For children 5-6 years old, it is better to use a large-sized notebook (0.8 mm) so as not to overstrain their eyesight. Starting with graphic dictation No. 40, all drawings are designed for an ordinary school notebook (they will not fit in a notebook in a large cage). The tasks use the following notation: the number of cells to be counted is indicated by a number, and the direction is indicated by an arrow. For example, entry: should read: 1 cell to the right, 3 cells up, 2 cells to the left, 4 cells down, 1 cell to the right. During classes, the mood of the child and the friendly attitude of the adult are very important. Remember that classes for a child are not an exam, but a game. Help the baby, make sure that he does not make mistakes. The result of the work should always satisfy the child, so that he wants to draw in cells again and again. Your task is to help the child in a playful way to master the skills necessary for a good study. So never scold him. If something does not work out for him, just explain how to do it right. Praise your baby more often, and never compare with anyone. The duration of one lesson with graphic dictations should not exceed 10-15 minutes for children of 5 years old, 15-20 minutes for children of 5-6 years old and 20-25 minutes for children of 6-7 years old. But if the child is carried away, do not stop him and interrupt the lesson. Pay attention to the landing of the child during the dictation, how he holds the pencil. Show your child how to hold a pencil between the knuckles of the index, thumb, and middle fingers. If the child does not count well, help him count the cells in the notebook. Before each lesson, be sure to talk with your child about the fact that there are different directions and sides. Show him where is the right, where is the left, where is the top, where is the bottom. Pay attention to the baby that each person has a right and left side. Explain that the hand he eats, paints, and writes with is his right hand, and the other hand is his left. For left-handers, on the contrary, left-handers must be explained that there are people for whom the working hand is right, and there are people for whom the working hand is left. After that, you can open the notebook and teach the child to navigate on a sheet of paper. Show the child where the notebook has the left edge, where is the right, where is the top, where is the bottom. It can be explained that earlier at school there were slanted desks, so the upper edge of the notebook was called the top, and the bottom edge was called the bottom. Explain to the baby that if you say "to the right", then you need to lead the pencil "there" (to the right). And if you say “to the left”, then you need to lead the pencil “there” (to the left) and so on. Show your child how to count the cells. You yourself will also need a pencil and an eraser in order to mark the lines you read. Dictations are quite voluminous, and so as not to get confused, put dots with a pencil in front of the lines you are reading. This will help you not get lost. After the dictation, you can erase all the points. Each lesson includes a graphic dictation, a discussion of images, tongue twisters, tongue twisters, riddles and finger gymnastics. Each stage of the lesson carries a semantic load. Classes with a child can be built in a different sequence. You can first do finger gymnastics, read tongue twisters and tongue twisters, and then do a graphic dictation. On the contrary, you can first do a graphic dictation, then tongue twisters and finger gymnastics. Riddles are best guessed at the end of the lesson. When the child draws a picture, talk about the fact that there are objects and there are images of them. Images are different: photographs, drawings, a schematic image. Graphic dictation is a schematic representation of an object. Talk about how each animal has its own distinctive features. A schematic representation shows distinctive features by which we can recognize an animal or object. Ask your child what are the distinguishing features of the animal he has drawn. For example, a hare has long ears and a small tail, an elephant has a long trunk, an ostrich has a long neck, a small head and long legs, and so on. Work with tongue twisters and tongue twisters in different ways: 1. Let the child pick up the ball and, rhythmically tossing and catching it with his hands, say a tongue twister or tongue twister. You can toss and catch the ball for every word or syllable. 2. Let the child say a tongue twister (pure tongue twister), throwing the ball from one hand to the other. 3. You can say a tongue twister by clapping the rhythm with your palms. 4. Offer to say the tongue twister 3 times in a row and not get lost. Do finger exercises together so that the child sees and repeats the movements behind you. And now that you have got acquainted with the basic rules for conducting a graphic dictation, you can begin to study.
It is very difficult to teach a child to navigate on a notebook sheet, while developing handwriting, accuracy and, most importantly, to teach him to write. Repeated and long writing leads to unwillingness to learn, robs the child of all the joy of learning. But in a kindergarten, where there is a lot of time in the classroom and there are no strict requirements for the child and academic performance limits, you can teach children not only to navigate on a notebook sheet and not be afraid of a notebook, but also to hold a pencil and pen correctly, strengthen the small muscles of the hand and develop fine motility.
Graphic dictations, conducted in an interesting, playful way, have the opportunity to contribute to the development of all of the above.
A fragment of a math lesson in grade 3 (school type VIII):
Working with children of senior preschool age in the preparatory group, I applied several techniques and forms of graphic dictations that I developed while working at school and where they brought tangible results and significant support in the development of writing skills, counting, motor skills, etc. My goal was primarily:
- development of fine motor skills of hands;
- development of the concepts of "left / right", "top / bottom";
- strengthening counting skills;
- development of attention;
- development of the imagination;
Along the way, we made observations of the position of the sun in the sky throughout the day, so the children still:
- developed observation;
- expanded knowledge of nature.
Stage 1. Preparatory work. Consolidation of knowledge of the left and right hand
We take a landscape sheet and fold it in half in height, bending the sheet from left to right (the next day - from right to left), equaling the edges. The sheet bent in this way is bent again, but already from top to bottom (then from bottom to top). The result is a rectangle. Let's deploy it. We have a sheet of 4 rectangles. We draw along the folds with a pencil. In the future, we begin to use a ruler for this. We count the rectangles, paying attention to the fact that we have two rectangles on the right and left, and two rectangles on the top and bottom.
Stage 2. Tasks
Draw a circle in the lower right rectangle, a triangle in the lower left, a square in the upper right, and a triangle in the upper left.
Stage 3. Observations of the sun
Where is the sun in the morning? Show. Name (lower left rectangle). Happy? Show. Name (upper left). After sleep? Show. Name (upper right). I'm going for a walk. Show. Name (bottom right).
Stage 4. Complication of tasks
Put a red dot in the middle of the lower left rectangle, a blue dot in the upper right corner of the lower right rectangle. We perform this work in stages: show the lower right rectangle with your finger, now find the upper right corner in it, put a dot there with a blue pencil.
Stage 5. Observations of the sun
We draw the sun at different times of the day, looking out the window. The window is also divided into rectangles.
I note that this work was carried out by me for only 4 months, almost every day, in various forms of complexity. But, nevertheless, 2 weeks after the first lesson, we began to work in squared notebooks. By that time, the children already had the concept of a cage and were a little oriented on a sheet of paper.
We draw the lines "by hand", along the notebook lines according to my samples. I drew samples for everyone. You can use entertaining game moments of preparation: large colored cells, various figures that children circled with pencils of different colors, etc.
Before starting work with a graphic dictation, draw a large visual sample on the board, put a large red dot in each notebook. Start working: 3 cells down, 3 cells to the right - this is an auditory sample, a reference point from which we begin to “dance”, build a figure.
The first graphic dictation.
The figure is a cage. I say: put the tip of the pencil on the red dot. Without lifting the tip of the pencil from the sheet, draw a line to the right 2 cells. Without lifting your pencil, draw a line down 2 cells. Without lifting your pencil, draw a line to the left 2 cells. Without lifting your pencil, draw a line up 2 cells. Connected lines. What did we get? Square. Well done.
Take a red pencil, circle the square along the drawn lines and paint over it.

We performed simple figures every day until the children were no longer afraid of the sheet. I took the material to start work from the manual “Developing hands - to learn and write and draw beautifully”, authors S.E. Gavrina, N.L. Kutyavina, I.G. Toporkova, S.V. Shcherbinin. (Yaroslavl, "Academy of Development", "Academy and K", 2000).

- Do not put a red dot, indicating the start of work.
- Perform not one, but 2-3 figures.
What was the result on the part of the children? Children began to confidently navigate the notebook sheet. They tried to clearly follow my instructions, listened to me carefully. They were very interested to know what would happen as a result of the dictation, what figure.
We have already marked the path of the sun as follows:

And they said this: In the morning the sun is in the lower corner of the lower left rectangle, then it rises to the upper right corner of the upper left rectangle. After lunch, the sun begins to sink down to the middle of the upper right rectangle. Before an evening walk, it descends further down to the lower corner of the lower right rectangle.
The result of such work with a group of preschoolers was that almost all graduate children were not afraid to work in a notebook, they began to understand that it was necessary to work in a notebook not in an arbitrary place on the sheet, they began to confidently hold a pencil and a pen, they did not confuse the right and left sides, they learned note the weather. They also improved their attention and began to develop their imagination, they became interested in studying at school.
Graphic dictations
(Drawing by cells)
Going to school is an important moment in the life of a child and his parents. The better the child will be prepared for school psychologically, emotionally and intellectually, the more confident he will feel, the easier it will be for him to adapt to the period in elementary school.
Graphic dictations or drawing by cells for preschoolers well help parents and teachers to systematically prepare the child for school and prevent such typical learning difficulties as underdevelopment of spelling vigilance, restlessness and absent-mindedness. Regular classes with these graphic dictations develop the child's voluntary attention, spatial imagination, fine motor skills of the fingers, coordination of movements, and perseverance.
Drawing by cells is a very exciting and useful activity for children. This is a playful way to develop a baby's spatial imagination, fine motor skills of fingers, coordination of movements, perseverance. Graphic dictations can be successfully used for children from 5 to 10 years old.
Performing the tasks proposed in the tasks below - graphic dictations, the child will broaden his horizons, increase his vocabulary, learn to navigate in a notebook, and get acquainted with different ways of depicting objects.
How to work with these graphic dictations:
In each dictation, tasks are given for children 5-7 years old.
Graphic dictation can be performed in two versions:
1. The child is offered a sample of a geometric pattern and asked to repeat exactly the same pattern in a squared notebook.
2. An adult dictates a sequence of actions indicating the number of cells and their directions (left, right, up, down), the child performs the work by ear, and then compares his image of an ornament or figure with a sample in the manual using the overlay method.
Graphic dictations are supplemented with riddles, tongue twisters, tongue twisters and finger gymnastics. In the course of the lesson, the child develops correct, clear and competent speech, develops fine motor skills of the hands, learns to highlight the distinctive features of objects, replenishes his vocabulary.
Tasks are selected according to the principle "from simple to complex". If you begin to study these graphic dictations with your child, complete the tasks with him in order: start with the very first simple dictations and gradually move on to more complex ones.
For classes, you need a checkered notebook, a simple pencil and an eraser so that the child can always correct the wrong line. For children 5 - 6 years old, it is better to use a notebook with a large cage (0.8 mm) so as not to strain your eyesight. Starting with graphic dictation No. 40, all drawings are designed for an ordinary school notebook (they will not fit in a notebook in a large cage).
The tasks use the following notation: the number of cells to be counted is indicated by a number, and the direction is indicated by an arrow. For example, the entry:
During classes, the mood of the child and the friendly attitude of the adult are very important. Remember that classes for a child are not an exam, but a game. Help the baby, make sure that he does not make mistakes. The result of the work should always satisfy the child, so that he wants to draw in cells again and again.
Your task is to help the child in a playful way to master the skills necessary for a good study. So never scold him. If something does not work out for him, just explain how to do it right. Praise your baby more often, and never compare with anyone.
The duration of one lesson with graphic dictations should not exceed 10-15 minutes for children of 5 years old, 15-20 minutes for children of 5-6 years old and 20-25 minutes for children of 6-7 years old. But if the child is carried away, do not stop him and interrupt the lesson.
Pay attention to the landing of the child during the dictation, how he holds the pencil. Show your child how to hold a pencil between the knuckles of the index, thumb, and middle fingers. If the child does not count well, help him count the cells in the notebook.
Before each lesson, be sure to talk with your child about the fact that there are different directions and sides. Show him where is the right, where is the left, where is the top, where is the bottom. Pay attention to the baby that each person has a right and left side. Explain that the hand he eats, paints, and writes with is his right hand, and the other hand is his left. For left-handers, on the contrary, left-handers must be explained that there are people for whom the working hand is right, and there are people for whom the working hand is left.
After that, you can open the notebook and teach the child to navigate on a sheet of paper. Show the child where the notebook has the left edge, where is the right, where is the top, where is the bottom. It can be explained that earlier at school there were slanted desks, so the upper edge of the notebook was called the top, and the bottom edge was called the bottom. Explain to the baby that if you say "to the right", then you need to lead the pencil "there" (to the right). And if you say “to the left”, then you need to lead the pencil “there” (to the left) and so on. Show your child how to count the cells.
You yourself will also need a pencil and an eraser in order to mark the lines you read. Dictations are quite voluminous, and so as not to get confused, put dots with a pencil in front of the lines you are reading. This will help you not get lost. After the dictation, you can erase all the points.
Each lesson includes a graphic dictation, a discussion of images, tongue twisters, tongue twisters, riddles and finger gymnastics. Each stage of the lesson carries a semantic load. Classes with a child can be built in a different sequence. You can first do finger gymnastics, read tongue twisters and tongue twisters, and then do a graphic dictation. On the contrary, you can first do a graphic dictation, then tongue twisters and finger gymnastics. Riddles are best guessed at the end of the lesson.
When the child draws a picture, talk about the fact that there are objects and there are images of them. Images are different: photographs, drawings, a schematic image. Graphic dictation is a schematic representation of an object.
Talk about how each animal has its own distinctive features. A schematic representation shows distinctive features by which we can recognize an animal or object. Ask your child what are the distinguishing features of the animal he has drawn. For example, a hare has long ears and a small tail, an elephant has a long trunk, an ostrich has a long neck, a small head and long legs, and so on.
Work with tongue twisters and tongue twisters in different ways:
1. Let the child pick up the ball and, rhythmically tossing and catching it with his hands, say a tongue twister or tongue twister. You can toss and catch the ball for every word or syllable.
2. Let the child say a tongue twister (pure tongue twister), throwing the ball from one hand to the other.
3. You can say a tongue twister by clapping the rhythm with your palms.
4. Offer to say the tongue twister 3 times in a row and not get lost.
Do finger exercises together so that the child sees and repeats the movements behind you.
And now that you have got acquainted with the basic rules for conducting a graphic dictation, you can begin to study.
Each dictation opens in a new window. To print it, right-click on the picture and select "Print".
Greetings, friends! Today we’ll talk about graphic dictations - a very interesting version of developmental activities for older preschool children. Graphic dictations for children of 5-6 years old can captivate boys and girls, giving moms and dads to enjoy the legal ten minutes of peace and quiet, which rarely fall out in a house where small perpetual motion machines, jumpers and whymies live.
In addition to the fact that almost all children really like this pastime, you have to learn from this material:
- what are graphic dictations;
- what are their benefits for the child;
- how to conduct graphic dictations with five-year-olds and older children;
- how to enhance the developmental effect of the lesson.
Graphic dictation: drawing by cells
Everyone understands what a dictation is: this is a type of written work that is used in the learning process to train writing skills, to consolidate and test acquired knowledge.
Graphic dictation involves the creation of drawings in the cells under dictation.
How does this happen:
- The child receives a sheet in a cage with a marked start (bold, well-marked dot).
- An adult slowly commands how many cells and in what direction to draw.
- Step by step, following the commands of an adult, the student creates a graphic image.
Consider the simplest example, so that you can finally understand what's what:

To get this picture, you need to sequentially draw from the starting point:
- 3 cells up;
- 2 cells right down;
- 2 cells right up;
- 2 cells down.
When compiling and performing graphic dictations, it is important to consider simple rules:
- The entire drawing is a solid broken line. Tear off the pen from the paper.
- Do not draw twice on the same line.
Sometimes, to make the lesson more interesting, after creating a picture according to a graphic dictation, the child is invited to refine the image: to finish the elements that give the outline a more complete look:
- swirling hair for little men;
- tails and eyes of animals;
- windows to buildings and vehicles.
The benefits of graphic dictations: to whom, why
Graphic dictations are an effective tool in the program for preparing a preschooler for the first grade. Their benefits for children 5-6 years old are enormous:
- train fine motor skills;
- train spelling vigilance;
- develop mindfulness and perseverance;
- stimulate spatial imagination and thinking;
- teach them to be independent;
- have a positive effect on hearing.
Performing a graphic dictation, the child learns to accurately reproduce the orders given orally. Agree, this is one of the skills that determine the success of education in the modern school system. It is very important to teach the child to listen and hear, correctly understand and correctly reproduce the words of the teacher.
Graphic dictations for preschoolers can be turned into a whole game.
First, a discussion of the task, then directly drawing by cells, then a discussion of the finished drawing, its revision and coloring.
- letters;
- numbers;
- geometric figures;
- animals;
- transport;
- plants.
You can draw very different objects in this way, which means that an additional developing element can be different. You can use graphic dictations to teach your child to read and count, to develop his speech and broaden his horizons.
The first graphic dictation with a child: learn to teach
To make classes according to this technique become one of your child’s favorite developmental elements, learn how to present them correctly. It is worth noting that with the entry of a preschooler into the ranks of elegant first-graders, graphic dictations will not only not lose their relevance, but, on the contrary, they will definitely come in handy. In elementary school, children will have to perform a lot of them, but already without fail and for evaluation. So, moms and dads, go for it: learn to teach your heirs, and then teach them to learn =)
How to conduct a lesson with a preschool child:
- Prepare everything you need: a sheet in a cage, a pencil, an eraser (so that you can correct mistakes that you definitely cannot avoid at first). You can invent tasks for the dictation yourself, or you can buy special workbooks or download and print graphic dictations from the Internet.
- See the assignment for yourself first. When you are sure you understand everything, invite your child to play a new game.
- Make sure that the child sits correctly, with a straight back, correctly picks up a pencil. These moments must be kept under control whenever you conduct developmental activities for your preschooler at home.
- Remind me where the right side is, where the left side is. By the way, this moment can be used to tell the child about the existence of left-handers and right-handers. That both options are normal. That all children, all people are different. In general, work on the socialization of the crumbs - it will never be superfluous.
- Do a simple workout. Show what it means to draw two cells to the right. Let the child repeat after you. Do a few of these.
- Draw several straight lines of different lengths in different directions on a sheet in a cage (indicate the direction with an arrow). Discuss each line: how many cells it took, in what direction it is drawn, where it starts.
Start Small
It is not at all necessary to start graphic dictations with the creation of complex drawings. Moreover, it is not necessary to conduct them in the form of a dictation - i.e. completing assignments from dictation. First, master the technique of drawing by cells, creating pictures according to the model, tracing dotted lines, drawing pictures. Finding assignments is not a problem. You can draw them yourself.
So, draw a simple pattern in a child's notebook with a thin line:

Let him first circle the drawn fragment, and then continue it to the end of the sheet.
Discuss how the pattern was created:
- 1 cell down;
- 1 cell to the right;
- 1 cell up;
- 1 cell to the right...
Now ask to draw a picture in the same way, but take two cells everywhere.
Vary different options for creating a similar pattern. For example, from the starting point, you can start moving not down, but up or to the side.
From the simplest, we smoothly move on to tasks more difficult. For example, use these patterns:


Gradually complicate the tasks by selecting graphic dictations of the appropriate level of complexity.
When the child reaches impressive heights in this lesson, invite him to switch roles: let him create patterns or pictures, and then dictate to you step by step how to repeat his masterpiece. We do not know of a single case when such "shifters" would not cause genuine delight in boys and girls.
Homework
And now we invite you to do a little homework from Eureka with your baby. What picture is hidden behind these commands?
Start at a distance of 1 cell on the left, 6 on top. There must be at least 5 cells down. Draw:
- 1 cell down
- 3 cells to the right
- 1 cell down
- 1 cell to the right
- 2 cells down
- 1 cell to the left
- 1 cell down
- 2 cells to the right
- 1 cell up
- 1 cell to the right
- 1 cell up
- 2 cells to the right
- 1 cell down
- 1 cell to the left
- 1 cell down
- 3 cells to the right
- 2 cells up
- 1 cell to the right
- 4 cells up
- 1 cell to the right
- 2 cells up
- 1 cell to the left
- 1 cell down
- 1 cell to the left
- 1 cell down
- 6 cells to the left
- 3 cells up
- 1 cell to the left
- 1 cell down
- 2 cells to the left
- 3 cells down
- 1 cell to the left
What happened? We are waiting for your answers and feedback in the comments.
Effective development and happy parenthood! See you soon!