How to make Santa Claus under the Christmas tree with your own hands. Master class with step by step photos
New Year is a home and family holiday. Even if it is not soon, you still want to devote time to creating something beautiful and unusual with your own hands. Everyone wants to please their family and friends with interesting gizmos and special ideas. Hand-made Santa Clauses look cute and mischievous: modern and antique, preserved in home chests from the middle of the last century.
Without the protagonist of the New Year holiday, it is impossible to imagine interiors, matinees, streets and shop windows. For any occasion, you can make Santa Claus with your own hands, and this is not always difficult and costly. For crafts you will need:
- improvised material that was gathering dust in the pantry;
- old sweaters and socks found in the closet;
- fabric cuts.
Cotton Santa Claus
An old man with a white beard is the main symbol of the New Year. The pre-holiday interior looks beautiful, where an old wizard settled under the Christmas tree. The child will not have to lie about who exactly put the gift under the Christmas tree and why obedient children receive gifts.
Make a face from salt dough in advance. Master Class:

According to the salt blank, you can make faces using the papier-mâché technique. Wetting small pieces of paper in glue, apply layer by layer. When there are about 4 layers, leave to dry. Now any of the face blanks can be painted:
- draw a mouth;
- eyes, eyebrows;
- cheeks.
Coat the workpiece with clear nail or hair polish.
 Cotton wool must be prepared in advance: paint it in different colors. To do this, use dyes for cotton fabric. Unwind the cotton and put in a saucepan, where the dye has been prepared in advance. Bring the contents to a boil and leave for a few minutes. Wring out and hang to dry. You can use white cotton wool, and then paint the finished toy with paints.
Bend a long piece of wire in half - a loop is formed for the grandfather's head. On both sides, make two loops - these will be the shoulders. Pass the second piece of wire, half the size of the first, through the loops of the shoulders and clamp it tightly with pliers so that it does not pop out. Bend the ends of the arms and legs with pliers to mark the palms and feet of the toy. Twist the bottom ends in the middle, forming a waist. Calculate the approximate growth of future crafts. If you want a toy about half a meter high, then the length of the wire for the “skeleton” is 1 meter plus 7 cm for each foot, for a total of 1 m 14 cm.
Take a gray cotton skein and twist it around your leg - you get a felt boot. Wetting your fingers in the paste, fasten it well to the wire. And do the same with the other leg. By the same principle, wind the mittens on your hands. Wrap the body, arms and legs with cotton wool, strips of newspapers or toilet paper, soaking the paper with a paste. When the body is ready, proceed to the wardrobe. Create pants from white cotton wool, wrap sleeves with strips of red cotton wool and make a fur coat, soaking each layer of cotton wool with a paste. Make a collar and cuffs for a fur coat from white cotton wool rolled into strips. Place your feet correctly and bend your arms into the desired position.
On a dried blank of the face, make a mustache and beard from white cotton wool, put it on PVA glue. Glue the blank itself to the eyelet for the head. Put a cap on your head to match the fur coat. Santa Claus from cotton wool is ready.
Craft on a bottle
An option when instead of a wire frame you can use a plastic bottle. To create Frost from a plastic bottle, you will need the following materials:

 Make a frame for the head from foil. Insert a piece of wire into the resulting ball. Cover with a piece of foil with salt dough. Insert buttons or beads in place of the eyes and form the grandfather's face. Make cheeks, lips, nose and ears from dough pieces. Make sure you have a good-natured expression on your face. Dry the head blank in the oven for about 30 minutes. Paint with watercolors and varnish. Choose the size of a plastic bottle and attach the finished head to the body. Make several holes in the lid, insert the head wire into the hole and twist. Screw the cap with the head onto the bottle.
The container can be filled with pebbles, sand for weighting. Wrap the wire around the neck of the bottle and pull the handles out to the sides. Wrap them with padding polyester, glue the body and mittens with cotton wool soaked in paste. A fur coat can be created from cotton wool or from a piece of velvet, sew a cover, put it on and pull it off with a braid around the neck. Model a hat on the head and fix it with glue. On the chin and under the nose, glue a skein of cotton wool in several layers, this will be a beard and mustache.
Desktop Santa Claus
Make a Desktop Grandpa can be from a plastic bottle or shampoo bottle, which can be found in every home. For work you will need:

Mark the face and mustache on the bottle. Paint the rest with red paint, adding PVA glue to gouache or acrylic paint. Paint the face beige, beard and mustache white.
Take a white thread and make a few turns on the tapering part of the bottle - this will be the hat of the wizard's grandfather. Make a pom pom out of yarn and glue it to the lid. Make a belt from a button and thread. Draw eyes and mouth or glue on buttons. Make arms and legs from strips of paper folded like an accordion and attach to the bottle.
Instead of boots, you can use plastic containers from chocolate eggs, painting them with red paint. For the company, the main character of the New Year can make the granddaughter of the Snow Maiden and a snowman using the same technique.
Crafts using quilling technique
To create a Santa Claus craft, it is not at all necessary to buy something, you can use the materials that are at hand. For a quilling applique, you will need:
- colored double-sided paper;
- glue;
- stationery knife or scalpel;
- toothpick.
Line and cut the paper into strips of 5 mm. Using a toothpick, wind the strips with a “snail”. Remove the "snail" from the paper, let it straighten out, fix the resulting circle with glue. When you make a large number of elements, you can collect Frost. Draw or print out the face of the Magician Grandpa on a piece of paper.
- Paste the beard, mustache, eyebrows, white part of the cap with ready-made white elements.
- Decorate the fur coat and hat with red elements.
- Green or blue - mittens.
The quilling wizard is ready.
felt toy
Felt is a very popular material that needlewomen love. Lightweight, comfortable, the edges do not crumble, do not fold. From felt, you can make a Christmas tree toy in the form of a New Year's character. Print a simple image of Grandpa on a printer. Cut out elements that can be used as a pattern separately:
- hat
- beard
- face.
Transfer the pattern of each blank to the felt. Cut out two copies of each piece. Sew each individual part along the contour on a typewriter, filling it loosely with synthetic winterizer, for a small volume.
Assemble the image of an old man from the finished parts. You can fasten with a needle and thread or hot glue from a gun.
Toy made of nylon tights
As a basis for making a doll, take old nylon tights, which easily take the desired shape due to their elasticity. To make a cute and soft Santa Claus, you will need:
- flesh-colored nylon tights;
- cotton wool or synthetic winterizer;
- acrylic, watercolor paints;
- spool of thread and needle;
- red fabric.
 First, form 4 lumps of cotton: 3 identical for the nose and cheeks, one larger for the head. Separate the foot from the tights, insert all the lumps there and sew up the hole. Form a spout between the cheeks, secure by stitching with light threads. In the same way form the eyes and lips.
Use the remaining tights for the torso. Cut off a piece of 20 cm, sew one edge and stuff tightly with padding polyester. Sew the head and body together.
Get on with your clothes. From the red fabric, open and sew a fur coat and hat. Make a beard and mustache from the remaining synthetic winterizer or cotton wool. Paint Grandfather's face - and the craft is ready.
Decoupage Wizard
They will look very interesting on the New Year's table glasses with the image of the fabulous Grandfather. Glasses decorated in decoupage style are used as candlesticks. For creativity you need:
- beautiful glass without decor;
- napkins for decoupage with the image of Santa Claus;
- PVA glue and brush;
- scissors.
 From napkins, you only need the part with the picture. Cut out the elements you want to see on the glass. Dilute the glue with water or prepare a paste.
With a brush dipped in glue, smooth the napkin over the glass. Do not forget that the glass-candlestick will stand upside down. Carefully smooth the napkin so that there are no wrinkles. You can add decorative stars or snowflakes after the glass has completely dried.
Put the glass on the table, place a candle on top - and the romantic decor is ready for action.
Christmas pillow with Santa Claus
Small pillows with the image of Morozko will help to decorate the interior for the New Year. The pillow itself can be in the form of a fairy-tale hero or a cover with the appropriate decor. Both will decorate your room. To sew a pillowcase in the New Year's style, you will need:
- piece of fabric:
- red and white felt for decoration;
- spool of thread and needle.
 On the finished pillow, cut, cut and sew the pillowcase. Sew on buttons and eyelets or insert a zipper for easy opening.
Cut out and cut out the details of the New Year's Santa's face and clothes from red and white felt: eyes, nose, beard, mustache, hat and pompom.
Sew parts of the picture to the pillowcase in turn, instead of eyes, you can use buttons. Make a pom pom out of the yarn and attach to the hat. Mustaches can be stuffed with synthetic winterizer, give them volume.
plastic dish toy


The cups are glued together, forming the shape of a ball: white at the bottom is the hem, two in the middle are buttons.
The head can be made with thread, PVA glue and a balloon. Randomly wrap a balloon with a thread dipped in glue, let it dry, then burst and carefully remove the balloon. Glue the resulting head to the base of the cups, make a beard from cotton pads, glue the eyes. From felt, cut out and glue a hat. The old wizard is ready.
glass bead grandfather
By the New Year, as a gift, you can make a glass bead keychain with your own hands. To do this, you need white, red beads and fishing line.
According to the scheme, string the beads on the fishing line starting from the hem of the fur coat. After finishing the craft, make a loop from the rest of the fishing line.
Attention, only TODAY!
The closer the New Year, the more often we think about decorating the house for this wonderful holiday. Santa Claus do-it-yourself crafts - new ideas with photos will help you create bright and interesting accents in your home.
Santa Claus FROM PAPER
Having made such a wonderful toy, you can hang it on a Christmas tree or decorate a room by making a garland.
What will be needed? Double-sided colored thick cardboard (or paper), wooden red beads (can be replaced with a tube), a bead, a needle and thread, a pompom and a thin ribbon, scissors, glue.
As you can see in the picture, the Santa Claus craft consists of two balls. To make a body with your own hands, you need to cut 6-8 strips 1.5 cm wide and 26 cm long. For the head, you should take 5 narrow strips 1 cm wide and 16 cm long.
To collect the ball, lay the strips in a circle - make sure that they divide it into equal parts. They should lie so that their ends intersect. To achieve this, we recommend using a template. Now we make out the bottom of the ball - we pierce the junction with a needle and thread, we fix the bead.
Next, we make the base, to which we firmly attach the free ends of the strips. In the original version in the photo, these are wooden red beads, but they can be replaced with a cocktail tube. The length of the beads should be half the length of the strip.
Having made two balls, cut out stencils of the face (1) and hands (4) from paper. We attach a pom-pom to the head. The figure shows two options for crafts Santa Claus - with legs (2) and without. Choose the one you like. An interesting addition will be a gift bag made using the same technique. Top stencil under number 3.

FATHER FROST FROM A BOTTLE

New ideas with photos help to take a fresh look at already familiar things. From an unnecessary plastic bottle, we will get a cute Santa Claus. And not alone - a hare will keep him company.
What is needed for this? Bottle, acrylic, paint, knitted scarf and headband.
To make the figurine stable, fill the bottle. You can either not empty it before work, or fill it with cereals.
After the bottle has been cleaned of the sticker, rinsed and dried, coat it with a white acrylic primer. When it dries, start painting the bottle with colored acrylic.
So that Santa Claus, made by himself, does not freeze, it is worth putting a scarf and a “hat” on the painted bottle. If you make a hare, then the ears for it can also be cut out of an unnecessary plastic bottle.
Crafts Santa Claus FROM WOOL

In order to make crafts from cotton wool, you need a paste - 1 tbsp. mix a spoonful of starch with water until a creamy state, pour boiling water into the resulting mixture, stirring constantly. When the mixture becomes clear, it is ready to use.
Now we dip the cotton pads and cotton wool into the paste and form the details of the future figure - two cones from cotton pads (these are hands), cotton balls - one large and two smaller ones (these are the head, nose and pompom).
Prepare a small bottle - for example, from drinking yogurt. It will become the body of Santa Claus, so you also need to glue cotton wool on it.
The formed parts will dry during the day, then they are painted with gouache. After the paint dries, we attach the finished parts to the body, add the finishing touches - sleeves, collar, mustache, beard and everything else with PVA glue. The eyes are painted with gouache.
Additionally, make Santa Claus a staff and a bag with gifts.
FROM MACARON

Here is such a funny decoration for the New Year's table made by hand. Of the materials you will need noodles, vermicelli and olives. And a flat surface on which the craft will settle down.
The cooking process is simple - boil the noodles and put them on a dish, creating a New Year's look. If you do not find colored noodles, we advise you to color the usual one.
FROM PALM

How do you like such a new idea as in the photo? You can literally make crafts with your own hands.
What you need to make such Santa Claus, which will become an interesting decoration for a postcard: red and white fabric, a postcard with the image of Santa Claus.
As you understand, everything is simple - you just need to circle your hand and cut out the resulting outline from the fabric. Next, we add the figure of the main New Year's Grandfather from the pieces and attach the head cut from the picture on top.
FROM A BULB

To make such a decoration, you need to paint the light bulb with white paint in two layers.
While the paint dries, start modeling from mastic (salt dough is also suitable) a round flattened ball - this is the nose of the figure. And sew a hat so that Santa Claus is not so cold.
If the paint is dry, then it's time to glue the finished nose into the area of \u200b\u200bthe future face. We advise you to do this with the help of a “hot gun”.
Now we begin to draw with a simple pencil the contours of the face, eyes, eyebrows, mustache and beard. Now you can paint over the rest of the body with red paint.
Now let's start painting the face - do not forget to add glitter to the eyes. To make the painted parts look voluminous, we recommend drawing them with a contour.
Now we put on a hat (to keep it securely, fix it with a hot gun). Sew a thread to the hat so that the toy can be hung on the Christmas tree.
Additionally, it is worth using a thin brush with black paint to draw the details of the toy. And don't forget the glitter!
FROM THE SOCK

An amazing craft, real Santa Claus can be made from ordinary socks!
First, let's take a white sock - this is the body of the toy. Cut off the unnecessary, leaving only the length that is convenient for you.
If in the end you get, for example, a cropped top, then carefully sew or tie the bottom - so that you get a "pouch". If you bandage, then turn the sock inside out, so the toy will become stable.
The blank should be filled with cereals or cotton wool. We fix the top with an elastic band. Father Frost's fur coat is made of another red sock. Usually the lower part of the sock is used, in which case the part that used to wrap around the fingers will become a hat, and the rest will become a fur coat. Mittens are made from parts of the bootleg.
With the help of cotton wool, the crafts are decorated - they make a pompom, a beard, the edges of clothes. With our own hands we make a bag and a staff. Don't forget the eyes and nose! They are made with beads or buttons.
We hope the photos from this article gave you new ideas for creating crafts for the New Year, which is just around the corner. We wish you good luck!
Today we will do our own hands the main character of the New Year - Santa Claus. We have collected the best ideas and master classes for you. All materials are elementary, and the schemes are simple and understandable - even children can handle it. Get inspired and get down to business!
It will be possible to decorate a Christmas tree or a table with ready-made toys, put them under a New Year's tree or hang them on a window. In addition, a homemade Santa Claus is one of the best additions to a gift.
We suggest you try to make this fabulous character from felt, paper and bottle.
Santa Claus from felt
Felt toys are always very popular. First, this material is very beautiful. Secondly, it is convenient in work. Thirdly, standard felt crafts are always sewn according to patterns, and therefore it is not so difficult to make even the most unusual souvenir.

Our Santa Claus is also sewn very simply. A little effort - and you will get a wonderful New Year's souvenir that will perfectly complete a gift for a loved one or decorate a Christmas tree.
What will we need?
- pieces of red (or blue), white, flesh and green felt
- red and white sewing threads
- some cotton for stuffing
- beads and any other decor
First you need to make a pattern. Take a look at what the details look like. You can draw them or print the drawing and simply cut out all the parts of the future Santa Claus from paper.

We transfer the template to felt. It is better to take red, blue or blue felt as a basis - we will make a fur coat and a hat from it. Let the beard and mustache be white, and let the face and nose be bodily. The edging for the cap can be made green or white - try on as you like.

We fold the large parts together and sew them with a red or white thread from the front side. When connecting the backing and the outer part, add some cotton wool inside so that Santa Claus "grows" a small tummy - it looks very cute and funny.
Small parts and decor can not be sewn, but glued. However, see for yourself - how convenient. New Year's crafts can be decorated with beads (you can also make eyes out of it), small parts from foamiran, plastic snowflakes and flowers, embroidery, etc.

Try to make several Santa Clauses at once. Sewing several identical figures at the same time is much easier than making toys one at a time. Sew at once, and decorate each one separately to make it more interesting, and the crafts were slightly different from each other.
Santa Claus from paper
This is the easiest way to make the main symbol of the New Year. The process of "assembling" it can be great fun for children.

The finished toy is a great decoration for the table. Place these crafts next to each guest's plate and hide a candy or tangerine inside. This small but very pleasant surprise will immediately create a New Year's mood.
By the way, the size of Santa Claus can be increased and someone's gift can be hidden under it!
What will we need?
- red cardstock or thick paper
- White paper
- glue stick
- colour pencils

We make a square out of red cardboard. Lubricate one side with glue.

We turn the square into a cone and press the edge tightly.

We cut off the excess.

On a white sheet we draw arbitrary figures, a bit reminiscent of the beard of Santa Claus.

In the center we will make a hole: such that the beard crawls up to a certain level of the cone. Do not discard the cut piece.

Draw the face, eyes, outlines of the mustache and beard.

From the cut out circles we will make pompoms.

Such crafts are very convenient to do at the same time: fold the paper in a pile and cut it out at once. If you want to get a more durable product, replace paper with cardboard. If desired, you can paste over it with a cloth and various decorative elements.
Santa Claus from a bottle
In this master class, the bottle will be the basis of our favorite New Year's character. It doesn't matter which one. You can decorate a bottle of champagne with the image of Santa Claus for the New Year's table or as a gift, or simply transform an empty bottle and put it under the Christmas tree.

You can also use a plastic bottle as a base. Just keep in mind that the design will not be very stable. In this case, you can pour small pebbles or cereals inside.
Views: 1 803
Olga Malafeeva
Material: ceiling tiles, building glue, knife, cotton wool, plastic yogurt bottle, old doll (baby doll, red cloth, drinking straw, tinsel, white yarn, cardboard box.


First, I come up with a plot. I make templates of the right size from paper and cut out details from the tile.

Glue with construction adhesive. You can use "titanium", but it dries for a long time.

I cut off the top of the box, leaving only the bottom with low sides,
I wrap with cotton. Here I use PVA glue.


Using building glue, I fix the figures on the base.

For grandfather frost I used an empty yogurt bottle, parts from an old baby doll (head, hands, red fabric, cotton wool, white yarn. For a staff, a drinking straw, tinsel, floral ribbon.
Now I'm creating a story. I install Grandfather frost, on a sleigh bag with gifts and decorate the Christmas tree with multi-colored beads.
Hush hush!
Grandfather Freezing is coming to us for the holidays.
He's lucky gifts who
Everyone, everyone, in the world!
Happy New Year, dear colleagues!
Related publications:
The New Year is getting closer, there are more and more worries, it is necessary to think over the design, and prepare for the holiday, and take care of the costumes. And here also.
I invite all colleagues and friends to the master class "Santa Claus" - origami technique, which Susanna will show you. For work, we need a colored sheet.
MASTER CLASS "FATHER FROST". Hello dear colleagues, parents and children. Soon the New Year, and of course everyone is waiting for a miracle and Santa Claus. Expensive.
MASTER CLASS "FATHER FROST FROM PALM" Prepared by: Maslova N.V. For work we need: Colored paper Glue White paper for cutting.
Doll "Santa Claus", made by hand, will bring a holiday to any home. And it doesn't matter if you believe or not in a magical grandfather with a bunch of gifts.
Soon, soon, a joyful New Year's holiday! Christmas tree, rain, tangerines and, of course, Santa Claus with gifts! Dear colleagues, I propose to you.
Decoration of the group: “Our beloved Santa Claus!”. Good day colleagues! The new year is coming soon. I would like to share with you how we are.
What New Year is complete without Santa Claus? Santa Claus is the main attribute of the New Year. Fairytale time is on the nose, you need to start preparing already. Today we will make Santa Claus with our own hands from improvised materials.
To create Santa Claus, we need:
- paper (for patterns);
- cardboard (for a footrest);
- wire (for shaping the legs);
- glue gun (for strengthening and gluing parts);
- thread with a needle (for sewing);
- fabric (for pants, mittens, cap);
- synthetic winterizer (for shaping the torso, nose and pompoms);
- foam rubber (for shoes);
- fleece (for tight boots);
- paints (to create a face);
- multi-colored felt (decoration for a fur coat, cap, shoes);
- buttons, beads, beads (decoration for a fur coat);
- wool (to create a mustache, beard, hair);
- scissors.

 We fasten a thin, relatively long wire to a massive wire. We fasten the places of fastening cardboard with wire, as well as wire with wire, with hot glue using a glue gun. From the same fabric that covered the circle, we cut out two long strips of a rectangular shape. We sew both rectangles from the wrong side and put them on Santa Claus's feet. This will be his pants.

 In order for Santa Claus to stand firmly and confidently, you need to strengthen the support of the legs. To do this, take cardboard, cut out traces. Using hot glue, we fix the footprints and the bent wire together. To give the boots a shape, we cut out the lining from the foam rubber and fix it with glue.
  To make the boots attractive, we cover them with fleece material. We glue felt on the sole, if the material goes beyond the boundaries of the boots, then carefully cut it with scissors.
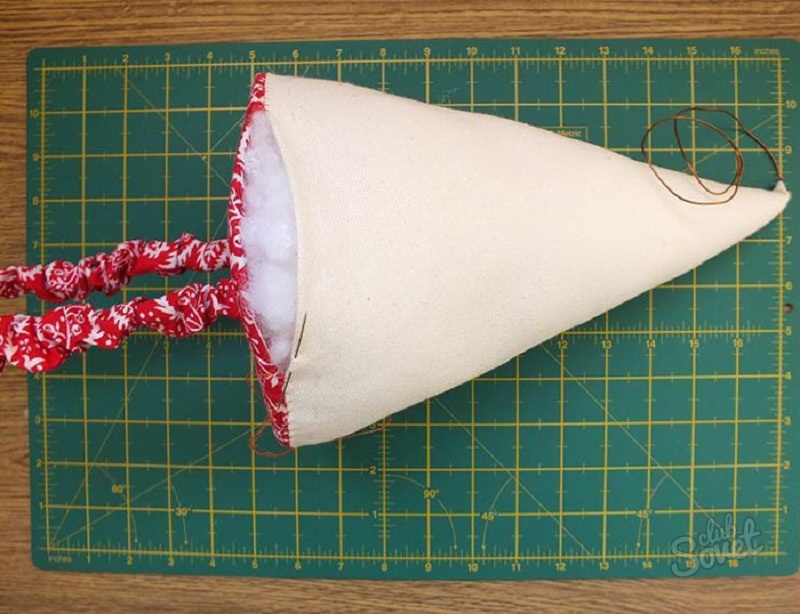
  Here we come to the design of the face. Conditionally divide the cone into the body, head, hat. We make the nose from a small piece of fabric and synthetic winterizer. We put the synthetic winterizer inside the fabric and with the help of a needle and thread we tighten it to give the shape of a ball. Sew the nose to the face of Santa Claus. First, paint the face with white paint, then draw eyes, mouth, red nose and cheeks with other colors.
  It's time to dress up Santa Claus. We sew a red fleece coat. We take the size a little larger than the body itself. Cut, sew, twist. According to the paper template, cut out 4 strips of future hands. We also sew them together, fill them with synthetic winterizer.
 We put on a fur coat on the body, sew on the hands. We decorate the fur coat with details cut out of felt. Add beads, beads and drifts of snow from white felt.
  From white felt we cut out strips for trimming the sleeves, collar, and lapels for boots.


 The final step is the manufacture of the cap. We sew together two conical pieces of fabric, then turn inside out. Right now, are we going to need that little wire? sticking out of my head. The cap is put on the head, and with the help of a wire we shape the tip of the headdress. We also decorate with a pom-pom made similarly to the nose and a white fleece lapel.

That's all, we made Santa Claus, which means we are ready to celebrate the New Year with our heads held high! Happy Holidays!


