Crafts from coniferous branches and cones. How to cover pine cones with glitter: master class
Beautiful handmade crafts from pine cones are often found at children's competitions and exhibitions. This natural material is accessible, convenient and safe to work with. The main thing is to have time to collect it on time and prepare it correctly.
Forest dweller made of pine cones


Topiary made of acorns and cones
Which cones are suitable for children's crafts?
To make crafts from pine cones for school or kindergarten, you need to know the following rules:
- Cones that have not yet opened should be collected - they take up less space;
- if it is necessary for the lump to open, they simply do not cover it with anything;
- If you plan to make a craft from an unopened cone, immediately after collecting it you need to dip it in the adhesive composition.

Original topiary
The safest way to cover pine cones for crafts is with wood glue, which has been previously diluted with water to a liquid consistency. You need to take the workpiece with tongs and dip it into the adhesive solution several times. Then put it on oilcloth. Periodically the cone must be turned over. It will take about three days to dry.

Composition of pine cones
How to make a large craft pine cone flexible
The natural shape of a cone is not always suitable for creating a specific composition. So, it happens that you need curved material. To soften the surface of the workpiece and give it a specific shape, you need to put the cone in boiling water and cook for about 5-10 minutes. After cooling slightly, “roll” it to the side with your hands and secure with a rope or adhesive tape.

Wreath of small pine cones
What crafts can be made from pine cones?
Children's crafts made from pine cones can be different. Funny figures of animals and people, decorative elements for the home, compositions and paintings - this material gives freedom to creativity. On the eve of the New Year holidays, you can make Christmas tree decorations from them.

Beautiful wreath

New Year's decor

Wreath decorated with balls

DIY gift from pine cones
Craft from pine cones for elementary school - hedgehog
If a child is tasked with making a beautiful craft from pine cones with his own hands, parents definitely need to tell him in which direction to move. It’s quite easy to make a hedgehog like this:

Hedgehog from a cone
You need to take a cone and plasticine. Form a muzzle out of the latter and attach it to the back side of the wooden base. It is better to make the eyes and nose from plasticine of a darker color so that they stand out well against the general background.
Hedgehog needles should be decorated with grass and leaves. You can make mushrooms and carefully attach them on top.

Funny hedgehog with sharp needles
A craft that involves several pine cones looks interesting:


Big hedgehog
Christmas tree made of pine cones for an exhibition
To make a Christmas tree from pine cones, you need to prepare:
- cardboard;
- acrylic paint;
- glue gun;
- cones;
- decorations for a homemade forest beauty.

DIY tree made from pine cones
You need to make a cone out of cardboard, and then cover it with open cones using hot glue. It is advisable to decorate the top of the Christmas tree with some flowers, beads, sparkles, and ribbons to make it look more elegant. If you want to change the color of your homemade Christmas tree, you need to spray paint on it from a can before decorating.

Another way of making a forest beauty from pine cones is also possible. The materials you will need are the same, but the order of work will be slightly different. Here you don’t have to make a base in the form of a cone - you just need to cut a circle out of cardboard and start designing it as follows:

Making a Christmas tree from cardboard and pine cones
Bear made of cones
A beautiful bear can be easily made from pine cones.

Its body must be formed from the longest piece, its paws from four small cones, its nose from peppercorns, its ears from acorn caps. If one of the natural materials necessary to design a forest dweller is not at home, it should be replaced. So, ears, nose and eyes can be made from plasticine, croton, colored dough.

Bear made from different cones
It would be great if cedar, pine and spruce cones are combined in one composition. Then it will look more interesting and neat.

Huge bear made of pine cones

Small bear
What other crafts can be made from pine cones?
You definitely need to experiment with pine cones. Since they are so easy to connect to each other, you can create shapes of many different shapes.
A bunny like this is made very quickly:

Pine cone hare
To make it you will need:
- one open bump;
- multi-colored plasticine;
- toothpicks (can be replaced with spruce needles).
The forest squirrel also looks unusual:

DIY squirrel
To complete the owl you will need only two cones:

Owl made of cones
If a child asks to make penguins for an exhibition at school or kindergarten, parents should not be afraid of such a task.

Penguins made of cones
Watercolor paint coated with varnish will help make the body of animals white.
Baskets of cones
A basket of pine cones can be made for an exhibition in a garden or school, or for decorating the interior of an apartment. To make it you will need flexible wire. You need to alternately connect the cones to each other, and then form rows of them.

Making a basket

Decorative basket

Small basket

Large container of pine cones
You can decorate the basket with flowers, acorns, and dry grass.

Decorating a basket of pine cones
The most unusual crafts can be made from such natural material as pine cones. Such crafts made from pine cones can become stylish interior decor or funny toys, and if you save them until the New Year holidays, they will turn into cute Christmas tree decorations.
Before making crafts from cones, it is important for children to know one subtlety: when dry, the cones tend to open, and in this case the shape of the finished craft may be disrupted. Crafts made from fir cones are especially susceptible to severe deformation. To avoid this, it is necessary to immerse the cones in warm wood glue. When the cone stays in such a glue bath, it will certainly keep its given shape, and their scales will not open. Then they definitely need to be dried and you can start making fun crafts from pine cones.

First of all, children's crafts made from pine cones are animal figurines, which are excellent crafts for the autumn holidays or any other holidays held in kindergartens or schools.

Children's crafts made from pine cones are fall-winter crafts for kindergarten, which have a beneficial effect on the child's mental development, wonderfully developing the motor skills of children's fingers. That is why this type of craft is widespread in kindergartens and elementary schools.

When making crafts from pine cones and plasticine, it is important to know that completely dried whole cones should be used in the work. Also, the cones of different trees can have different shapes and sizes, which allows the child to use his imagination to create crafts from cones of various shapes. Small craft elements can be made from plasticine or other available material. In addition to plasticine, you can also use glue to secure parts. Ready-made crafts from cones and plasticine can be decorated with acrylic paint of any color, varnish with glitter, or decorated with beads, threads, cotton wool, for example, when creating a Christmas tree or a snowman, etc.


If you are lucky enough to not only walk through a coniferous forest, but also bring back a few pine cones, then make beautiful New Year’s crafts out of them.
Making toys for the Christmas tree
From a pine cone you can make not only a New Year's toy for the tree, but also the tree itself, as in the photo. To do this, paint it green and wait until it dries. Attach bows, beads and snowflakes, flowers cut from white lace to the miniature Christmas tree. Don't forget to make a stand for the New Year's tree.

If you show your imagination, you can create creative crafts from pine cones in the form of squirrels, deer and birds, but you will have to make their heads and legs, and the pine cones will serve as a body.


If you simply paint the cone or cover it with glue and sprinkle it with glitter, you will get an unusual decoration, to which all that remains is to attach a loop.

Candlesticks made from natural materials
The glow of holiday lights lifts your spirits, so during the holidays you want to see them as often as possible. Don't limit yourself to just garlands, make New Year's candlesticks from pine cones, and they will add brightness and coziness to the interior.

The easiest option is to decorate ready-made candlesticks, decorating them in the spirit of the holiday with pine cones, twigs and Christmas tree decorations.

Interesting candlesticks can be made from glass jars if you pour artificial snow (or ordinary salt) on the bottom. Glue a strip of lace to the top of the jar, tie a couple of cones sprinkled with “snow”.

Make candlesticks from flower beds, as in the photo, decorating them with artificial pine needles. For decoration, use small New Year's toys, cinnamon sticks, beads and pine cones.


Wreaths on the door
Christmas wreaths are currently popular; they are not difficult to make. The main thing is to prepare a reliable base in the form of a circle.
The frame base can be made from:
- wires;
- bendable wire clothes hanger;
- thick cardboard;
- buy a ready-made circle at a handicrafts store.

Decorative elements are attached to the base: cones, ribbons, bows, nuts, leaves, etc. To make the product look more impressive, some parts can be coated with gold, white paint imitating snow or sparkles.


Decor for table setting
Don’t forget that not only the New Year tree should be elegant, but also the festive table. Let cute pine cone gnomes hide between the plates or bright owls peek out. Make nice souvenirs for each participant in the feast: glue bright feathers to the pine cone and write the name of the person for whom the cutlery is intended.

Every year in all kindergartens and schools they ask to make products with their own hands. This is perhaps the most common puzzle for parents.
And you know, it's not even bad at all.

We have a lot of natural material, we need to add a little imagination.

Well, most importantly, you and your whole family will immerse yourself in the charming world of creativity.

Today, we will look at a natural resource - pine cones.
It is used not only in school crafts, but also for interior design, Hand-Made designers and others.

Below are photos and a detailed diagram of several crafts made from pine cones.

What crafts from pine cones can you make with your own hands?
Almost everyone can make a craft from real pine and spruce cones, the main thing is desire and a little imagination.

Using this amazing natural resource you can do:
- Decorative elements that will bring the stunning smell of the forest and a cozy atmosphere to your home.
- New Year's crafts: festive wreath, candlestick, Christmas tree, garland, New Year's ball and much more.
- Interesting crafts of funny animals with children.
Festive wreath
You can convey the New Year's mood to your guests right from the doorstep. To design the New Year's wreath we will use:
- Cardboard
- Spruce or pine branches
- Cones
- Satin ribbon
- Not real snow
- Dye
- Glue gun
- Decorations for decoration, optional.

Many materials are used to make the base.

For example: plastic, cardboard, branches, bending wire, and even newspapers.

We settled on cardboard; it is quite simple and convenient to work with.

On cardboard we cut out the diameter of the circle that we need. Next, we attach the branches and cones, forming a symmetrical circle.

After the cones are glued, we continue to decorate our wreath. Take a can of artificial snow and spray the edges of the cones.
If you couldn't find snow, you can paint the scales with white or silver paint.

We tie it with a satin ribbon, choose the color yourself.
Note!


For a more interesting and rich wreath, you can add additional decorative elements: red beads, acorns, nuts, flowers.

Use your imagination and you will succeed!

New Year's garland
A quick and easy craft to make.
Material you will need:
- bumps
- glue gun
- rope
- dye
- glitter

Step-by-step instructions for the craft:
- We prepare the cones in advance and paint them with paint. The paint can be chosen in different colors. Or make it in one color that matches your interior design. You can also use glitter to make the product more elegant.
- We take a rope and mark the distance between the cones.
- We leave 10-15 cm from the edges so that there is room to attach the garland.
- Using a glue gun, attach the pine cones to the rope. Glue along the entire length.
- We are waiting for the glue to dry. And Voila! The New Year's garland is ready.

Note!

For kids and schoolchildren it will be easy to make crafts from pine cones and plasticine of funny animals: Teddy Bear, Hedgehog, Little Squirrel, Owl, etc.

Mishutka
We will use:
- Cones of different types (pine, spruce, open, closed)
- Scissors
- Plasticine

Step-by-step instructions for making crafts:
Body. From the collected material, select an elongated pine cone. Apply glue to the connecting parts of the scales. We connect the parts so that the scales secure each other.

Paws. We choose 2 larger cones for the lower paws, and 2 smaller ones for the upper paws. Glue the parts to the body, pay attention to symmetry.

Head. We make the head from open pine cones. They perfectly convey the fluffiness of a bear's fur. We attach it to the base with glue.
Note!


Ears, eyes and nose. You can make it from plasticine, and the tip of the nose, for example, from black peppercorns.

If you want to surprise everyone around you, then you can make a big bear. You choose the size of the bear, the main thing is to collect the required number of cones.

You can make the base - the frame of Mishutka - from polyurethane foam, polystyrene foam or papier-mâché. An excellent solution for the stability of the product would be to attach something heavy to the bottom.

We cover the frame with pine cones, and make the ears and muzzle from plasticine or pom-poms.

Hedgehog
The simplest children's craft made from pine cones. To make it you need only two materials:
- Cones
- Plasticine

Step by step description:
Body. The cone itself is well suited for the base of the craft. If you look closely and rotate the scales correctly, they look like hedgehog needles.

Muzzle. Here we will need some plasticine. We make an oblong muzzle from it. And fix it on the craft.

Eyes, nose, paws, ears. We also use plasticine, only in a different color.

As you can see, there is nothing complicated, this craft made from pine cones is suitable for kindergarten.

Experiment! Decorate your home with interesting design solutions that you have prepared yourself. Don’t forget about the children, they will also be interested in taking part in the creation of a small miracle.

Photos of crafts made from pine cones


Cones are an excellent material from which you can make a variety of crafts. In addition, they have a refined, pleasant aroma of pine needles. Of course, initially such material does not look very attractive. However, if you use your imagination, you can make original decorations for the holiday from pine cones. In this case, no special costs are required. Almost anyone can make something out of pine cones. How to do this?
Preparation of material
Pine cone decor always looks unusual and beautiful. The main thing is to know how to properly prepare material for crafts. Cones that fall from the tree while still closed gradually open over time. At the same time, pine ones look like small fir trees, and spruce ones look like ruffled hedgehogs. Of course, initially the decor made from pine cones looks unusual. However, over time, the crafts begin to deform. To avoid this, when processing materials you should adhere to certain rules:
- To avoid the buds from opening even when the room temperature changes, you should lower them for 30 seconds in
- To make the cones open faster, it is recommended to boil them for half an hour and then dry them on a radiator. The material can also be roasted in the oven at 250 °C for 2 hours. These methods allow you not only to achieve the desired result, but also to kill all bacteria. The material after processing will be safe and clean.
- To make the pine cone decor beautiful, you can adjust the shape of the material. It is enough to soak the raw materials for the craft in water, and then tie it in the right place with a string and dry it.
- To make the material lighter, you can bleach it. To do this, it is recommended to soak the cones in a container with bleach for 5 hours. In this case, it is necessary to observe proportions. Use one part bleach to one part water. Finally, the cones must be thoroughly washed and dried.

What decor can you make from pine cones?
Fir and pine cones are natural materials that are easy to work with. To make decor from such raw materials, it is enough to walk through the forest once and collect the required amount of material. After careful preparation, you can make original and beautiful things from pine cones. At the same time, you can save on purchasing expensive New Year's decorations for the room and for the Christmas tree.
It is worth noting that many interesting decorative elements can be made from such material. These can be miniature Christmas trees, Christmas tree decorations, a wreath for candles or entrance doors, and so on. Almost anything can be made from this material. All you have to do is use your imagination.
How to make a Christmas tree
Let's conduct a small master class. You can make small and original Christmas trees from cones. To make this decor you need:
- Cones.
- Glue gun.
- Scissors.
- Spray cans with gold or silver paint.
- Circle and cone made of cardboard. It is better to use brown or green material.

Manufacturing stages
So, how to make decor from pine cones? First you need to select and prepare the material. It is better to take the cones that have already been opened. The material should be cleared of debris, rinsed well and dried.
After this, the cones must be covered with an even layer of paint. This will give the material a more festive look. If you wish, you don’t have to do this if you want to maintain naturalness. If the cones have been painted, they should be dried thoroughly.
You need to glue a circle to the cone. Moving in a circle, the prepared cones should be fixed on the surface of the structure. You should start with the largest ones, gradually reducing the size of the material. The cones should fit tightly to each other. The extraordinary Christmas tree is ready. If desired, you can decorate it. An unusual decor made of pine cones can give the interior a more festive look.

Party Ball
Crafts made from pine cones for the New Year can replace even the most non-standard things. For example, many have seen glowing balls hanging from the ceiling at large parties. A similar interior element can be made from pine cones. To create such a craft you will need:
- Balloon.
- Toilet paper.
- PVA glue.
- Brown paint.
- Cones.
- Ribbon.
Making a blank for the ball
Such crafts from pine cones for the New Year can be made in several ways. First you need to make a preparation. You can buy it ready-made, or you can make it yourself. The last option is more interesting. You should take a balloon and inflate it to the required size. Now it’s worth pasting it over. To do this, the ball must be wrapped in toilet paper, previously soaked in a solution of PVA glue. It can also be made at home. To do this, mix 1 part PVA glue and 2 parts water. The ball, covered with more than one layer of toilet paper, should be left to dry for 24 hours.

Making a ball
When the workpiece is ready, all that remains is to glue the carefully prepared cones to it. However, there is no need to rush. The cones should be located tightly to each other. You need to glue a satin ribbon on top. The craft is ready. You can hang it from the ceiling or on a chandelier.
If desired, you can stick a stick into such a ball, placing its other end in the pot. The result will be a kind of topiary.
Wreath of pine cones
You can also make an extraordinary decoration from it. Most often they are used to create a New Year's wreath. Traditionally, such a product is woven from spruce branches. However, recently wreaths began to be made from satin ribbons and New Year's tinsel, decorating it all with balls and paper flowers. If desired, you can create it from cones. To work you will need:
- Stapler.
- Scotch.
- Newspapers.
- Fir cones.
- Spray paint, preferably brown.
- Scissors.
- Glue gun.
- Beads, ribbons, spruce branches, etc.

Let's get started
First of all, you need to make the base of the future wreath. If you don’t have time, you can purchase a ready-made one in a specialized store. If this is not possible, then the bases for the wreath should be made yourself. It will cost much less. The newspaper must be rolled into a long tube and then rolled into a donut. The edges of the material can be fastened using a stapler. It is recommended to additionally wrap such a blank with cut newspaper and then with tape. This will prevent the finished product from becoming deformed.
To hide the base material, cover the workpiece with an even layer of paint. After the coating has completely dried, you can glue the cones, filling the entire space with them. Finally, the wreath should be beautifully decorated using satin ribbons, beads and twigs. It is recommended to varnish the finished wreath to preserve it for a long time.
Star made of cones
This New Year's decor made from pine cones can be an excellent decoration for a Christmas tree. The process of making such a star is quite simple. To work you will need:
- Ribbons.
- Metal skewers or strong wire.
- Fir cones of various sizes.

How to do it
You need to make 5 skewers of equal length from the wire. They should be connected by bending them in the center. This will be the basis for the five-pointed star. You need to string the cones onto the wire, assembling an original composition. One of the twigs should be bent and tied with a satin ribbon. This will allow you to hang the finished craft near the fireplace, on the wall or on the doors. Such a star can be attached to the top of the New Year's tree.
Christmas decorations
If you wish, you can make an original decoration from cones with your own hands for the New Year tree. The products are quite simple to manufacture, durable and beautiful. How can you turn a simple bump into a work of art?
The easiest option is to use old small soft toys. To begin with, you should paint the prepared pine cone in the appropriate color, and then attach the toy’s head to it. You can also add a tail, paws and wings. The result is an original Christmas tree toy.
There is an even simpler way to make such crafts. First, you should paint the cones in the desired color or cover them with glitter. Finally, you need to attach a neat bow made of satin ribbon or several pine branches, as well as a string, to the toy. The craft is ready, all you have to do is hang it on the Christmas tree.

Using felt and felt, you can create original fairy-tale characters from ordinary pine cones. The most important thing is to firmly glue all the parts together. Otherwise, the toy will begin to crumble over time.
To make Christmas tree decorations, you can use not only cones, but also their scales. Before starting work, they should be carefully separated from the base. To make a toy, you need a blank. It can be made in the form of an animal figure. In this case, foam rubber and papier-mâché can be used to make the blank. You should carefully glue the scales of cones to the surface of such a base, and then decorate everything with sparkles, creating a snowy effect.
Working with children
Cones are an excellent natural material that can be used for activities with children. However, in this case it is not worth using glue to fasten the parts. Usually plasticine is used for classes. It is worth noting that children really like the process of making figurines. In addition, creating crafts allows you to develop hand motor skills, as well as influence the mental development of the child. Before starting classes, you should familiarize yourself with several rules:
- The cones must be well dried.
- The variety of sizes and shapes of the material allows you to develop your child’s imagination.
- Small parts of the figures can be made from plasticine and other suitable materials.
- If the child is no more than 3 years old, then crafts can be made from only one cone. For older children, you can come up with several compositions.
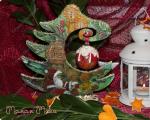
Chanterelle made of cones
To make a chanterelle with your children, you will need:
- Plasticine in white, orange and black.
- Cones of various shapes and sizes.
To begin with, you should choose a material that will be suitable for making the body, tail and head. The cones should be connected to each other using plasticine or good glue. The workpiece is ready. All that remains is to decorate it. To do this, you should sculpt the paws, ears, eyes, nose and muzzle of the animal from plasticine.
Nimble hedgehog
This animal can be made from one beautiful and large cone, which has already fully opened. It remains to be decorated with individual parts made of plasticine. To complete, you need to mold 4 legs, ears, nose, eyes and face of the animal.

You can also mold the body of a hedgehog from plasticine, and then cover its top with scales of cones or small cones of the same size. If desired, the back of the animal can be decorated with mushrooms and apples. They can be molded from plasticine.
Cones and acorns
Decor made from cones for the New Year will look more original if you use acorns to make it. You can create beautiful Christmas tree decorations from such materials. To work on the decor you will need:
- Acorns.
- Cones.
- Thin satin ribbon.
- Sintepon or down.
- Glue gun.

The process of making a gnome
You should remove the cap from the acorn and then make a hole in it. You need to stretch a thin ribbon through it and secure it, making a neat knot. You should put a piece of padding polyester between the acorn and its cap and secure everything with glue. This will be the head of the gnome.
It is worth gluing a little padding polyester onto the bump so that you get a beard. Now you need to connect the body to the head, gluing everything with glue. The craft is ready.

In conclusion
Cones, chestnuts and acorns are natural materials that can be used to make original crafts. They can be not just a reminder of time spent with children, but also excellent New Year's decorations for the home and for the Christmas tree. If you approach the manufacturing process with love and due patience, you can end up with extraordinary things that will be difficult to distinguish from store-bought ones.