Crochet napkins are dense. Crochet napkins with patterns - simple and beautiful
It's always nice to create something new and beautiful for your home, for example, knitting napkins. Light and airy, with various shapes, they will not leave anyone indifferent. An exquisite hand-knitted napkin can significantly transform the interior, create tenderness and comfort in the home.
The napkin is knitted in circular rows on a ring of 8 chain stitches. The flower in the center is beautifully highlighted thanks to the bias net knitted around it. The border between the round center and the peripheral part of the openwork napkin is a relief made of relief columns. The same technique was used to create volumetric accents at the base and on the tapering sections of the petals in the middle part of the pattern.
The volume of the entire pattern of the openwork napkin is given by the contours of the petals made in relief columns. The pattern is completed by “fans” made above the original gaps between the petals.

When making any pattern and crocheting a napkin, in particular, be creative. Try replacing different volumetric elements. Perhaps you will find a better solution based on your individual knitting style.
 For example, the “bump” crocheted in the 22nd row can be replaced with a lush column, and in the “fans” of the peripheral part of the openwork napkin, “corn kernels” can be crocheted instead of “bumps”.
Select the number of stretches for a lush column and the number of double stitches forming a “corn grain”, taking into account the thickness of the thread used and the desired effect. You can also enhance the relief by knitting treble crochets on the far half-loops. 10th row of openwork napkin crochet decorative row.
Knit the embossed columns that form the outline of the petals around the round center of the knitted napkin with an additional slip of stitches.
In the 22nd row, tie a “bump” of 3 cm. 1n. Having completed the 5th treble crochet, work 3 treble crochet stitches. with a common base, sticking a hook under the st.bn. 10th row; Pull up a stitch for the 6th dc by pulling the yarn through the top of the 4th dc. prev row; Knit all the loops on the hook in one step.
Or complete the “bump”, and only then work the 6th crochet stitch.
Napkin pattern:

More napkins and diagrams for them:


Good afternoon, dear needlewomen and all blog guests!
I have accumulated ideas for crocheted napkins, patterns for which I usually post in this post. I decided to update it today and show it on the main page.
I know that there are a lot of people who like to knit napkins. Someone may think that knitted napkins have long gone out of fashion. But I believe that this is not so.
The fashion for napkins has never gone away. Crocheting napkins is always relevant. After all, how beautiful they look on small tables, bedside tables, under flower pots and vases. Napkins can be of practical use: if you place various objects, watches, keys and other items on them, this will protect the furniture from possible scratches and stains. You can knit large napkins for the headboard of chairs and sofas.
You can create original paintings from napkins. You can use them beautifully: pillows, T-shirts, and curtains.
Nowadays, round ones made of thick yarn or cord are very popular in modern interiors.
I made a selection of ideas in a video on how you can use napkins in modern life.
But I myself just love knitting them, I enjoy the process and the result, you could say I’m sick of napkins, I never get tired of knitting them, especially since all the time there are some new interesting models that you can’t pass by. By the way, I’m making a video on my YouTube channel.
Materials for knitting napkins
Delicate openwork napkins It is best to knit from thin cotton threads- ordinary bobbin threads, which are used to sew with number 10 or 20. The hook, accordingly, should also be the thinnest - No. 0.5.
You can also knit napkins from cotton yarn for knitting: iris, violet, lily, phlox, rose, pelican, pekhorka successful and others, in this case a hook No. 0.9-1.25 is suitable.
The diagrams can be opened in a separate tab, printed and saved in a folder on your computer.
I made a description of knitting this napkin for those who find it difficult to understand the pattern. It . I enlarged the diagram and divided it into parts for convenience.


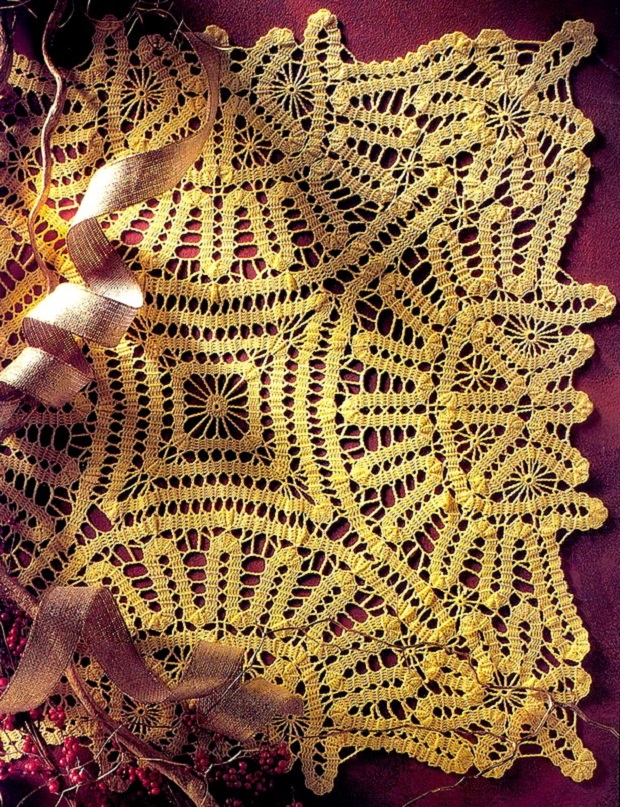
Friends, I bring to your attention a selection of fabulously beautiful crocheted napkins, as well as patterns for them. In my opinion, crocheting napkins is truly the pinnacle of crocheting skill. This is beauty, subtlety of work, and all products are lightweight.
These airy snowflakes made of fabric are a kind of embodiment of flight and lightness. Napkins perfectly complement any interior and make it feel homey. And of course, this is an excellent basis - a motive for knitting large elements, such as a bedspread or, say, a tablecloth. In addition, sitting down and starting to knit a napkin is a great way to relax and get a charge of good mood.
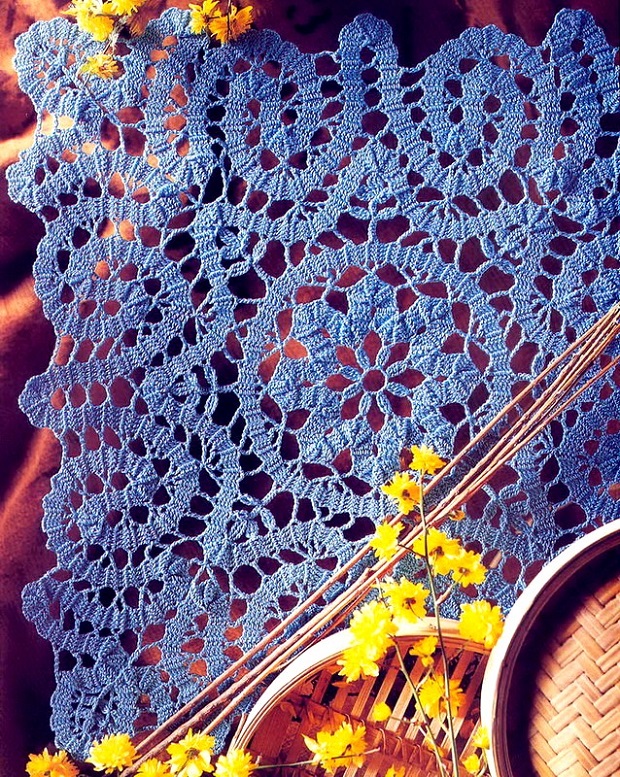
Beautiful and simple crochet blue napkin for the table

I’ll start the selection with such a wonderful openwork napkin.

Increasing!
Oddly enough, this is both a training ground for beginners and a pedestal for professionals. You can both learn to knit and create masterpieces. For example, for beginners, small napkins are perfect for creating their first product. Well, the fact that knitting them is interesting allows you to captivate a novice needlewoman.
Beautiful classic crochet round napkin

A wonderful example of a crocheted napkin using the fillet technique.

Increasing!
The knitting technique is also perfected by the fact that almost the entire arsenal of all kinds of loops is used in napkins. These include half-columns, chain stitches, double crochets, and many others. This gives you a good skill, and also teaches you to understand circuits.
I also want to draw your attention to the fact that these products also have different shapes. Here we can mention the classic round napkins, which are knitted in the round.
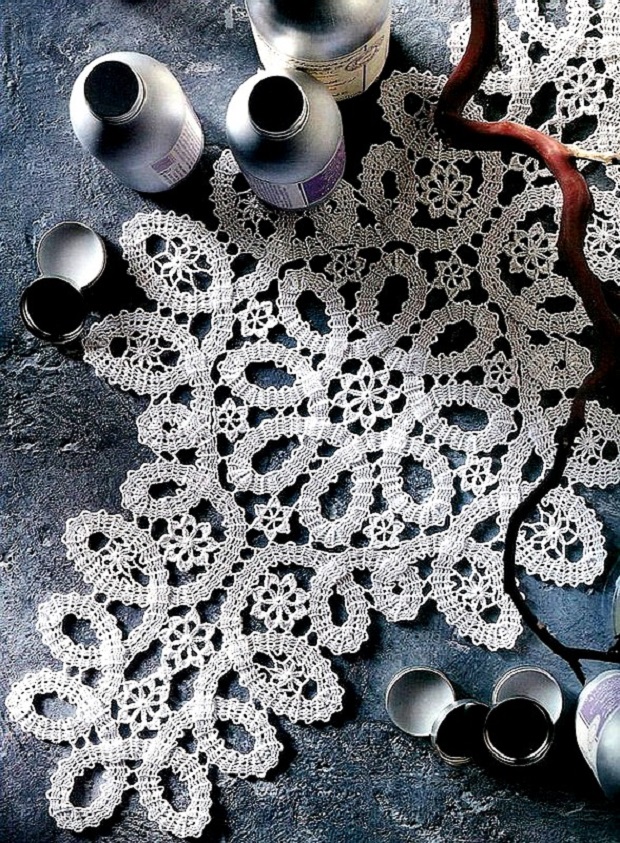
Beautiful openwork crocheted napkin with floral patterns
An awesome crochet napkin - it captivated me with its elegance! The knitting pattern is below.
You can lay such a napkin on the table or put a vase of flowers on it.
When crocheting napkins, the method of using motifs is very often used. Motifs are square, round, triangular. There are also more complex polyhedra, such as hexagonal ones, but they are rarely used.
In addition to all of the above, there is also a wide variety of napkin knitting techniques. For example, Irish lace. Or Bruges lace - a Belgian technique. Creativity in knitting napkins is like art. Only the master creates not with the help of paints and a brush, but with the help of yarn and a hook.
Okay, I'm babbling about something. Next, see a selection of samples of various napkins. They have one thing in common - they are crocheted. All photos are enlarged. Just click on the image with your mouse. Good luck with your knitting! And come back often. I always have something interesting for you.
Knitting patterns are increasing!


For starters, there is such a wonderful simple option. Beautiful crochet napkin - amazing pattern geometry!


But this beautiful round crocheted napkin will fit well on the table. In general, we must admit that Japanese options are considered the most sophisticated of all. They are also presented in this collection.


Here's another nice example of a beautiful round crochet doily - the central web is of particular interest here.


And this napkin has a structure very similar to coral.


A beautiful classic crochet napkin that looks like a snowflake.


Pineapple patterns in a beautiful crochet napkin.


Beautiful round crocheted napkin with a spades pattern.

Crochet a tablecloth from napkins

A beautiful square crocheted napkin with motifs can be turned into a large enough tablecloth for the table. The advantage of squares is that they can be combined and ultimately get a large canvas.

These are the options. This is, of course, not all that could be shown. But be patient, we are in no hurry. Right?
How to starch a crocheted napkin
After reading many guides on starching napkins, I came to the conclusion that they are hopelessly outdated. In all of them it is proposed to cook a paste from starch, but why such difficulties? It is much easier and faster to soak a napkin in wallpaper glue, which consists of starch that does not cause yellowing. It applies quickly and is not visible after drying. Ideal, in my opinion.
Make the solution thinner and dip a napkin into it, give it time to dry, and now you have a beautiful copy in front of you, smooth, without creases or curls. Wallpaper glue easily soaks in water, so don’t be afraid of ruining the product.
Video master class - simple crochet round napkin
To conclude the collection, I want to show a simple and understandable master class from Anna Andrienko on crocheting a simple napkin for beginners. There is nothing complicated in the lesson, just what a beginner needs.
I hope you liked these patterns for crocheting beautiful napkins and will take something for yourself to work with! Well, that’s all I have for today... Happy crafting!
When crocheting napkins for beginners, it is better to start with thicker (but not very thick) yarn so as not to get tangled in the threads. For example, half-wool or acrylic.
We select the hook according to the thickness of the thread. This is done by trial method: if you take a very thin hook, then knitting with thick yarn will be difficult, almost impossible. A crochet hook with a very large number will result in a napkin that is too full of holes. 
For knitting a thick napkin for beginners, a hook with number 2 - 2.5 is suitable. But, again, I repeat, do not strictly follow what is written. Try it, choose the option that you think is more convenient. 
It is better for beginners to choose the simplest patterns for crocheting a napkin.
Crocheted small napkins can be used as a coaster for glasses and cups. White or multi-colored thick small napkins will look good on the table.
Well, in the future, for knitting openwork napkins, it is better to use thin cotton bobbin threads, such as those used for sewing (No. 0-10). The product will be soft and airy. 
In this case, the hook should also be taken with the smallest number 0.5 or 1.
You can also knit napkins from thicker cotton yarn like Iris; a hook size of 1.2-1.5 is suitable. 
So, how to crochet a napkin?
Crochet doily tutorial
Excellent video tutorial on knitting a napkin with a hexagon
Crochet sunflower napkin video, part 1 and 2
Attention to the training video lesson for beginners.
First, you can learn how to knit a small napkin under a vase, for example. How to do it? To begin with, you should familiarize yourself with the implementation of several loops. Knitting is based on an air loop and double and single crochet stitches. Everything else is derivatives of these figures, which, when combined with each other, make up patterns.
Making a napkin under a vase
A napkin with a diameter of about 30 cm, cotton yarn about 50 g and hook No. 1.
As with most napkins, we start knitting with air loops (v.p.), in this case there will be 8 of them, they are closed using a connecting post (conn. st.).
Symbols for the diagram 
Knitting patterns

2nd row: knit 3 sts. p. rise and 2 double crochets (dc. s/n), tied together, forming a ring, (in the diagram, a fragment of a napkin) * 3 c. p., 3 tbsp. s/n, tied together, from * must be repeated 6 times and end with 3 v. item 1 connection Art. togetherrelated art. s/n.
Such work is not particularly difficult if the novice needlewoman has become familiar with the graphic designation of certain loops. You can find simple designs for a variety of napkins here.
And now pay attention to our master class below.
Instructions for knitting rows:
You need to dial 5 ch. and connect them together. Art.
Row 2: cast on 3 vp. rise and 2 more vp, then in a circle 7 tbsp. s/n, each of which is knitted through 2 vp, carried under the loops of the ring.
3rd row: 3 p. rise, 4 tbsp. s/n, knitted under 2 ch, between st. bottom row. Now under v.p. bottom row in a circle, five st. We complete the row by connecting the leading loop with 3 stitches.
4th row: perform 3 sts of lifting and 4 tbsp. s/n, knitting them with a single top. Then 5 ch. Next comes alternating 5 tbsp. with one vertex and v.p. We finish the row with 5 vp, the last of which is connected to the 3rd vp.
Row 5: Repeat the entire row in 9 sts. s/n under v.p. bottom row. We connect the leading stitch with the 3rd lifting stitch.
row: 3 p. rise, 4 tbsp. s/n with a single top, knitted in st. bottom row, then 5 vp. and 5 tbsp. with a single top we alternate until the end. We finish by connecting the leading loop with 3 lifting points.
7th row: 3 sts of lifting and 9 sts. s/n under 5 v.p. bottom row. Next *under five vp. knit 5 tbsp. s/n, under the next 5-10 art. s/n* and this combination (**) we knit 7 more times until the end.
8 row: 3 sts of lifting and 4 tbsp. s/n with a single top, then 5 ch and repeat.
9 row: 3 p. rise, under 5 v.p. We knit 9 stitches on the bottom row. s/n. Next *under 5 ch. lower - 5 tbsp. s/n, repeat this step and under the next 5 vp there are already 10 sts. s/n*. We continue the combination (**) throughout the circle.
You can adjust the diameter of the napkin yourself.
Napkins can be of various shapes - square, round, rectangular, polygonal, oval and so on, it all depends on your wishes. The easiest way to make napkins is to knit identical motifs that are simply connected to each other.
Square napkin
Square napkins are often crocheted from the same motifs; as their number increases, the napkin turns into a tablecloth or blanket. For a square napkin measuring 27 x 27 cm, you need 80 g of yarn and a hook number 1.5.
Scheme

As you can see, the napkin consists of large and small motifs.
Large motif: we knit 10 stitches. p. and close the chain of connections. Art.
1st row: knit 3 sts. lifting item, 23 st. s/n about the circle. We finish using the connection. Art.
2nd row: dial 17 v. p. (where 1 v. p. rise, and the remaining 16 v. p.), 2 tbsp. without crochet (b/n) in the next 2 tbsp. s/n first row. Now * 1 tbsp. b/n in the next article. s/n of the previous row, 16th century. p. and 2 tbsp. b/n in 2 tbsp. s/n of the previous row *The combination (* *) is repeated 6 times. That is, 7 arches are formed, 7 arches in total, and the row ends with a connection. Art.
row: knit in accordance with the diagram and cut the thread when finished. You need 9 such motives.
To connect we knit a small motif: cast on 8 ch. and close the ring.
1st row: dial 3 v. p. rise and 23 tbsp. s/n in a circle and finish the connection. Art.
2nd row: knit 14 in. p., 5 tbsp. s/n in 5 tbsp. s/n of the previous row. * 1 tbsp. s/n in art. s/n of the previous row, 11th century. p. and 5 tbsp. s/n in 5 tbsp. s/n of the previous row *, combination (**) is repeated 2 times, for a total count of 4. We complete the ending using the connection. Art. You need 4 of these elements. The motifs are connected according to the scheme.
Standard round napkins
If we consider the variety of round napkins, then there is room for your imagination to run wild. They will become not only an exclusive decoration for your home, but also an original gift. For round oval napkins, you can also use simple and complex motifs. And the end result is very beautiful napkins, even for beginners.

You will need white thin threads and hook No. 1. For a napkin, 7 circular motifs are knitted. They are connected after completing 4 rows, and to complete they are tied with 2 rows of air loops. For each element 8 vp. connect the connection Art.
row: knit 3 ch. and 19 st s/n and connect the outer loop with 3 sts of lifting
2nd row: need 5 v. p. lifting and 2 tbsp. with three yarn overs in connection. Art. knit together in a single loop, *4 in. p., 3 tbsp. with three double crochets in the next stitch with a single loop*. Repeat the combination (**) 19 times, 4 more times. p., we complete the row of connections. Art. in the 5th century. lifting point.
We knit the third and fourth rows in accordance with the diagram. That is, after connecting all the parts, we tie it with 2 rows of vp.
video tutorial
Openwork napkins
Crocheted openwork napkins always receive special attention, the diagrams of which you will find below. Beautiful and elegant, they can decorate any interior. Masterfully executed products will not leave anyone indifferent.
To perform openwork patterns, certain skills are required, since thin threads and small hooks are used for knitting. 
The scheme involves the use of a large number of techniques and combinations of loops.
and beginners can independently knit an openwork napkin, which is easy to make. It consists of air loops, which beginners can do. Make a slip loop and knit 17 sts. b/n inside the loop. We connect a row of connections. p. of the first and last loop.
2nd row: 3 v.p. and into the base loop we knit a st. b/n. and repeat in a circle, the first and last loops are connected.
3rd row: pass the hook under the arch and knit the connection. p., 3 v.p. and knitting st. b/n through the arch, repeat in a circle. We connect the 1st and last loops.
4th row: we knit the connection through the arch. loop and *4 v.p. and carry it through the next arch, knitting st. b/n.* We repeat the combination (**) in a circle. We connect the first and last loops.
5th row: We knit 2 connections into the arch. p. and * 5 vp, draw under the arch and knit st. b/n*, (**) repeat to the end, connect the first and last loops.
row: again 2 connections. p and * 6 vp, draw under the arch and knit st. b/n*, (**) repeat, ending by connecting the 1st and last loop.
The size is simple, but the size of the openwork napkin can be adjusted independently, adhering to the knitting principle.
Video tutorials for beginners
Be sure to watch our selection of video tutorials for beginners.
How to read diagrams?
Napkin with stars

Size: 24*24 cm.
For knitting you will need: 40 g white cotton yarn (265 m/50 g), hook number 1.25-1.5.

Description of knitting: for a large motif, knit a chain of 8 air. p. and 1 connection Art. connect it into a ring. Perform 3 air. p. instead of 1 tbsp. s/n, 1 tbsp. s/n, then knit in the round * 2 air. p., 2 tbsp. s/n, from * repeat 6 times, finish with 2 air. p., 1 connection Art. to the 3rd air. n. beginning. Knit according to the pattern, start each circular row with air. p., the number of which is indicated in the diagram, and finish the connection. Art. The diagram shows only part of the napkin. Finish the circular rows according to the drawing. After the 11th round, the 1st mot is completed. Complete 4 such motifs in total; in the last row, connect each subsequent motif with a connection. Art. with the previous one. For small motifs, knit a chain of 8 chain stitches. and 1 connection Art. connect it into a ring. Knit according to the pattern. For the middle motif, perform 3 circular rows, in the last row attach the connecting motif. Art. to the others. For 8 external motifs, perform 3 rows according to the pattern; in the 3rd row, attach the motifs to the rest of the connections. Art. The numbers indicate circular rows. Stretch the napkin and dry it under a damp towel.
Crochet napkin “Bunch of Grapes”. Step-by-step master class
To work you will need 3 colors of acrylic yarn (white, green and blue) and hook number 3.
Crochet napkin: master class

We take a blue thread to knit grapes. We attach the thread to the arch and wind 7-10 elongated loops onto the hook (the number of elongated loops depends on the thickness of the thread), then we pull all the loops through the hook and secure them with a half-column. Then we knit 1-3 air loops (again depending on the thickness of the thread) and move on to a new berry.
We knit the remaining 9 berries in the same way. We cut the thread and fasten it.
And on all fans we knit the first tier of berry clusters.
Let's move on to the leaflet. First we knit 3 single crochet stitches, then 2 chain stitches, and again 3 single crochet stitches.
We knit 3 air loops to move to the bunch.
And we tie the bunch itself with connecting posts. Between the berries we knit 1-3 connecting stitches (depending on the thickness of the thread).
When the row is completely knitted with green thread, we move on to the second tier of berries on each bunch.
When knitting the next row with green thread, for the leaves we add 2 stitches in one loop of the bottom row on each side of the air arches. The green part of the knitting should be wide.
And so we knit until we knit the entire bunch.
We cut all the ends of the threads, tuck them in and tie the entire napkin in a circle with arches of 6 air loops. We insert a hook into each loop of the previous row.
The work is done.
Filet crochet is a filet lace style knitting pattern. Using this technique, you can create truly beautiful napkins and tablecloths, as well as summer blouses and openwork scarves. And knitting them is simple and very interesting. Sirloin knitting is similar to fillet embroidery. Double crochets and chain stitches form a mesh and at the same time a pattern is knitted on it. For those who want to make a beautiful thing using the fillet knitting technique: the patterns can be seen below:


Loin knitting napkins
It’s best to start getting acquainted with the fillet knitting technique with small napkins. The peculiarity of fillet knitting is that it requires a large space for a complex and interesting pattern. Therefore, the larger the fabric, the more room for imagination in the fillet knitting technique.
The theme in loin knitting can be varied, since you can implement anything you want using this technique. The most famous styles of loin knitting are checkered fabric designs that resemble geometry. Therefore, the pattern embodied in the fillet technique looks very beautiful. The patterns for fillet crochet technique are given below:
How to master this style for beginners
The fillet mesh, which is the basis of crochet, can be simple and unfilled. But there may be a more complex option, with filling in the cells that make up the pattern. However, the possibilities of fillet knitting do not end there.
Ribbons can also be threaded into these cells, and ruffles can be knitted along the contour of these cells. Today, fillet knitting resembles a kind of imitation of fillet-guipure embroidery.
There is nothing difficult in the fillet knitting technique; you just need to strictly follow the patterns and also check the strength of the threads, and then you will get a beautiful product. You can make different things with fillet knitting: napkins, tablecloths, clothes. After all, it’s always nice to admire things made with your own hands. The main thing is to have a responsible approach to creating materials. It is important that they are done flawlessly.
To easily master fillet crochet, beginners need patterns with a full description of the pattern. You can start with a simple example, the photo is below: 

We will need:
regular cotton threads No. 10 or medium-thick yarn, any neutral color;
hook No. 3-3.5;
But first of all, you need to learn how to read crochet patterns. An example of such a diagram with notations can be seen below: 
Work should begin by knitting a chain of air loops. The number of stitches must be even, and one more stitch at the end to complete the row.
It is necessary to link a sample that may be useful in the future. The width of the finished product should be at least 25 cm, that is, about 30 cells or 60 loops plus 1 air loop. The length of the finished product should be 1.5 times greater than the width, about 45-50 cells.
It is important to know that the number of air loops and the number of columns does not coincide with the number of cells, but the number of rows corresponds to the number of cells in height.
Step-by-step master class with photos
You need to cast on 12 loops 
Next you need to connect the chain into a ring 
Then connect 2 air loops into the 3rd from the beginning 
Then 5 loops in the same loop 
Next you need to knit double crochets into a loop, and the result will be a neat mesh 
Now the needlewomen are very lucky. After all, a huge number of magazines are sold in which you can find free patterns about loin crochet. There is also a lot of information on the Internet. Sections on fillet knitting can help you figure it out. These sections contain a lot of good diagrams and drawings that you can easily learn from. Having studied the fillet knitting technique, you will be able to amaze everyone with your wonderful works.
For a long time, a television, carefully covered with a napkin, remained one of the main attributes of any Soviet housing. Times are changing, and now it is rare to see a woman who decorates her home with knitted napkins. However, seeing such a decoration in someone else’s house, each of us admires the talent and skill of the craftswoman. So why not continue the tradition of knitting beautiful things that will bring new, interesting accents to your home? Crochet napkins– what could be simpler? Especially if there is an article with diagrams- things work out simple but very beautiful!
How to understand a knitting pattern?
Crocheting napkins using a crochet hook is really simple, but the working pattern is not always clear. We invite you to look at this picture - the main symbols that are most often used when weaving are deciphered here.

Knitting in circles
The simplest and most classic knitting is circular weaving. The designs for such napkins, as you can see, are very simple - the main thing is to know the symbols and have at least a little experience.
As you can see, many patterns with German text are an echo of those times when it was possible to find a way to knit a beautiful thing only in German magazines. And now such napkins can be knitted using patterns from the Internet - what could be more accessible and simpler?


By the way, many needlewomen use patterns for knitting lace doilies to create interesting and unusual large items - for example, tops or dresses.
Figured napkins
DIY knitting crocheted napkins with patterns taken from our article will be excellent, simple and beautiful solution for non-standard surfaces. After all, it often turns out that you need to decorate part of a piece of furniture. A round napkin has its drawbacks, and then you should pay attention to such figured things. They are the ones who show your taste and ability not only to knit, but also to decorate the surrounding space.


Patterns for napkins in the style of fillet knitting
Using a hook you can knit such unusual, but incredibly beautiful napkins:


Experienced knitters know that this technique is called “loin knitting” and any item is knitted very quickly and simply, although you cannot tell this by the excellent result. Amazing job! Try to surprise your family and guests by decorating your home with these napkins.
Bruges lace for napkins
There is such an interesting way of knitting napkins using a hook. Of course, this will not be easy for beginners, but more experienced craftswomen can easily find master classes describing this technique on the Internet. We suggest you admire the options for napkins that you can knit yourself (and they look as if they were machine knitted!). For lovers of Bruges lace, we also offer quite simple patterns.


Napkins with the spirit of Ireland
We have already told you a little about Irish lace . Crochet napkins with patterns knit using this technique Just, but the thing turns out very beautiful. Such natural motifs will be an excellent addition to any interior.