Covers and cushions for chairs using patchwork technique. Cozy pouffe pillows in patchwork style for stools and chairs
If there are no textiles in the design of an apartment, then it looks like a non-residential space, creates a feeling of cold and becomes uncomfortable. To fix this, decorate the room and make it comfortable, you can create an interesting cover for upholstered furniture or a chair seat with your own hands. You can choose beautiful pillows or bedspreads and much more.
If you have sewing or knitting skills, you can create covers for stools and chairs yourself and without much difficulty. But the furniture will look more beautiful in the interior of the room, and at the same time it will become much more comfortable. This cover is easier to clean than upholstery. And in addition, it can be made themed to decorate a room for an event or in the form of an animal for a child’s room.
Now we will analyze several different techniques for creating seats in detail with descriptions.
Knitted products
Knitted items evoke feelings of warmth and softness, and chair covers create a special charm and attractiveness.
Option one
We will need any threads, of any composition and different colors. We will do the knitting with crochet.
The diagram below will help you visually suggest how to knit:

For knitting we will use the “popcorn” pattern. Since stools are often square, when creating them we will knit two elements from one arch in the corners. We collect eight air loops with a chain and close them into a ring with a connecting column. In the 1st row we make three air lifting loops, then we knit four double crochets from the ring. After this, we form a cone and remove the hook from the working loop. We insert it into the third lifting loop, then again into the working one. In order to assemble a series of columns into a cone, we pull the working thread through the 1st loop.
We knit four chain stitches and five double crochets from the ring. We pass the hook through the top of the 1st column, and then into the working loop through the top of the 1st column. We do this twice. We finish the row by knitting four chain stitches, connecting column into the 1st cone. We knit the second row. We make three air lifting loops. We knit two cones from the arches, making four air loops between them, and three air loops on the sides of the square. The first cone will consist of instep stitches and four double crochets, and all other cones will consist of five double crochets.
In the third row we knit two cones from the corner arches, and between them there are four air loops. On the sides of the square we make three air loops, then cones from the arch and three air loops. Finish the row with a connecting column at the top of the 1st cone. We knit all the next rows in exactly the same way, not forgetting to knit two cones from the corner arches. And on the sides of the square you need to knit 1 cone from the arch every three air loops.

We select and combine colors depending on the colors used in the interior. The cover will look more harmonious and brighter if you use the brightest yarn in the center, and then gradually move to dark tones towards the edges. To change the color, you need to knit the row to the end, cut and fasten the thread, then attach a thread of a different shade.
After the square reaches the size of a stool, we knit two more rows of cones without increasing the corners. When making the last row, we knit the cones through two air loops. This will make the edges of the cover narrower.
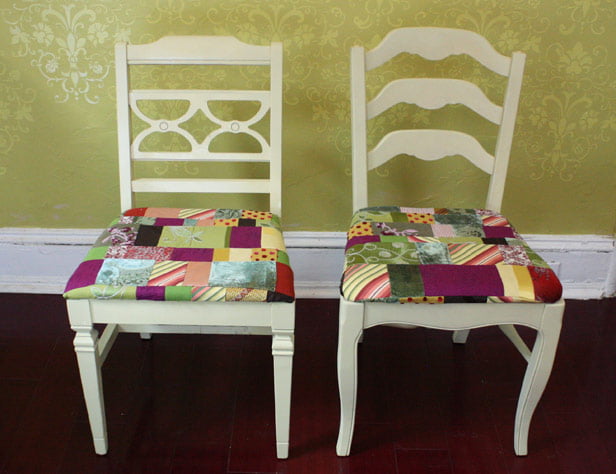
All that remains is to put the cover on the stool and fix the corners along the bottom of the seat.
Option two
An original chair cover can also be knitted; let’s look at this method in detail using the example of the cover shown in the photo below.
The size of the chair for which knitting is performed is shown in the picture below.
In this version, knitting is made from natural wool; you can also use acrylic threads with wool or cotton.

Patchwork
An original seat cushion can be created using the patchwork technique. The lightest elements are squares and triangles. This technique is very simple and a beginner can easily handle it. You can use a variety of color options and combinations, while creating unique patterns.

Now let's start sewing a seat from scraps, we will need:
- Several pieces of cotton printed fabric in different colors;
- Roller knife and cutting mat;
- Sintepon;
- Six buttons with a diameter of 28 millimeters;
- Six buttons with a diameter of six to ten millimeters;
- Ruler, scissors;
- Needle and thread;
- Sewing machine.
Note! If you don’t have a specialized roller knife, you can use scissors when cutting.
Getting the job done:
- We cut out the details.
We select fabrics that match each other.

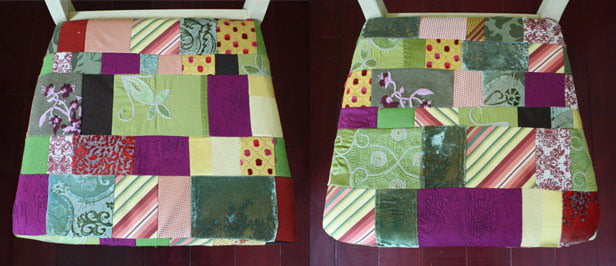
The sides of the seat consist of 24 squares. Based on this, we need 48 squares. For fabrics from this example it turned out: fabric with flowers - 24 pcs., green with leaves - 6 pcs., white with leaves - 6 pcs., pink with polka dots - 6 pcs., pink with leaves - 6 pcs.
We make squares with sides of nine centimeters.

- Sewing a pillow.
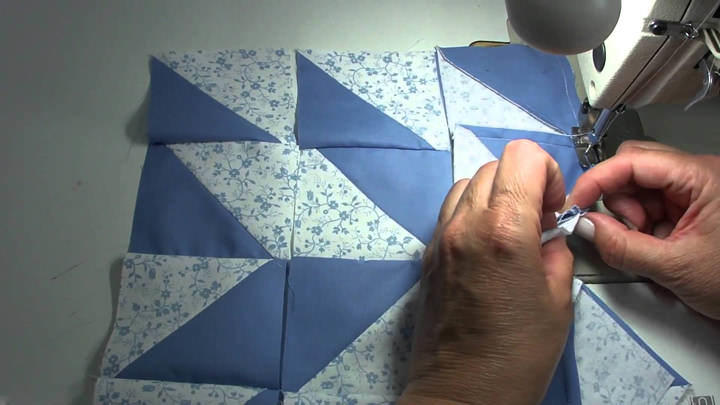
We lay out the squares on the table in the same way as they will be located in the finished product.

Then we sew the squares together.

If everything is done correctly, the back side will turn out very neat.

We sew the squares for the second side of the seat in the same way.
Then we cut out strips whose lengths will be equal to the length of the sides of a rectangle sewn from squares, and the width will be six centimeters.

We sew these strips to each side of one rectangle, with a seam allowance of six millimeters.

Please note that due to the seams, the strips turned out to be slightly longer than the rectangles; these will be seam allowances.

We sew stripes along the lines, as shown in the image below. We do this with all corners.

Now we sew the second side. Don't forget to leave a small hole so that you can turn the product inside out and stuff it with padding polyester. Then we sew it up with a hidden seam.

Then all that remains is to sew on the buttons and at the same time tighten the seat a little with them.
Today it will not be a problem to purchase any part necessary for the interior, because there are many stores that satisfy almost all needs. Therefore, handicrafts are more classified as hobbies. For example, patchwork pillows have found their fans among craftswomen who use sewing to create a unique decorative element with their own hands.
When you want to decorate a room in a special way, bringing coziness and comfort into it, many people began to use patchwork pillows. With the help of such design solutions, it is possible to successfully highlight an armchair, bed or sofa cushions.
To add such a detail to the interior, you can sew special pillowcases from scraps or directly make a pillow with your own hands.
For those who decide to use the second option, it is important that all the necessary materials are at hand. Only by strictly following the special technique, using diagrams and taking into account all the instructions provided by the master class, will you be able to avoid missing a single detail.

What are the advantages of patchwork:
- Sewing from scraps is used not only for making pillows, it can be blankets, clothes and pillowcases.
- It is important that this style has become a real find for thrifty housewives.
- To sew, for example, a pillowcase, old used fabrics were selected, from which flaps of the required size were cut out. And then the required model was created.
Using this simple method, you can make the overall interior bright and beautiful by adding an interesting detail from multi-colored scraps with your own hands.
How to make patchwork pillows with your own hands
Having decided to make such a decorative element with your own hands, you should determine which technique is best suited for creating a pillow. There is a master class that helps beginners learn how to create different models.
First, you need to choose your own scheme; with its help, no matter what technique you choose, you will be able to correctly complete the job you started. Moreover, the shreds can differ in size and color, and can also be made from different types of fabric.

Therefore, if you decide to decorate sofa cushions with your own hands, you can use fabric scraps in any way you like, thereby creating your own unique patchwork style. After all, there is no clearly established type of pillow, and before you start sewing, you should determine which shape (round, square or rectangular) and size will best suit the interior.
Thanks to the use of a special pattern, even a beginner can quickly sew a patchwork pillow, and this activity will become an interesting and favorite hobby.
How to sew a patchwork pillow with your own hands (video)
Patchwork patchwork technique: patterns for pillows
So, having decided to start sewing a decorative pillow yourself, first of all you will need special patterns, after applying which you need to use a master class. Moreover, the diagrams will help each needlewoman choose the best option.
The most common are shreds represented by blocks of squares or other shapes.
For beginners, these schemes are suitable:
- Square within a square. A square consisting of isosceles triangles.
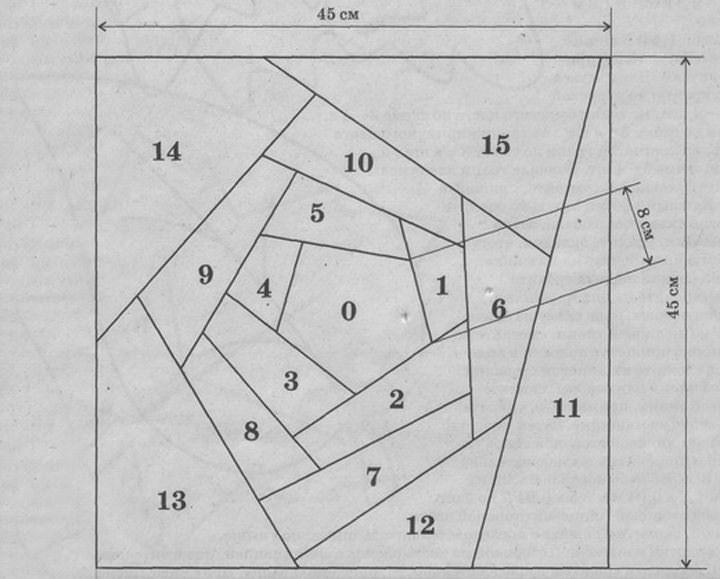
- American square. The diagram is represented by a figure located in the center, surrounded in a spiral by various rectangles, in which the length differs, but the width remains the same size.
- Russian square. Here you need to sew special stripes and triangles around the main figure.
Those who already have some experience in creating a patchwork style can use diagrams:
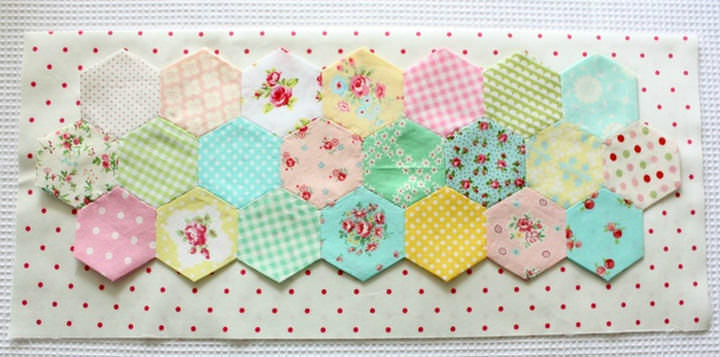
- Diamond. This composition contains several quadrangles and pentagons. This pattern is designed to create six patterns.
- Mill. Here triangles and squares of different sizes are successfully combined.
- Star. This pattern includes a combination of triangles in which all sides are equal.
After choosing a suitable pattern, using the master class, you should begin sewing.
How to properly patchwork pillows: master class
Any master class on sewing a patchwork pillow with your own hands is designed to comply with several points:
Before starting work, it is important to carefully prepare your workplace and stock up on all the necessary materials.
Patchwork stages:
- If it has been decided to use a master class with embroidery for decoration, floss, scissors, a needle, etc. must be present. The embroidery is applied to the fabric, and then used to create a pillowcase or pillow.
- You need to leave 2-2.5 cm on each side of the design. The next step is to cut out the shreds. You will need strips the width of which is equal to the embroidery and the height of 2.7 cm. Be sure to leave 0.6 cm on each side for the seam. After sewing the flap, you need to iron it well with an iron.
- The next strip should be from a different fabric. It is measured by the overall size of the resulting flap and ironed well. The sizes of the remaining strips are measured in the same way and cut from other types of fabric.
- For such a pillow with embroidery, you will need four types of fabric, which must be alternated with each other until the front side is ready. All that remains is to sew the bottom part to it, fill it with filler and make a hidden seam.
This master class is just one of many possible options for creating decorative pillows.
Master class on sewing fragrances using patchwork technique (video)
Patchwork design solution: pillow ideas
A patchwork pillow is a thought. To create this style, ideas using bright and eye-catching colors are suitable. Thanks to its fashionable sewing technique, this type of patchwork will be an excellent decoration for the room.
Types of pillows:
- Classic pillow. Ideas for lovers of this style can be varied and in demand. Standing out for its traditional style, this type easily fits into any interior. The main condition for such a design solution is a successful combination of the patchwork pillow with the tone of the furniture. Moreover, classic ideas can combine the use of contrasting fabrics or remnants of curtain fabrics. To create such a pillow, preference is given to rectangular stripes and square patches.
- Knitted pillow. Using such ideas for patchwork, you can not only successfully highlight a recreation area, but also improve the interior of the room. For example, comfort and a cozy atmosphere can be achieved with the help of a round tube pillow. Foam rubber, hooks and yarn are prepared in advance. The main thing is to knit the selected openwork pattern, the edges of which should be enclosed in a small square frame at the end. All that remains is to sew the opposite sides of the embroidery and you get a pipe. Using circular knitting, you can make the sides of the pillow. And foam rubber is used to stuff it.
- Denim pillow. Using patchwork sewing for such a patchwork idea, you can create an original design solution. Moreover, there will be no problem with selecting fabric, because thanks to this technique, old jeans will find their new use. There is nothing complicated about the denim patchwork technique. It completely replicates the classic style.
- Crazy patchwork. This is the most striking style of decorative sewing. A master class of this type is presented using many bright patches of different colors and sizes, as well as laces and braid (they will help hide and decorate the seams).

Unlike the classics, there are no alternately connected strips of fabric. The remaining pieces of fabric must be sewn one by one to the central uneven patch, aligning the edges if necessary.
What are patchwork pillowcases
Today, the most common product among patchwork designs are patchwork pillows. And needlewomen give particular preference to sewing decorative pillowcases.
Before you start sewing, you should apply the finished patchwork design to the fabric. After this, the pillowcase pattern must be transferred to the canvas, folded right side inward. Be sure to leave allowances for fastening.
In order for the pillowcase to fit perfectly into the interior, it is important to choose the right style in which it should be made. It won't be a problem with so many great ideas out there and it won't take much time.
By starting to create such pillowcases, even a beginner can quickly learn patchwork sewing and, over time, acquire good skills in the production of other patchwork products.
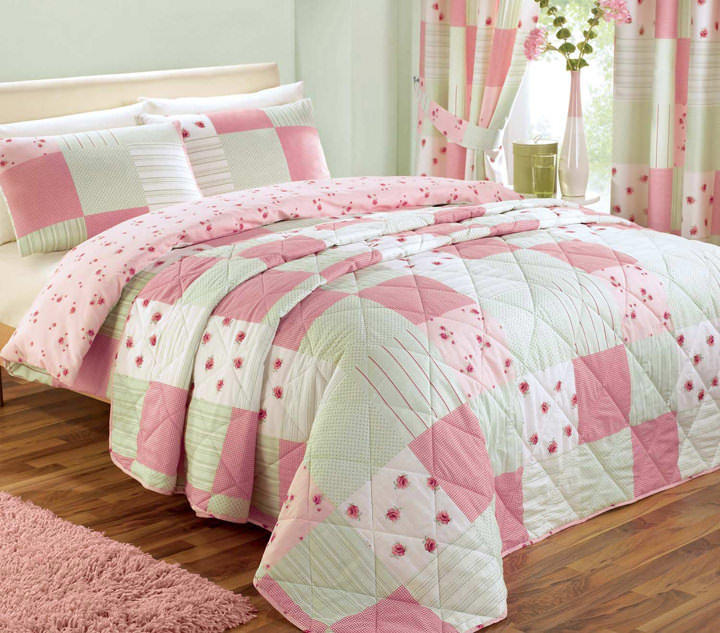
Best Design Solution: Patchwork Bedding
Patchwork style bedding is well suited for a great mood and creating coziness in the home. Thanks to the variety of options, every housewife will be able to create a special interior detail with her own hands.
Bed linen made from shreds will be a practical design solution. This type of linen does not require any special care; it is easy to wash and iron. Another advantage will be its excellent wear resistance. Due to the high density of the fabric, patchwork linen will not lose its color for a long time, thus it can decorate the room for many years.
Sewing a duvet cover or sheet using the patchwork technique will not be a problem thanks to the existence of special master classes that help in creating a masterpiece. You just need to be patient and have all the materials necessary for the job.
Ideas for decorative pillows in patchwork style (video)
So, the patchwork technique will be an excellent decoration for any home. Thanks to patchwork, even a beginner can independently create a unique interior detail.
Patchwork pillows (photo)


In this master class we will tell you how to make amazingly beautiful soft seats for chairs and stools with your own hands. Let's call them "ottomans".
First we need fabric for the base. It won’t be visible on the finished product, but it will help us a lot. This base will act as a grid on which we will draw the layout of our ottomans. My stool turned out to measure 30 by 30 centimeters. From our base we cut out a square 32 by 32 centimeters. 2 centimeters will remain as an allowance, more precisely one centimeter on each side.

Therefore, I step back a centimeter from each edge and draw a square with sides of 30 by 30 centimeters. Then it’s a little more complicated, we need to divide the large square into a number of small squares, equal in height and width. Therefore, we draw 5 squares of 6 centimeters each. So, our large square was divided into 5 small ones in width and the same in length. There are 25 small squares in total. Our base is ready.

Let's move on to the fun part. To begin with, let's choose the fabrics that will make up our seat. You can choose a variety of fabrics, and what’s best is that you can use scraps left over from something. The main thing is that from these flaps we can cut a square with sides of 11.5 centimeters. And we should have 25 such squares. Then, we can arrange them in the order in which we want to see our future pouf. If there are several colors, you can lay out a diamond, or limit yourself to multi-colored squares inside each other. In general, your imagination has freedom and complete freedom. I limited myself to diagonal lines.

Now we sew our squares into a strip. Simply take a row of squares and sew them together in sequence. So, we already have five stripes. Now the most important part begins. We will need tailor's pins. The first strip must be pinned together with a large square, placing the strip on it with the front side facing out. We stick the pins in so that the assembly lines of the small squares and the lines on the grid coincide. At the same time, do not forget that both the large and all small squares contain allowances that extend beyond the grid line.

We stick pins across the long side of the strip of small squares. This will make it much easier to sew everything together later. The outer squares are connected from the very edge, although there is no connecting seam there. Next, we secure the vertical lines with pins, aligning the seams of the patchwork strip with the lines on the base. The most difficult thing here will be to form beautiful folds. In fact, it won't be difficult for you to do this. Our scraps turned into a series of pockets. Carefully fill them with filler. You can use padding polyester, cotton wool or fabric scraps. I used foam rubber cut into small pieces. Stuff and sew on top.

Sometimes it can be difficult to decide on a gift for your loved ones, because they are so important to us and, of course, deserve the best. In this case, it is best to do something yourself. An original gift for your grandmother, mother or friend can be made using the patchwork technique.
England is considered the birthplace of patchwork, but it is very much loved in many other countries. And Russian needlewomen are no exception. Square and triangle are the simplest elements of patchwork. In this master class will be told how to sew a seat cushion from squares. It's very simple and accessible for beginners. By the way, using different colors and combinations, you can create an endless number of non-repeating patterns with the help of squares.
So, let's start sewing a patchwork pillow and first decide on the necessary tools and materials.
We will need:
By the way, if you don’t have a special cutting mat and a roller blade, don’t despair! Since the pillow is small and consists of simple elements - squares - you can cut out the parts using scissors.
Reveal the details.
To begin, select fabrics in the desired colors. It is very important that they are combined with each other. I used cotton fabrics with floral patterns.

Each side of the pillow consists of 24 squares. This means that in total we need to cut out 48 squares. For these fabrics it turned out:
The side length of the square is 9 cm.

Sewing a pillow.
We place the squares of one side on the table in the order in which they will be placed on the pillow.

Sew the squares together. If you don’t know how to stitch squares correctly, then we have a good master class on our website that explains this in detail:

If everything is done correctly, the wrong side will look very neat:

Sew the squares on the back side of the pillow in the same way.
We cut out strips whose lengths are equal to the length of the sides of a rectangle sewn from squares, and whose height is 6 cm.

Sew strips to each side of the square. The seam allowance is 6 mm.

Please note that now, due to the seams, the strips that we sewed to the rectangle turned out to be slightly longer than the patchwork part. These will be the seam allowances.

We sew the stripes along the line indicated in the figure.
We do this with all four corners.

Sew the reverse side. Don’t forget to leave a small hole through which we turn the product inside out and stuff it with padding polyester. After this, we sew up the hole with a hidden seam.

All that remains is to sew on the buttons and use them to lightly tighten the pillow.

We will cover large buttons (diameter 28 mm) with fabric. To do this, cut out a circle with a diameter of 65 mm from fabric. If you have buttons of a different diameter, just keep in mind that the circle of fabric should be 3-4 cm larger.

We place a basting stitch along the edge of the fabric circle.

We tighten it slightly, put a ball of synthetic padding polyester and a button inside. Tighten the hole, then stitch it several times.

Sew buttons onto the pillow. We fasten it on the reverse side with small buttons.

Congratulations! You've just made your own patchwork pillow!

This master class was written specifically for the site, so copying the entire material is PROHIBITED! And in case of partial copying, be sure to post a link to the source.

With best wishes in your creativity, Jeiana Johanssen.
At all times, good housewives were engaged in needlework. Even our great-great-grandmothers knew how to sew from scraps. And not only in Rus' they sewed scraps into one whole, but also in European countries and even in America. And it makes no difference at all whether people live richly or not in this country. The whole point is that a woman who invents some useful thing in the house from scraps, showed others that everything in her house goes into use, and with her own hands created comfort, stability and reliability. And in our time, housewives get to work precisely in order to create things that create the aura of a warm and well-groomed home.
Nowadays, sewing from patches is called the foreign word “patchwork”. But the name does not change the essence. If you haven't tried to learn how to sew pieces of fabric together before, it's never too late to start learning. First, try sewing simple shapes cut from cotton fabrics: squares or rectangles. They are called blocks. It is necessary to cut pieces of fabric of the same size; for beginners this will be the most acceptable option.

Although you can combine rectangles and squares in one canvas. Before sewing the pieces together, lay them out on the floor so that you can see the combination of colors that will be in the finished product.
Once you learn how to create a common fabric out of them, try sewing patchwork covers or pillows for your chairs.

Such pillows are easy to make; practically no material costs are required, because leftover fabrics are used that are no longer useful. At the same time, enjoy being creative. And such pillows will suit almost any folk style:, and others.

Take a wooden chair that has a hard seat and measure its width and length. If the chair is round, you will have to measure the diameter. To make a pattern for the future pillow, you need to transfer these dimensions onto the newspaper, adding 3 centimeters on each side for the seams. You can, of course, attach a sample sewn from scraps to a chair and trim the edges “by eye,” but this is best done by those who have already “trained” their hands and can easily do everything correctly. Others should act more cautiously. The future pillow will require filler. Choose for yourself what it will be: padding polyester, holofiber, comforter or other material.
Sew the bottom part of the pillow to the scrap piece cut out from the pattern; it can be just a plain fabric or with some kind of pattern. It is better to choose a fabric that will not slide on the chair seat: flannel or flannel. In order to sew these two parts, fold them with their right sides inward and make a seam along the entire perimeter, not forgetting to leave 8-10 centimeters unstitched to fill the pillow with some soft material. When the pillow is filled, distribute the filler evenly throughout the pillow, choose the thickness yourself. Then you need to sew up the remaining hole by hand or using a sewing machine. It’s good if you stitch your new pillow on a sewing machine so that the filling is sewn to the fabric and then it will not move.

All that remains is to sew a decorative piping, cord, fringe or frill along the edge of the new pillow. To do this, you can manually baste the selected material onto the pillow to make it easier to sew it on a machine.

To secure the pillow to the chair seat, sew ribbons to its corners, which will tie the pillow to the back and legs of the chair. In order to hide the place where the ribbon is attached to the pillow, or just for beauty, we sew on a button of a matching color.

If you decide to sew a pillow or cover for a round stool, the procedure is the same. The ruffles on these pillows look elegant. To prevent such a pillow from sliding off the seat, insert an elastic band into the strip of fabric that goes around the seat of the stool.

In addition to covers and cushions for chairs, you can sew a patchwork-style cover for the backrest. This is also a simple product. It is sewn in the same way as a pillow, only the fourth side is not sewn at all, but is put on the back of a chair. Difficulty may arise if the back of the chair widens upward. Then you will have to make a pattern for the cover according to the top measurement, and tighten the bottom of the product with braid or elastic.

It happens that the chair is still quite strong, but the soft seat has either worn out or the fabric on it has lost its original appearance. To update such a chair, stock up on tools: screwdrivers (spatula and square), pliers and a furniture stapler. You will also need desire and patience. Turn the chair over and unscrew the seat from the chair frame. Using pliers, pull out the staples that secure the upholstery. When you remove the old fabric, cut the seat cover from the new fabric according to its dimensions.