Beautiful craft for March 8th. Master class for primary school students
Hello everyone who came to my blog today! How are you feeling? I hope it's fun and you're doing well. After all, another time of year will soon come, and with it the spring holiday International Women's Day will come. And we will gladly congratulate all women on this day.
Let's present mothers and grandmothers with beautiful and original crafts that will be made with care and love.
Of course, you can make a bunch and shower your favorite girls and sisters with them. You can also make gorgeous bouquets of flowers or make original postcards and souvenirs. From this article you will learn all this, so let's go...
What can you make crafts from? Of course, from scrap materials that you always have on hand, let it be paper, cotton pads and a bunch of napkins. After all, the main thing is to come up with and then bring the idea to reality.
I really liked this craft that you can give to your mother - this is a flower. Moreover, it is made of paper, and look how magical it looks in this pot.
You will need corrugated paper, and it will need to be cut into small squares, they should all be the same.

And then glue it to the base using the trimming method. You can also make the base from a long strip of paper, twist it into a tube and glue it together. After this, twist each piece of paper prepared for this task onto a rod and glue it to the base.

Make petals and take any flower pot, you can fill it with plaster or come up with something else.

Be creative and you will succeed.

Using this technique you can create a different look.

If you want to find a more delicate option, then make the number 8 from satin ribbons and you can even hang it on the wall. Here, of course, you need certain skills to create such beauty in the Kazansha style.

Using the quilling technique you can also build a real spring masterpiece, see for yourself.

This piece looks amazingly cute and very original; even your teacher will be delighted to receive such a gift.

The most common children's souvenir is a postcard in the form of tulips or some other flowers.

I also liked this fridge magnet basket, how cool, don’t you think?
Or a small multi-colored clearing like this.

Of course, there were some protrusions, my favorite type, if you need a template, write to me, I’ll send it for free. So chic and not at all difficult, literally five minutes and your masterpiece in the form of an openwork figure eight will stand on the table and you won’t take your eyes off it.

There is an even easier option: from ordinary strips you can make such a wonderful bouquet, which both a kindergarten child and a schoolchild can do.

You can use applique, make a template of a vase or basket and decorate it with leaves and flowers.

Dads, remember they gave it to you when you were preparing for February 23, you can repay this idea here. How do you like it?

For the next great idea you will need materials, namely felt, a needle and thread and scissors. You can create such a magical and bright bouquet.

First make a base like this; you can also use satin ribbon to secure it.

Cut out the flowers from felt, and the center will be a bead.

In principle, instead of a bead, you can use something else, multi-colored pebbles or sparkles.

I was also captivated by this soft pink beauty, and why go to the store when you can make a miracle yourself. It looks like an orchid, just cool!

Volumetric postcards made of paper and cardboard
On this day, all daughters and sons delight their mothers and grandmothers with nice gifts, presenting them with cards that they made themselves during labor lessons or in kindergarten. These can be done quickly and at the same time beautifully.
I suggest you and your children make such a nice greeting card from corrugated paper; it will also look voluminous, take note. You can use this step-by-step master class in senior, preparatory or primary classes. Get a bouquet of roses or wildflowers.

We will need:
- cardboard
- corrugated paper
- satin tape
- openwork napkins for baking

Stages of work:
1. Take cardboard, preferably blue, light blue or green. Then glue a napkin to it below the center.

2. Cut strips from corrugated paper and place it on a pencil or pen and begin to twist it, as shown in this photo.

3. And then pull it out, pull it off the pencil like an accordion.

4. Twist in a spiral to create something similar to an open bud.

5. Use your fingers to unwind and fluff the product.

6. Glue colorful creations onto a napkin.

7. Cut out leaves from green corrugated paper.

8. And decorate the craft with them.

9. Make a bow from a satin ribbon and tie a bouquet.

10. Pretty good and I would say it looks charming. Creative success! Don't forget to learn a poem on this topic.

You can also make such a creative product.

With some preparation, you can make this beauty from an openwork napkin and cardboard - a daisy.

If you are looking for a simpler option, for example for the little ones from 3-5 years old, for example for the middle group of a kindergarten, then this tip may give you the right idea.

For the younger group, make a huge craft from plasticine, literally 10 minutes and you’re done. Look how great you can make it out of balloons.

Or a violet.

For schoolchildren, you can make a product from threads, like embroidery. The product itself does not use glue; the threads pass through the holes.

The idea of making the number 8 and using a music disc as a stand seemed quite interesting to me.

And this is what can come out of these materials.
The most beautiful souvenir ideas
First of all, I want to invite you to watch this video, how do you like this idea? Be sure to write your opinion at the bottom of this note after watching.
With the arrival of spring, you can notice not only flowers, but also the arrival of birds and insects. So let's make a clearing with a bee, wow, it all looks just great and very beautiful.
We will need:
- toilet paper roll
- double sided tape
- kinder surprise mold

Stages of work:
1. Take the sleeve and double-sided tape, wrap it around the entire diameter.

2. Then glue a piece of paper with double-sided tape.

3. Wrap any unnecessary leftover paper inside.

4. Take sheets of green paper of different colors, fold them in half, and then cut them into strips, as if you were making a bookmark.
5. Using a stapler, wrap the pieces onto the prepared base and secure.

6. You will get seductive leaves or grass. The base of the sleeve needs to be wrapped with paper again to hide everything that is not needed.

7. Or do it like this.

8. Then buy figurines for decoration in the store or make them yourself, butterflies, bugs, spiders, etc. Give free rein to your imagination and apply them on the grass in an original and scattered manner.

9. After this, make a blank of wings for the butterfly, which will be made from a surprise kinder case.

10. Don’t forget about the eyes and possibly a mouth, which you can draw with a marker. Here are the tones of spring charm that will decorate any home or apartment.


Use available materials, lids, cocktail straws and inspiration will definitely come to you.

There are a great many options, I never cease to admire and be amazed at times.

You see, they even used an egg carton here. And of course we used regular pasta to make another masterpiece.

As they say, who knows what, what did you come up with? Or are you still searching and don't know what to do?

Well, then you might be interested in making such a souvenir using ordinary disposable spoons, and indeed tulips came out, only unusual ones.

Undoubtedly, a basket or pot will emphasize the originality of this simple idea.

I saw this kind of work at school the other day.

By the way, you can even make dandelions or daisies from cotton swabs and plasticine; what flower does this work remind you of?

Well, there's definitely a dandelion here.

And here there are most likely asters.


Or chamomile.

Using paints and brushes you can draw a story and a greeting.

Skilled craftswomen can make a product from beads, it is of course difficult, but for those who are interested in it it will not be difficult.
For most, the palm card remains the most favorite. It’s so simple, you can even take it to a competition or exhibition.

Making crafts for kindergarten with children
With the kids, first of all, you can make all kinds of drawings for this international day. Use something unusual, like drawing with crumpled paper or a cotton ball.

Well, for joint activities, you can give such a gift to mothers and grandmothers and place it near the group at the booths with congratulations.

We will need:
- red paper napkins
- corrugated paper
- scissors
- stapler
- tassel
- cardboard

Stages of work:
1. Take a regular paper napkin, look at the diagrams from left to right. Fold it in half, then again, connect it in the center with a stapler. Then cut out a shape resembling a circle. Make small cuts along the entire diameter, and then fluff the product.

2. Cut out the shape of a bouquet from cardboard and wrap it with corrugated paper, tie a bow.

3. Make leaves and let the children glue the resulting flowers in any order.

4. This is such a wonderful and magical creation, it just looks amazing, like a real bouquet of roses.

We give flowers to mothers on March 8
In this post I won’t delve too deeply into this topic, at the very beginning you already saw some ideas, now I’ll show you the simplest ones, and in the next issue there will be new items and very cool options for flowers for this Women’s Day. So, don’t miss a new note, add this one to your bookmarks so you don’t lose it.
You can make small bags out of pieces of paper for notes, look, and then glue them in a circle, this is what happens.
By the way, you can give such a charm to your favorite teacher).

Nothing seems special, but it looks cool.

Or you can use this video:
Also use coloring books, because children really love this activity. Any mother will be pleased to receive such a drawing.

You can use pictures with animals, or just with flowers.


Or at the same time even arrange it in the form of messages and wishes.

Choose any template you like, print it out and congratulate!

We will need:
- cotton pads
- scissors
- threads
- tassel
- gouache paint
- skewer or stick
- corrugated paper
Stages of work:
1. Place cotton wool on the stick; you can glue it with glue.
2. Then paint it yellow, and then wrap the cotton pad around the entire circumference of the stick, using a thread to prevent it from falling off.
3. Decorate the stick with corrugated green paper to create a stem, cut out a leaf and also wrap it on the stem.

4. These flowers will turn out white and at the same time elegant, quite beautiful and cute, super!

Master class for primary school students
I would like to offer you an unusual craft that will be made from yarn. You will also need a vase and your good mood, because you will get bright yellow flowers that everyone loves, called mimosa.
Next time in another post you will find instructions in this paper mimosa.

Well, now let's make a twig like this from threads of yarn. Here all the steps are shown at once, all you have to do is repeat.
Now let's create a box, or such a miracle can serve as a candy bowl or vase, 3 in 1, and this can be done from cardboard, toothpicks and woolen threads.
1. Cut a heart out of cardboard and stick toothpicks into it. But first of all, first make holes on the cardboard with a needle and drop glue into them, and then stick toothpicks.


3. This is what will happen over time, you can add beads or seed beads.

4. And of course, you can play with the shapes, make it round or square.

Well, how do you like this idea? If you don’t like it, then move on to the next type of 3D greeting card, so to speak 3D.
We will need:
- cardboard - 1 pc.
- colored paper
- PVA glue
- scissors
- designer punch
- rhinestones or scrapbooking set
Stages of work:
1. Take a white sheet of cardboard and fold it in half, make two cuts in the center 5 cm wide, like this, as shown in this photo.
2. Now bend it with your hands so that it looks like a ladder, this will be the base on which you will stick the craft.

3. Draw a basket out of colored paper and cut it out.


5. Determine the number of products yourself.

6. Now, using a special hole punch, make a decoration; to do this, take a strip 2-3 cm thick.

7. Glue this decor on the sides and the basket on the center.

8. Then decorate with flowers and butterflies, as well as rhinestones or sparkles. In general, what jewelry you have on hand.

You can use this template and make unusually expressive and pretty gerberas.

To do this, print out the flowers, and then glue them one on one so that it turns out quite lush and voluminous.

I also liked the work in the form of a fan, and there are tulips on it.

Or this postcard.


Also, such a cute wire product can be an excellent option for schoolchildren.

Or make such a souvenir from paper strips.

That's all for me. I wish that everything you plan will succeed. Creative success, inspiration and all the best and positive things! Bye-bye everyone!
Sincerely, Ekaterina Mantsurova
When something is done with your own hands, it takes on individual characteristics. How an artist puts a piece of his soul, leaving it in each of his paintings, how a writer shares his inner world. Such things immediately acquire their own unique features, their own aura, which makes them priceless. Let's look at some DIY crafts for March 8, the most beautiful ones you can make.
Purchased surprises do not have such an aura, because they are made by faceless craftsmen for the masses. That's why mothers usually keep their children's handicrafts, first postcards, plasticine figures, and sewn toys. They may be lopsided and simple, but truly priceless.
You can please your loved ones not only in childhood. It’s worth remembering how they created in the garden, then at school, marveling at the simplicity of making many things. Why not apply the acquired skills and at the same time expand your knowledge, because the most beautiful DIY crafts for March 8 will definitely delight your loved ones.
Why not store bought?
Indeed, in stores you can always find a dozen different things for any, even the most demanding taste. Boxes, various candles, soft toys, interior items or vases - depending on what your loved one likes best. And buying a gift is much faster. Choose the one you like and take it to the packaging department, they will be beautifully wrapped there.
All you have to do is take a postcard and write it. This can be done for the sake of a friend or colleague, but you want to please your loved one especially strongly. You can, of course, take something with humor, for example, a funny T-shirt or order a mug with a recognizable image, let it remain as a memory. But why not try DIY crafts for March 8th?

Any thing made by hand is unique. It has its own character, appearance, it carries a piece of the master who made it, and this turns even a simple little thing into a priceless surprise;
For crafts, they use available materials, so production will not be expensive, especially since you were planning gifts anyway;
A great opportunity to learn something new, and at the same time make several different crafts for loved ones, thus solving the “gift issue”;
By the way, an interesting idea: make several identical or slightly different little things that will connect, for example, a circle of close friends as a sign of friendship or sisters. Previously, they gave half medallions to their halves - a heart divided into parts, half a circle. Now you can make any things that are somehow interconnected, filling the gift with deep meaning. This is how family members remind you of blood ties, and friends remind you of the strength of friendly ties.

A hand-made gift has a better chance of being retained as a keepsake; most small items bought “once” are thrown away, others are simply used and, when they run out, are also thrown into the trash (for example, gift shampoos or bath accessories). A souvenir made by a loved one is kept for years.
Quilling - technique for crafts
A curious style, more like a beautiful folding of long ribbons. Here you will need paper cut into ribbons, good glue and instructions. You can make any shape with quilling, the main thing is to firmly secure it later so that it does not unravel. A good technique for making paintings, cardboard frames. The figures are voluminous and look interesting.
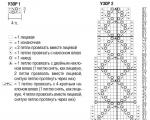
For convenience, you can take corrugated paper or several sheets of colored paper so that the finished drawing does not remain just white. Corrugated paper is softer and holds its shape better, while plain paper has more variety in colors. The only thing is that the figure will be completely the same color, as can be seen from the diagrams.

To make a beautiful card, you will need a durable cardboard background, pre-decorated. Quilling is beautifully complemented by flat drawings, figures like a flower from the proposed postcard option. Themes for March 8 cards are flowers, birds, beautiful bouquets.
Creating a postcard:
Choosing cardboard for the base;
PVA or a good pencil glue so that the quilling figures “take”;
Selecting a background image;
Selection of quilling figures;
Making smooth multi-colored paper strips;
Twisting and gluing them.
By the way, it is better to fill the inside of the postcard before gluing the three-dimensional figures, otherwise it will not be very convenient to write later.
Take bright, beautiful colors, choose the recipient’s favorite shades. After all, this is a spring holiday, the arrival of long-awaited warmth. And don’t skimp on good wishes!
Sometimes a beautiful drawing is enough for congratulations if it is made with one’s own hand. The recipient will understand the hidden meaning.

You can start with simple figures, eventually complicating the overall configuration. As you can see, quilling allows you to create a variety of compositions.
Box and quilling
There is no need to limit yourself to a postcard when you can make a real wonderful surprise, like a box. Every woman has a lot of small things that sometimes have nowhere to put them. And they just accumulate in boxes or drawers, sometimes it’s simply impossible to find the right thing there. The box will be an excellent and useful gift.
What you will need:
The paper is thick but easy to fold;
Ruler to measure length;
Scissors;
Good glue, better than PVA, quilling tools;
Paper bags.
Operating procedure:
Cut paper bags into even, uniform thin strips. First think about the shape of the box, its size and colors. Choose packages for this. For example, if you need white, take white paper if there are no white bags. It also needs to be cut into strips. One craft requires a lot of strips, don’t skimp.
Next, from thick, good cardboard (this is the future bottom of the box, ordinary cardboard is unlikely to work, so that later the recipient can put different things there and the bottom can withstand the weight), cut out a template evenly and beautifully. It is not necessary to make a rectangular or square box. If this is a heart, look at the dimensions: approximately 10 wide (5 on each side) and 8.5 cm long.

Taking the tools, roll up tight rolls from the paper you have stored. These are the edges of the bottom - glue each roll to hold its shape, then glue them together so that they go around the contour of the bottom.
You will get 3 separate ready-made layouts.
Next, twist 6 rolls, place one on top of the other and connect with glue. You will get 3 identical columns with 2 rolls each - glue them alternately from below, then to the base, and from above. Using the heart box as an example.
Now it's time to take the brown stripes. Roll other, S-shaped rolls that are more voluminous. Fill one of the ready-made heart shapes with them, gluing them - the lid is ready. Do not fill it with the same rolls, even if the color is the same, the curl pattern will turn out different.
Now it's time to decorate the sides of the box. Place the remaining free third frame on top of the bottom, gluing it to the tops of the three columns. And the remaining free space needs to be filled with rolls. You can make an unusual one for March 8th.

Beautiful little things from simple disposable spoons
These are sold at any grocery or hardware store. Large and small, often white. Disposable spoons are not too dense, they bend easily, but they hold their shape well and are easy to glue. True, the paint does not stick very well, so when choosing designs for spoons, it is better to use their native, white color. A pleasant surprise - a postcard.
What you will need:
Several spoons;
Sheet of cardboard;
Paint, if you plan to paint the background or immediately choose cardboard of the desired color;
Glue, PVA is best, it “takes” well.
Operating procedure:
You can vary the shape of the spoons to make the flower more interesting. To do this, cut off the tops of the spoons and cover them with a cloth, run a heated iron, light pressure is enough.
Choose something for the middle of the future flower. You can lay out a circle of sequins, or find a round already unnecessary decoration, cut out a regular cardboard circle or draw a circle.
Cover 2 spoons with green paint and trim the edges, giving them the shape of sheets.
Now it's time to collect the card. Carefully glue each part with PVA, holding it for a couple of minutes so that the glue “sets.”

The stem can also be cut out from another cardboard or drawn on it. By the way, before designing, take care of the internal content so that the voluminous cover does not interfere with your writing later. It’s easier to decorate the inside with a flat pattern, let only the outer part be voluminous.
In addition to a simple flower, you can make any figures from spoons, you just need a heat gun if you attach them to the edge. For example, collect a white Christmas tree or... a beautiful water lily, which love to sway mysteriously on the surfaces of ponds or swamps to the croaking of frogs.
Swamp Lily
You really will need a lot of spoons, each is a petal of a future flower, the more of them you get, the more beautiful and voluminous the lily will become. Therefore, take a couple of dozen at once, both large and small.
Cardboard - take green, it is needed for the petals for the water lily.
A figurine of a frog - to complement an already finished composition. Better take a toy.

Operating procedure:
Carefully cut all spoons to the shoulders. The beginning of the water lilies will be small spoons; they are glued tightly together with a heat gun. Hold each part, wait until the glue “sets” and when adding new parts, look at the condition of the structure so that the lily does not fall apart later.
The spoons for the next parts of the water lily need to be cut a little larger, leaving a little from the stem.
The center of the future flower can be decorated with yellow plastic - for example, cut into pieces from a yellow cup. You need to cut it with a fringe in a circle.
It is more difficult to monitor the integrity of the flower structure and its overall shape. Having finished with the water lily itself, carefully glue it to the green cardboard base, after cutting out the leaf. A lizard or frog would be a cute addition. Ready!

As a rule, all children, under the guidance of teachers, make crafts for March 8th in kindergarten. The materials will be useful for children in the primary, secondary and preparatory kindergarten groups.
However, if for some reason the baby does not become part of a large children's group, he can make a surprise at home if one of the elders helps him with this.
To create an impressive craft for mom with your own hands, you can turn any detail that is at hand into an original and beautiful souvenir or postcard.
Card with chamomile for March 8
For March 8th, you can make a charming card with daisies. We make the base of the card by folding a pink sheet of cardboard in half. Glue a green circle to the front of the card. To make daisy petals, we need thin strips of paper, which we twist with a stick or pencil.

Glue the twisted strips onto the green circle. We decorate the center of the circle with a twisted curl of yellow paper. We have the first daisy - the upper part of the future eight.

We frame the outline of the bottom of the figure eight with green leaves. Glue a small chamomile onto each of the leaves. We make small daisies in the same way as a large one, only we fold the paper strips in half. We complement the craft with yellow flowers. Postcard for March 8th - ready!

Postcard with a paper tulip
You can make a very beautiful postcard with a voluminous tulip from colored paper. Cut out a circle from yellow paper.

Fold the green paper in half and draw half a leaf on the fold. When cutting out, we get an even leaf with the center on the fold. For the postcard we need two leaves.

Fold a sheet of red cardboard in half - this is the base of the postcard. Cut out tulips from pink paper.

We fold the yellow circle around the edges. We glue the pink paper blanks together to form a three-dimensional tulip flower.

Glue green leaves and a tulip flower to the top of the yellow blank. We cut out a narrow strip of green paper, which we twist into a spiral. The green paper strip will curl into a graceful curl.

Glue the curl to the bouquet. Glue the bouquet onto a cardboard base. A postcard with a voluminous tulip for March 8 is ready!

Here is a postcard using the same technique, but made a little differently. The ribbon bow gives this card a special charm.

Bouquet with tulips for March 8
Flowers and tulip petals can be glued onto the paper parcel itself. We fold the bundle along the edges, forming a paper bouquet. We glue ribbons to the edges of the package and tie them with a bow. We got a simple and beautiful bouquet.

How many children there are, so many options for making a paper bouquet for March 8th. You can put together a real exhibition in honor of mothers!

Postcard with a picture for March 8
A stunning postcard for March 8th can be cut out of paper. Fold the album sheet three times. We cut out a figure eight on one of the parts, and cover the other two parts with a floral pattern.

We color the card in delicate pink and lilac tones.

After the paint has dried, we decorate the craft with patterns made with a silver helium pen. When all three parts are folded in front of us we will have a very beautiful postcard for March 8th!

Postcard with "eight" (with a surprise)


Postcard with "eight" (with a surprise)
Crafts with the “eight” for March 8
The classic version of the craft for March 8th in kindergarten is a figure eight made of paper. We cut out the base of the craft with a stand from thick cardboard.

We glue the stand and decorate the figure eight with patterns and flowers.

Another craft for the smallest kids is the “Eight” applique. The teacher cuts out figure eights in advance and prepares decorations from thin paper. The kids’ task is to glue the decorations onto the figure eight, trying to do it neatly and evenly.

Figure eight applique
From ordinary and metallized cardboard you can make very simple but colorful crafts “Basket with tulips” and “Tulips applique”.

Crafts for March 8 with flowers and bouquets
You can glue together a luxurious spring bouquet from colored paper folded like an accordion.

Using green and red paper you can create a spectacular tulip applique.

The core of a button can also be made into paper flowers. Such a bouquet will become especially original if you place it in a voluminous palm. To do this, we outline our hand, cut it out, glue only the base, and on top of it - flowers, which we cover on top with our fingers.

Using the same principle, you can make the entire picture out of paper. And if you glue the fingers first, the brush will turn the other side.

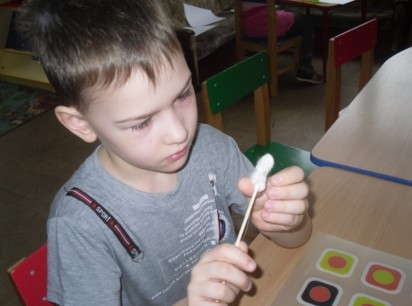
You can turn cotton pads into equally impressive calla lilies. We make the stem from a cocktail straw, the core from a cotton swab, one tip of which is painted yellow. We wrap the core with a cotton pad and the stem with a wide sheet of paper. The flower is ready!

You can make a whole bouquet out of kaal and corrugated paper.

Cocktail straws are great for using as stems and for creating paper flowers, which make a beautiful bouquet when wrapped in wrapping paper.


An incredibly beautiful craft for your beloved mother - “ “.

Postcards for March 8th to kindergarten
A very beautiful craft for March 8th can be a postcard decorated with a tulip using the origami technique.

Folded burgundy paper makes spectacular roses. By placing the roses on the heart we will get a wonderful postcard for March 8th.

A lovely card with a heart can be made from colored paper. We make the bottom part of the card, not forgetting to write a confession for our beloved mother.

We decorate the top part of the card, decorating it with lace and flowers.

We put a rivet or brad, allowing the card to open and close.

Paper card "heart"
Postcard for March 8 (with movable part)
A postcard with .

Heart with roses and ribbon
It’s very interesting to see a heart panel with roses. We fold the roses themselves using a stapler or glue according to the pattern.

Cut out a heart from red paper and make many holes around its perimeter. We insert the ribbon into the holes, processing the edge of the heart.

We glue the stems with leaves, as well as the roses themselves, to the heart, forming a festive bouquet. Glue a ribbon bow at the bottom. Panel with roses for March 8th - ready!

A very beautiful heart-shaped card can be made using the popular scrapbooking technique. The base of the card is a heart made from special textured paper with a print. The scrapbooking technique is characterized by volume and layering. Some of the card decorations you can find at home, and some you can buy in scrapbooking kits. Anything will do: figurines, flowers, ribbons, paper cutouts and pictures.

We place all the details of the craft on the base, trying to give the composition a finished, beautiful look. Scrapbooking postcard in the shape of a heart - ready!

There is another option for a luxurious postcard for March 8 using the scrapbooking technique. We make the base of the cardboard card. Cut out the front side from colored paper with a print. It should be 3-5 millimeters smaller than the cardboard base on each side.

Glue the ribbon along the card. We glue openwork paper figures, flowers and a congratulatory inscription to the front side. Some things you can cut out yourself, and some you can find in special scrapbooking kits. Postcard for March 8th - ready!

Craft for March 8th from corrugated paper
From paper and cardboard you can make a very impressive three-dimensional application for March 8th “flowers in a vase”. Cut out a vase from blue cardboard.

Glue flowers from corrugated paper.


A very beautiful three-dimensional applique for March 8th is made from yellow corrugated paper. We form a flower bud from yellow paper.

The buds rolled from yellow paper are wrapped in green paper. Green paper is rolled into a thin tube. We get a flower and a stem.

The flower is complemented by green leaves and attached to a round cardboard base. Volume applique for March 8th - ready!

Bouquet of tulips made of corrugated paper
Another wonderful craft for March 8 made from corrugated paper is a bouquet of tulips. Let's start with one tulip. Cut a strip of yellow corrugated paper and twist it in the center. We fold both parts on one side.

We need a bunch of stamens on a wire (we fix them with adhesive tape). Roll a ball out of yellow paper. We put it on the wire.

We begin to wrap the ball with stamens with petals.

When the bud itself is ready, fix the green petals with adhesive tape.

Spring bouquet of tulips made of corrugated paper. Read the detailed master class.

You can make a three-dimensional card with a whole bouquet of flowers from corrugated paper.

Sweet crafts for March 8
The craft “bouquet of lollipops” looks interesting. Decorate the lollipops with paper flowers. We fix the sticks in a transparent plastic cup using plasticine. Those with a sweet tooth will surely enjoy crafts made from candies for March 8th. You can put paper flowers on lollipops and place them in a pot of plasticine.

You can use chocolate candies instead of lollipops for crafts. They will need to be pierced with a thin stick, which we will fix in the pot. We wrap the candies in corrugated paper and secure with glue. A luxurious bouquet of sweets for March 8th is ready!

It’s not at all difficult to make, and the result is tasty and beautiful. For a detailed master class, see ““.

Watch the video on how to make a beautiful bouquet of purple tulips candies
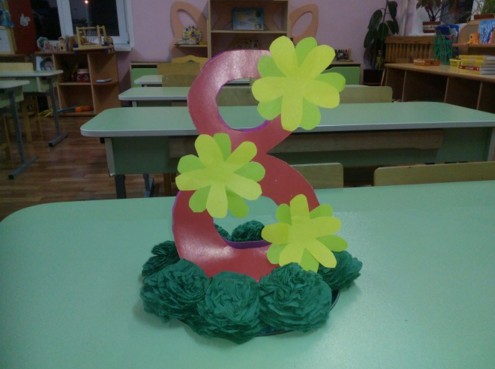
Craft for March 8th “Flower stand”
A very bright and interesting craft for March 8th is a “flower stand”. To make it, fold a green sheet of paper in half and make cuts of different lengths on it.

We glue the cut green leaf onto the base - an ordinary sheet of cardboard folded in half. We glue some of the protrusions onto the base, and bend some of the protrusions in the opposite direction (we do not apply glue to them).

Glue flowers onto the curved protrusions. We decorate the back and bottom of the craft with flowers, butterflies and congratulatory inscriptions.

Eight of ribbons - a gift for mothers and grandmothers
A very bright and beautiful craft for March 8th - a figure of eight made from ribbons. It is very easy to make, but looks very impressive and festive. First, cut out a figure eight from paper or cardboard.

We wrap the figure eight with pink ribbon of medium width “overlapping”. Fix the ribbon with glue.

When the entire figure eight is wrapped, we make a pendant loop in the upper part. From folded pieces of glued green and scarlet ribbons we get a festive bouquet. Eight of ribbons as a gift for mom - ready!

Bouquet of felt tulips for March 8
A very beautiful soft bouquet of tulips for March 8 can be made from felt. You can find a template for cutting out a tulip at the end of the article. For each flower, cut out two parts for the bud, two parts for the leaf and two parts for the stem.

Sew together the parts of the stem and bud. We leave one of the ends of the stem and bud unsewn and fill them with padding polyester. We insert the stem into the bud and sew them up with a hidden seam.

We sew together the parts of the leaf and sew it to the stem. We make several of these flowers. We made a charming spring bouquet for March 8th from felt!

You can make a beautiful bouquet of violets for March 8 from felt and thick drape. We make the pot stand from dense brown material rolled into a roll. Such flowers will never wither and will delight you for a very long time.

Craft for March 8th - painting from salt dough “Roses”
With the help of adults, you can make a very beautiful wall panel from salt dough. To do this, mix the dough with green and red paint. To prevent the dough from crumbling, add PVA glue when kneading. We prepare the base of the craft - a frame with thick cardboard. We start by making green leaves, which we glue onto cardboard.

We make narrow strips of red dough, which we then twist into buds.

We frame the buds with petals made of salt dough - we should get quite lush flowers. We leave the two buds as they are and glue them to the base in the same way, adding a small stem of green dough. We will get a wonderful picture with bright colorful flowers.

Ideas for crafts for March 8 from different materials.
Plasticine and a disk make a wonderful “Spring Rose” applique.


Any mother will surely love the elegant rhinestone “shoe” applique.

A very bright and simple craft is made from colored foam rubber (you can use a dishwashing sponge). To do this, we glue cardboard leaves onto the CD and place a foam rubber “figure eight” on top. The craft can be complemented with shiny rhinestones, beads or other decorations. Children in the preparatory group of kindergarten will be able to make such a craft.

Another beautiful applique with a figure eight is made from painted pasta.

You can make a luxurious applique of red and white buttons as a gift for your mother on March 8th. We cut out the base for the vase from white paper. Decorate the vase with white or transparent buttons. We draw the branches with a black pen. We decorate the branches with red buttons. The bouquet looks interesting if the red buttons are of different sizes and shapes.

An incredibly beautiful and delicate craft for March 8, “a bouquet of daisies,” is made from a very unusual material - plastic bottles.

Drawing “Mom on March 8”
There will probably be talented artists among us who can draw a beautiful portrait for my mother. First, we make a pencil sketch.

Pencil drawing of "mom"
Then we fill the drawing with color. You can find a detailed master class.

Drawing "mom" with paints
DIY drawings for March 8th (ideas from the Internet)


Template for cutting out “card heart”
Crafts for March 8th in kindergarten reviews:
Mommy is beautifully drawn, but I will never draw it like that))) (Sasha)
It is impossible to imagine the wonderful holiday of March 8th without beautiful flowers, warm congratulations and cute ones, including those made by yourself. Children's DIY crafts for March 8, which kids prepare for mothers and grandmothers in kindergartens and primary schools, are especially touching. What kind of materials do they use to create these sweet souvenirs for International Women's Day! With a light hand, ordinary cotton pads, corrugated paper, napkins, water straws, and scraps of fabric are transformed into amazingly beautiful flowers, vases, decorations and other gifts. Such DIY crafts delight mothers and grandmothers for many years, reminding them of sincere and kind moments of the holiday. Our article today contains simple master classes with step-by-step photos and instructions for creating original crafts for March 8th, which any child can master. Read on to learn more about how to make a beautiful DIY gift for International Women's Day.
DIY craft option for March 8th from cotton pads for the senior group of kindergarten, master class with photos
Let's start with a DIY craft for March 8th for the older group of kindergarten - sophisticated calla lilies made from cotton pads. This master class can also be used for children in the middle group of kindergarten. Read more about how to make this version of the March 8 craft from cotton pads with your own hands in the senior group of kindergarten below.

Necessary materials for March 8 crafts made from cotton pads for the older group
cotton pads
- cotton swabs for ears
- yellow felt-tip pen
- straws for drinks

Instructions for DIY crafts made from cotton pads for March 8th for kindergarten
- As mentioned above, in this version of the craft it is proposed to make an original bouquet of cotton pads, consisting of calla lilies. First you need to make the stamens for this amazing flower. To do this, you need to color one side of the cotton swab with a yellow felt-tip pen.

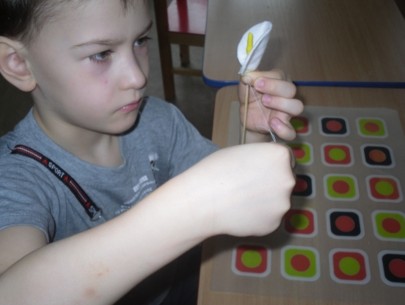
- Then the finished stamen should be glued to a cotton pad, as shown in the photo below.

- The edges of the disk need to be folded inward, forming the base for the bud, and secured with glue.

- The free end of the stick should be inserted into a green drinking tube, which will become the stem for the flower.

- Then you need to make another petal from a cotton pad and secure it to the stem with glue. Ready!

How to make a “Tulip” craft for March 8th with your own hands for your mother, grandmother, step by step
The tulip can be called the flower symbol of International Women's Day, so it is not surprising that it is often chosen for gifts on March 8th. It’s not at all difficult to make a DIY craft in the shape of a tulip for March 8th for your mother or grandmother. For example, you can create a stunning bouquet of tulips from corrugated paper, which will delight its owner for many years. Learn how to make a “Tulip” craft with your own hands on March 8th for your mother or grandmother in the next master class.

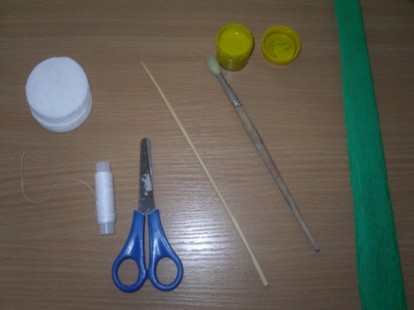
Necessary materials for DIY crafts in the form of a tulip for March 8
- corrugated paper of different colors
- pliers
- cardboard
- simple pencil
- green adhesive tape
- thin wire
- hot glue
- scissors
Instructions on how to make a tulip with your own hands for March 8th for mother and grandmother

An original DIY postcard for March 8th for kindergarten, step by step
An original and good version of a DIY postcard for March 8th for kindergarten awaits you further. In this master class there will be no traditional figure eight, which usually adorns the front side of any children's card for March 8th. Read on to learn how to make an original DIY postcard for March 8th for kindergarten.

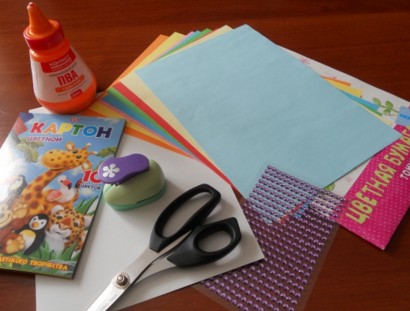
Necessary materials for crafts-postcards for March 8th in kindergarten
- colored paper
- scissors
- white cardboard
- double sided tape
Instructions on how to make a postcard for March 8th with your own hands for kindergarten
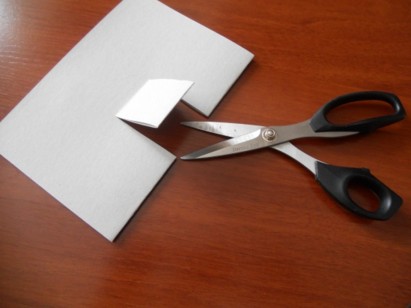
- Fold a sheet of cardboard in half.

- Cut out hearts of the same size from pink and red paper.


- Take 2 pink and red hearts and place one piece on top of the other. Using the same principle, we will attach hearts to postcards, forming them into a three-dimensional beautiful flower.

- We attach double-sided tape to the back of the blanks. We place the heart petals on the cardboard, forming a flower similar to a peony. In this case, the red and pink hearts should also be connected to each other on one side with tape.


- We carefully move clockwise, forming a flower. Ready!

Beautiful DIY crafts for March 8 from satin ribbons, step-by-step master class
You can make incredibly beautiful crafts for March 8 with your own hands from satin ribbons. Ribbons make lovely jewelry, such as brooches, for mothers and grandmothers. Learn how to make beautiful crafts for March 8th with your own hands from satin ribbons in the form of brooches from the following step-by-step master class with photos.

Necessary materials for DIY crafts for March 8 from satin ribbons
- satin ribbons 2-3 shades
- lace
- large beads/pearls/beads
- thread and needle
- scissors
- pin
Step-by-step instructions on how to make a craft from satin ribbons for March 8 with your own hands
- First you need to make blanks for the brooch. To do this, the wide tape must be cut into 8 pieces of 6 cm in length. Each piece should be folded in half. Two pieces need to be folded in the shape of a heart, as shown in the photo below, and stitched with thread.

- Of the four ready-made blanks, you need to make two. To do this, 2 blanks need to be folded together crosswise and stitched with thread.

- Then the blanks should be folded together crosswise again and stitched with several stitches.

- A thinner ribbon of a different color should be cut into 5 pieces of 3-4 cm in length. Each piece must be folded in two and stitched from the bottom.

- Small blanks should be placed on top of the main part of the brooch and secured with threads. Then cut a small piece of lace ribbon and use a thread to form a blank from it, as in the photo below.

- The lace part should also be sewn to the main part of the brooch. Then the middle of the decoration must be decorated with beads or pearls. You need to secure a large pin to the back of the brooch with glue. Ready.

Do-it-yourself children's crafts for March 8 from napkins for elementary school, master class with photos
The next master class on children's crafts made from napkins for March 8th is perfect for elementary school. It tells how, using the origami technique, you can turn an ordinary paper napkin into a useful vase in which you can store small jewelry, sweets and other small items. Learn more about how to make a children's craft for March 8 with your own hands from napkins for elementary school in the master class below.

Necessary materials for DIY crafts for March 8 from napkins for school
- paper napkins of different colors
- small jar or glass

Instructions for children's crafts for March 8 from napkins for elementary school
- Take a napkin and straighten it carefully.

- Now we bend each corner of the napkin inward to its middle.


- We repeat the same thing, but with the corners of the resulting square.


- We repeat the same thing again - we bend each corner inward to the middle of the napkin. Press with your finger for a few seconds so that the workpiece holds its shape better.


- Now we turn the workpiece over. Again, bend each corner to the middle and press lightly with your finger so that the workpiece does not fall apart.


- Then we turn the workpiece over again and place it on the hole of the jar or glass.

- Now, holding the middle of the workpiece with your index finger, carefully straighten each fold of the napkin, as shown in the photo below.


- After the first four “petals” are straightened, we move on to the next row of corners. We continue to straighten each corner one by one until all the “petals” are dissolved.


- Now all that remains is to carefully remove the finished vase from the jar and turn it over. This is just the perfect device for storing small items that need to be kept at hand at all times.

DIY paper craft option for March 8th for mom, master class with photo
Any mother will like this DIY paper craft for March 8th. After all, it is a huge peony flower, which is not inferior in beauty to its living counterpart. Find out how to make this version of paper crafts for March 8th with your own hands for your mother from the following step-by-step master class.

Necessary materials for DIY paper crafts for mom on March 8
- corrugated paper pink, green
- wooden skewers
- green paper tape
- scissors

Instructions on how to make a paper craft with your own hands for your mother in honor of March 8
- The first step is to draw a template of a large heart, which will become the basis for the correct shape of the petals of our peony. The finished template should be attached to corrugated paper and cut out 8-10 blanks.


- We put two wooden skewers or sticks together and wrap them with green paper tape - this will be the basis for the peony stem.

- Now you need to give the petals the correct shape. To do this, each heart blank needs to be stretched well in the middle. Then the edges of the petal need to be lightly wound around the pencil in the opposite direction, as shown in the photo below.


- At the next stage, you can proceed to assembling the flower. To do this, each petal needs to be wrapped around the stem and secured with glue and tape.

- You need to cut out a blank for a leaf from green corrugated paper, and then secure it to the stem with paper tape.

- All that remains is to cut out the base for the sepals from green paper and secure it on top with tape.

Do-it-yourself crafts for a child on March 8th, video with instructions
You can find another simple master class on an original DIY March 8 craft for a child with step-by-step instructions in the video below. In this do-it-yourself crafts for a child on March 8th, this master class shows how you can make a very interesting present for your mother or grandmother from colored paper. Details in the video below.
The holiday atmosphere begins with the idea of a gift. Today you can buy anything, but homemade gifts always replace finished products. This is especially true for crafts made by little children’s hands for their beloved mother.
If you are serious about surprising the main hero of the occasion, then don’t forget to stop by a store with craft supplies and stock up on materials. But first, decide what kind of crafts you will do on March 8th. We offer some useful and inspiring ideas.


They always remain not only in memory, but also in the most visible place. And if you decorate them correctly, they will become the main decoration of the interior. For a handmade idea you will need a photo, not necessarily a modern one. As a gift for mom, it is appropriate to choose photographs of children at a very early age or bright and cheerful moments where the whole family is together.
Grandma will be happy to see her children and grandchildren in the photo. Black and white photographs that can be framed in the style of vintage postcards will remind you of your youth. Use homemade holders and stands. Any materials are suitable for this - wood, glass, stones. You can find dry branches in the garden, take ordinary laces to make your own family tree.

Bouquets - traditional and not quite
At a women's holiday, bouquets are never superfluous. And if they look different than usual, even more so. We are talking about original ideas for bouquets of sweets. Making them is not difficult at all. You will need:
- candies;
- corrugated paper;
- wire;
- paper ribbon;
- threads;
- scissors;
- scotch.

If you have a hot glue gun, you can use it.
- Glue the flower candies onto the wire without piercing it.
- We form petals from corrugated paper.
- Secure with thread.
- Trim off the remaining paper at the base of the flowers.
- We wrap the wire stem with green ribbon.
- We form leaves from green corrugated paper and attach them.
- You can decorate flowers with beads or use beads. These will be impromptu dew drops and decoration.
- We form a bouquet and wrap it in paper of a contrasting color.

Origami ideas
The art of origami remains relevant. At first glance, a simple way to give your mother a gift on March 8 with your own hands turns into a complex creative process. The origami technique allows you to make beautiful flowers.
Even one flower made by a child is already a worthy gift. It's worth hundreds of flowers in my mother's garden. For origami, regular office paper is suitable. The origami technique is easy to master, but it makes you look at the art of paper crafts in a completely different way.
Fresh flowers in original pots
Even if your mother or grandmother has her own garden, she will always be happy to receive flowers as a gift. And to surprise her, you can play with this idea beautifully. Everything is very simple.
- Use small bouquets of primroses.
- Choose an original pot. You can take a regular large tea cup.
- Transplant flowers into it.
- Don't forget to include a mini card with your best wishes. You can cut it out of craft paper and sign it.
Small plants in pots look fresh and beautiful if you use eco-friendly craft paper, corrugated paper and colored ribbons for decoration. Wrap the pot with the plant and tie a ribbon. Such a gift is not inferior to armfuls of expensive flowers and looks very cute.

New design of familiar objects
Any item can be designed beyond recognition if you use a little imagination. Using felt applications, sequins and ribbons, you can create an original vase. As a basis, you can take an ordinary jar or a small bottle of an original shape.
If mom keeps notes and often uses a diary, it can also be designed in an original way, wrapped in felt. This will make the notebook pleasant to the touch and lift your spirits. Simple jars can be turned into garden lanterns or beautiful candle holders.

Handmade postcards
If schoolchildren are taught to make cards for mothers in labor lessons, it means that the most women's holiday of the year is approaching. Today you can make not only a traditional paper card, but also:
- voluminous pop-up card with flowers made of corrugated or plain colored paper;
- postcards using decoupage and photo techniques;
- with felt applique;
- decorated using quilling technique.

Mom and grandmother will be happy to receive such a children's gift from their daughter or son. See even more ideas and master classes on postcards for March 8 .
Gifts from needlewomen
Those who do handicrafts can always please with a handmade gift for the holiday. Some people crochet napkins, others can make a warm stole on knitting needles in an evening, and others are into felt crafts.
Felt is a very beneficial material for needlework. He is easy to work with. Felt does not fray, does not stretch and does not require pre-treatment. In stores today you can easily find felt in different colors. Using soft material, you can decorate a postcard, make a beautiful stand for a cup, sew a felt pot holder, and even a handbag.

For this it is enough:
- patterns;
- pieces of felt in the desired colors;
- thread, scissors, needle or heat gun.
Felt toys
If you want to sew a toy as a gift, choose felt. Even beginners can work with it. Don't be afraid that your gift will seem very childish. Handmade toys are highly valued today. Even adults love to decorate the interior with childhood memories, especially when the idea is implemented with love and effort.

Beaded gift ideas
Beads can be used as a base for a gift or as decoration. In small quantities, beads are useful when decorating a vase, decorating lanterns for the garden, decorating paper flowers, and making felt crafts. Just imagine how cute a card will look with a cute piece of felt with beaded embroidery glued on it.
A simple heart made of red beads will evoke the most pleasant emotions. If you know how to make flowers from beads and more complex compositions, you should definitely use this idea to create a gift. You can make jewelry from beads - necklaces, bracelets, earrings. Even in a children's card, beads will find their place. A student can use it to make a paper postcard.

Pompoms to the rescue
Funny soft lumps can do everything, but few people know that pompoms make very cute crafts. The simplest gift option is for women who love to read. You can make several colored bookmarks with pompoms for them. Different colors of thread can be intended for different literature: green - for books about gardening, gray - for detective stories, red pom-poms - for novels.
From large pompoms you can form an original scarf without even holding knitting needles in your hands. And what funny animal figures you can make from pompoms! Pompoms make wonderful flower arrangements, curtains, three-dimensional paintings and many other interesting things.

We are sure that you already have a lot of ideas. It doesn’t matter what material you take as a basis - felt, beads, paper, use the already familiar origami technique or come up with something of your own, it is important that it conveys your idea and helps express your attitude towards the person you plan to congratulate.