Nightgown pattern size 50. Patterns of nightgowns for women
If you accidentally have a piece of silk fabric left over, for example, after sewing a dress, do not rush to be upset. It turns out that you can sew a lot of useful things from it, for example, this charming nightgown. And Svetlana Kuksa shares with us the “recipe” for such a magical transformation in her master class.
Master class. Silk nightgown on the bias
Many needlewomen have scraps of dress fabric at home, for example, left over after sewing a dress. Turns out they can make an adorable spaghetti strap nightgown. And how to sew it, Svetlana Kuksa tells in her master class.
Svetlana Kuksa: “I’ve been doing needlework all my life. It seems to me – almost from early childhood, from the moment my mother decided to learn to sew. She took cutting and sewing courses. Threads, needles, pieces of fabric appeared in the house... We bought a foot-operated sewing machine “Chaika” "Mom learned to sew an apron and panties... After school, while my mother was at work, I slowly mastered the sewing machine. And one day my mother caught the eye of machine-made doll dresses... I was 10 years old. Since then, the sewing machine has been in my possession .
At first I sewed for dolls. Cloth. Bed sheets. Using available materials, she assembled and glued doll furniture and interior items. Under the desk there was an entire residential mansion... At school I had very gentle labor teachers: I sewed easily and quickly for myself and for my friends. Then, older, out of boredom - even to teachers. The first self-sewn school uniform is for the eighth grade. Not according to the rules. With a front bodice fastening with 29 buttons. Then everything becomes one multi-colored carpet: a lot of sewing, knitting, embroidery. Both for yourself and for your friends. Then the first wedding dresses for my friends. Then - to myself.
And today I sew with great pleasure and a lot: costumes for ballroom dancing, complex wedding dresses, I love sewing corsets. In other words, I sew what is put on, but not worn. Which requires complex cutting and careful fit. I've been looking at Osinka's website for quite some time now. There's always something interesting to find. I enjoy looking at the latest in the fashion world. I read with interest the exchange of opinions in the Forum. I definitely check out the Master Classes: there’s always something useful.
And it seems that Svetlana’s first pancake didn’t turn out lumpy at all... What do you think?
Regardless of the variety of nightwear, many women still prefer a regular nightgown. It does not hinder movements and allows the body to completely relax, making the rest truly complete. Since stores do not always offer comfortable clothes at reasonable prices, needlewomen opt for their own reproduction of a nightgown. In addition, the variety of styles and patterns makes it easy to choose the right option. Based on the instructions, which describe how to sew a nightgown with your own hands, you can get a comfortable item quickly and at no extra cost.
One of the simplest ways to sew a nightgown is to follow a ready-made pattern. Since most models have a loose fit, one pattern can fit several sizes at once. The model of a nightgown with one-piece sleeves is equipped with such a universal design.
The sleeve here is designed together with the base and also has a free shape so that the product does not interfere with restriction of movement.

But such shirts were worn in ancient times, and most women still want to look modern. Therefore, preference is given to more feminine models that allow you to add a touch of playfulness to the product. Many people like a thing that bares their shoulders and creates a flirty image.
A Midsummer Night's Dream
The proposed shirt with straps will be a constant companion for a night's rest in the warm season. In order for the product to allow the skin to “breathe”, it is recommended to select natural materials.

To sew such a nightie, you need to prepare:
- Textile;
- Needle and thread to match the material;
- Scissors;
- Pins;
- Centimeter tape;
- An elastic band.
If you don’t have a ready-made pattern, you can create it yourself. Using a tailor's centimeter, the circumference of the chest, waist, hips is measured, and the desired length is determined.
The fabric is folded in half. A rectangle is constructed based on the measurements.

The width of the rectangle is calculated using the larger girth measurement, to which seam allowances are added. The length increases by 8 cm. Now you should design the silhouette of the product. To do this, the lower part expands slightly, forming a trapezoid, as in the photo.
When designing an armhole, an old T-shirt works great. Based on it, you can draw the armhole of the future product. The tailored piece is cut out.

There should be two parts of the product.

The parts are folded together with the wrong side up and stitched along the side sections to the armhole line. Next comes the processing of the bottom of the shirt. It should be folded and stitched. Then the edges of the armholes are stitched.
The upper cut of the product is folded and processed with two parallel machine lines. The width between them should correspond to the width of the prepared elastic band.

An elastic band is inserted. It is advisable to immediately measure the required length in order to avoid excessive tightening. The product should be tried on to determine the length of the straps. They are sewn from leftover material in the form of two strips. If desired, you can decorate the straps with ruffles from the same material.
As a decoration, a modest bow made of satin ribbon, sewn to the front of the shirt, is suitable.
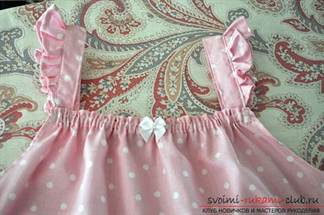
This shirt is suitable for both women and girls. The only difference is in the selection of material. For a girl, it is appropriate to make the product from colored cotton, adding ruffles.
A woman will look more elegant in a cambric shirt with lace. In this case, you can replace the straps with lace, making them a little wider, and also decorate the bottom of the product.

If you want to slightly open your shoulders, but straps are too daring for this, you can use a shirt pattern with an additional top insert. To do this, it is enough to modify the basic pattern of the nightgown, removing the one-piece sleeve.
The upper part consists of a rounded strip of fabric, for which it is quite possible to use openwork fabric.

A nightgown equipped with a detachable insert that smoothly turns into wide straps is called a nightgown with a yoke. This model is attractive because it allows you to easily combine different fabrics in a product and add variety to the product.

Sleepwear in the form of a nightie is widespread among girls. Lovers of elegant dresses do not want to part with a piece of clothing dear to their hearts, even while sleeping. Therefore, mothers go to different lengths, trying to please their daughter and sew an elegant and at the same time comfortable nightgown.
Used materials in action
It’s attractive that when making a nightie for a girl, you don’t have to stock up on a piece of fabric and select the appropriate pattern.

The product can be created from a pair of old knitted T-shirts. The corresponding master class will tell you how to do this so that the baby is satisfied.
To work you will need:
- 2 old knitted T-shirts (contrasting colors);
- Pattern paper;
- Sewing supplies.
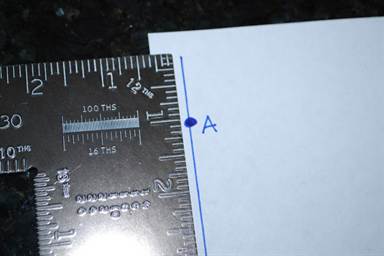
The product is designed for a 5-6 year old girl. 50 cm is laid out on paper. 1 cm is measured from the upper end of the segment and fixed with a dot.
A second point is placed 2.5 cm to the side and connects to the previous one. 6 cm is measured horizontally to the right, and then 2.5 cm is measured down vertically. The points are aligned with smooth lines.

A line of 40 cm is drawn down, which then goes 20 cm to the right, forming a trapezoidal silhouette.

From the lower end of the initial segment, the next point is laid 3 cm to the side. It is connected by a smooth curve to the previous mark. The resulting simple pattern will form the basis of the future product.

One of the T-shirts is unraveling at the seams. The pattern is transferred to the material.
The stores are full of ready-made nightgowns. And floor-length, and mini, and old lady’s. But we want something of our own, different from everyone else. If we can’t surprise you with styles, let’s choose a fabric that we’d like to always sleep with.
Fabric for nightgown
We come to the Fabric store and select the material, feeling it and applying it to the cheek. We are looking for someone who would warm and caress. Chintz, calico, cambric, staple, linen...we are looking for a fabric that is pleasant to the body.
How much fabric do you need to make a nightgown?
Found. Now we are faced with the question of how much to measure? How do you know how much fabric you need to buy to make a full nightgown? We measure ourselves according to the most voluminous place. For some it is their hips, for others they are proud of their ample breasts. If only this place was not at the waist.
Let's assume that the circumference is 100 centimeters. This means that we need to buy at least two lengths.
We measure the length from the cervical vertebra through the bulge of the chest and to the place on the legs where the shirt should end. We got 150 centimeters. The material we like has a width of 140. So we ask the seller to cut us 151x2 = 300 + 10 centimeters for the seams and hem. Total 310cm.
It happens that the fabric you chose has a width smaller than your size. For example, chintz is often produced with a width of 80 cm, and you wear size 52. This means you will have to buy four lengths + 20 cm for the hem. By the way, don’t forget to buy bias tape in the same store to match the fabric or, conversely, in contrast.
Style
We choose the simplest style with the minimum number of seams. Nightgowns should be absolutely comfortable, so that they don’t sting, rub or interfere anywhere. We take as a basis the simplest Russian women's shirt, poneva.
By the way, you can also decorate it in the Russian folk style along the edges of the sleeves and neckline. Now in stores you can buy beautiful braid that imitates traditional embroidery.
Nightgown pattern
Let's begin the most important stage in our business. We cut and cut out. If you are completely new to this business, then rehearse everything first on a piece of wallpaper. For connoisseurs and docs, you can immediately grab your favorite fabric from the store. We will cut a nightgown like this. 
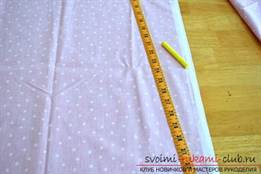
Carefully fold it in half. 310/2 = 155 cm. We get a rectangle of 140x155 cm. It is unlikely that there will be a table of this size in your house, so you can lay out the fabric on a clean floor. Let's fold the cut again, but this time lengthwise.
You have a rectangle with dimensions of 70x155cm, in which one single corner out of four has no edges. There will be a neck here. Pick up tailor's chalk in a color contrasting with the fabric and a ruler (you can use colored pencils, just don't forget to return them to the child).
Measure 9 centimeters from this corner along the short side and 2 cm along the long side. Draw a smooth arc with chalk, connecting these points. This will be the cutout from the back.

Now let's work on the sleeve. From this short side, but from the other corner, we put 17 cm along the long side (sleeve width) and from this point along the edge another 8 cm. Let's put it at risk. Now, from the marks deep into the fabric, we draw a line along the ruler.
Draw the hem. Before us is the fourth part of our nightgown. We must place a quarter of our volume in it (100/4 = 25 centimeters). It needs to be placed comfortably, so we add another 5cm. In total we have a width of 30 cm.
We put it aside along the lower short side and draw a line upward until it intersects with the line from the mark. The armhole will begin at this point. We connect it with a smooth arc to the point of the sleeve (17 cm). We widen the hem a little at the bottom. We connect points I and E with a straight line. That’s it. We measured it seven times, checked everything, now we will cut it.
Attention! We cut not along the lines, but retreating from them by 2 centimeters, except for the neck. Here we cut straight along the line. We cut it out and unfolded it completely to a length of 3 meters.
Now fold it lengthwise again and replace the scissors with a ruler and chalk. We deepen the neck on one side by 7 centimeters. We draw a smooth arc with chalk, drawing half of the future neckline, and then repeat the route with scissors.
Sew the side seams. We turn up the hem and sleeves. Attach bias tape to the neckline. Sew on your favorite decorative braid. All. Sweet dreams.
There are never too many nightgowns. Pleasant, light, warm, puritanical, sexy, given by mom or bought for the occasion - they all must meet one main requirement: to be as comfortable as possible. Modern lingerie stores offer a large number of sleeping sets, consisting of shorts and a T-shirt or pants and a long-sleeved blouse. But still, many representatives of the fair sex opt for the classic option - a long nightgown. Of course, buying sleepwear now won’t be difficult, but it’s much more pleasant to sew it yourself. Today we will tell you how to sew a nightgown quickly and easily with minimal consumption of materials and using simple patterns.
How to sew a nightgown with straps?
For work we will need the following list of necessary materials and tools:
- Fabric of your choice.
- Pattern.
- Corners.
- Threads to match.
- Needle.
- Scissors.
- Sewing machine.
Important! Opt for natural fabric so that the body can “breathe” freely. Flannel is good for a winter shirt, but chintz and cotton fabric are good for a summer shirt.
Step-by-step algorithm of actions:
- We measure the chest circumference and make other measurements in order to find out the length and width of the future sleep product. Add 8-10 cm to the length for allowances. We multiply the resulting figure by 2. After the calculations, draw a rectangle on paper, noting all the obtained values, and then transfer the figure to the fabric. Fold the rectangular fabric in half and draw a line that will indicate the silhouette of the shirt.
- Cut off excess material. We don’t throw away the leftover fabric - we will still need it for sewing ruffles on the future product.
- Cut out the armholes using your well-fitting T-shirt as a template. We sew together the parts of our nightgown. We place the first seams on the sides, move to the bottom of the product, and only after that we sew the neckline and armholes.
- Sew a narrow elastic band to the top of the nightgown.
- Attach ruffles to the bottom of the shirt.
Important! If desired, they can also be used to cover the armholes of the sleeves. All these elements will serve as decoration for such simple sleepwear.
- We try on the shirt and determine the desired length of the straps. We make the straps from pieces of fabric that were left at the very beginning when cutting out the rectangle. We finished the straps with delicate ruffles.
Your DIY nightgown is ready to use! In such incredibly feminine clothes you will be irresistible even in your sleep.
How to sew a chintz nightgown with your own hands?
Now we will analyze step by step each step you take to make a simple chintz shirt.
Textile
The material for the nightgown must meet some basic requirements, namely:
- Be pleasant to the touch.
- Have increased dimensional stability.
- Have good color fastness.
- Do not accumulate static current.
- Be hypoallergenic and easy to care for.
Important! For summer, more suitable fabrics are silk, voile, chintz, linen, spatula, cambric. For the winter period - flannelette, poplin, flannel, rep, cotton wool.
How much fabric do you need to make a nightgown?
So, we have already found the fabric. Now we need to make the calculations correctly so as not to make a mistake in the amount of material purchased. How to do this? Here's a summary of your next steps:
- We take our measurements for the largest area. For some girls it's hips, while for others it's full breasts. So, for example, the length of the most voluminous circle was 100 cm. This means that you need to buy 2 lengths of fabric.
- We measure the length of the product, starting from the cervical vertebra, passing down through the chest and ending at the ankle - where the shirt ends. We got 150 cm. The width of the material we liked is 140 cm. In this case, we ask the seller to cut off 150x2 = 300 + 10 cm for allowances. We buy 310 cm of fabric.
Important! Chintz is often made 80 cm wide. So, for example, for a woman who wears size 52 clothes, you need to buy four lengths of this material + 20 cm for hems.

Style
Nightgowns are distinguished not only by fabric, but also by style:
- Baby-doll. Erotic sleepwear of minimal length, with a deep neckline and long slits with a lot of lace.
- Slip shirt. The hem reaches just above the knees, the product is complemented by short sleeves and decorative trim.
- High-waisted nightie. With its help you can hide problem areas of your figure: excess at the waist and hips.
- T-shirt shirt. Easy to implement and very practical to use.
Important! We chose the simplest style with the minimum number of seams. Such a product will not press anywhere, rub or interfere with movement.
How to sew a nightgown for beginners? Pattern
After selecting the fabric and determining the style, we came to the most important thing - the pattern and sewing of the nightgown.
Important! If you are new to cutting and sewing, rehearse first on paper and then transfer the details to fabric. Experienced seamstresses can work without a pattern - mark all the measurements at once on the material they like.
Step by step instructions:
- Fold the fabric in half. In our case, it happens like this: 310/2 = 155 cm. We lay out the material on the floor due to the small size of the canvas. Now fold the fabric in half again, only this time lengthwise. So we got a rectangle measuring 70x155 cm, where one corner has no edges. This place will be the neck for our product.
- We measure with contrasting chalk from the corner without edges 9 cm along the short side, and 2 cm along the long side. We draw a smooth arc, which will connect the previously marked two points. This is how we got the cutout on the back.
- Now we are working on the sleeve. We measure along the long side 18 cm (sleeve width) and along the edge 8 cm. Put a mark. Draw a line along the line from the last marked point.
- We form the hem. We've got the fourth part of our nightie. We place ¼ of the previously measured volume into it (100/4 = 25 cm). We add another 5 cm to the resulting figure to give comfort to the product. We received a width of 30 cm, which we set along the lowest short side of the part. Now we draw a straight line upward, stopping at the intersection with the border of the upper mark. This point will be the beginning of the armhole. We connect it with a smooth arc to the sleeve mark (18 cm). We widen the bottom of the nightgown a little. We connect two vertical points with a straight line.
- Depart from the lines 2 cm, and cut out all the details. After cutting, we unfold the fabric to a length of 3 meters. Fold the fabric lengthwise again. We deepen the neckline on one side by 7 cm. We draw a smooth arc with the soap, forming half of our neckline. Using scissors, cut out the marked notch.
- We sew all the side seams using a sewing machine. We turn the bottom of the product and sleeves several times. Next, attach the bias tape to the almost finished neckline. We sew decorative braid onto the neckline.
That's all the work! Now you can sleep peacefully!
DIY nightgown with lace
In this case, we take the following data: we have one large piece of fabric, from which we will sew a long and loose shirt with a closed chest.
Work progress:
- Fold the fabric in half.
- We cut the fabric on both sides for symmetry of the pattern (in our case, fabric with a pattern).
- Find the middle of the fabric. We outline the neckline using available tools: plates, frying pan lids, and so on. We determine the size of the neckline in a simple way - by trying it on ourselves. So, if the head passes freely, then everything is in order.
- Now we cut out the neck of the future product.
- We tighten the contour of the neck with a “forward needle” seam. We make small stitches to more accurately process the cutout. This step can also be done on a sewing machine, after first loosening the bottom thread.
- We machine stitch along the edge of the neckline, evenly distributing the gathered fabric along the contour. For this we used tailor's pins.
- We use leftover lace to trim the neckline. We sew its edges and attach a piece along the edge of the neck. This is how we got shuttlecocks.
- We cut long pieces of fabric on the bias from the existing leftover material. We slightly stretch the edging when sewing it to get a neat edge of the neckline.
- We retreat 20 cm from the top of our shirt, cut off 2 cm on each side. We sew everything with a zigzag stitch, hemming the edges of the sleeves.
- We make an incision on one side of the product so that the fabric does not restrict movement. To do this, we did not completely stitch one side seam.
- Fold and stitch the bottom.
The nightgown for sleeping is ready!
Figure 44 shows techniques for working with drawing tools: how to correctly draw a circle or arc and curved lines. A circle or arc is drawn with a compass, turning it by the holder in the clockwise direction (Fig. 44, a).
Curved lines connecting given points are drawn using patterns. The edge of the pattern is selected so that it connects as many points as possible (at least three), and a line is drawn along it (Fig. 44, b).
When making drawings and patterns, as well as when drawing up instruction cards, you must use the correct techniques for working with drawing tools and use the lines and signs shown in Table 25.
The clothes we wear can be divided into three types: outerwear, light clothing and underwear (color table 4).
Underwear includes outerwear (pajamas, shirtfronts, collars, cuffs) and underwear (shirts, slips, briefs, sleepwear, etc., Fig. 45). Underwear is sewn from linen fabrics (see p. 62).

The following requirements apply to finished linen:
1. Hygienic- underwear should be comfortable to wear, loose, and have few finishing details.
2. Operational- underwear must have a certain wear life. This depends on the convenience of the design, the correctly chosen processing methods and the quality of the work performed.
3. Aesthetic- linen should be beautiful in shape and finish.

Designing a nightgown
Nightgowns are very diverse in cut and finish. They can be with or without a collar, with different collar shapes, sleeveless or with sleeves of different lengths, long and short (Fig. 46).
Nightgowns should be loose in shape.
Taking measurements to create a drawing of a nightgown

To construct a drawing of a nightgown, take the measurements given in Table 26.


Details of the nightgown The nightgown consists of two parts - the back and the front. The shape and size of the parts are the same, they differ only in the shape of the goal line. At the front, the collar is cut deeper than at the back (Fig. 48).

This is explained by the structure of the human figure: most of the neck, at the base of which the collar is located, is located in the front.

Remember the words: outerwear, light clothing, outerwear, underwear, cut, measurements: half neck girth, half chest girth, shoulder girth.
Questions and tasks
1. Why are measurements taken?
2. Which of the measurements are recorded in half size, and which in full, and why?
3. By what measure is the size of the product determined?
4. What parts does a shirt consist of and what is the difference between them?
5. Look at Figure 49 and remember the names of the lines of the shirt drawing.
6. Take each other's measurements.
7. Prepare a sheet of album for constructing a drawing of a nightgown.
Practical work
Instruction card. Drawing a nightgown for size 38, height II
Tools and accessories: scale ruler, square, compass, pattern, TM and 2M pencils, eraser, album

Questions and assignment. 1. What measurements determine the width and length of a shirt? 2. Why is the increase given to the POg measure? 3. What tools are used when constructing a drawing of a shirt? 4. Make calculations and create a nightgown pattern according to the measurements taken. MODELING A NIGHTGIY You can sew products of different styles using the same pattern. When modeling, the style lines are applied to the pattern of the base of the product. Figure 46 shows models of nightgowns. They differ from each other in length, collar shape and design (use of finishes). Shirts 2, 3 and 5 are sewn using one pattern, to which changes and additions have been made. These changes are applied to the pattern of the base of the shirt when modeling it. Figure 50 shows samples for finishing shirts with vyshiyoka.


Questions and tasks
1. What is the modeling process?
2. What changes can be made to the shape of the shirt details?
3. How is a product sketch made?
4. Select the shape of the collar for the shirt you will be sewing and the trim in accordance with the chosen fabric (Fig. 51).
5. Design the style of the nightgown. An example of the work is shown in Figure 52. Draw a sketch of a shirt in your album. Make a sample of the product from colored paper (in M 1:4) in accordance with the sketch and glue it to the album.
6. Calculate the approximate amount of fabric that will be required to make a nightgown according to your measurements: 2Di+40 (for processing the bottom of the shirt and for the hem).

Preparing the pattern for cutting
Quests
1. Cut out the shirt pattern.
2. Make a pattern for the facing of the collar of the shirt: trace the facing pattern along the pattern (you should take the pattern depending on your POSH measurements). You can draw the facing pattern yourself, as shown in Figure 53. Cut out the pattern. 3. Apply inscriptions to the pattern of the shirt parts - the names of the parts and the size of the allowances - and indicate the direction of the grain thread and the position of the shoulder line on the facing (Fig. 54).


Sewing a nightgown
For the manufacture of nightgowns, mainly cotton and linen fabrics are used: madapolam, chintz, chiffon, cotton wool, flannel, linen. These should be light-colored fabrics, plain-dyed or with small patterns (color table 5).
Practical work
When performing practical work on the manufacture of garments, it is necessary to remember about the economical use of fabric, comply with sanitary and hygienic requirements (see Appendix 4) and safety rules when working on a sewing machine, with an electric iron, scissors, needle and pins (see Appendix . 5) and technical conditions for performing manual and machine work (see Appendices 11 and 12).

Instruction card. Cutting the nightgown (see appendix 10)
Tools and accessories: work box, nightgown pattern, fabric.
Questions and assignment. 1. How to prepare fabric for cutting? 2. What should you consider when laying out pattern pieces on fabric? 3. What safety rules must be followed when cutting? 4. Calculate how much fabric is required for the nightgown.
Instruction card. Preparing cutting details for processing
Questions. 1. Why are control lines laid on the cut details? 2. Why, when making copy stitches, their loops must be at least 5 mm1 3. How to protect your finger from being pricked by a needle when sewing by hand?
Processing the gate with undercut facing
Color table 6 shows an instruction card for performing the work of processing a collar with an undercut facing.
Self-control. Check: 1) the accuracy of making and sweeping the overlock seam; 2) accuracy of stitching; 3) uniform width of the facing along the entire length; 4) quality of ironing.
Questions. 1. What machine and hand stitches did you use when finishing the collar? 2. Why do you sweep the inner edge of the facing along the line of the facing seam? 3. What safety rules must be followed when sewing on a sewing machine?
Instruction card. Finishing the bottom of the sleeve with a hem seam
Tools and accessories: working box, cutting details.

Questions. 1. What is the sequence for sewing a hem seam with a closed cut? 2. What device can be used when sewing a hem seam? 3. What hand tools did you use to finish the sleeve bottom?
Instruction card. Joining shirt parts with a double seam
Tools and accessories: working box, cutting details.

Questions. 1. What seams are used for sewing linen? 2. How is a double seam made? 3. What safety rules must be followed when working with an electric iron?
Instruction card. Finishing the bottom of a shirt with a hem seam
Tools and accessories: work box, semi-finished shirt.

Questions. 1. What manual techniques are used when making a hem seam? 2. How to iron the finished bottom of a shirt? 3. What tool is used to remove running stitches?
Instruction card. Final processing of the shirt
Tools and accessories: work box, nightgown.

Questions and assignment. 1. What temporary stitches are removed when finishing a shirt? 2. Tell us about the sequence of ironing a shirt. 3. How to check the quality of the finished shirt?
Various types of processing of shirt cuts (color, tables 7 and 8)
Processing collars and sleeve cuts
The collar of the nightgown is treated with a trim from finishing or main fabric. You can trim with lace, ribbon, piping, bindweed, frill from the main or finishing fabric, embroidery: The lower sections of the sleeves can be finished with a hem seam with a closed cut or hemming using the same finishing as when processing the collar In shirts 1 and 4 lace is inserted between the facing and the main fabric. The shirt has 2 collars with a hem facing, and the bottom of the sleeve with a hem seam with a closed cut. The lace is applied from the wrong side to the finished collar and the bottom of the sleeve. In shirt 3, from under the facings with which the sections of the shirt are processed, an edging can be released from a strip of finishing fabric cut at an angle of 45°. You can also stitch bindweed onto the facing or perform a finishing stitch on it.
Processing the bottom edge of the shirt
The bottom section of the shirt is finished with a hem seam with a closed cut and trimmed with lace, a frill of ribbon or finishing fabric. They are adjusted from the front (shirt 5) or back (shirt 6) side.
Questions and tasks for reviewing the topic “Making a nightgown”
1. What types of underwear do you know?
2. What measurements need to be taken to draw a drawing of a nightgown and which of them determine the size of the collar and sleeves?
3. Name the lines of the shirt drawing.
4. What is the design process for a shirt?
5. How to prepare a pattern for cutting?
6. Tell us about the cutting sequence.
7. How to prepare the cut details of a shirt for processing?
8. How are the collars, the bottom of the sleeves and the bottom of the shirt processed?
9. What is the final processing of the shirt?
10. Fill out the table. To do this, find the correct answers and enter their numbers.