How to make a felt fish. felt toys
Fantasy textile fish and their practical application
Chukreeva Alevtina Nikolaevna, teacher of technology, teacher of additional education, MAOU Gymnasium No. 202 "Mentality", Yekaterinburg.
Material Description: this master class presents two ways of making fantasy fish from textiles. Bright textile fish can be made from the remnants of fabric that can be found in any home, make them fantasy if you offer different shapes, materials and interesting ways of decorating. Fish are fast, perky and fun! Various variants of such products and their practical application as decorative elements of the interior are also proposed. We make such fish with junior schoolchildren and students of grades 5-6 at additional classes of the Colorit fashion theater.
Purpose: this material can be useful in the work of educators, teachers of primary and secondary schools, both in educational activities and for decorating the interior of a group, a playroom, and will also be useful to parents for their child's leisure activities.
Age of participants: such a fish can be performed by junior and middle level students.
Target: making fish from textiles and presenting options for its practical use.
Tasks:
- introduce the technology of making fish from textiles and show options for using it in the interior;
- improve the ability to decorate the product in accordance with the theme;
- develop creativity, sense of style, compositional skills, fantasy and imagination;
- educate perseverance, accuracy, diligence.
Materials:
- bright shreds of fabric corresponding to the marine theme, it is better to use dense cotton fabrics;
- synthetic winterizer or holofiber for filling;
- materials for decor: braid, cords, sequins, beads, beads;
- 2 large buttons and 2 small ones for the eyes.


Tools, fixtures and equipment:
- manual needle No. 3;
- tailor's pins;
- threads in the color of the fabric No. 60;
- scissors;
- remnants or tailor's chalk;
- peg for eversion or stick for sushi;
- sewing machine;
- iron.

In my master class, I will show two ways to make textile fish. The first method is more complicated, since a curly seam is made to connect the details of the fish (tail and head), and the second one is with a straight seam, it is easier to manufacture, less experienced performers can use it.
Method 1. Making a textile fish with a figured seam for connecting parts (tail and head).

The proposed pattern is made in full size with seam allowances, indicating the share thread and the number of parts. The pattern can be printed on the printer, pre-reduce or enlarge the layout.

After printing the pattern, cut it out.


We prepare the fabric by ironing it on both sides. At this stage of work, it is advisable to carefully consider the compositional solution and color combinations in the product: fabrics should be combined in color and not cause visual rejection, you can choose colors for a specific interior. When selecting color combinations in a product, the children and I use the Oswald Color Wheel computer program, which can be downloaded from the Internet.

First, we connect the details of the tail and body along a concave contour.
To do this, fold the fabric with the right sides inward, attach the patterns to the fabric with tailor's pins to avoid displacement. We outline the contours with a remnant or tailor's chalk, on light details, in extreme cases, you can use a pencil (ensure that there are no pencil lines left on the front side). Make sure that the details of the fish are cut out:
- along the shared thread indicated on the pattern;
- with the front sides inward, otherwise you will get the details "on one hand."

We cut out the blanks (it should turn out 4 parts), you can use zigzag scissors (you don’t need to leave allowances for the seams, they are included in the pattern).


We fold the cut parts of the head and tail with the front sides inward, equalize the cuts, pin them off with pins, mark control marks on one part - a place for eversion.


On the sewing machine, set the stitch length regulator to 1.5-2 mm., The smaller the stitch, the neater the outline of the fish on the bends will look. At the beginning and at the end of the line, we perform bartacks 1 cm long.
On one part, we sew the seam completely along the connection line, on the second, up to the control marks, leaving room for turning the workpiece. It is better to leave a place for eversion on a straight section of the seam, so that it is easier to sew it up with hand stitches.

We iron the seams towards the tail of the fish.

We chop off the resulting 2 parts with the front sides inward, grind along the contour, the seam width is 3-4mm.


In the place of bends we make small incisions, not reaching the line of 1 mm., Then when turning out there will be no creases of the fabric in these places. We iron the blanks.

We turn the blanks inside out, straighten the seams from the inside with a peg or a sushi stick. In the areas of eversion of the nose of the fish and the caudal fins, we use a needle, gently pry the tip that is not completely everted with a needle and gradually pull it out. Be careful not to pull the threads out of the fabric.


We iron the turned-out blank, straightening all the seams. We stuff with holofiber or synthetic winterizer. For stuffing with synthetic winterizer, we first tear it into small pieces. We stuff tightly with a peg or stick for sushi, first along the edge of the fish, and then we stuff the body.


We combine the edges of the unsewn area on the abdomen and chip off with a pin. Sew by hand with a hidden seam, sticking the needle exactly into the smoothed folds.


We mark a place for the eye (the diameter of a large button is 20 mm, a small one for the pupil is 10-15 mm.). We sew on buttons: we stick and remove the needle on one side of the fish, connect two buttons along the holes for sewing, string both buttons, insert the needle into the second button hole and pierce the fish through and through. We bring the needle out on the other side and string two more buttons on it. So repeat 3-4 times to consolidate.


We sew four buttons at once, pulling the thread a little, the eyes are obtained in the recesses (eye sockets).

Fish do not have eyelashes, but we have a fantasy fish and we can come up with eyelashes for it, for example, from genuine black leather, the image will turn out to be flirtatious and kind. Also, cilia can be made from sequins or yarn. We embroider the mouth and nose with hand stitches or sew on a machine.


Let's start creating the image of a fish, for this we will apply various methods of decoration:
- sequins to imitate scales;

- braid "bindweed" or any other decorative braid to close the seam of the connection of parts;

- finishing fabric with lurex to make a goldfish.

- a round cord along the contour of the fish to make it look smart;

Method 2. Making a textile fish with a direct seam for connecting parts (tail and body).

Let's add a little variety and make multi-colored fish with a straight seam connection. This method is easier to manufacture, since the parts are connected in a straight line. On the pattern, the seam of the connection of parts is straight.

To do this, at the initial stage, we sew several fabrics from which the fish will be made. The head may be golden, and the tail dark red. We sew the golden stripe for the head and the dark red one for the tail together.


We bend the resulting cut in half, apply the pattern so that the seam on the pattern is aligned with the seam on the completed part (we do not cut the pattern).

And then according to the above algorithm:
transfer the pattern to the fabric;

sew, cut;

we twist, stuff, sew eyes;


we decorate, it turned out such a “Goldfish”.

We use textile fish as decorative elements in the playroom of the elementary school students of our gymnasium. To do this, we design and manufacture removable interior elements in a marine style, with the help of which it can be easily changed. The popularity of the marine style in the interior is explained by lightness, unobtrusiveness, special pleasant associations with summer and the sea. It is beautiful, stylish, original, festive and, most importantly, there will always be a good mood in such a room!
1. We attach the made fish to crocheted linen cords and hang them from the ceiling, we get a wonderful floating composition in the form of a curtain or panel. We knit linen cords (11 pieces) 2.5 meters long from linen twine and attach decorative rings to them, which form an arch in the composition. We also attach elements of marine paraphernalia to the cords: shells, starfish, anchor, we got the “Underwater World” panel.
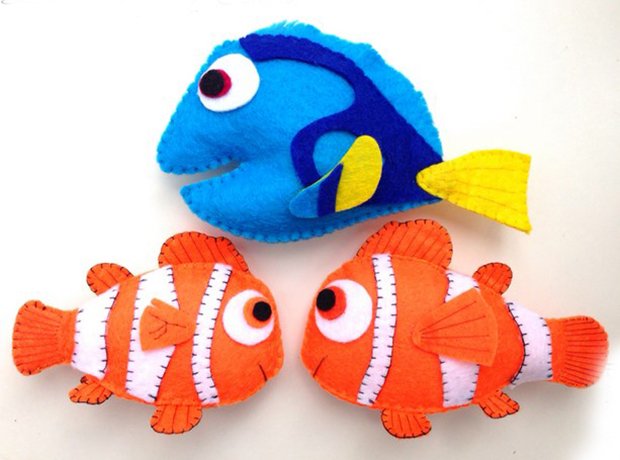
Large and small, bright and inconspicuous inhabitants of the ocean amaze with a variety of colors and shapes. That is why picturesque cartoons about wonderful marine life are so popular with children. Would you like the characters of the cartoon "Finding Nemo" to come to your house? Rather make them out of felt.
You will need:
- colorful felt,
- thread,
- magnets,
- scissors,
- needle,
- filler,
- beads, sequins (optional).
Clownfish Pattern- the first in our list of inhabitants of the sea kingdom. It will not be difficult to make a mischievous Nemo and his dad.
Sew white wavy stripes to orange blanks. Make eyes out of black beads. Sew the halves of the fish by filling the toy with cotton wool or holofiber.

Sea stars- universal crafts made of felt. They can decorate the whole room, turning it either into a fabulous seabed, or into a starry sky. And what will your fantasy draw today?

Medusa from felt. Creating a toy will not take even 20 minutes. Just sew the parts of the jellyfish by inserting felt tentacles between them. Everybody! Medusa is ready.

angel fish, probably one of the most beautiful sea creatures. Shall we make it?

And now I'll show you how to do it parrot fish with your own hands.

What else can be done from felt? Yes, whatever! For example, lemon butterfly.

anemones- the perfect decoration for your aquarium.

Butterfly fish It is also very easy to sew from felt. Do not forget to decorate the fish with sequins and sew on bead-eyes.

And finally, some decorations. colorful corals The perfect addition to your aquarium.

It's easy: use superglue to attach a small magnet to the back of the toys. A great magnetic aquarium is ready! But if you are delighted with voluminous soft toys, just make larger patterns, and you will get a whole collection of marine life, which, by the way, will pass for small pillows.

With the help of beads, sequins and artificial stones, you can make a real picture out of these beautiful fish.

Colorful fish will be a great gift for a friend or someone from the family.
Merry creativity!
Quote from TATIK_222Textile fish. Pattern and master class
Cute fish in a cage. And if you sew it from brocade, you get a goldfish.
2.
3.
4.
5.
6.
7.


Pattern of fish - carp. How to sew a goldfish
Quote message irina_kondik Read the WholeTo your quote pad or community!Pattern of fish - carp. How to sew a goldfish
Carp is a very resilient fish that can live not only in clean fresh water, but also in a pond and marshland. River carp is able to overcome huge distances and colossal obstacles on the way to their spawning grounds. Its purpose is life. Therefore, carp is a symbol of stamina, endurance, determination, perseverance, and the image of a carp helps to fulfill desires, achieve success, never give up. We suggest you sew a carp with your own hands according to the pattern below.
Pattern of a carp fish toy:
Textile fish. Pattern and master class
Quote from TATIK_222 Read the WholeTo your quote pad or community!FISH
Cute fish in a cage. And if you sew it from brocade, you get a goldfish.
2.
3.
4.
5.
6.
7.
A series of messages "Toys with patterns.": Pattern toys.
Part 1 - Cat in clothes
Part 2 - Cat with a mouse.
...
Part 98 - Hedgehog
Part 99 - Behemoth has no waist...?!)))
Part 100 - Primitive frogs. Pattern
A series of posts "Textile and primitive":
Part 1 - Miniature Bunny. Pattern
Part 2 - Funny primitive bunnies
...
Part 63 - Bees!
Part 64 - My works. coffee bunnies
Part 65 - Textile fish. Pattern and master class
Pattern of fish - carp. How to sew a goldfish
Quote message irina_kondik Read the WholeTo your quote pad or community!Pattern of fish - carp. How to sew a goldfish
Carp is a very resilient fish that can live not only in clean fresh water, but also in a pond and marshland. River carp is able to overcome huge distances and colossal obstacles on the way to their spawning grounds. Its purpose is life. Therefore, carp is a symbol of stamina, endurance, determination, perseverance, and the image of a carp helps to fulfill desires, achieve success, never give up. We suggest you sew a carp with your own hands according to the pattern below.
Pattern of a carp fish toy:
It's nice to do something useful on a Saturday night.
It is doubly interesting to make some cute crafts with your own hands together with the baby.
Today's master class is dedicated to the manufacture of textile fish.
All of them are small in size and different colors.
You can take advantage of this and build in parallel a decorative panel in a marine style, which will look best at a crib.
Even future fish can be hung by strings from the ceiling. You will get a wonderful soaring composition. Such a creative work will gracefully decorate the interior of a child's room or bathroom.


Stage #1
Fabric rainbow fish
In the process of sewing, you will need the following materials: pieces of fabric of medium or high density, not stretching, synthetic filler for a toy, several multi-colored pieces of felt, a few buttons for the eyes. And also: sewing machine, matching threads, needle, scissors.

A pattern is offered. It can be drawn directly from the screen by hand or printed on a printer. Before printing, it is possible to change the size to the desired one: reduce or enlarge the layout. As you can see in the figure, allowances have already been taken into account. The numbers also indicate the number of cut parts.

After printing, all the details of the fish are cut out and superimposed on the fabric. At this stage of work, it is advisable to carefully consider the color scheme of the toy. Fabrics in color should be combined and not cause visual rejection. It may be worth choosing colors for a specific interior. Such crafts can become the highlight of the room, a bright accent.
After the details of the pattern are ready, you can cut on the fabric. It is desirable to outline the contours with soft tailor's chalk or a disappearing marker. As a last resort, with a pencil or pen.

The felt heart is sewn on first. The part is simply cut out in the shape of a heart with scissors. The edges do not need to be processed, since the felt does not crumble around the edges. The shape is sewn in the tail area using a sewing machine. A special "line 1 millimeter from the edge" is laid. For such lines, the sewing machine has a foot that regulates the width of the indent.
In the next turn, multi-colored scales are made. Each scale is stitched along the edge from the wrong side, and then turned inside out. A small amount of synthetic filler is stuffed into all five scales. They need to give a little volume. Then they are pinned with needles to the product in the torso area.


The remaining three scales are sewn in the same way.

The result was a fish that does not yet have fins.
For the manufacture of fins, 4 pieces of fabric are cut out, two of which are mirrored. On the wrong side, the future fins are stitched along the edge, turned inside out, stuffed with lightly synthetic filler and sewn to the main part.

The second half of the fish can be made in two versions. In the first case, a mirror image of the first half is made. All according to the same scheme as described above. In the second case, fabric is simply sewn to the second half. No decorations. This option is suitable for a vertical panel. We will consider it below.
The finished half of the fish is laid out on the table with the wrong side up. Attention, the fabric under the fish is wrong side down.

In order to evenly lay the line, the fabric and the fish are pierced with tailor's needles. Only the tail will remain unstitched in order to subsequently turn the fish on the front side. Next, on a typewriter, a “line 0.5 cm from the edge” is laid along the contour. All excess is cut off with scissors.
In order for the fish to have a beautiful oval shape after eversion, in the places of rounding on the wrong side, notches are made with scissors. After that, the product is turned inside out and checked to see if the seams are stretching somewhere. Otherwise, the number of notches increases.
Now the fish can be stuffed with synthetic filler. Next, the tail is sewn up. Sections on both sides are tucked 0.5 cm inward and stitched with a hidden stitch by hand.
Eyes are sewn on.
Stage #2
Felt miniature fish
This creative process is simple. A pattern is printed and details are cut out of felt. The size of the fish can be adjusted before printing on a computer.

Orange felt will make clownfish with white wavy stripes on the sides. From yellow felt - butterfly fish with red spots on each side. And a fish with black stripes is an oceanic striped gate. For a variety of marine flora, you can cut a couple of jellyfish.

These toys are sewn on the front side, since with such a miniature product eversion is excluded. The folds can ruin or render unusable the material itself - felt.
In order to entertain the baby even more, you can sew magnets into the fish and make not a hovering mobile, but a toy on the refrigerator. However, with careless handling, such a fish is easy to spoil. The felt is torn.
On magnetic boards it will turn out to play an interesting fairy-tale performance. Such an activity will certainly please the baby.
Hello to all my subscribers and guests of this blog! Ekaterina is in touch with you. As I promised in one of my articles, today I will share with you patterns of felt toys. The selection will not be too large, I offer you only what I liked most, what I found on the Internet.
Remember mine, from it you can also take some ideas and ideas on how to sew these wonderful, and most importantly beautiful, unique felt toys on different topics. If you are not fond of needlework, then perhaps you like to crochet such a charm in the amigurumi style, then go to this one and knit the most important symbol of the upcoming New Year.

Well, whoever sees and thinks about what kind of material this is for the first time, I will say right away that this is the most unpretentious and easy-to-use material. With it, you will definitely not know grief, it does not crumble and the details are cut out very neatly and beautifully the first time.
Now the world does not stand still so much that innovations continue, and in this direction too, for the smallest, you can even make a carousel over the crib.
And for more children, there are ideas and options for work from various animated series, just imagine how happy a child will be if you give him, for example, a set from the Superwings cartoon.

Or like mimics.

Penguin Pororo.

When my kids were a little younger they were very fond of watching Peppa Pig, of course, within reason).

Kitty, you can even make it soft, just stuff it with padding polyester.

Did you recognize these beauties? Yes, yes, paw patrol.

For the smallest babies, toddlers or smeshariki are perfect. I can send the schematics and the master class to anyone who needs it, write a comment at the bottom of this article (I will gladly share what is in my piggy bank with you).

At home we have an alphabet made of felt fabric with little animals and animals. Isn't it brilliant? How do you think?


If you need all such a fun alphabet in the form of animals, write.

Girls can sew such a doll.

The holidays are coming soon and that's why I wanted to present you with something so magnificently beautiful, how do you like this idea? How many different options are there and a squirrel, a lion cub, a zebra, a penguin, a bat and even a pikachu.


Master class on how to sew felt souvenirs
Now it has become very fashionable to sew toys for children who have just been born or when they are one year old. Usually they do it in the form of a name and some kind of plot. I suggest you watch this video, just those who do not know how to sew the details of felt toys correctly, this video will help you figure it out, see all the stages of work:
Well, of course, if you dream of sewing any fairy-tale hero or cartoon characters, then be sure to use this video instruction, based on it you can later make animals or little men of absolutely any kind, the main thing is to find and print a template for the one you planned to sew:
Christmas felt toys for the New Year 2018
When the time for New Year's Eve comes, everyone will immediately start creating, so here are some ideas for you.
Craft in the form of a deer.
House with a white cover made of snow.  Christmas tree beauty.

Gingerbread men.

Heart.

The symbol of this year is a dog, so you can make it on the Christmas tree, below I will present you even more schemes with different breeds of puppies.

Patterns of New Year's toys from felt
Of course, the symbol of any year are mittens, mittens, Christmas trees, horses, as all these accessories always adorn the spruce.


You can even make a keychain and give as a souvenir. 


Or here is a table set.

Christmas bell.

Schemes and patterns of animals from felt for beginners
Now I offer you quite simple schemes, for those who are at the very beginning of the journey. Choose and do well!
Funny kitty.


Teddy bear in all its glory.


The giraffe is adorable.


Insects such as butterflies and bees.

Bookmark for books in the shape of a delicate butterfly.

Little sister fox.


This bunny with long ears won me over.

Doggy and puppy.


These are such naughty cute puppies.


Owl toy.

A cockerel and a family of hens and chicks, which can be made for Easter.


You can sew various other little animals, for example, it can be a monkey, a mouse, an elephant, a lion, a pig or a bear. They all have the same scheme, just decorate the muzzle in a different way.


I also really liked the idea of an angel.

Toys for children developing fine motor skills of hands
For the smallest, there are options for crafts in the form of puzzles, it looks quite interesting:


Or you can make such a game, pick up "clothes" for the animal))).

Or make a finger fairy tale or cute animals.

The most famous fairy tale Teremok.
Or lacing.


That’s all for me, what I liked myself and shared with you, so take a thread, a needle, scissors and felt and create different masterpieces. All pleasant creative fruitful work. See you later))).
Sincerely, Ekaterina Mantsurova


