Beautiful crafts from chestnuts on the theme of autumn with a photo, original crafts from acorns.
With the onset of the school year for parents of elementary school students, an exciting game “do crafts for your child” begins. There are a lot of topics for the development of creative thinking in the school curriculum, so employment for caring moms and dads is provided until May.
Moreover, a special highlight of this game is the sudden start of the next round: at 9 pm, the child remembers that tomorrow they need to bring crafts made from natural materials. It would be impossible to complete such a task if it were not for the all-knowing Internet, which kindly provides photos of handicrafts from chestnuts to such a request.

Chestnut craft ideas
The beauty of the chosen material lies in its availability - chestnut trees are much easier to find in parks and alleys than the same oaks. In addition, the chestnut does not require painstaking gathering, drying and other preparatory work. Here it is enough to find a tree, on its branches or under it, find about 10 chestnuts (with a margin), and wash them at home and dry them with a towel.

To make a craft from chestnuts, in addition to the chestnuts themselves, you will need imagination and any available finishing means. As a rule, chestnut nuts become part of a variety of animals or fabulous creatures.


Moreover, not only seeds, but also their prickly shell can be used. Depending on which composition is made, the types and amount of auxiliary materials will differ.

chestnut flora
The simplest do-it-yourself chestnut crafts, accessible even to kids, involve copying well-known items. At the same time, it is important to take into account that the material is difficult to process, that is, it is better for it to remain in its original form as part of the composition. So, as representatives of the flora, which can be copied with the help of chestnut, as a rule, flowers and mushrooms are included.

To assemble such a craft, as a rule, the chestnuts themselves and plasticine are enough. The flower can be made both as a three-dimensional composition and as an appliqué.

For the most realistic simulation you will need:
- chestnut;
- tree branch (with several knots);
- maple seeds;
- dry leaves (herbarium);
- plasticine and glue.

The twig will be used as a stem. It can be glued to cardboard or installed in a tall glass to keep the craft. Then, leaves are glued on the tips of the knots, and a chestnut is fixed on the top of the branch with plasticine. It will play the role of the core of the flower, so you need to make a plasticine ring around it.

Maple seeds (or colored cardboard cut in the shape of petals) are glued onto this ring. If you want to create a bouquet, you can use 2-3 chestnuts.

A chestnut mushroom is created using plasticine, which forms a leg. The finished mushroom can be painted with paints or left in its natural form.

chestnut fauna
Chestnut crafts made for a child at school can also depict a wide variety of animals. So, if you wish, you can create a spider, caterpillar, bird, bear, dog, horse and many others.


Moreover, it is absolutely not necessary to somehow additionally decorate the product with paints, because the chestnut has a shade that is most often found in the color of animals.

Plasticine, colored cardboard, toothpicks or matches and glue are usually used as auxiliary materials when creating animals. In other words, a set of items that can be found in any home.

A master class on creating a chestnut spider, however, implies the presence of a wire, but this component can be replaced with the same plasticine. In the classic version, to make a spider, it is enough to glue cardboard eyes over the nut, and pierce 8 holes along the underside. A wire is inserted (screwed) into the holes formed, which is bent at an angle of 45 °, imitating spider legs.


It doesn't take much effort to make a caterpillar either. In the simplest version, 10-12 chestnuts are laid out on cardboard covered with a layer of plasticine (4-5 mm). Then, on the first nut, the muzzle of an insect is drawn, and on all the rest, paws.

If you want to create a more voluminous version of the craft, you can fix half of the chestnuts in plasticine on cardboard, and lift the other part by putting it on a wire or a toothpick.

The hedgehog made of all the components of the chestnut looks original. To create it you need:
- on a chestnut nut, form an elongated muzzle of a hedgehog with plasticine;
- mark the eyes and nose with beads on the muzzle;
- blind and glue the paws of the animal to the chestnut;
- cover the craft with a chestnut shell, the spikes of which will create the effect of hedgehogs;
- glue apples or leaves cut out of cardboard on top of the shell.

The manufacture of other animals from chestnuts follows the same pattern. The head (1 chestnut) and torso (2 chestnuts) are assembled from nuts, and with the help of plasticine or matches / toothpicks, limbs, ears and tails are formed.

Photo of crafts from chestnuts


Do crafts from chestnuts The kids really like it, not only because of the end result. The fact is that chestnuts are so beautiful, so pleasant to the touch that working with them turns into a real pleasure. At the same time, while creating with a child, by all means praise all his successful actions, do not focus on failures, pay attention to the fact that with the help of the most trivial movements you will together create figures of various animals, insects, birds and people. Creating crafts with the help of such natural ingredients will allow the baby to see the beauty of nature and the unlimited possibilities that handmade opens up.
Crafts from chestnuts with your own hands
Bunny
To make a funny figurine, you will need to stock up on a couple of fruits, the smaller one will play the role of a bunny's head, the large one will be a calf. At the same time, keep in mind that the natural material must be fresh - only then will it be well pierced with toothpicks (they will be needed to attach other parts). However, you can also take dried specimens, only then mom or dad will have to make holes in them with an awl.
Insert a couple of toothpicks into the head and wrap plasticine around them to make ears. This measure is necessary, because voluminous plasticine parts themselves do not adhere very well to slippery chestnut surfaces. But you can try to stick the plasticine eyes, mouth and nose - they should not fall off.
Now go to the body - you will need to attach the tail and paws to it. Then, using half a toothpick, connect the head and body of the animal together. As a decor, you can also fashion a bright plasticine carrot for a bunny.
Make and - the child will certainly like it too.
birdie
Attach the eyes and beak to the chestnut-head of the bird, you can make them multi-colored - it will be more fun. Just like with a bunny, you will need to attach the bird's head to the body - for this you need to make holes with an awl in the appropriate places of the chestnut fruit. Connect them together with toothpicks. Now it remains only to make the wings.
If you wish, then from the plastic mass and dry twigs you can build a nest for the bird.

To make a horse, pick up large fruits. In the chestnut body, punch 5 holes with an awl - for the legs and for the head. Sharpen 4 matches and insert them into the leg holes. Do the same manipulations with the match for the head, only it will need to be sharpened on both sides. Connect the chestnut head and body.
The mane and tail are very easy to make - for this you will need to use woolen threads. Then they will need to be attached to the craft, wielding an awl.

A funny bug will turn out not only from the fruit, its peel will also be needed. Fasten the torso and head with a plastic mass. Make eyes using any suitable natural material, such as cereals. Legs and antennae are leaf petioles or thin twigs.
The kids will love it and - we bring to your attention a master class with step-by-step photos.
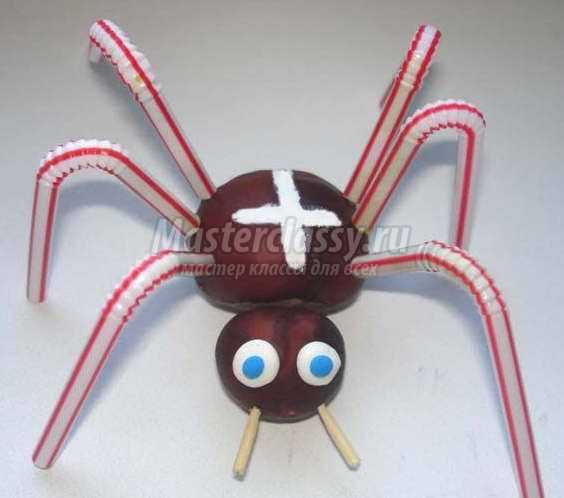
A spider is also made very simply, only for its manufacture it will be necessary to take a couple of fruits already. Connect them in a way that is already familiar to you. Cut eight plastic tubes (you can just halve 4 pieces), put them on plasticine - these will be the legs. Don't forget to sculpt your eyes.

Collect fresh fruits, they should all be approximately the same size. Drill them through with a thick awl, but if you have a small drill, then by all means use it to make your work easier. You can also make holes with a nail, driving it with a hammer.
Prepare small wooden beads in advance. You can do nothing with them - the wooden texture looks unusually harmonious, or you can paint it with acrylic paints of the color you need. After the acrylic has completely dried, collect the beads on the fishing line, alternating the "beads". Make a knot on the fishing line, and melt the ends, then they will not be untied. You can hang such decorative beads on the wall to create an autumn entourage in the apartment.
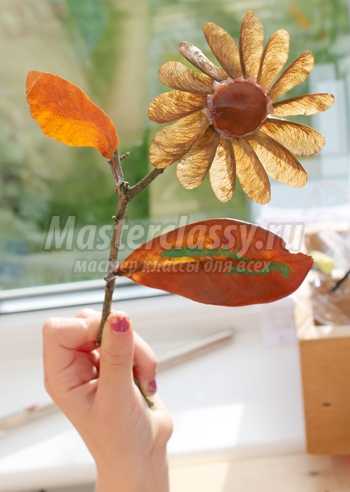
One more children's crafts from chestnuts and other natural material can be called a delightful flower. The middle chestnut with a glue gun will need to be attached to a branch of the desired shape. With the same tool, attach petals to the middle - maple lionfish, and leaves made from beautiful autumn leaves to the branch-stem.
Crafts from chestnuts with your own hands - photo:
Crafts from chestnuts and acorns
BearPut a small chestnut on a large chestnut - you get the body and head of a bear. You can use the same technique with toothpicks, or you can use some kind of plastic mass. Glue the ears to the head - a couple of tiny chestnuts.

Eyes for the bear can be made using two miniature buttons, roll up the nose and mouth using plasticine of the appropriate color. Attach to your head. Make paws for a bear cub very simply - put it on four acorn plushes, fixing it with plasticine.
If you would like to do crafts from cones and chestnuts, then you can plant a bear cub near a large pine cone, previously painted with green gouache. It turns out that the bear is sitting under the Christmas tree.
Cow
Our main material will act as the cow's body. For the legs, roll up four brown or black plasticine sausages, put the body on them. A thin plasticine sausage, fixed at the back, will imitate a ponytail. Attach a small plasticine cake cut with scissors to its tip.
A cow's head is an acorn without a hat, a pair of molded white horns, eyes and ears should be fixed on it. In place of the nose, a molded cake should flaunt - make two nostril holes in it. Attach the head to the body.
Mushrooms
Line the lid of the box with autumn foliage - it can be either fresh or dried. Using plasticine, connect together an acorn without a plush and a chestnut. Choose acorns that are not very thick, so that as a result it looks like a mushroom. Glue a few blades of grass or leaves on the surface of the hat, this will help to achieve greater realism. Put man-made mushrooms on the lid-clearing - and here you have it crafts from chestnuts "Autumn", unusually beautiful and harmonious. Or you can put a cute animal on such a mushroom clearing.
Crafts from chestnuts - photo:

Make others too, because this time of year gives us a sea of natural materials and ideas for turning them into real handmade masterpieces.
Crafts from chestnuts on the theme of autumn - topiary
You can create a stunningly beautiful autumn tree with your own hands, and we will tell you what exactly should be done to achieve the goal. This will be a real highlight of your interior or an excellent gift for friends.
The basis of the craft will be a ball. You can use a variety of materials, for example, you can purchase a foam base from a craft supply store. We suggest you use the most common newspapers - they are quite inexpensive and are perfect for the workflow. Crumple them well and tie them with thread so that the newspapers keep their shape. The base ball should be tight, which is why it should be lightly smeared with glue. You can also mask the protruding pieces of newspaper sheets.
Put the base on the trunk. For the barrel, you can take both a wooden and a plastic stick. First, make an incision on the ball, through which you pierce the stick.
Pick up a pot for your topiary in advance - it can be ceramic, glass or plastic. Pour the gypsum solution inside, and when it begins to slowly harden, insert the trunk into the pot. Support the topiary until the plaster has completely set. If the container does not look very attractive, then now is the time to decorate it, for example, by wrapping it with twine or sticking rhinestones.
Sort your natural "treasury" by selecting flat chestnuts that will be more convenient to glue, in addition, they will look more attractive on the crown. Starting from the top, start gluing using a glue gun. Try, of course, to glue the fruits as close to each other as possible, but if there are gaps, then do not worry, because then they can be masked with sisal or tea. Tea or sisal is also useful for decorating a plaster in a pot.

Do you want to make the topiary fragrant? Then, in between, you can put crushed vanilla sticks, aromatic spices or herbs, tea with fruit additives. Fragrant decor can crumble, which is why it needs to be fixed - sprinkle the "master" with odorless hairspray.
You can decorate the crown with whatever you like - bows, butterflies, sparkles, decorative ladybugs.
In order for the "lifetime" of the topiary to be longer, you need to hold the chestnut fruits in a cool place after harvesting, this will allow them to dry naturally without undue acceleration.

To decorate the interior, especially for Halloween, you can also use a woolen web. The craft is so simple that even a three-year-old under the supervision of an adult can try to do it. To make it, six holes should be made in a large chestnut tree, insert a thick branch 10 cm long into each hole, putting it on glue for greater reliability. Wait for it to dry.
Tie the end of the woolen yarn of your favorite color to the first stick, then stretch the thread and wrap it around the next stick. Continue to do these actions again and again with all the "rays" of the web. If you want to change the color, then just cut the thread and tie a different color to it. When you finish the gossamer, then simply tie the thread to the last stick, leave the tip of the required length for hanging and cut off.

As you can see, there are many ideas that allow you to decorate your home and create a great mood, do it quickly crafts from chestnut cones, various animals and autumn compositions, because the service life of such natural material is not very long.
If it is autumn in the yard, then very soon crafts from chestnuts will be needed in the kindergarten. In Europe, it is customary to bake chestnuts and eat them warm without spices, but in our region, chestnuts turn into funny animals or funny little men.
To make beautiful crafts from chestnuts, you may need a wide variety of materials. From natural materials, this can be the shell of various nuts, small twigs or acorns. From improvised materials, it is worth taking plasticine, a glue gun, pompons, chenille, plastic eyes, toothpicks, matches, beads and everything that comes to hand.

From which side to approach handicrafts from chestnuts? Start by picking chestnuts. For crafts, use fresh chestnuts, as slightly aged chestnuts tend to wrinkle and lose their beautiful shape. Depending on the size and shape of the chestnuts, decide on a future craft. If nothing but a chestnut caterpillar comes to mind, don't be discouraged. Just visit our website and take a look at the rich selection of chestnut crafts we have to offer.

Let's start simple. To make a bear out of chestnuts, prepare two chestnuts of different sizes and plasticine. Fasten both chestnuts together with a piece of plasticine. The smaller chestnut will act as a head, so stick a white muzzle, a pair of eyes and brown plasticine ears to it. Roll up and attach four identical legs to the body.

To make a bunny, when collecting chestnuts, do not forget to take with you a couple of seed boxes from a tree (in common “helicopters”) and rowan berries. You will also need a glue gun and ready-made eyes for toys. For the body of a bunny, it is best to choose a chestnut with one flat side. Glue a round head to the body, and in turn attach the ears, nose and eyes to it.

The deer is also not the most difficult chestnut craft. In addition to the main material, you will need twigs from a tree, eyes, a pair of seeds or oval-shaped seeds, matches, an acorn hat and a glue gun. To make the match legs fit snugly in the chestnut, make holes with an awl or a nail with a hammer.


And you will get this touching sheep if you attach a toothpick to the chestnut tree, and plant an acorn on it. Glue a hat, eyes and felt ears to the acorn. The legs will traditionally be four matches.

Another fluffy forest animal - a squirrel, will be obtained as a result of gluing a chestnut and a cone. All details of the body and muzzle can be cut out of paper, and the tail is best made from a red feather.


Another version of the squirrel suggests the presence of peanut shells or pistachios for the lower legs and chenille (fluffy wire) for the upper ones. Make a head from an acorn glued horizontally to a chestnut body.

Combining natural materials in different versions, you get completely different animals, each animal with its own character and mood.


Everyone will succeed with an owl from an acorn, because it will be easier to make it than a pair of turnips. You will need acorn caps, leftover felt, a glue gun and a marker. If you want to make the owl look cuter, use black beads, pom-poms, or ready-made toy eyes for the peephole.


Chestnut, brown pom-pom, pistachio shells and multi-colored feathers will make an adorable bird.

And using just plasticine, you can get such glorious animals.


Fasten two chestnuts with a toothpick. Attach four toothpicks to the bottom chestnut and draw white spots on it, and glue felt ears, paper eyes and nose to the top chestnut and stick a couple of toothpick horns. 
Even one chestnut will be enough for a piglet. Glue a pair of paper ears, nose and eyes to it. Attach the legs and the pig is ready.

For the second version of the pig, you can use two chestnuts and a flat button instead of a patch.

A monkey will become a wonderful craft from chestnuts. You will need two chestnuts, a piece of plasticine, two acorn caps, chenille for the tail, a pair of eyes and a glue gun.

One chestnut, five apricot pits, some bright plasticine, eyes for toys, and you have a charming turtle ready.

If you make a large hole in the chestnut tree with a nail, glue various details to the chestnut tree, and attach the chestnut tree to a pencil, then you will get a fun decoration for stationery.


A glorious snail can come out of plasticine and chestnut. Just roll a long snake out of plasticine and partially wrap the chestnut with it. By the way, you can sculpt not only from plasticine, but also from salt dough or polymer clay.

To make such a clatter fly, glue large plastic eyes, a toothpick proboscis and wings from leaves or seed pods to the chestnut tree.

To make an autumn hedgehog craft, you will need a chestnut peel, plasticine and three peas of black pepper. Roll up the body of the hedgehog, attach the peel and eyes with a nose to the head on top.

Never scary, but very kind chestnut spiders. You can make them from one chestnut, a pair of chenille sticks and two eyes. Glue all the details with a glue gun.
The coming autumn is an abundance of natural materials: chestnuts, leaves, acorns, plant seeds, chestnut peel.
What can you do with your own hands from chestnuts on the theme of autumn for a kindergarten or school?
What crafts from chestnuts to prepare for the autumn holiday? Where can I find videos and photos on making crafts from chestnuts?
The most famous and simple crafts: caterpillar, cheburashka, mushrooms, bear cub, hedgehog.
Among the little-known, but not requiring special time and material costs: a snail, a horse, a dog, a fox, a turtle, a bird, a spider, a beetle, a hare, a butterfly, a dragon, a heart, beads, bracelets, a captain, a snowman, a house, a basket, a monkey , cat.
Let's look at each craft in detail, from the selected materials to the finished product.

Necessary for manufacturing: chestnuts - 4 large, 3 small, matches or toothpicks, plasticine, marker, paper knife, needle for holes or awl, proofreader if there is no indelible marker.
- We lay out the prepared tools and materials and select the largest chestnuts - the body and head - 2 pcs. We spread Cheburashka on the table to see how it will look like in our finished form. If necessary, replace unsuitable chestnuts.
- We collect the head, having previously made 2 holes in the chestnut head with a large needle or an awl for the ears. Before making a hole, try on how your Cheburashka will look like.
- We insert toothpicks or matches into the finished holes and slightly sharpen the ends. We perform similar operations with the ears. We choose chestnuts that are flatter on one side for the ears. We attach them to the head, attaching them to toothpicks.
- We select the second large chestnut and with the help of toothpicks we attach the head to the body in the same way.
- The arms are small chestnuts attached to the body with toothpicks.
- The legs are small chestnuts, cut in half, if there are flat chestnuts left, then they will do.
How to draw a muzzle?
Let's look at 3 ways:
We draw a muzzle in a place where it is slightly rough and differs in color from the main smooth dark brown color. Draw eyes, nose and mouth with a waterproof marker.
With the help of a corrector and a marker, or for black, we use plasticine. Similarly, draw the eyes, mouth and nose.
Using a needle or awl, we make holes or cut out the mouth, nose and eyes with a knife.
If you have toy eyes, or if you've purchased them and they fit, you can make them from a pack of pills if you like.
Cheburashka is ready, check that she stands steadily on the surface, if she cannot boast of such an ability, it is worth redoing her legs.
In this tutorial video you will see how to make Cheburashka and other characters.
How to make a mouse out of chestnuts?

Necessary for making a mouse: chestnuts - 4 large, 3 small, matches or toothpicks, plasticine, marker, paper knife, needle for holes or an awl, corrector if there is no indelible marker.


Here we have such a mouse, look at the photo.
Teddy bear or chestnut bear

In this photo, you see 4 options for chestnut bears using plasticine, acorns. Ideas for creating such craft options will be very useful for creating a composition or a finished craft. All that remains is to make a tree and the clearing itself or a platform for a bear, or maybe a lair. A tree can be a cone or a leaf from a maple, oak, chestnut.
It is done similarly to a mouse, only for the ears we use small chestnuts, as well as for the legs and arms.
We will need: chestnuts - 2 large, 6 small, matches or toothpicks, plasticine, marker, paper knife, needle for holes or awl (nail file), corrector, if not, non-washable marker. 
We perform similar operations, as in the creation of Cheburashka crafts, only we attach the ears to the top of the head. We make the nose from black plasticine and draw the mouth with a black marker.
If there are no small chestnuts, we make these parts from plasticine, the second option is in the photo of the bear cub.

How to make mushrooms from chestnuts?
We will need: chestnuts according to the number of mushrooms, a knife for cutting paper.
- Carefully cut off a section of the brown skin of the chestnut, shaping the top into a mushroom cap shape.

- Give the white inside of the chestnut the shape of the stem of the mushroom, choose the shape that you like best.
- The mushroom is ready, now it remains only to place it in your clearing next to other heroes.

A detailed master class on carving a chestnut mushroom is shown in this video with step-by-step explanations - Prepare: chestnut, peel with needles, plasticine, scissors with curved ends.
- We attach a nose from gray plasticine to the chestnut and 4 legs under the bottom.
- From above we smear a rather thick layer of plasticine, making cuts on it with scissors with curved ends.
- Attach a small ponytail as desired.
- Put a mushroom or a small apple on the needles.
- Choose a chestnut of the correct shape so that by cutting off the skin of the chestnut and the chestnut itself, it is easy to get an elongated spout.
- If there is no such chestnut, mold a nose out of plasticine and make eyes and a mouth with a needle or marker.
- Blind 4 legs from plasticine in the form of columns or bent sausages, attach a hedgehog and a tail to the tummy.
- We fasten the chestnuts to each other and the peel with the help of: a glue gun, toothpicks or plasticine.
- The second chestnut with a peel, it will not be necessary to fix it if you did not get a chestnut out of it. The peel should be from 2 halves and diverging to one of the ends - these are the wings of our beetle.
- The head must be supplemented with a mustache made of twigs by gluing or inserting into pierced holes. Draw your beetle's eyes and mouth with a marker, varnish, or a corrector stroke.
- If there is only PVA and paints, then add paints to it and paint your beetle's head with it.
- Choose one chestnut that is slightly smaller than the second, this is the head and body of our cat.
- Connect to each other with plasticine cakes.
- Then we sculpt the ears - these are 2 triangles. Eyes - 2 white circles, with black dots or stripes in the middle, tail - sausage.
- We fasten the cat by attaching plasticine to the chestnuts. A smaller chestnut to a larger one, replace the ears, eyes and tail.
- The muzzle is 2 circles connected together and on top of the pink dot is the nose. Be sure to use a paste or a needle to put dots on the muzzle and add a mustache from the fishing line by simply sticking them.
- Paws sculpt sausage and 4 fingers for each. For our cat, 2x will be enough, because. he's sitting.
- Under the 2nd lower chestnut we make only a foot, a sausage and 4 fingers, we attach everything to the chestnuts.
- The cat is ready, it remains to make him a bowl or sausage to give the image of reality.
Secret: for a short leg - cut out the mushroom from the upper part of the chestnut, for a long one - we make a hat from the side of the chestnut.
A more detailed master class is shown in the video - a lesson on cutting mushrooms from chestnuts.
2 method of mushrooms with plasticine
If you want to get collapsible mushrooms, then use method 2.
We cut out a mushroom cap from a chestnut or use a chestnut that is suitable in shape, with a flat one of the sides and a convex second.
We sculpt a mushroom leg from plasticine and stick yellow plasticine on the lower part of the mushroom cap, exactly matching the shape of the hat.
With the help of a needle, we make a large number of small holes, like butter.
We attach the leg to the chestnut with plasticine or toothpicks.
The mushroom is ready.
Caterpillar or centipede

The simplest craft, it will suit even 3 year old kids.
The number of chestnuts is the length of your caterpillar. We fasten them together with plasticine or toothpicks, previously threaded holes.
We draw a muzzle and insert antennae from toothpicks or sticks.
For older children, we sculpt legs and arms with them.
Chestnut hedgehog - 4 options

with mushroom
Hedgehog from chestnut peel

From green chestnuts
We need to create a hedgehog craft: chestnut peel, chestnut or slightly greenish chestnut already in the peel, a marker and plasticine.
hedgehog standing
For those who want to make a hedgehog standing on its hind legs, we use similar materials, just think about how or by what means it will be attached to a table or other flat object.
snails

We sculpt snails from colored plasticine. We roll sausages and make them thinner at the end, and divide the second into 2 parts to make thin horns.
And the houses are our chestnuts. At will, you paint them with circles or not. Such a family is easy to make in a few minutes.
Basket
We cut out a basket from a large chestnut, suitable for crafts in the garden or to school, to fold tiny mushrooms.
The second option is to glue the chestnuts in the form of a basket, it is better to fasten the chestnuts to each other with a hot gun or instant glue. For decor, use cones or other natural materials.
2 variants of chestnut turtles
Needed: chestnut peel with cut needles, plasticine, scissors.
Armor
We cover the prepared peel from half of the chestnut together with the chestnut itself with green specks of plasticine or use scissors to make oval rounds if there is only one chestnut.
We cut only the brown peel with scissors with curved ends.
Head
We roll a plasticine sausage of medium thickness, bend 1 side of it and slightly thicken it, giving the shape of a turtle's head.
Slightly flattening it on the edge, if the neck turned out to be very long, remove a piece of sausage.
On the head with a toothpick or a needle we make eyes and a mouth. Option 2 eyes are made of white with black or green plasticine.
We fasten the head to the body, pressing down on the chestnut itself from the back side, where the legs are.
Turtle legs
These can be plasticine barrels made from thickened sausages. We need to form 4 identical ones. In order for the turtle to stand, check the soles, they must be even.
Draw the turtle's fingers with a needle or toothpick, if there is cumin, we make nails from them.
Tail
The tail is made of plasticine. Roll out the sausage and thin towards the end.
We attach the legs molded from plasticine, head and tail to the body. If they do not hold well, then use toothpicks for better fastening or a hot gun, then the turtle will turn out to be non-separable.
If there is little plasticine, and there are a lot of chestnuts, then we make a turtle from chestnuts like this:
We scratch the shell on the chestnut with a compass or any other sharp object.
We make legs from other small chestnuts or cut them out of chestnuts.
Bug
Materials needed: 2 chestnuts, chestnut peel without needles, marker or varnish, sticks for mustaches and legs.
How to make a cat
You will need: chestnuts, plasticine, a modeling board and paste or a needle, a little bit of mustache fishing line.

What other animals or insects are easy to make from chestnuts?
Spider
horses
Dog
Fox
Bird
Hare
little people
Gluttons or alien creatures
Elephant
pigs
ladybugs
House
beads
Bracelet
What crafts from chestnuts on the theme of autumn can be made for the garden and school? (a photo)

Come up with a plot. For example: from the cartoon Winnie the Pooh, Owl and Piglet pick mushrooms in a clearing, 3 pigs hide in a chestnut house from an evil wolf, a hedgehog picks mushrooms and apples in a clearing, Tsokotuha Fly and Spider Villain. Remember fairy tales or cartoons about autumn and heroes, it will be much easier for you to create a picture.
For ready-made heroes, it remains to make a clearing, a house or other decorations. Often in kindergartens or schools they suggest plots or main characters.
Use such natural materials in creating crafts: acorns, leaves, mountain ash, sticks.
It is easy to create a whole kindergarten or school from chestnut men at the blackboard and at the desks. If you want to fantasize without limits, then flying saucers with gluttons are perfect for this!
For school, make a clearing with mushrooms or an autumn forest of leaves, cones, chestnuts.
What crafts from chestnuts to do for the autumn holiday with your own hands?
How to imagine autumn? Collect leaves, twigs, chestnuts and acorns. Come up with a composition, for example, a house and a clearing.
The house (description above) of hedgehogs and the family of hedgehogs in the clearing. Make hedgehogs, as described in the article, adding rowan berries to them on needles.
Bears or other forest dwellers can also live in this house.
DIY planet in autumn
Find a polystyrene in the shape of a hemisphere and paste over it with leaves and decorate with twigs. Add other gifts of autumn: acorns, rowan, nuts, chestnuts and cones. Call the craft “Autumn has come to the planet” and come up with a story or take a poem about autumn. The following videos show options for crafts for kindergarten and school, take a look and take note of interesting ideas.
We hope that it will become much easier for you to make chestnut crafts after reading our article and watching video tutorials. It's time to start creating crafts from chestnuts, we wish you good luck in such an interesting and creative process.
The tradition of making autumn crafts with your own hands is rooted in ancient times. Once upon a time, man made the greatest discovery: food can be grown. Survival was now almost guaranteed, and there was time to think about higher things. From the threshold of winter cold and famine, autumn has become a harbinger of long rest and holidays after hard field work. And it's still warm in the forest, there are mushrooms and berries. The game has grown fat over the summer, its flair, hearing and vigilance have become dull - it’s good to hunt. In the rivers and lakes there is an autumn bite, so there will be meat and fish for the winter. In general, in winter it became satisfying, but boring, so I wanted to keep the charm of my eyes longer ...
From which only reminders of the joyfully sad beautiful time of the quiet withering of nature are still made with their own hands: from simple autumn bouquets, the material for which you just need to collect and put in a vase, to complex figures and compositions that require extraordinary imagination and fine work, see fig. They all have one thing in common: the ability to discern the hidden essence of a thing and extend its natural life cycle as far as possible.

Some argue that autumn compositions of fresh flowers, vegetables and fruits are akin to the Buddhist-Tibetan mandala. But the monks, hiding from everyone, carefully remove it for a year with colored sand, so that later they themselves can sweep it away, in commemoration of the futility of all things. And the compositions on the theme of golden autumn, although short-lived, wither in a natural order and manage to please many before that. However, let's not philosophize about both worldviews. We will see how to make autumn crafts more durable, capable of reminiscent of the sad beauty of the withering of nature, at least until spring. But let's not forget about the golden autumn either ...
Some innovations

A significant part of the fruits of autumn creativity are figurines of people and animals. They need eyes. Traditionally, very expressive, but, alas, short-lived eyes are obtained from the fruits of the snowberry - a common shrub in the middle latitudes, see fig. For clear pupils, small rounded black seeds can be inserted into them, for example. mouse peas.
Eyes that can live with the figure all its life can be made from pasted pieces of white and colored felt, like all other additional elements, see fig. left. Its full-fledged substitute, and more affordable and easy to use, is geofabric (geofilm). The one that covers greenhouses and greenhouses. You can color it with felt-tip pens.

The details of handicrafts are usually glued with PVA, Moment, etc., but recently acrylic glue has been increasingly used. Non-toxic instant cyanoacrylate, but water based. It is safe, easy to peel off the body. From the hair - with a comb moistened with water. The same goes for acrylic varnishes and paints.
Children love to express the emerging personality in autumn creativity. Children's crafts are highly desirable, even necessary, to create without the use of piercing and cutting objects. There is also a traditional way of connecting - matches. But they are blunt, too soft and peel acorns, chestnuts, beans, etc. pierce with difficulty and inaccurately. Nowadays, instead of matches, it is better to use toothpicks: they are harder wood, and their tips are sharp enough to pierce the seed coat, but not so much as to injure children's fingers.
Muzzles, paws, and other small animals are most often molded from plasticine. If we are talking about durable products, it is better to replace it (with plastic, cold porcelain). Plastic can be done at home with your own hands. Raw materials are inexpensive and available, but the cooking process itself is quite laborious. But 300-350 g of plastic obtained at a time is enough for a whole collection of trinkets. Plastic easily accepts painting and varnishing with acrylic, processed with a knife and an awl. Well, we will recall other autumn craft tricks along the way, in relation to a specific material.
cones
The most solid basis for autumn crafts is provided by empty cones of coniferous trees. Well-made crafts from cones retain their appearance for years and can serve as a permanent decoration of the interior. The material is hard, working with it requires a small steel tool. Therefore, cone-making should be done by adults and quite grown-up children.unknown bumps
Cones are not only on pines, spruces and cedars. Cone-bearing plants also include those that not all botanists call conifers. For example, species and garden form of arborvitae. In cultural plantations, they are common up to St. Petersburg. Tui cones are small, but varied, see fig. From them you can make various complementary elements in the general spirit of cone compositions.

Juniper cones do not look like cones either, rather like berries, on the right in fig. they make good and durable pupils of the eyes and noses of little animals. There is no need to look for juniper, now rare and protected by law: its cones are medicinal and are sold dry in pharmacies.
Note: sometimes araucaria is grown in rooms. This is also a cone-bearing plant with small very original cones.
One bump
Mini-crafts come out already from the 1st cone, there would be enough imagination and vigilance. By the way, in pos. 1 fig. on the back of the hedgehog are the very cones of araucaria that were discussed. But back to fantasy. The cone is most often viewed from the side of the splayed scales. And if you just look from the bottom, "at the ass?" See what might be there, pos. four? Baba Yaga with a walking fly agaric instead of a goblin or Kashchei, pos. 5 - this is quite in the spirit of a dense forest from Russian fairy tales, but crocodiles do not eat cones and do not live in pine forests with spruce forests, like penguins, pos. 6 and 7.

Note: acorns organically fit into crafts made from cones, which we will recall later.
Cone Techniques
The cones are firmly glued with any wood glue, so the easiest way to assemble a craft from them is to glue the suitable base with cones. This is how hedgehogs, so popular now, are made from cones and a plastic bottle, on the left in fig. But the cones can also interlock on their own if they are stuck into each other with scales in the center. For strength, a few drops of glue are allowed into the joints.

In the same technique of mutual coupling, baskets are made from cones. But here, for greater strength, it is desirable to reinforce the product with a flexible electrical wire in isolation, on the right in Fig. Especially if the basket is not just a decoration, but also a household item - a vase for sweets, etc.
Sometimes the crowns of autumn dry trees - topiaries are collected from cones. To do this, you will have to use an awl or a micro-drill with a thin, 0.7-1.2 mm drill. In the stem, the cones from the rear (where the tail was) are drilled or pierced with a blind hole with a depth of approx. 1 cm. Then glue is dripped into it and a harsh or nylon thread is immediately pushed with a toothpick. The toothpick is broken off, leaving a plug in the hole. As an option, but much less convenient, a thin wire with a bent end is inserted directly into the glue. With the tails of a cord or wire, the cones are attached to the stem, starting from the bottom. The tails of the upper ones, which are already difficult to tie, are passed through the crown with a crochet hook and knitted at the bottom.
Cone flowers are also a very popular craft. There are 2 ways in use here: either the top of the cone is bitten off with wire cutters, and the scales are broken, on the left in the figure, or the bottom of the cone will be the corolla of the flower, on the right. Paint in both cases with acrylic paint.

Speaking of hedgehogs
Among the autumn crafts, hedgehogs occupy a special place. They make needles from sunflower or acacia seeds, straws, yarn, etc., see fig. Even from pine nuts, at current prices! The work is painstaking, but a completely plausible hedgehog comes out of a whole sunflower basket with a scraped loose core and cut edges, on the right in fig. So that the seeds do not fall out, its back is dug from a PVA medical syringe or transparent acrylic varnish, diluted two or three times with water. In any case, it is better to mold the base from plastic.

There is another way to make an autumn hedgehog from the 1st cone, and not only a hedgehog. This is also quite painstaking work, although not as much as in the previous one. case: the needles are stuck between the scales. In order not to fall out as it dries, they dig in glue. You can also stick twigs, leaves, etc., depending on the plan, see next. rice.

chestnuts
Horse chestnut fruits are not as durable as cones: by spring, the core dries out, the crust fades and becomes brittle. But fresh chestnuts are very elegant, and beautiful crafts from chestnuts can be created right there, right on the street, walking with children. For example, it is enough to add eyes to the chestnuts in the plush, and funny faces will turn out, on the left in fig. From the husked ones, figures like a snowman are also assembled right on the spot on matches, toothpicks or twigs, on the right in the figure; mouth, nose, eyes can be pierced and scratched with a penknife. True, there is no chestnut-colored snow even in areas of man-made disasters, so children call such figures (at least they used to call them) “fried scarecrow-mewed”.

The trace from the plush on the chestnut seed is wide and looks like a monkey muzzle, therefore, like a hedgehog from cones, so from a chestnut, the most common craft is a monkey figurine. As for the other figures, then it's only a matter of fantasy; see some samples on the next page. rice.


Here, as mentioned above, it is better to use toothpicks instead of matches. Firstly, you do not have to prick chestnuts many times. Secondly, complex three-dimensional compositions can be assembled from chestnuts on toothpicks, such as models of chemical molecules, pos. 1 in fig. on right. Volumetric chestnut things with a seemingly solid surface (topiary crowns, vases, baskets) are already assembled on a propylene thread or nylon cord using a sewing needle. Quite wide gaps between chestnuts need to be covered with something, acorns and beans are most suitable for this, pos. 2.

In complex autumn-themed compositions created at home, mushrooms are often made from chestnuts, cutting through the peel along the equator and cutting off the core, so you get something similar to a boletus, porcini or Polish mushroom. To imitate butter and mossiness mushrooms, it is better to put an acorn on the leg, fastened to the hat with a piece of toothpick. The underside of the hat is tinted with acrylic paint, see fig. left. And to get a boletus or a fly agaric, they already paint a hat.
Leaves
Autumn leaf crafts are the most common. Immediately on a walk from the leaves, you can weave a wreath on your head - which of the girls in childhood did not feel like a princess in it? A wreath of fallen leaves is made in the same way as a wreath of wild flowers, see the video below. You just need to take leaves with long petioles - maple - and in the southern regions plane trees are suitable.
Video: a wreath of leaves - an example of manufacturing
The dead leaf is considered a very short-lived material: it is only suitable for work for a few hours, then it dries up and becomes brittle or rots. Crafts from autumn leaves without additional preparation and processing are kept in a room with moderate humidity for 2-4 weeks. But what is this preparation with processing?
In order for crafts from autumn leaves to last until spring, or even several years, you will need:
- PVA glue or water-polymer emulsion. It is sold in packages of 5 liters for construction and woodwork, but this is the same PVA, highly diluted.
- Acrylic water-based varnish.
- Distilled water in an amount sufficient to dilute the varnish and PVA (if there is no emulsion) by 3-5 times. Distilled water can be bought at any pharmacy with a prescription department.
The essence of the method is in distilled water. To impregnate wood, PVA can be diluted with ordinary good quality tap water, but in order to make the fallen leaves suitable for finer work and fix the entire product, there should be no dissolved salts in the water. A step-by-step instruction for increasing the ornamental qualities of a fallen leaf and strengthening autumn leaf crafts is simple:
- We dilute the varnish and, optionally, PVA, 3-5 times. Thus, we obtain a bactericidal water-repellent impregnation-plasticizer and varnish-fixer. The proportion is not critical, solutions in tightly closed containers are stored for a long time;
- Leaves that are not yet brittle are cleaned of dirt with a soft toothbrush and rinsed in tap water;
- Then we blot them with a paper towel or napkin and dry them not in direct light and not near heating appliances;
- When there are no visible drops and a film of moisture left on the leaves, we treat with a soft brush on both sides with a water-polymer emulsion or diluted PVA;
- After the impregnation has dried (1-3 hours), we put the leaves into work. You can only glue them with PVA or acrylic glue!
- Finished product several times, until it ceases to be absorbed, coated with fixative varnish;
- After the fixative dries, the craft can be opened for strength and gloss with undiluted acrylic varnish.
It is best to fix leaf applications on paper in this way. They can hang on the wall in their original form for several, up to 10 or more years. If autumn pictures from leaves are created using this method for a kindergarten or school, then it is possible to create a large gallery for several generations of children, or even a museum.
A little more about applications
Children's works from fallen leaves sometimes participate and take prizes at serious autumn opening days with reputable juries; parents of little writers might then be offered to admit their offspring to a school for the gifted. What criteria do sophisticated art critics and artists use to determine noteworthy works?

The most important thing is laconic expressiveness, it has always been valued and is valued in art. The second condition is a minimum of additional materials, coloring and trimming, as in fig. One cannot become an artist without feeling nature, and the feeling of nature largely comes down to the ability to see the hidden expressive possibilities of blanks. Thirdly, some pomp and fine detailing are not forbidden, but without frills and only where they are necessary and appropriate. And, finally, thematic compositions are especially appreciated, where the same set of materials plays with all its facets, as if on a trail. rice.

Cups-vases
The same technique finds application in the creation of three-dimensional objects from leaves. The base is a balloon. Inflatable balls come in different shapes, so it is possible to make autumn cups, vases, jugs using them from leaves. The inflated ball is lubricated with petroleum jelly and pasted over with plasticizer-treated leaves in several layers. After the workpiece dries, the ball is blown off, and the product is fixed and, if desired, varnished.
Trees and bouquets

With phytoplasty (this is the art of creating three-dimensional works of decorative art from leaves), autumn topiaries and bouquets are closely related. The simplest, but quite reliable and natural-looking, base-trunk of an artificial autumn tree is a kraft paper bag crumpled and twisted into a bundle. Branches and branches are obtained by tears of the top, also twisted into bundles. Then the barrel is treated with the same diluted PVA, and then it’s up to your imagination, see fig. on right.
Creation of autumn bouquets is a special art, also coming from phytoplasty. In addition to school ones by September 1, they are collected from seasonal cut flowers. The following can be said about autumn bouquets - decorations. First, the bouquet is the same as on the left of the trail. Fig., can be made much more durable, leaving it almost the same in appearance, drying it in the sand. Sand is needed for construction, the finest and yellowest, from relatively soft feldspar with rounded grains, but without a large admixture of iron salts, i.e. not white quartz and not reddish or reddish. You also need a vessel made of thin plastic, in which the bouquet will fit without touching the walls and bottom. Next, we proceed as follows:
- We take enough sand so that the selected vessel is completely filled with it;
- The sand is thoroughly calcined on a baking sheet in the oven, and cooled to a temperature of 3-5 degrees above room temperature. Its control is with a thermometer immersed in the sand;
- We hang the bouquet upside down in the dishes on crossed sticks so that it does not touch the walls and bottom;
- Gently, smoothly circling the edge with a stream, we fill the bouquet with sand to the top of the dishes;
- We dry not in direct light and without additional heating in a warm, dry room for 2-3 weeks;
- We put a container with a bouquet on the edge of a larger vessel;
- We cut a hole in the bottom of the drying tank with a sharp knife and gradually release the sand;
- Without turning the bouquet over, we blow off the remaining sand from it with a syringe or a household hair dryer at the lowest power without heating.

The bouquet, which is on the right in fig. - a composition with roses from leaves that is very popular now. Leaves for it need fresh maple leaves. It is not necessary to process them immediately, as described above, the finished product is impregnated and fixed. And how to turn leaves into roses, see the master class in pictures below.

Harvest in the bins…
Compositions on the theme of "Golden Autumn" is also a separate art, a synthesis of phytoplasty and autumn bouquets, with its own exhibitions and competitions. They are timed, as a rule, for the harvest festival, so the indispensable elements of the golden autumn compositions are the ripe fruits of fields, orchards and orchards in large quantities, see fig.

Compositions "Golden Autumn"
Here, firstly, we need splendor, symbolizing abundance. Secondly, light, veiled, erotic hints in the form of peppers, etc. are acceptable and desirable. And what is it, because autumn is the time for weddings? In the old days, this had a very definite meaning. It was not customary for newlyweds to delay the conception of offspring. The wife gave birth by the spring, when the mother could already receive fresh food and vitamins. And the baby by his first winter turned out to be so strong that he could survive it, if the year turned out to be lean.
Fallen leaf descendants
Phytoplasty also gave rise to autumn origami. The purpose of this flow is to create an autumn mood, which is achieved by the base of dry branches, and the leaves are made of paper, see an example in pos. III fig. The art of paper folding is origami.

How to make leaves for an autumn bouquet - origami
There are, so you know, 2 directions of origami: origami-do, or high origami, and modular origami. In origami-do, only 1 solid square sheet of paper is allowed; possibly colored, without cuts, glue and tools. Modular origami objects are glued together from parts and can be painted. Blanks are allowed to be cut.
Which type of origami you like more is up to you. How to fold in origami-up to a maple leaf is given in pos. I; willow - on pos. IV. And how it is done and what the maple leaf of modular origami looks like is shown in pos. V and III respectively.
acorns
Coming to the end of our review of autumn crafts, one cannot help but linger on acorns. For children, acorn toys are a special world, because they see small objects larger, more convex and brighter than adults.
Several types of oaks grow within the Russian Federation, and several more are introduced from Asia and the Western Hemisphere. All of them have different acorns, pos. 1 in fig. With acrylic glue, smooth acorns are glued into complex objects; one example is in Fig. at the beginning. But traditionally, the objects of acorn inspiration are mini-compositions.


If the original cone figurine is a hedgehog, and the chestnut figurine is a monkey, then acorns are also inherent in the manifestation of themselves in microdishes. The acorn service can also be assembled on the spot, pos. 2. Handles - strips of bast or thin bark. Holes for them are pricked with the tip of a penknife. The same service, but with the use of plastic and glue, homemade is possible, pos. 3. Spectacular and minicompositions of acorns on any other subject, pos. 4, it's just a matter of imagination. For example, the original frames are made from acorn caps - plus, pos. 5. How many do you need? Are there few acorns on earth? As much as you like, you can string it on a cord and make an excellent wreath on the door with glue, pos. 6. And only from the 1st acorn and many hats with the same stringing - a snake, see fig. on right.

Here in fig. “For inspiration” we give details of the acorn watchdog and samples of figurines of this type. But the little man on the right from the category of “fried stuffed meow” can also be with movable arms and legs. To do this, their acorns are pierced with an awl and the limbs are collected not on toothpicks, but on a copper winding enameled wire with a diameter of 0.6-0.8 mm or pieces of twisted-pair computer cable (“vituha”). The conductors of these wires are made of oxygen-free copper, which can withstand a fairly large number of bends. The conductors of electrical wires are thinner, 0.15-0.4 mm, and they are made of ordinary electrical copper, which is more fragile.
The insulation of the “vitukhi” wires is bright multi-colored, so they are well suited for making acorn toys in combination with other natural materials. For a small tutorial on this part with figurine examples, see fig. Beaks are made from sunflower, pumpkin and melon seeds, and a tuft of a bird is made from a corn kernel at the top left.

Note: crafts are made from acorns pierced with wire and painted with acrylic paint - bunches of grapes, olive branches, etc., see fig. on right.

Autumn for adults
Autumn is also the most favorable time for people who are engaged in decorative art from natural materials quite seriously and even professionally. In the rivers in early autumn, low water, the time of the lowest water level. Along the banks here you can find well-ironed and washed-out snags. Root plastic is the art of carving wood on roots and snags, which is based on a successfully found blank.
Later, in the midst of leaf fall and at the end of it, in deciduous forests they look for burls, influxes of wood on trunks. Do not confuse with a boxing mouth guard, a device for knocking out teeth! A cap on a tree is a neoplasm of the masculine gender.