Original DIY Christmas tree. A DIY Christmas tree made from scrap materials that will surprise your friends and win the competition
Summary: How to make a Christmas tree with your own hands. Original Christmas trees made of pine cones and tinsel. Photos and templates of paper Christmas trees. Homemade origami Christmas tree. Christmas tree made of candies.
Even kids can take part in preparing for the New Year and making New Year's crafts with their own hands. For example, even a two-year-old can make a Christmas tree from an ordinary pine cone and plasticine. You just need to teach him how to roll plasticine balls of different colors and attach them to the pine cone. The base of the Christmas tree is a spool of thread wrapped in foil.
Here are more complex versions of Christmas trees made from pine cones. In the first case, the cone was painted green and white with acrylic paint. In the second version, the pine cone was decorated with beads.


You can make a Christmas tree like this with your own hands from a large number of cones. The basis for the Christmas tree is a cone made of thick paper or cardboard, which is then covered with cones on all sides using a glue gun. Decorate the finished Christmas tree with beads and large beads.

Another very simple homemade Christmas tree made from tinsel. You can make it in literally five minutes.

To do this, you need to make a cone out of cardboard and stick tinsel on it in a spiral.


Christmas tree made of candies. DIY candy tree. How to make a Christmas tree out of candy
If, before wrapping a cardboard cone with tinsel, you use tape to attach candies to the future Christmas tree, you will get a sweet Christmas tree made from candies. For a detailed New Year's master class on how to make a Christmas tree from candies, see the photo below or follow the link. When creating a Christmas tree from candies, it is convenient to use double-sided tape.


A large number of Christmas trees can be made with your own hands from paper. Let's start with the simplest New Year's crafts.
DIY paper Christmas trees
DIY Christmas tree made of paper (option 1)

Print on thick paper or cardboard and cut out the blanks with scissors >>>> Bend each Christmas tree in half and glue them together. This Christmas tree is made according to the same principle as the Christmas tree ball from our previous article. See link >>>>

The openwork Christmas trees from the Country of Masters website were made using the same principle.

The Singapore website of Epson offers ready-made templates for its Christmas trees:


DIY Christmas tree toy (option 2)
If you have an unnecessary cardboard box, then you can use the same technology to make a Christmas tree like this.

DIY Christmas tree toy (option 4)

You can also make a curly Christmas tree by gluing a cardboard cone base with strips of rolled paper.


DIY Christmas trees made of paper (option 10)
To make such a Christmas tree, you must first cut out circles of different diameters from paper. You will also need wire and a stand, which can be successfully replaced by half of a large Kinder Surprise. The Christmas tree is easily assembled with wire, and, most importantly, it is easily disassembled. See link >>>>


Origami Christmas tree from a magazine
This origami Christmas tree is very easy to make with your own hands. Small format magazines that can be found in any home are suitable materials.

Work plan:
The procedure described below must be done with each page in the magazine. If the cover is thick, you can simply detach it (tear it off).
1. Fold the page, upper right corner, at an angle of 45 degrees to you.

2. Once again fold the sheet in half diagonally.

3. We go through all fold lines with a fingernail or other object so that they do not open, especially thick pages.
4. Fold the bottom corner that extends beyond the borders of the magazine upward.

In this way we add up all the pages in the advertising magazine.

The result is a cute origami Christmas tree.

Origami Christmas tree from a magazine
Another origami Christmas tree model for the New Year. Unlike the previous origami Christmas tree from the magazine, the pages here are not folded, but figuratively cut out according to a template.

The manufacturing principle is very simple. You need to prepare a template for half of the Christmas tree, circle it on one page and cut it out. Further, the cut out page itself will serve as a template for other pages. You can cut out several pages at once, but you shouldn’t cut a lot at once, as the cut line will turn out uneven (crushed) and the tree will not open well.

The tree itself turns out to be more one-sided; to achieve volume, you can fold and glue 2-3 magazines together. But believe me, she looks good anyway.
Origami Christmas tree made of modules. Modular origami Christmas tree
Assembling a Christmas tree from triangular origami modules is not at all difficult. It consists of individual branches, so you can make Christmas trees of a wide variety of shapes and sizes. In addition, from such branches you can make New Year's compositions, make toys, snowflakes, and stars. See the New Year's master class at the link >>>>

Christmas tree coloring on the wall
Large Christmas tree painted on the wall. The individual parts of this New Year's beauty must be printed on 22 A4 sheets and pasted on the wall in the correct sequence. The advantage of this New Year's paper craft is that the Christmas tree is made in black and white, so the printer's ink consumption is low. In addition, this New Year's coloring book with many small details will captivate the child for a long time. Link >>>>

DIY Christmas tree made from napkins
A master class on making a very beautiful, unusual Christmas tree from napkins can be found at the link >>>>

How to make Christmas trees from corrugated paper
The Country of Masters website invites you to make two Christmas trees with your own hands from corrugated paper.
Option 1. The candles and the Christmas tree itself are made of corrugated tubes. Link >>>>

Time flies by unnoticed. It would seem that just recently we celebrated the New Year and celebrated Christmas, but outside the window it is already autumn. With the onset of the first cold weather, there is a desire to begin preparing for the upcoming holidays, delighting yourself and your loved ones with a small miracle. And the first thing that arises is the question of purchasing the most important attribute of the New Year - a Christmas tree. Without this fluffy beauty, the mood will not be the same. And the holiday will seem unreal.
But you can approach the issue of purchasing a traditional tree creatively. Just use your own imagination and ingenuity to create a fluffy beauty with your own hands, using unnecessary materials lying around the house.
What can you make a Christmas tree craft from? From anything! Moreover, it is better if you do this with your children. They will also get great pleasure from this process.
What kind of Christmas tree can you make that will please your loved ones and guests, and also bring the feeling of a real holiday? There are a few tips you should know before you get started.
The first of these concerns form. As a rule, Christmas trees are made in the form of a cone or an isosceles triangle. However, the form does not have to be correct. You can make a craft Christmas tree at an angle and with any number of tiers.
The next tip concerns the color of your piece. And it doesn't have to be green. You can make your Christmas tree white, yellow, silver, gold or even blue. Don’t be afraid to deviate from the standard rules, because your furry beauty should become a real miracle.
A very important point in the work is the fastening of the craft. This will need to be thought out in advance. The details of the Christmas tree can be fastened with tape or glue, wire and other materials. It should be taken into account that this will need to be done carefully and reliably, because the Christmas tree should please you with its appearance and withstand throughout the holidays.
Particular attention should be paid to the top. According to tradition, this detail serves as a decoration for the crown of the spruce. The top of your tree can be any toy, star, ball or just a curved spiral. A decoration in the form of a symbol of the coming year or an angel will look interesting.
Paper crafts
What can you make a Christmas tree from? The easiest and fastest way to make it is to use paper. In addition, made in miniature sizes, such a craft will become a wonderful New Year's toy.
How you can do this To do this, you will need to prepare in advance all the materials necessary for the work:
- sheets of paper, which can be magazine, book or simply blank;
- stapler;
- scissors;
- glue;
- glitter or spray paint;
- a ribbon or paper clip for hanging the craft on the Christmas tree.
When starting work, all the leaves must be placed in a stack and secured with a stapler. Next, you should draw the outline of the tree with a pencil and cut it out. The next stage of work consists of bending the leaves and painting them with glitter glue or spray paint. The finishing touch is to glue a ribbon or attach a paper clip.
The second manufacturing method is more troublesome. However, the beauty of the resulting craft will certainly delight you. So, for work you will need:
- book pages;
- cardboard;
- glue;
- scissors;
- mini-toys, stars and ribbons for decorating the Christmas tree.
The first stage of work consists of making a cone-shaped base from cardboard. Next, you should put the leaves one on top and make cuts on them, but only on one side. After this, the entire base is glued over. In this case, the uncut side of the paper is placed on the cone. To cover the top you will need to make a “lid”. That's it. The Christmas tree is ready. Now it can be covered with glitter or spray paint.
What can you use to make a Christmas tree for the competition of artificial green beauties? Instead of regular paper, you can use corrugated paper to make a tree. Such material will be a valuable find for the home designer. A Christmas tree made from corrugated paper will look unusual and very beautiful. It will certainly stand out among other crafts.

What can you make a Christmas tree from? The basis of your craft can be not a cardboard cone, but a tube. This piece can be purchased at a hardware store or glued together from a few leftover toilet paper rolls. With this option, the cone is made of colored paper, attached to cardboard with tape. At the end of the work, the top of our Christmas tree will need to be decorated with a bow made of ribbons.
You can use polystyrene foam as the basis for making a New Year's beauty. Strips of paper folded in the form of needles are attached to it.
The Christmas tree can also be made in the form of a panel. For this craft, you will need to cut strips of paper and then roll them into tubes of different lengths. Next, all the parts are glued onto a herringbone-shaped base. The finished product is decorated at your discretion.
What else can you make a Christmas tree out of? From toilet paper. This option for making a New Year's beauty is the simplest and most economical. At the initial stage of work, a cone is constructed, the material for which is white cardboard. The dimensions of this part can be different and depend on the desired height of the final product. Next, take toilet paper. It should not have tear strips, that is, the cheapest option will do. Toilet paper should be folded lengthwise, and then, after gathering it, stick it on the cone from the base to the top, like an American skirt.
The strip should remain intact. The resulting Christmas tree should be decorated with green gouache. At this stage, you can involve children in the work.
What can you use to make a Christmas tree toy made from such thin material? From the same toilet paper. A piece of it should be rolled into a ball, coated with PVA glue, decorated and glued to the Christmas tree.
Crafts from pine cones
In order to bring joy to your family and friends, what can you do for the New Year? Christmas tree made of pine cones. For many, working with this natural material will be a real pleasure.
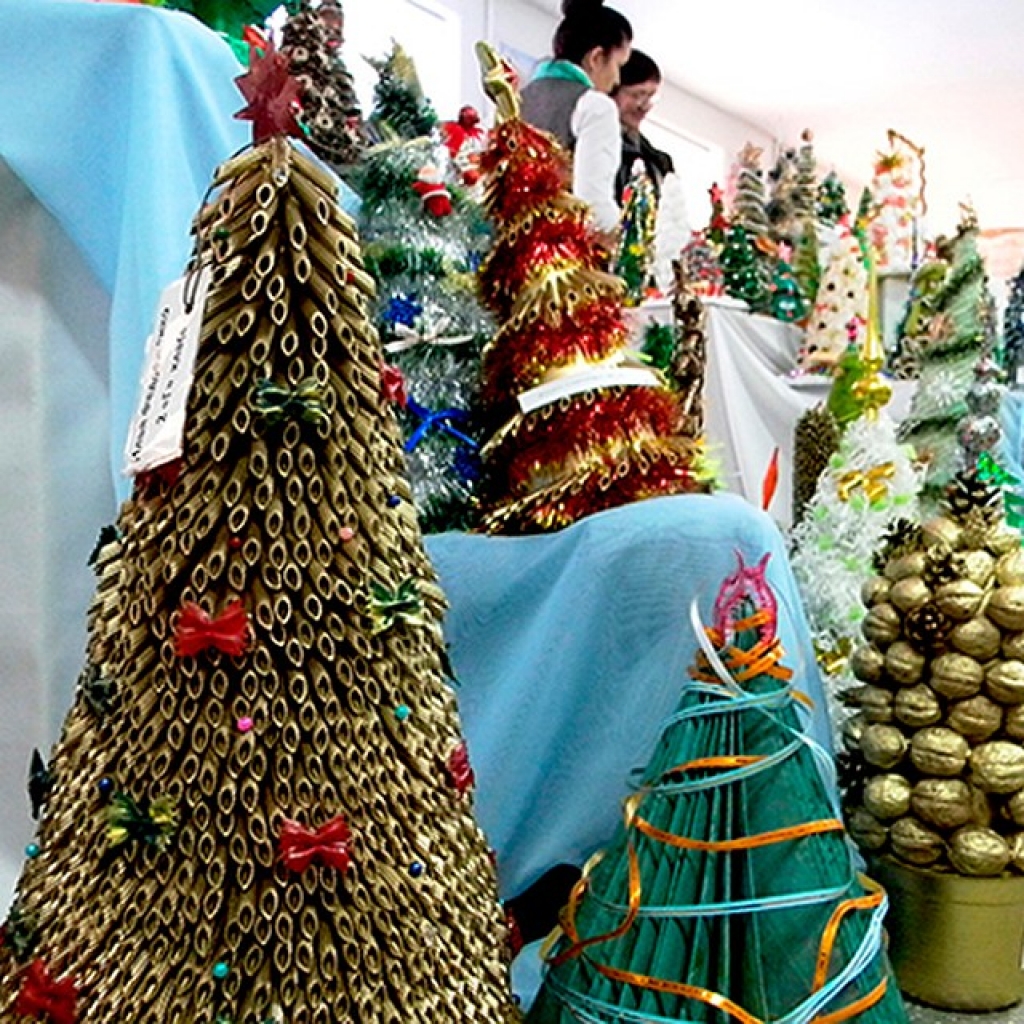
They are considered to be one of the most beautiful. In addition, this is one of the best options for those who are thinking about the following question: “What can you use to make a Christmas tree for the homemade Christmas tree competition?”
There are several options. The easiest and simplest of them involves creating a cone of the required size and gluing cones onto it. Work should start from the bottom, gradually moving to the top of the cone. What kind of toys can be made for the Christmas tree from pine cones? The finished craft is painted or decorated with bows, candies, toys, tinsel, etc.
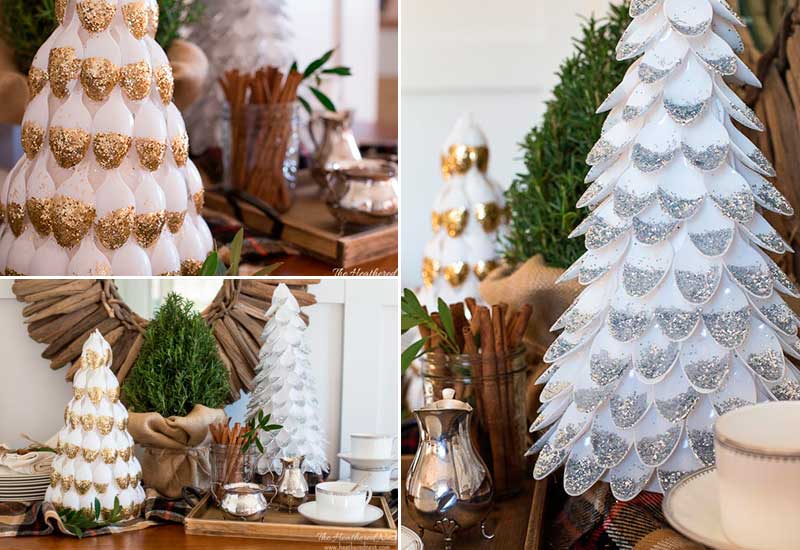
What can you make a Christmas tree from (see photo below)? The second method of making a New Year's beauty involves using not whole cones, but their scales.

The basis of such a Christmas tree will be the same cardboard cone. Scales of cones are glued to it from the bottom in a circle, which will play the role of needles. At the final stage of work, the Christmas tree is coated with green, silver or gold paint. As an additional decoration, glitter is glued to the tips of the needles.
The basis for a Christmas tree made of cones can be a cone cut out of polystyrene foam. It will need to be painted some dark color. For the craft you will also need wire.

One end of it is wrapped around the tail of the cones, and the other is straightened. After the required number of such blanks has been made, they will need to be attached to the base. To do this, the free end of the wire is inserted into the foam.
Autumn version
What can you make a Christmas tree out of for the New Year? From dry leaves. To do this, the material prepared in the fall is glued to a paper cone, creating a wonderful tree. Such a tree will be made from twigs of walnut and cherry, holly and salal, ruscus, etc. Bay leaves are also suitable as green material.
There are two ways to make such a Christmas tree. The first of them involves gluing the leaves to a cardboard cone created in the required dimensions. The crown of such a tree is formed from top to bottom. In this case, the leaves are glued on top of each other.

The next method of making an “autumn” Christmas tree is somewhat more complicated. At the first stage, a base is made in the form of an ordinary cone made of cardboard. Next, holes are pierced at the ends of the branches with leaves, through which a fishing line or thin twine is pulled. This creates a kind of garland. This part is wrapped around a cone, pre-lubricated with glue.
New Year's beauty made from pasta
What other Christmas tree can you make with your own hands? A New Year's tree made from pasta will look very original. It's not difficult to make. In addition, today pasta is sold in different sizes and shapes, which will make your Christmas tree simply fantastic.
The first stage of work is the manufacture of a cardboard case. The workpiece must be painted in the desired color. For this, acrylic paint, spray or gouache are used. Next, you should take pasta of different shapes and use PVA glue to glue them to the cone. At the same time, the design of a fabulous spruce should be prompted by your imagination.
Work should be continued until the pasta covers the entire body. After the glue has dried, the finished Christmas tree needs to be painted in two layers.
Tree made of thick fabric
What can you make a Christmas tree from? To create a New Year's beauty, felt is sometimes used. This material holds its shape perfectly and does not crumble. Felt can be used instead of felt. For contrast, it is advisable to take the material in two different colors.
First of all, a cardboard cone is made. Next, circles of various diameters are cut out of felt (from smallest to largest). Christmas tree tinsel is glued to the bottom of the cone with glue or double tape. After this, felt circles are strung onto the tree blank, in which crosswise cuts are first made. The fabric parts fit tightly onto the cone. The top of such a Christmas tree is decorated with a felt cap or tinsel, pre-lubricated with glue.
New Year's beauty made of threads
You can make a “woolen” Christmas tree with your own hands. To do this, you need to charge yourself with a positive attitude and start creating beauty. The first step is to twist a sheet of paper or cardboard into a pyramid, securing it along the contour with glue or tape. Next, take thick woolen threads (necessarily fluffy) and wind them in circles on the base from bottom to top. It is important that the product is neat and even.

The threads should not overlap the adjacent row. For those who make such a Christmas tree for the first time, things may not go well at first. There will definitely be “harmful” threads that will constantly come off. How to get out of this situation? For convenience, the edge of the thread can be attached with a pin. After finishing the work, a conventional garland should be placed on our Christmas tree. It is made from thin threads.
A small pompom will serve as decoration for the top of the New Year's beauty. To make it, you should cut out two circles with a diameter of 3 cm from cardboard, in the center of which there is a 1 cm hole. Threads are wound on the parts folded together. Next, they are cut along the contour and tied in the center.
What kind of Christmas tree toy can be made from threads? It is better to decorate such trees with multi-colored pins. Bright buttons of various diameters can also serve as decoration.
Christmas tree made from plastic bottles
Often you can find unnecessary containers in the house. If these are plastic bottles (preferably green) with a volume of 0.3 to 3 liters, then they can be used to create a New Year tree.

At the first stage of making a New Year's tree, the bottom of our material should be carefully cut off. This can be done using a utility knife or scissors. You will need one largest bottom. It will serve as a support for our product. The rest can be thrown away immediately.
Next, the prepared bottles are cut into strips, the width of which is from 2 to 2.5 cm. The neck must be intact. As a result of these manipulations, you will get a kind of plastic flower.
At the next stage of making the Christmas tree, we cut each strip of the bottle again along the edge every 0.5 mm. These will be our Christmas tree needles. Small cuts will make the New Year's tree fluffier and more beautiful.
Next, the prepared branches should be strung onto the “trunk”. They will use a stick, the length of which should be equal to the intended height of the tree. Blanks from bottles of larger volume should remain at the base, and containers of smaller capacity should be strung to the top. Cover the top of the tree with a plastic lid, hammering a nail into it for security.
New Year's beauty made from cups
What are original Christmas trees made from? New Year's beauty can be made from plastic cups. This material should be green.
At the first stage, eight cups are laid out in a semicircle and fastened together with a stapler. This will be the first row of our product. Next, seven cups are laid out. This is the second row of the tree. The process continues further. Fewer and fewer cups are placed in each row. Next, all the parts are fastened together and fixed with staplers. Collected in a circle and located one above one, they will become our Christmas tree. Next, the New Year's tree should be decorated. To do this, you can put a toy or ball in each cup.
Feather Christmas tree
Anyone who decides to make a New Year's beauty from this material does not need to gut old pillows. Feathers made from them are not suitable for crafts. You can purchase the necessary material only in special stores that sell handicraft goods. This will be the first stage of work. Next, you will need to sort the feathers by size and fluff them up a little. This will make it easier to work with them in the future.
When using this lightweight material, the decoration of the product must be done before it is formed. Small plastic beads are suitable for this. They can also be purchased at a craft store.

The beads are carefully glued to the very tips of the feathers. After drying, the resulting blanks are glued from bottom to top onto a cardboard cone. The result is a fluffy one that can be decorated with artificial snow to make it look more like a real Christmas tree.
For stability, a cardboard circle can be glued to the base. A small hole is cut out in the middle, into which a cardboard tube painted brown is inserted.
Putting up a Christmas tree for the New Year is a good tradition supported by many families. But cutting down a living spruce in order to enjoy the beauty of the forest beauty for just a few days is not very humane. Fortunately, recently people have increasingly begun to think about this issue and make their choice in favor of artificial beauties that can brighten up the New Year holidays for many years.
To get the main attribute of the New Year into your home, you don’t have to buy a Christmas tree. It will be much more interesting to make it yourself, especially if there is no free space for a big fluffy beauty or there is an active baby in the house. Moreover, similar DIY Christmas trees– a great gift for the New Year.
If you choose colorful magazine pages, you will get a bright Christmas tree that can be placed in the nursery.
To make an original Christmas tree from pieces of a magazine you will need:
- old magazine (book with bright drawings, glossy posters, etc.);
- thick sheet of paper or cardboard;
- PVA glue (it’s better to take a glue gun);
- pencil;
- scissors (it is much more convenient to take a shaped hole punch).
Step 1. Make a cone from a thick sheet of paper, securing the edges with glue.
Step 2. Take magazine pages with bright pictures and cut out many identical circles. If you have a shaped hole punch, it will be much more beautiful if you use it.
Step 3. To make the cut out circles curl a little, wrap them around the pencil for a while.
Step 4. It's time to start assembling your Christmas tree. Starting from the base of the cone, cover it in a circle with bright swirling circles. Try to make neat rows, gluing the circles tightly so that there are no gaps.
Step 5. Make a small cone from one of the circles and place it on the peak.
DIY fragrant Christmas tree made from dried citrus fruits and pine cones

Such a tree will advantageously decorate any interior, and its subtle aroma will create a festive mood.
To make a fragrant Christmas tree you will need:
- a sheet of thick paper or cardboard;
- dried lemon or orange slices;
- cones;
- puncture;
- glue gun
Step 1. Make a cone out of cardboard or thick paper. You can make several cones of different sizes at once.
Step 2. Prepare and dry citrus slices. Prepare the cones.
Step 3. Glue dried lemon or orange circles and cones onto the cone. You can make a separate citrus Christmas tree, or a separate Christmas tree from pine cones, but it is better to combine the ingredients and you will get a lemon-cone Christmas tree.
Step 4. Twist a star from the wire and attach it to the “top” of the tree.
A wonderful fragrant Christmas tree is ready!
Christmas trees made from wrapping paper
You can decorate your house with these Christmas trees, supply them to a group in kindergarten, and also present them to the teacher on the eve of the New Year holidays.
To make a Christmas tree from bright wrapping paper you will need:
- a large sheet of cardboard or thick paper;
- wrapping paper;
- double-sided tape and regular tape;
- scissors;
- small decorations (beads, seed beads, sequins, sequins, ribbons, etc.).
Step 1. Make a cone out of cardboard. If the wrapping paper is thick enough, then the cone can be made directly from it.

1.1. Fold the paper diagonally to make a cone.
1.2. Secure the resulting cone with tape.
1.3. Carefully trim off the excess paper at the base of your cone.
Step 2. Take some brightly colored wrapping paper and cover the cone.

2.1. Place the wrapping paper face down on the table. Tape the end of the colorful paper to the top of the cone.
2.2. Slowly turn the cone and wrap it tightly in the wrapping paper.
2.3. Attach double-sided tape to the edges of the paper and connect the end to the cone. Cut off the excess at the base so that the “bottom” is even.
Step 3. Decorate the Christmas tree as you like.
The creative Christmas tree is ready!
DIY felt Christmas tree
A soft and delicate fabric Christmas tree can be presented as a New Year gift to a colleague, friend or relative.
To make a felt Christmas tree you will need:
- felt (it is better to take felt of two or more colors in the same range to make the Christmas tree look prettier);
- cardboard;
- double-sided tape or glue;
- scissors.
Step 1. Make a narrow cone out of cardboard, securing it with glue or tape.

Step 2. Now take the felt and use scissors to cut out circles of different diameters in ascending order. It is better to use pre-prepared cardboard circles as templates.

Step 3. Attach Christmas tree tinsel to the base of the cone with glue or tape.

Step 4. Make a cross in the center of each felt circle.

Step 5. Sequentially put circles on the cone to the very top.

Step 6. To decorate the “top” of the Christmas tree, add tinsel, attach a star or a pre-prepared felt cone with decoration at the very peak.

The cute cozy Christmas tree is ready!
DIY glowing creative Christmas tree.
This tree will be a wonderful night light for your baby during the New Year holidays. It can also be placed on the windowsill, which will add special originality to the interior of your home.
To make a glowing Christmas tree you will need:
- floristic (flower) mesh (it is better to take a mesh of several shades of green);
- floral wire;
- cardboard or thick paper;
- scissors;
- cellophane
- PVA glue;
- pins;
- Christmas tree garland with small lights;
- additional decorations (optional).

Step 1. Roll the cardboard into a cone.
Step 2. The top of the cone should be wrapped in cellophane.
Step 3. In a deep container, make a solution of a small amount of water and PVA glue.
Step 4. Dip small pieces of floral mesh into the solution and stick them onto the cone. The joints can be coated with additional glue.
Step 5. Strengthen the structure with pins and wait until the first layer has completely dried.
Step 6. In the same way, make the second layer of the future creative Christmas tree.
Step 7 After drying, you need to remove the Christmas tree from the cone and remove the cellophane.
Step 8 Place a garland inside the Christmas tree, securing it with floral wire.
The wonderful glowing Christmas tree is ready! All that remains is to decorate the Christmas tree to your taste.
Christmas tree made from pasta

You can make such an interesting Christmas tree with your child. An exciting activity will also be useful for fine motor skills of the fingers.
To make a Christmas tree from pasta you will need:
- a cone made of foam or plastic (you can make a cone from thick paper or cardboard);
- pasta (various shapes and sizes);
- dye;
- PVA glue;
- brush.
Step 1. Prepare a cone and paint it any color.
Step 2. After the cone has dried, you can start gluing the pasta in any desired design.
Step 3. After all the pasta has been applied, they can be carefully painted, preferably in two layers.

The pasta Christmas tree is ready! Every grandmother will be delighted with such a sincere gift from her beloved grandson or granddaughter.
DIY colorful Christmas tree made of paper
A paper Christmas tree will decorate any workplace and create a festive mood for everyone who is lucky enough to see it.
To make a paper Christmas tree you will need:
- long skewer;
- colored colorful cardboard or design paper;
- thick cardboard;
- glue gun or glue moment.
Step 1. From thick cardboard, cut out a square base for the future Christmas tree.
Step 2. Use glue to secure the skewer to the base.
Step 3. From designer paper or colored cardboard you need to cut out circles (preferably with curly edges) of different diameters, 3 circles for each diameter.
Step 4. Make small holes in the center of each circle.
Step 5. Lubricating the holes in the circles with glue, gradually assemble the Christmas tree.
Step 6. Decorate the top of the finished Christmas tree with a paper star or any other beautiful detail.
Christmas cozy tree made of thread
Cute fluffy Christmas trees made from yarn will give you a lot of warm, pleasant impressions.
To make a Christmas tree from thread you will need:
- cardboard for a cone or a ready-made foam cone;
- pile yarn;
- thick yarn;
- miniature pins;
- decorations.
Step 1. Prepare a pre-purchased styrofoam cone or make a cone out of cardboard.

Step 2. Take two threads at once and secure the ends with pins at the very base of the cone.

Step 3. Wrap the threads around the base of the cone, securing approximately every 5 cm with pins.
Step 4. Wind the threads towards the top of the cone; after a full circle at the base, you can no longer secure the threads with pins.

Step 5. Having reached the top, fasten the threads and wrap the cone in a downward direction, covering the Christmas tree with a second layer of threads.
Step 6. Cut the ends of the threads at the base and secure them with pins.

The Christmas tree is ready! You can leave it in this form, but it is better, nevertheless, to decorate the New Year tree with various beads, seed beads and other decorative elements.
Creative Christmas tree made of corrugated paper

If you want something unusual, you can make a huge Christmas tree for the wall.
To make a Christmas tree from corrugated paper you will need:
- matte cardboard or foam base;
- corrugated paper;
- scissors;
- masking tape;
- stationery knife;
- PVA glue;
- marker.
Step 1. Lay the cardboard on the floor and, using adhesive tape, connect all the sheets to form a large rectangle. Black tape is used in the photo, but it is better to use white (painting tape works best).
Step 2. Draw the size of your future Christmas tree and using a utility knife, cut out a large triangle.
Step 3. Fold the crepe paper in half and cut the fringe with scissors.
Step 4. Carefully apply the fringe, starting from the base of the tree to the very top, without leaving any gaps.
Step 5. Make a trunk from a rectangle of brown paper or cardboard. You can decorate the trunk with a fringe of brown corrugated paper.
The Christmas tree is ready! You can hang it on the wall and decorate it as you wish. It turned out to be a wonderful photo area for New Year's photos.
And they made garlands. Would you like to know how to make a Christmas tree with your own hands from scrap materials? This craft will be useful for decorating your home, and as work for a kindergarten or school.
Volumetric Christmas trees
And this section will consist of 2 topics:
- Desktop options;
- Large sizes.
The first ones are suitable for our children as crafts for school or kindergarten. The second ones are more for decorating the room. For home or office.
Children's crafts for school or kindergarten
For most robots, you need to make a base. And it will be a cardboard cone. Here I will tell you how to prepare it.
Cone
You can simply draw a circle and glue a cone out of it.  But there is also another option.
- We measure the width of the sheet.
- We measure this distance from the upper corner of the sheet using a compass, ruler or just a thread. And make dots on the sheet with a pencil.
- Let's connect the dots.
- Cut it out.
- Glue it together.
Third option- Roll up a paper bag. Fold the edges.
Now we use this blank.
Our crafts
I’ll start with the Christmas trees that my son and I made from twine and the second from decorative Christmas tree beads:
Another Christmas tree that I hung on the wall and it made me happy until the summer. Looks very nice as decoration. Made from twine and twigs. And toys made from salt dough.
Like it! We will be pleased.
Tinsel

- Glue tinsel to the bottom row of the base.
- The next row is candy.
- And so on to the top. And instead of a star there are lollipops.
The photo shows candy. But you can decorate with anything instead of candy. True, a Christmas tree with candy canes looks especially elegant. She herself is like a gift.
Threads

You may have seen openwork balls made this way more than once. The Christmas tree turns out no less lacy!

Do not wind the yarn too tightly, otherwise the delicacy will be lost. This original craft is “knitted” from white threads. But you can use both green and blue.
The second option is to make a base of threads, as in the previous master class.

Take a square sheet 60x60 cm

Roll into a cone, align the bottom

Wrap with cling film
Mix PVA glue with water, soak the threads in it and start wrapping from the top to the bottom 
Apply a second layer and leave to dry

When the base is dry, remove it from the cone, remove the film, and glue the small cones. 
Cover the workpiece with gold spray 
Adding sequins

Our Christmas tree is ready. Very bright, sparkling and elegant!

The third option is to tightly wrap a cardboard cone with thread or twine. Subsequently, we do not remove the cone. We decorate as desired. 
Feathers

If you have decorative feathers, I suggest making an original and unusually airy Christmas tree from feathers.
We make a cone out of cardboard and decorate the base.


Our fluffy Christmas tree is ready: 
Cotton pads

Very simple design even for kids.

The size and color are determined by you.
Wire

Here you will need the help of adults.
We twist the wire around the cone.
Does this craft need decoration? It's your choice! 
To make the following designs, a cardboard cone is no longer needed.
Pasta

Glue pasta onto the cone. The easiest way is to use a hot gun.
And then the entire structure is painted.


Beads will serve as bright toys.
Magazine

The technique is very simple.
We remove the cover. And each sheet is folded like this: 
- Fold the top side of the page toward the spine of the magazine.
- And once again we fold this page in the same way, with the side facing the spine.
- Below is a corner, bend it inward.
Perhaps one magazine will not be enough. To make the structure more magnificent, take 2-3 magazines. 
Do I need to paint? Not necessarily. Even pictures in magazines are not a hindrance. This product looks very attractive
Newspapers

From newspapers and magazines we cut a lot of squares with a gradually decreasing side. For example, from 14 to 3 cm, cut with a cutter, if you don’t have one, then with scissors.
For the base, take half a foam ball and cover it with spray paint. Insert a kebab stick. 
Now start creating the Christmas tree. Put on the squares and turn them. Sometimes wear small ones between large squares to make it more airy. Decorate the top with a star. Now cover it with a little spray paint, glitter, fake snow, whatever you think is nice and appropriate.
On a wire

In the article about garlands, I said that you can make some pendants yourself. Here is one example.
- Using thin wire, knit a backbone shape in the shape of a Christmas tree.
- The backbone is tightly braided with beads.
- The loop will also be made of wire.
From twigs (photo same as the previous one)
Another way to use scrap materials to make a creative toy for a Christmas tree or for a garland.
- Cut branches of different lengths.
- Most of all you will need very short branches, only 1.5-2cm long. In our design they will be located between the main branches.
- The branches are easily pierced with a thin nail or awl.
- Putting the craft together. At the bottom are the long ones, at the top is the shortest part.
We paint the product and cover it with glitter.
Paper

I will show you a master class on how to make this Christmas tree.
We will need:
- Green and brown paper;
- Sushi stick;
- Glue;
- Stapler;
- Scissors.
Making: 
- We fold the paper like an accordion.
- We mark the middle. Make a hole in the middle with a stapler.
- Cut off the side edges at an angle (to form a triangle).
- We pass a stick through the hole.
- We make a strip of brown paper.
- We roll it around a stick and place it on glue.
- The bow on top is our star.
You can decorate the work in your own way!
Another option from paper folded like a fan: 
All these ideas can be used for room decoration.
From the bark

We go with the kids to the forest and collect bark, leaving nothing for the bunnies.)))
Glue pieces of bark onto the cone. Original! Definitely no one will have one like this in kindergartens or schools!
Kanzashi


Christmas trees made from ribbons using the kanzashi technique are also very beautiful and can probably take 1st place in a competition at school or kindergarten! Of course, this requires more work and patience. But it's worth it!
Details in the video:
Tubes

It turns out that not only a garage for cars and an advent calendar, but also a Christmas tree can be made from paper tubes. 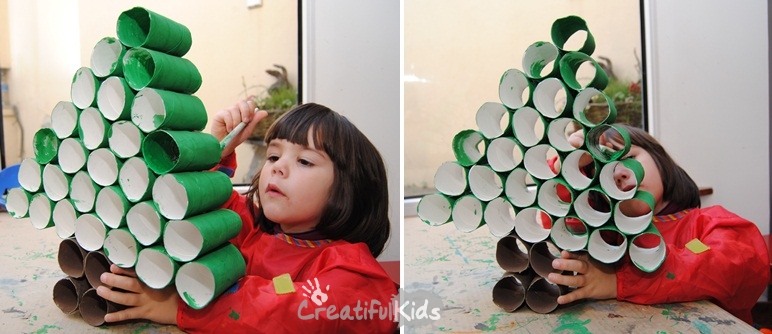
We paint with any paint or spray can, hot melt glue, add balls or candies and voila!
From spoons

Yes, I’ve seen trees like this a million times, but not so chic. This is straight decor for a royal table. And all thanks to the painting method.

Please note that spoons can be glued on different sides; the appearance depends on this.
Shells

Have shells lying around and don’t know where to use them? Glue it boldly onto the cone.

Mini tree made from pine cones

A cute little Christmas tree is made from an ordinary pine cone. But we already talked about this in the article as
Crafts for home
I will display 2 models separately. They are definitely not suitable for school. However, the houses will look beautiful.
Traffic jams

Sometimes it's a shame to throw away corks. And there are a lot of ideas for decor from them. So we use this material.
- Let's draw a triangle.
- Following the template, we will make row by row, connecting the corks with glue.
- Some corks can be painted.
- Let's form a bow on top.
- Another plug will serve as the “trunk” of the tree.
If you wish, you can come up with a pattern for the spruce.
Boards

This design looks powerful. But it won’t be possible to do it quickly.
We will also need small boards. They will be at the top of the tree. And the big ones are below.
Between them you will need to nail several small wooden squares, like a tree trunk.
As an option, a Christmas tree made of stairs and a bunch of balls. Really unusual!? I think guests and neighbors will also be surprised. If you’re tired of regular spruce, then this is the idea to add: 
You can make a miniature from coffee or ice cream sticks or small boards. 
From cardboard

You can make a Christmas tree of any height. Moreover, cardboard sticks can be twisted and changed the shape of the Christmas tree!
We cut the cardboard into equal strips using a stationery knife and a ruler (be careful with your hands). We put it on the knitting needle. You can spray paint it or leave it like that.
Wall installations
Wrapping paper

Such work will look like a colorful picture. And it completely matches the festive mood.
- Roll the paper into tubes.
- Glue it onto the base in the shape of a triangle.
- Decorate with buttons.
Simple and interesting!
Branches on the wall

There are many ways to decorate this simple Christmas tree model.
You can use the following as a design:

- Toys;
- Garlands:
- Children's crafts;
- Household items.
Or you can tightly connect the branches, without gaps, and paint them in light snowy tones.
Glowing garland

I'll tell you step by step about this model:
- Choose a suitable location.
- Drive 3 nails into the wall (triangle shape).
- Tie the garland to the nails, like the edging of a triangle.
- Tie several branches to a rope.
- Secure the rope itself to the top nail.
- Decorate the interior space by gluing photographs, snowflakes, and toys to the branches.
More options: 
All work is filled with warmth and pleasant emotions.
What material will you choose? I tried to fill the collection with very different ideas and options. If you have anything to add to this collection, please tell us! And don’t forget that we have a continuation of the New Year’s theme ahead. Subscribe to learn how to make your own star!
What New Year can be imagined without the main symbol - the Christmas tree. Green beauties are sold on every corner on the eve of the holiday. However, for such a holiday it is not necessary to buy a live spruce. Try making it yourself. Therefore, in this article we will talk about what you can use to make a Christmas tree for the New Year holiday. It is worth saying that you can create the main symbol of the New Year from completely different materials. And today we will tell you more about this.
Mini Christmas trees made from pine cones.
If your children love making crafts just like you, then they can also take part in creating such crafts. The next craft - a New Year tree consists of cones and plasticine. All your child needs is to learn how to roll small balls from plasticine. At the same time, you can use plasticine of the brightest shades for this purpose. You can use regular spools of thread as a base for the Christmas tree. But you must wrap them in foil. The cones are attached to the coil using super glue.

If you like the next Christmas tree, then take acrylic paints and paint the cone with it. Remember that it is wisest to use green paint here. In this case, the tips of the tree are painted white. Make a base for the Christmas tree from brown plasticine. Use a star for decoration.

The next craft is a little more difficult to make. Here it is worth using beads. Therefore, if your child is small, then monitor this process yourself. Glue the beads to the pine cone using a glue gun.

All of the above crafts made from pine cones can not only decorate your home. It will be a pleasure to present such Christmas trees as a gift to your loved one.
The next craft looks more voluminous. And to create it you will need several cones. You should use a thick cardboard cone as a base here. After which, the cone is covered with cones on all sides. In this work it is customary to use a cool gun. Once the glue has dried, cover the tree with large beads.

Simple tinsel trees.
If you read this article, you can learn how to make an artificial Christmas tree at home. Above we offered you ideas for Christmas trees that were made from pine cones. Now we suggest using tinsel for this job. Naturally, for such a craft you must purchase the tinsel itself. For Christmas trees, make cones from cardboard. Then, glue tinsel to them. In this case, the tinsel should be glued to the cone in a spiral. While working, arm yourself with a glue gun.

Christmas tree made of candies.
The next Christmas tree may turn out to be not only a beautiful decoration, but also a very nice gift. To make this craft, make a cone. Secure the candies on it with tape, and then wrap the Christmas tree with tinsel.


A simple and voluminous Christmas tree made of paper.

The next craft is also very easy to make. It can be an excellent decoration for a child's room during the New Year holidays. To make it, prepare:
- thick green cardboard,
- markers, glitter, paints,
- scissors and glue,
- scotch.
Work progress:
- We bend a sheet of cardboard in half and use scissors to cut it along the fold.
- We put the two parts that you got together and bend them in half again.
- Opposite the fold, using a marker, draw half of the Christmas tree.
- Now cut along the drawn line. As a result, you will get 2 Christmas trees that will not differ in any way from each other.
- Using gentle movements, bend each tree in half. Mark the center.
- Next, make a cut on one of the trees. The cut should be long from the very tip to the midline. For another tree, the cut should be from bottom to middle.
- Now we connect the trees by inserting them into the resulting cuts.
- To make the tree more stable, use tape.
- That's all, now start decorating your Christmas tree. Use your imagination and available materials here.

And here is another version of the Christmas tree, which you can make in the same way from an old cardboard box.

Elegant Christmas tree made of paper.

If you want to know how to make a beautiful Christmas tree, then the next idea was created especially for you. For such a Christmas tree, prepare:
- colored paper,
- scotch,
- glue and scissors.

 The most difficult thing is to cut strips of colored paper, which must have the same length and width. In this case, each strip must be glued together with tape to form a loop. After which all the loops are glued to a strip of tape.
You should wrap a thick cardboard cone with similar garlands.
How to make a glowing Christmas tree.
If you decide to learn how to make a Christmas tree with your own hands, then you are on the right track. Above we have described some simple crafts. Now it’s time to engage in serious creativity in order to do something original.
 For a creative Christmas tree, prepare:
- Flower floristic sphere. For this case, we recommend buying more than one shade of green.
- Scissors, PVA glue.
- Thick cardboard for the cone.
- Cellophane, pins, garland, floral wire.
- Various decorations.
Work progress:
- First, we make a cone from cardboard.
- Wrap the cone in cellophane.
- We dilute glue with water in a container.
- We cut the floral mesh into pieces and place each piece in a container with glue and water.
- Now glue the pieces onto the cone. In this case, the joints are glued again for reliability.
- Use pins to prevent your craft from coming apart at the seams.
- As a result, you have the first layer of the tree. Make the second layer in the same way. Remember that after gluing the second layer, the structure must dry well.
- If the glue is dry, remove your tree from the cone.
- A garland is placed inside the tree.
- Now simply decorate the Christmas tree as you wish.
Christmas tree made of threads.
If you want to have something unusual in your home for the New Year, then in addition to standard decorations, decorate your home with various New Year-themed crafts.
Creating your next Christmas tree is also quite easy to handle. Take a sheet of Whatman paper and make a cone out of it. Coat the cone with glue and begin wrapping it with green thread.
When the glue is dry, separate the cone from the paper.
Decorate the finished Christmas tree with various accessories. You also glue the decorations to the tree using glue.

In conclusion
Celebrate your New Year brightly! Make many different Christmas trees that can make the atmosphere in your home truly magical.