DIY ballerina panel templates for cutting. Paper ballerinas
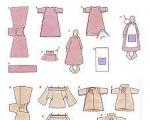
It’s not difficult to make a handmade panel with the silhouette of a ballerina to decorate the interior with your own hands and it won’t take you much time. If you like ballet and you like flowers, you should like this idea as it combines both. I suggest you create a decorative panel with the silhouette of a ballerina in a tutu of artificial flowers. This gentle romantic idea can also be used to create a gift for the upcoming March 8th. Watch the master class.
To work you will need:
== passe-partout, wooden frame or any board,
== white or colored acrylic paint for the background - optional,
== brush,
== black printer paper,
== miniature artificial flowers,
== hot glue gun,
== paper glue or double-sided tape,
== silhouette of a ballerina - template for printing. 
To create a panel, you can take anything, even a thick lid from a cardboard box will do. Having prepared the basis for the panel, select the silhouette of the ballerina (see templates below) and print it on the printer. Cut out a ballerina from black paper. 

Glue the silhouette: 
Now we will create a flower tutu for the ballerina. We will need miniature artificial roses. If you don’t have these on hand, you can twist flowers from silk ribbons. 
Glue the roses with hot glue. 

The ballerina's tutu can be either plain or with rosettes of different colors, as you like. 
Ballerina silhouettes for printing:


The magical New Year holidays are approaching, and many have already begun to think about how to effectively decorate their home. DIY decorations always make the room warmer and more comfortable. Ballerinas and gymnasts made of paper are replacing traditional tinsel and Christmas tree balls. Made using various techniques, they look elegant and light.
In addition, the silhouettes of female ballerinas can be used not only as cutting patterns or a sketch for the punching technique - a silhouette drawing can become a motive for panels and postcards, stylish calendars in black and white style.
Paper ballerinas are replacing traditional tinsel and Christmas balls
One of the simplest options for modern New Year's decor is a similar figurine made from scrap materials.
To make the simplest model you will need:
- A sheet of white paper or cardboard. The size depends on the desired size of the dancer.
- Sharp scissors to carefully cut out outlines.
- Square paper napkin for a skirt.

One of the simplest options for modern New Year's decor is a similar figurine made from scrap materials.
Making a garland or individual ballerinas is very simple:
- Print a ready-made template or draw a silhouette of a dancing girl on a sheet of paper.
- Using scissors, carefully cut out the figure.
- Fold the napkin in half twice. Bend the resulting square diagonally. Using stationery or nail scissors, cut out various patterns from the triangle and remove the top corner.
- Put the resulting light skirt on the finished ballerina.
You can attach a thin white thread of any length to such an original snowflake and hang it on a window, a chandelier, if the decoration will not be touched by guests, a Christmas tree, or make a whole garland of graceful girls spinning in a dance.
To make the ballerina even more interesting, you can find a color image on the Internet, for example in the Victorian style. All that remains is to print it on thick matte photo paper or a regular A4 sheet. To make the girl beautiful on both sides, they take two pictures at once in mirror image. They are cut out and glued together.
A simpler option for making a skirt is to fold two rectangular sheets of paper measuring 10x5 cm like an accordion, bend them in half and glue them to the silhouette on both sides. Depending on the size of the snowflake, the skirt can be reduced or increased.
This simple and fashionable way of painting an apartment for the New Year will appeal to guests. They will probably ask you to conduct a master class.
Gallery: paper ballerinas (25 photos)


Ballerina silhouette for cutting
It will take no more than 10 minutes to create an original dancing snowflake thanks to modern technologies. The finished template can be downloaded and printed on a printer. A girl's pose in a light dance can be any.

A girl's pose in a light dance can be any


These familiar silhouettes are being replaced by rather unexpected options. For example, a baby ballerina or a fairy tale that will complement the interior of a children's room.

These familiar silhouettes are being replaced by rather unexpected options.


For those who think a girl dancing alone seems sad, there are templates for ballet couples.

For those who think a girl dancing alone seems sad, there are templates for ballet couples

Decorating a room in this way is limited only by the imagination of those who live in it. You can choose the most unusual silhouettes from fairy-tale characters to your favorite actors or animals.
Ballerina using the vytynanka technique
An elegant and openwork decoration will be obtained if you make it from plain paper, but cut out the silhouette not with stationery scissors, but with a more precise tool. This type of work involves detailed elaboration of contours and the presence of many intricate shaped slots.
To create a vytynanka you will need:
- sharp sharpened scalpel or paper knife;
- a special rug made of dense material;
- A4 sheet of any color, preferably thick, so that it does not tear when cutting out small parts.
To create such a delicate ballerina, you need to draw her in advance or print a ready-made template, preferably with the outline of the skirt, and work with it as follows:
- Place the paper with the image on the prepared surface.
- Using a blade, carefully separate off the excess.
- Next, we begin to design the skirt. Here everything depends on the author’s imagination, since with a scalpel you can cut openwork patterns of any shape and size. The main thing is not to divide the ballerina into parts.

To create such a gentle ballerina, you need to draw her in advance or print a ready-made template
The craft is attached using water or diluted starch paste to a flat, non-absorbent surface: window glass, door. You will get a very beautiful decoration that none of your friends will have.
DIY ballerina postcard
The idea with a dancing girl will be useful not only as New Year’s decor for an apartment or school class, but will also take its rightful place in a congratulatory message.
To make a postcard you will need the following materials:
- A sheet of colored cardboard. You can choose any shade you wish, but keep in mind that the ballerina should not blend into the background.
- White A4 paper.
- Printer and ballerina template.
- Openwork napkin for cake.
- Glue stick or PVA.
- Sharp scissors, stationery knife for paper.
- A special rug made of dense material if you plan to use the tugging technique.
- Ruler.
- Pencil.
The procedure for creating a beautiful postcard with your own hands:
- Fold a sheet of cardboard in half, color side up.
- Using a ruler, measure the width and length of the part and mark the middle with a pencil.
- Print a picture of a ballerina. You can use an outline or a color image. It all depends on the characteristics of the printer and the age of the person to whom the congratulation is intended.
- Carefully cut out the dancer along the contour, use a utility knife or a sharp scalpel to create additional patterns on the skirt, if it is not intended to be made from other materials.
- Fold the round cake napkin with lace edges in half twice. Cut a sharp corner to fit the ballerina's waist.
- Using glue, attach the figurine to the front of the card. Attach the top of the skirt to its upper base. The bottom edge should remain free. The decoration will be voluminous.
You can send a finished postcard with an applique to a friend, mother or sister for her birthday, March 8th and other holidays. This is a good idea for wedding invitations. You can also attach a ballerina made using other techniques, such as origami. But it will not turn out so tender and graceful.

How to make a ballerina from napkins
Another very interesting and simple way to create a dancing snowflake is to use only plain white, blue, pink or any other paper napkins.
In addition to this available material, you will need:
- Wire without plastic braid.
- Scissors.
- PVA glue.
Work progress:
- They make a frame in the form of a human figurine with a head, arms and legs. It is better to fold the wire in two layers so that it is strong.
- The napkin is divided into thin layers and torn by hand into thin strips.
- Wrap the wire tightly enough so that it does not show through, and from time to time lubricate the structure with glue.
- Take a whole napkin, fold it into a triangle and cut out a regular snowflake for the skirt.
- The ballerina raises her arms up and puts the “clothes” on her.


Another very interesting and simple way to create a dancing snowflake is to use only plain white, blue, pink or any other paper napkins
The finished product can be hung on a Christmas tree or chandelier. The advantage of such a craft is the ability to give it any position by bending your arms or legs at the desired angle. In addition, you do not have to use a printer to print the finished stencil.
The ballerina panel will look great in the kitchen, living room or children's room. The ballerina panel can easily live in a nursery, living room or dining room. It all depends on the colors in which the composition is made, and what message the master conveys in it. The end result can be tender, shocking, bright... whatever you want! Making a painting with your own hands is not at all difficult, so even children can be involved in the work process. If necessary, you can take advice from experienced handicraftsmen who constantly share their own master classes.
Content:
- Panel ballerina (photo)
DIY ballerina panel for beginners
The ballerina panel begins with the development of the basic concept. You need to choose an image, imagine exactly how it will look and be sure to prepare the required materials.
Namely:
- The base is preferably thick cardboard;
- Acrylic paints;
- Organza;
- Satin ribbons;
- Decorative decorations.
At first glance, it seems that choosing a general idea is almost elementary. Ballerinas can appear in a variety of positions, which determines further decoration. It is better to choose light, almost flying images that will visually enlarge the room and make it more frivolous and playful.
The ballerina is a miniature character, symbolized with fragility and insecurity. Similar motifs should be seen in the panels.
Also, don't make the picture too big. Everything is good in moderation: a small image has some piquancy and attracts the interest of everyone who sees it. Large paintings often reek of bad taste. It is very difficult to grasp the fine line of this transition. Therefore, in order to avoid disappointment, it is better not to take risks.
DIY ballerina template for a panel
In order to create a panel, you must first select a template. You can make it yourself, which is justified exclusively for people with excellent artistic skills. For everyone else, it is advisable to use a ready-made product, which will not be difficult to find.
As a rule, wall panels are made on a plain background, for which it is better to choose pastel colors. The silhouette of the ballerina itself should be either black or white. Then the picture looks most impressive.

Before you start creating a ballerina panel, you need to choose a ballerina template
To achieve a more festive look, you can use sparkles that adorn the dancer’s figure. Thus, you can get: a bright and memorable original panel that will never get boring over time.
In order not to make a mistake with proportions and choose the best composition, you can take advantage of master classes in which experienced craftsmen give advice to beginners. When performing work for the first time, you can take on board their tips that will help you avoid common mistakes. Then, performing the work subsequent times, you can give free rein to your imagination, which allows you to somewhat refresh the picture and give it a touch of individuality.
Where to hang the panel: options for the interior
Due to its versatility, a panel with ballerinas can be suitable for any room:
- Living room;
- Dining room;
- Kitchens;
- corridor;
- Bedrooms.
However, there is a place where it will look most harmonious - this is a girl’s children’s room. If your goal is to decorate this particular room, now is the time to act.

The ballerina panel will look appropriate in any room
The most favorite and pleasing colors to the eye are pink and blue, but sometimes children are delighted with rather unusual combinations: green and yellow, red and gray, etc.
The most important thing is that the colors are not too bright and do not conflict with each other. You can ask your child what shades he likes or observe his preferences yourself. The result of such attention will exceed all expectations.
Children who have paintings in their room develop their imagination several times faster, train their memory and attention.
What if you involve a small resident of the room in the process of making panels? Surely after this, admiring the masterpiece hung on the wall will be much more pleasant for him. Over time, when the child grows up, you can show him a picture, which will now be a pleasant memory of his past childhood.
How to make a skirt: master class step by step
A striking accent of any ballerina is her unusual skirt, called a tutu. And, if in real life professional designers are engaged in the production of this wardrobe element, then in the process of making the panels the responsibility falls on the master himself. Of course, it is not advisable to involve little craftswomen in the sewing process, but they can easily observe the process. However, if the child has already reached school age, entrusting him with this task, even under adult supervision, is quite realistic.

Making a ballerina skirt is very easy. You can make it together with your child
The production of the skirt is carried out in the following sequence:
- Choosing a suitable fabric (it is best to have a voluminous mesh or light satin);
- If necessary, the fabric should be lightly starched;
- You need to cut a suitable piece of fabric and tie it with thread;
- The resulting tutu must be attached to the ballerina’s waist using glue;
- Decorate the seam with beads or rhinestones.
How to make a three-dimensional panel of a ballerina (video)
On average, making a ballerina panel takes only a few hours. Once you get the hang of it, you can prepare paintings for every holiday and delight your friends with them. The most important thing is not to overdo it, because even such a minimalist picture can be ruined if you try too hard.
A beautiful silhouette of a paper ballerina is an excellent decoration that can be used to complement the interior, stick to a New Year’s card, or make a three-dimensional figurine. It’s easy to find ready-made templates on the Internet. Save and print for yourself, then transfer to sheets of white or colored paper. For beginners, it is better to start with something simple, then gradually complicate the task for yourself.
Why does the ballerina look so attractive? She moves gracefully and seems like an extraterrestrial, fabulous creature. That's why the image of a ballerina, along with a fairy and an angel, is so popular, especially on New Year's Day.
First of all, you will need to choose the silhouette of a beautiful ballerina to cut out. The Internet is full of options. To make the figure voluminous, the skirt (tutu) is made separately.
What you will need:
- ready-made templates;
- sheets of paper (white, colored);
- scissors;
- pencil, eraser (circle);
- felt-tip pens, pencils or paints (to color the paper silhouette);
- rope or ribbon (if the craft is for a Christmas tree).
Manufacturing process
The step-by-step master class will begin with choosing a suitable picture. There are several options. The first is that you need an ordinary white silhouette, a colored ballerina or a real personality. The last option is used when a person’s face cut out from a photograph is glued onto a finished paper craft. The craft is placed inside a holiday card or made into a Christmas tree toy. An original New Year's gift.
For a colored ballerina, you can either choose a picture of a dancer and print it out and cut it out. Or take a regular white outline and then color it using markers or paints. It is not necessary to carefully draw the details; light strokes are enough, especially if the author is not a very skilled artist. You can put such a ballerina on a postcard with your own hands. All that remains is to fill out the wishes inside.
To make the image two-dimensional and viewed equally on both sides, print two identical, but mirrored pictures. Then glue them together with the wrong side. Then the figure will be double-sided. Excellent Christmas tree toy.

Pack. The dress looks more impressive. The easiest way is to cut out a paper snowflake for the pack. Carefully make a small hole in the center or cut to the center to attach the snowflake skirt to the ballerina silhouette. Then glue the cut out part. This tutu looks beautiful and gives the dancer’s image a special charm.
White silhouette or black? If you want to make a garland of several silhouettes of ballerinas, you don’t have to make them white. Take sheets of colored paper and choose colors that match each other. Two or three for contrast. For example, white-black-blue or green-red-gold. By the way, if the garland will be a festive decoration, it is better to take classic colors.
Then the craft will convey the spirit of the event. Carefully attach the cut out ballerinas to a thread and hang them together on one ribbon or strip. Or tie it to one long thread. Then it will seem that the dancers are floating weightlessly.

Ballerina silhouette for cutting
To make a paper ballerina beautiful, you will need a ready-made template, which you need to trace with a pencil, then cut out the figure. It’s easy to decorate an apartment with such crafts: stick them on windows, make long garlands and hang them from the ceiling, attach threads to figurines and hang them like Christmas tree decorations.
You can download the picture you like from the Internet, there are a lot of options there. By the way, by tracing the silhouette, it is easy to correct the features of the dancer’s figure, draw her skirt or remove it (this is necessary if the tutu is cut out separately). Estimate the size of the future craft.

Craftsmen will draw a little dancer themselves, but if the artist’s skills are limited, it is better to take templates for cutting.
No printer. How to transfer pictures if you can’t print them? It's not difficult. To begin with, display the silhouette you like clearly on your monitor screen. Next, attach a sheet of A4 to it. Thick paper will not work; it is better to use regular office paper. Step by step, trace the visible contours of the drawing with a pencil and the template is ready.
Ballerinas: stencils
Ballerinas of similar sizes and figures who take different poses look more beautiful. It seems as if one dancer is moving, changing position. It is advisable to keep the color of the skirt and the figure itself the same.
For example, make 5-6 similar silhouettes of a ballerina, which will differ only in poses. And hang them in a group from the ceiling or on the Christmas tree (if preparations are underway for the New Year). Find ballerina stencils on the Internet.
Colored figures look good. They add color.
Ballerina - DIY postcard
Why buy ready-made cards, choosing a suitable design and “adequate” congratulation text, when you can make them at home? The graceful silhouette of a ballerina will be an excellent decoration.

What you will need:
- a sheet of thick paper (the base of the postcard);
- colored paper (for ballerina);
- finished stencil;
- scissors;
- thin marker;
- beads or sequins;
- glue;
- bow (for a skirt);
- a pen and a good idea (for congratulations).
Manufacturing process:
- First you need to prepare the basis for the future postcard. Fold a sheet of thick paper in half, trim the edges so that they are the same. Imagine where the ballerina will be - outside, inside or on both sides. The last option will require 2 stencils (so that the ballerinas are different or one, but in different poses).
- Print the selected stencil with a silhouette and press it firmly onto the paper. Use a thin marker to carefully trace the stencil, drawing the figure of a ballerina. For beginners, it’s better to try your hand at pencil, because with a marker you can’t erase irregular lines. However, it is easier to trace a stencil than a regular template, because the silhouette is there from the inside.
- When finished, remove the stencil and color the ballerina with a thick marker. A dark color looks more impressive: black, blue or dark purple.
- Skirt. It can be made from a piece of a colored bow or other beautiful fabric. The edge of the material needs to be pulled together by sewing or gluing it to make the skirt airy and voluminous. Carefully glue the finished skirt to the ballerina’s silhouette using PVA glue or stationery glue. Press tightly and hold the material for a couple of minutes until the glue “takes.”
- Decorate your head. Ballerinas often decorate their hair with shiny hairpins or wreaths. To do this you will need several beads, beads or sequins of the desired color. Carefully glue them to the ballerina's head, forming a shiny wreath.
That's it, the ballerina is ready. You need to wait until the glue is completely dry and fill the card. If you need two dancers, then it is better to make the second one, inside the card, not voluminous. Draw a skirt or glue a paper one.

All that remains is to write beautiful congratulations and wait for a reason to give a card!
Snowflake - ballerina
A spectacular decoration, especially for the New Year, when you need to prepare your apartment or office for the holiday. Why cut out regular snowflakes? It is better to make beautiful skirts out of them for little dancers. They will complement any interior.

What you will need:
- sheets of paper (for ballerinas and snowflakes);
- scissors;
- ready-made templates (separate figures of dancers, separately snowflakes);
- pencil;
- glue.


Manufacturing process:
- To begin, select and print graceful silhouettes of dancing ballerinas. Transfer them to sheets of white paper, then carefully cut them out. The beauty of the finished craft will largely depend on the actions with scissors (rough strokes are clearly visible).
- Snowflake. It is not necessary to take templates of complex snowflakes; it is enough to understand the manufacturing scheme. Many people made these as children, carefully cutting out intricate patterns from white or colored paper. Only for a skirt a snowflake with sharp patterned edges looks better. The size should be determined by the paper figure of the dancer. It is not necessary to make a snowflake skirt short, the main thing is that it does not exceed the length of your legs.
- Figurine assembly. Carefully cut out the middle of the finished snowflake. Then, if the ballerina figurine has folded arms, you can thread it through the hole, securing a beautiful skirt at the waist. If not, you will need to cut the snowflake to the middle, thread it onto the ballerina figure and glue the edge.
White faceless figures will look better. They look the same on both sides, in addition, real snowflakes are white. However, you can leave them white and cut out ballerina figures from sheets of multi-colored paper.

That’s it, the finished craft can be hung through a thread from the ceiling, attached with tape to glass or on a Christmas tree.
Origami - ballerina
Folding origami is a complex matter, requiring care and a step-by-step diagram. You need to follow the pictures arranged in a certain order.
The only material is a sheet of paper. A regular A4 will also do. Fold carefully, clearly forming all fold lines. The finished figurine can be used as a Christmas tree decoration or attached to the ceiling. The result will be a voluminous craft.


Paper ballerina applique
The graceful silhouette of a dancing girl is perfect for creating applique. The ballerina can be decorated with multi-colored rhinestones, and other elements can be painted on, creating a surrounding background.
What you will need:
- finished stencil;
- a sheet of light cardboard (the basis of the applique);
- dark gouache (any color);
- brush;
- colorless glue;
- glitter;
- satin ribbon;
- scissors.

Manufacturing process:
- First of all, draw or print a figurine of a ballerina. The difference between the stencil is that the figure is outlined from the inside, not from the outside. Thus, the finished result is neater and more beautiful, even for beginners. All blots remain on the border of the stencil. It is more convenient to use for creating appliqués or decorating postcards when the silhouette is placed on paper rather than cut out.
- Here we need the silhouette of the ballerina itself. Carefully cut it out, following the contour and transfer it to the base - a sheet of cardboard. Applying it more tightly, trace the figures along the lines.
- Paint the outlined figure with dark colors. If the base is colored, it is better to choose a color that matches it. For example, a black figurine on a white/blue/green background looks beautiful.
- When finished, leave the craft and let it dry.
- Pack. By cutting off a piece of fabric or fringe, create a skirt (gather the fabric from the edge at the waist and fasten it). The ballerina will hold the ribbon with her hands. In this case, it can be glued either completely or in parts.
- Sparkles and small sequins serve as background decoration. After dripping glue onto several areas of the base, sprinkle them with glitter. If instead of them there are beads or sequins, then hold them with your fingers so that the glue is fixed.
- Figurine decoration. It is important to show imagination here. Add colors to the image by drawing the ballerina’s pointe shoes and a wreath on her head, add elements for the background - a stage or a round arena, the edge of the curtain, as if the dancer is on stage. Anything.


The finished application looks more like a painting.
Ballerina made of napkins and wire
If you have some wire at hand, you can make a figurine of a dancing ballerina out of it. And use napkins to create a dress for her.

What you will need:
- thin wire;
- napkins;
- threads;
- regular fishing line;
- glue.
Manufacturing process:
- Frame. Carefully twist a body out of thin wire, mark where the head, two arms, and legs are. Hide all sharp ends.
- Divide the napkins into layers. At the same time, leave 3-4 pieces whole, because they will be needed more.
- Carefully tear the layers of napkins into strips. Use your hands to create ragged edges. Carefully wrap the wire frame in strips, wetting their edges with glue. Wrap tightly, folding the napkin several times over the chest and waist area, forming a voluminous figure of the future ballerina.
- Carefully fold the whole napkin in half, not forgetting to bend all the corners towards the center. You will get a small triangle.
- Using scissors, trim the edge from the bottom, rounding it. Now fold the resulting dress again, twist it tightly so that the bottom hem becomes textured. For volume, make several similar dresses at once using multi-colored napkins.
- Make three small holes on top (adjust them for the head and both hands). Carefully place the finished dress on the finished ballerina figurine.
- Fastening the dress. You will need a white thin thread. Wrap the ballerina's waist several times, weaving it crosswise to imitate the straps of a dress.
- Give a pose. To do this, carefully bend the leg, then both arms of the ballerina. The dancer froze while performing steps.
As a New Year's decoration for a room or a Christmas tree, you can make original snowflakes - ballerinas with your own hands.
The craft consists of two parts: a silhouette figurine and a tutu in the form.
It’s not difficult to make; this type of creativity is suitable for activities with children. You can organize work with several kids by preparing different templates for cutting in advance and printing them.
Tools and materials you will need for work:
Scissors;
paper glue;
white cardboard (double-sided);
colored cardboard;
white and/or multi-colored napkins;
thread or fishing line;
needle;
pencil;
ballerina template or tracing paper for creating it;
protractor for cutting out snowflakes;
nail scissors or stationery knife.
If children are involved in the work, scissors should be used with rounded ends.
To make a decoration in the form of a ballerina, you need a figurine template for cutting. You can simply print it on a printer and then transfer it to cardboard. It should be double-sided, since the figure will spin at the slightest air movement and both sides will be visible. You can also take colored cardboard in pastel shades or plain paper, pre-gluing it in several layers.
Paper ballerina: we have provided cutting templates below. 


The main thing is that the figurine is already in a tutu skirt, onto which it will be convenient to attach the top, light and airy snowflake.
The dancers are approximately 25 cm in height with their arms raised. If the room you plan to decorate is small, you can make the figures more miniature. The easiest way to do this is to copy the picture into Word and resize it. The printer settings also have a function such as changing the sheet size for printing.
Advice! When printing a silhouette on a printer, it is best to set the minimum toner consumption. This will help save money and hide flaws when cutting.
You can draw a ballerina yourself or invite your child to do it. It may not turn out perfect, but it will be very soulful and homely. Let the parents make one figurine and the baby another, so that they can exchange gifts later.
If it is not possible to print the template, you can use tracing paper or even edible tissue paper. To do this, you need to lean the tracing paper against the monitor, having first enlarged one of the figures in the photo below to the desired size. Using light movements, outline the outline of the figure. For this purpose, it is better to take a soft pencil, marked B or 2B. And the line will be visible and nothing will threaten the monitor.

Then the silhouette is cut out, adhering to the inside of the drawn outline, so that there are no pencil marks left on the finished figure. It will look neater this way. There is no need to finish drawing the face or other details. This will deprive the ballerina of lightness.
Let's start making an air pack. It can be made in the shape of a real snowflake, that is, hexagonal. To do this:
take a square piece of paper and fold it in half;
there is a central point on the fold of the sheet;
using a protractor, it is marked into 3 equal parts of 60° each;
rays are deposited from the center through marked points;
the rectangle is folded along the drawn lines, as shown in the diagram, then in half again;
straighten the edges of the paper with scissors. 
After the workpiece is folded, you need to draw a drawing of the future snowflake with a pencil and carefully cut it out. If time permits, the finished skirt can be placed under a heavy book to straighten out the folds.
In the center of the snowflake, you must make a cutout, which will help you put the skirt on the dancer. It could be just a large round hole or an asterisk with thin rays. For convenience and to avoid crushing the ballerina, you can make slits on one or both sides, and then glue them with a narrow piece of tape.
Advice! The more complex the pattern on the snowflake pack, the more airy the finished figurine will look. A skirt made from several napkins of different colors looks very beautiful.
Several figurines of ballerinas can be used to decorate a chandelier or attach to the top of a doorway. They are suspended using long white threads or very thin fishing lines. The mount can be glued to the figure’s head with glue or tape, but it is better to pierce a small hole with a needle and tie it. It turns out to be a kind of “mobile”.
Ballerinas begin to “dance” every time someone passes by or there is a draft.
Using the paper ballerina cutting template shown below, you can make entire garlands of aerial ballerinas. 
The algorithm of actions is the same, only this figure needs to be cut out, first folded in half so that its hands are closed. Then you can thread tinsel through them and the garland is ready.
Advice! The easiest way is to cut out the ballerina from the first picture. To carefully cut out the remaining dancers, you should use nail scissors or a stationery knife. Particular attention should be paid to the fingers and the curve of the ballerina’s neck.
The skirt can be further decorated. To do this, you need to apply a thin layer of glue on it, and then sprinkle it with glitter. 
A ballerina in a fabric skirt will look charming. For this, tulle is useful, preferably of medium hardness.
you need to cut the selected fabric into a rectangular shape, its width is 10 cm, its length is about 40 cm;
then, using a needle and thread, you need to gather the future pack on one side with frequent small stitches;
putting the skirt on the dancer, you need to tighten it with threads;
distribute the folds evenly, carefully tie the ends of the threads into a bow. 
Any fabric that holds its shape but is not too stiff is suitable for making a skirt. For example, lace, nylon ribbons, chiffon, taffeta. For lack of anything better, you can even make it from an ordinary bandage. Beads, small beads, rhinestones, and sequins are used as decoration. You can trim the edges of the pack with curly scissors or simple, but original ones.
You can also watch a video on how to make a paper ballerina: