DIY wedding accessories glasses. DIY wedding glass decor
Glass or crystal glasses were purchased, but it seems that the dishes are missing something, perhaps original decor.
An excellent solution is to decorate glasses with your own hands; this is how you can turn ordinary dishes into a real work of art, and in a unique design.
A wedding is undoubtedly one of the most important events in the life of any person. On this amazing day, I want the lovers to have a fairy tale around them that will be remembered for a lifetime. Traditionally, special glasses are prepared for the bride and groom on their wedding day from which they will drink champagne. Decorated glasses will remain as a keepsake in the new family, delighting the spouses on every anniversary.
For the bride and groom, decorating wedding glasses with their own hands can be one of the best moments of joint preparation of a wedding event or a pleasant surprise.

Unity of style
Usually the entire wedding ceremony is prepared in the chosen specific style and color; this is adhered to by an invited designer or by the bride and her close friends who have decided to do everything themselves. That is why the design of glasses for the ceremony should also be in harmony with the overall style. The glasses and bottle of champagne for the newlyweds’ table, decorated in the same color scheme, look beautiful.
Traditionally, wine glasses are chosen that are the same in shape, although a pair of different glasses looks no less interesting, for example, for the groom - narrow and thin, for the bride - lower and round.
Modern stylish decoration of glasses with your own hands involves the use of various materials: lace, paints, flowers, beads, pearls, ribbons, feathers, etc. There are endless options to make your glassware unique.
Lace luxury
Decoration with lace looks elegant. Even beginners in needlework can decorate glasses with their own hands. Such glasses will look great in the hands of the newlyweds.

Advice! Lace of any color is suitable for decoration - white, cream, scarlet or turquoise, preferably to match the bride's dress, the decoration of the hall or in contrast with them.
To glue the selected lace braid, you must:
- Degrease the glass. To do this, you need to wash the glasses, dry them, and wipe them with alcohol.
- Try on the lace braid on the glass, cutting off the required length and adding 2 cm to it.
- For gluing, both special glue for glass (sold in handicraft stores) and traditional silicone or waterproof super glue are suitable.
- It is necessary to retreat at least 1 cm from the edge of the glass so that toxic glue does not get on your lips even after drying.
- Glue is applied around the circumference of the glass, and a braid is immediately applied, which is not pulled tight. The glue is applied carefully so that it does not get on your fingers or smear on the lace.
This decoration of glasses looks interesting; the dishes are decorated with your own hands not with braid, but with a cut out separate piece of lace, for example, a large flower or bouquet. Beautiful convex woven lace gives aristocratic nobility even to simple glass wine glasses.

The lace is complemented with rhinestones, beads, pearls, satin ribbon bows or flowers. They are usually either sewn or glued.
If there is not much lace, it would be useful to decorate the stem of the glass with a bow made of satin ribbon to match the lace, securing it with an elegant knot or sparkling rhinestones.
The lace skirt on the base of the dishes looks original. To make it, you need to take a small piece of lace, the same as on the wine glass itself, and baste it along one side. Then the basting is pulled together, the resulting skirt is applied to the leg and stitched. For additional fixation, the skirt is placed on glue, then it can be decorated similarly to the decor of the glass itself.
On a precious day - precious dishes
Decorating glasses with rhinestones with your own hands will not only bring an original result, but will also give a charge of positive mood during needlework.

- Rhinestones can be placed over the entire surface of the glasses randomly or in a certain order, leaving only the glass border at the edge (otherwise it will be uncomfortable to drink). Then at the holiday all the sparkle and radiance will go to the pair of lovers!
- By combining rhinestones of different shapes and diameters, various patterns are laid out on the glass surface, for example, hearts or rings.
- The wine glasses will be unique, with the initials of the bride and groom written in rhinestones.
Like lace, rhinestones are glued with glue, but you need to work especially carefully so as not to leave glue smudges and stains.
The shine of the stones looks beautiful in photographs both under artificial lighting in a restaurant and in daylight outdoors.
Ephemeral beauty
DIY floral decoration of glasses has become extremely fashionable lately.
Delicate fresh flowers on the dishes harmoniously echo the bridal bouquet, pleasing the eye and imparting aroma. To decorate the glasses with fresh flowers, you will have to make a lot of effort; this must be done literally a few hours before the ceremony.
- The selected flower, which is planned to be placed on the wine glasses, is placed in water. The flower should absorb as much moisture as possible.
- Then the flower is trimmed, leaving the shortest possible stem. A piece of cotton wool soaked in water is attached to the cut using floral tape.
- The flowers are attached to the dishes with tape.
- Flowers look beautiful, shaded with greenery and small artificial flowers or beads, rhinestones, pearls, which are secured with glue.
A video of decorating glasses for a wedding with fresh flowers will help you do everything right. Such decor, of course, is short-lived, but extremely effective and original.
Important! It is better to choose flowers that are durable and that are easy to mount, for example, orchids, medium-sized roses and chrysanthemums, and irises.

If there are concerns that fresh flowers on wine glasses will not survive the ceremony, you can use artificial ones. They cover the entire glass, the stem, or lay out a pattern of small flowers. Rhinestones glued to the petals look like drops of dew.
The glasses look interesting, looking like magical bouquets - they are decorated using artificial flower petals. How to decorate glasses with your own hands this way?
- Select a flower of the desired shade. Those with many petals - roses, peonies - look beautiful.
- The flower is disassembled into individual petals.
- Petals are glued one at a time. You need to start from the top, gradually going down to the leg. At the junction of the glass with the stem, the flower is decorated with ribbons, feathers, and rhinestones. The stem of the wine glass can be painted to match the color of the flower.
The delicacy of painted glass
Painting with acrylic or stained glass paints gives the dishes an extraordinary charm, because traditional champagne in it will sparkle with all the colors of the rainbow!

When decorating glasses like this with your own hands, you can study photos of master classes in advance, or you can follow step-by-step instructions directly during the creative process. However, you need to stock up on materials ahead of time; they are easy to find in stores for artists. The following things will come in handy:
- alcohol for degreasing;
- thin round brushes;
- stained glass or acrylic paints;
- stencils for those who do not know how to draw, or a prepared sketch;
- varnish for fixing;
- spray paint in cans;
- stained glass contours.
A few nuances:
- It should be remembered that the first stage of any type of painting on glass is always degreasing thoroughly washed dishes with alcohol.
- During the process, you should try to move the dishes in your hands as little as possible so that fingerprints do not remain.
- It is better to leave a couple of centimeters unpainted in the upper part of the glass, which touches the lips. No one needs allergies or poisoning on a holiday.
- Stained glass paints are more fluid, liquid and transparent, acrylic paints are thicker and opaque.
- For stained glass paints, a contour is required; the paints are then poured into the resulting cells. You can paint with acrylic without an outline.

You can depict whatever your heart desires on a wine glass! Here are just a few design options for wedding wine glasses.
Simple and elegant
- The glass is completely covered with spray paint, then the dishes are decorated with patterns of rhinestones, beads, and flowers.
- When applying paint, the can must be held at the same distance, carefully turning the glass by the stem.
- When the top part is dry, the glass leg is sprayed in the same way. All gold and silver glasses look beautiful.
Painted Happiness
- The selected stencil or prepared design is glued to the inside of the glass with tape. Most often these are rings, initials of lovers with crowns or names, wedding date, roses, just beautiful fantasy patterns. However, the drawing can be anything, even portraits of the heroes of the occasion, it all depends on the artistic skill of the performer.
- On the outside, the pattern is repeated with a stained glass outline. After the outline has dried (this is at least 2 hours), they begin to paint with a brush and paint. You need to work carefully; in case of mistakes, remove excess paint with a cotton swab.
- Drying is speeded up with a hairdryer, but in any case, the products must stand for at least a day for the paint to set.
- Then you can complement the drawing with a variety of decor; decorating glasses with beads with your own hands, glued as individual accents, is perfect.
The decoupage technique will come to the aid of those who do not know how to draw. Required minimum materials:
- decoupage glue for glass;
- tassels;
- clear nail polish.
When performing the decoupage technique, drawings are taken ready-made and in the required scale. You can choose from special napkin motifs, rice paper, or by printing what you want on a laser printer.
- The design is not cut out, but neatly torn off, since uneven edges are better glued.
- The glue is applied to the drawing or glass in the place where it will be placed.
- The design is applied, then smoothed from the top with gentle movements from the center to the edges.
- After drying, the glass is varnished and additionally decorated with contour painting, shiny stones, pearls, and ribbons.

Glitter and chic
It’s easy to do, but the use of glitter when decorating wedding tableware looks incredibly bright.
Glitter is applied to the wine glasses using stencils. The finished design is applied to the inside of the glasses, secured with tape. The image is repeated on the outside with a brush dipped in glue. While the glue is still wet, sprinkle the glass with glitter. After drying, shake off excess glitter.
Two - or several?
The bride and groom need 2 glasses for their wedding. However, a wedding, like any special event, implies turmoil; no one guarantees that the necessary dishes will not break or get lost at a crucial moment. Therefore, when decorating glasses for a wedding yourself, it is worth preparing a spare set or making a second option specifically for a wedding photo shoot.
Useful tips
If you're planning a wedding, you're well aware that the costs will likely be will far exceed planned: You will definitely need small details, of which a wedding requires a great many.
TAKE A FUN TEST:
If your budget is limited and you dream of a wonderful, beautiful wedding with all the attributes, why not use a little imagination, find time and make some original decorations with your own hands?
DIY wedding invitations
As you begin to prepare for your wedding, you will certainly think about how beautifully warn your loved ones, friends and acquaintances about it. Wedding invitations can be ordered, but making them yourself is not that difficult. In addition, guests will definitely appreciate your work and, most likely, will keep postcards in memory of your special event.

What you may need:
Sheets of white or colored paper and cardboard
Lace
Satin ribbons – wide and narrow
Curly and regular scissors
Printer for printing text
Hole puncher
Lighter

Let's get started:
1) First, think about what size will your invitations be?, and type the appropriate invitation text. One sheet of A4 can usually make two invitations, and one sheet of cardboard can make 1 envelope.
You can take a variety of colors. Traditionally, white or soft pastel colors are used, but if you want to make your invitation bright and colorful, you can take bright colors of cardboard and ribbons.
2) Print the invitation text on a sheet of paper, and then cut it out using curly scissors.

3) Using a hole punch, make a hole at the top to attach the bow.

4) Make an envelope from thicker paper. To do this, using the measured templates, cut out a similar figure from an A4 sheet, taking into account that the side edges of one of the sides will be protrude slightly and should be bent back. The envelope should be made depending on the size of the invitation itself, so that it fits perfectly inside the envelope.

5) Use lace ribbons to decorate the envelope blanks. To do this, use glue to secure the lace on the inside of the future envelopes.

6) After this, fold the edges along the folds and glue them to the opposite side so that you have an envelope.

7) Make a hole in the top, insert the invitation into the envelope and secure it in it with a thin ribbon, threading it through the holes and tying it with a bow.

8) Do it with wide and narrow satin ribbons large bow for the center of the envelope. To do this, bend two pieces of wide tape and secure the center with thin tape. Do not forget process the edges satin ribbons with a lighter.


9) Glue the resulting bows to the center of the card using glue. The work is ready.

Original wedding invitations
Very beautiful invitation with an unusual heart in the middle easy to make using the following materials and tools:
Colored paper, preferably tissue paper, very thin - several colors of different shades of red
A blank for a postcard with inscriptions, inside you can write details about where the wedding will take place and so on.
Sheet of plain paper
Scissors

Fold each sheet like an accordion (5-6 folds) wide 2 centimeters. Then use scissors to make cuts.

Glue strips with cuts of different colors together, and then glue them on the back side a heart pre-cut from plain paper.

Trim the excess tissue paper along the outline of the heart. Then glue it onto the card blank two ribbons, cut out of paper as shown in the photo. On these tapes you can write something like: "We invite you to the celebration" and date. After that, stick a multi-colored heart on top.

DIY wedding car decoration
Decorations for the wedding carriage– an important detail of wedding events, because the car should be as elegant as everyone else gathered. Traditionally, cars are decorated flower bouquets, colorful ribbons and bows, toys.

The most popular parts for decorating wedding cars are long colorful ribbons. You can also find special metal ribbons that sparkle in the sun.
Attaching the tapes to the car is not so difficult, you just need to hook them onto the protrusions in the front and in the back, or, in order not to cover the windshield - front and side.

Here is another example of a simple ribbon decoration for a car:

Using the same tape and decorative New Year's rain or braid you can make whole drawings: waves, flowers, hearts. Here it is important to attach the braid to the surface with tape in the right places, and it will fall down beautifully under its own weight, creating the impression of an original pattern.

Flowers– the second most popular detail for decorating wedding cars. Moreover, it is not necessary to make large bouquets in front and behind, you can simply attach one flower over the entire area of the car. In this photo you can see that the flowers are attached using simple tape (Both real and artificial flowers are suitable. The tape will not be visible from afar):

Bouquets of flowers, balloons or the same folded ribbons will look good on the handles.

Can be designed in an original way inside of the car, for example, wrap colorful ribbons around the steering wheel or hang garlands on the windshield. Remember to keep these decorations did not interfere with good visibility for the driver.

Those who have artistic ability, can paint the surface of the car with beautiful designs using special washable paint. This decoration, of course, is not for rainy weather, but it looks very impressive. If there are no artistic abilities, then you can use ready-made stencils, or car stickers, which can then be easily removed.

DIY wedding car decoration (video):
Decoration of wedding glasses
Decorating wedding glasses for the celebration is not at all difficult. For this you will need:
Satin ribbons or braid
Lace, lace ribbons
Beads
Small fresh or artificial flowers
Glass painting paint
The easiest way to decorate glasses is use of satin ribbons. Typically wedding colors are white and soft pink, but you can use other colors if you wish:

To make such a decoration, you need put ribbons of three colors in a row, and then wrap them around a simple smooth glass, cutting the edges in the right place and securing the decoration to the product with glue. To prevent the ribbons from slipping, try to wrap them as tight as possible. Glue the prepared bow from one of the ribbons in front.

Another simple way to decorate a glass with ribbons is wrap the leg, and tie a bow in the place where the leg is attached to the bowl. In this case, you can do without glue.

You can also use more thin satin ribbons, which in the form of patterns are glued directly onto the glass. Ribbons can be chosen pure white or multi-colored. In this case, the cut ribbons were carefully glued onto the glass in the form of three pyramidal designs and decorated with beads. At the base of the bowl bows tied from a combination of thick and thin ribbons.

Advice: When working with satin ribbons, it is very important to process the ends with fire, otherwise they will fray and lose their neat appearance.
DIY wedding glasses with lace
Another very simple way to decorate glasses is use of lace. Lace is an ideal ready-made material that already contains an intricate design and looks great on glass. Ideally suitable for wedding glasses white wide lace.

To make the lace richer, you can add beads, satin ribbons and other decorations. In this case, the glasses were decorated with rhinestones.

Advice: To better attach the beads to the uneven surface of the glass, it is better to use flat beads or rhinestones.
Painting wedding glasses
Those who are good at working with paint brushes can try paint glasses with your own hands. Here your imagination will work to its fullest: you can make beautiful curls, dotted patterns, floral images, hearts, bows and so on. The pattern on the glass repeats the lace pattern. Here we use white and gold paint:

For such drawings it is not necessary to have great artistic abilities; you can also use stencils:

Advice: To paint glasses, you can use glass paint, simple gouache or nail paint.
How to make a rose out of ribbon
Wedding glasses are often decorated small roses, made from the same narrow satin ribbons. You can buy ready-made roses at a jewelry supply store, but they are easy to make yourself. There are several ways to create a rose from ribbons, we offer you one of the simplest.

To make roses from satin ribbon you will need: ribbons, scissors, thread and needle.
Let's get started:
Take the edge of the tape in your left hand, and with your right hand begin to roll the tape so as to obtain middle of the rose. Then secure the result with thread and needle.

Continue to twist the ribbon, not too tightly, remembering to periodically make stitches to secure it.


At the end, do not wrap the tape too tightly so that you get half-opened bud. Secure the base of the rose with thread. Cut off the excess with scissors.

Advice: In order to easily attach the rosette to the flat surface of the glass, make it as flat as possible.

By the way, it’s a great idea to cover the glass real rose petals, however, such decoration is short-lived and will look perfect “fresh”.

In addition to glasses, you can also beautifully decorate a bottle of champagne. You can read more about this.
Wedding hall decoration
Decorations for the wedding hall Usually the concern is those who rent out this hall, but sometimes it happens that decorations are a separate service. You can try to decorate the hall yourself to your taste. For this you may need balls, flowers, colorful ribbons, tablecloths, draperies.

Decorating the wedding hall with flowers
Natural flowers They always refresh and give the room an elegant and very festive look. The only thing is that they, of course, They lose their appearance quite quickly without water, so attaching bouquets of fresh flowers to the walls is not a good idea.
It is entirely possible to use only artificial flowers, which will cost you less and which can be used many times later. For sale ready made artificial flower garlands, and your task is just to hang them in the right places.

If you still choose fresh flowers, it is better to use them to decorate tables or place them somewhere indoors large vases with water.

Since tables at weddings are usually full of dishes, and there is almost not enough space for decorations, you can choose tall narrow vases with flowers.

Decorating the wedding hall with balloons
Balloons will cost you a little less than flowers, so you can leave flowers only on the tables and decorate the hall itself with balloons.
If you don’t know how to weave gorgeous garlands from balloons and make unique shapes out of them, it doesn’t matter. You can simply combine several colorful balls and hang them.

Can be used balloons filled with helium. This gas is lighter than air, so the ball will constantly strive towards the ceiling. To prevent it from flying away, it is enough to attach it to chairs, tables or other interior parts.
With such decorations, even a simple interior becomes your own flavor and it becomes more comfortable.

Balloons filled with helium do not need to be tied to something, just tie them to them serpentine and let it hit the ceiling. This decoration of the hall will look original if the ceilings in the room are not too high.

DIY thread balls
If regular inflatable balloons seem too simple and cliche for you to decorate a wedding hall, you might like balls of thread.
What you may need:
Thick threads for knitting
PVA glue (1.5 cups)
Starch (0.5 cup)
Water (0.25 cup)
Balloons
Oilcloth
Ball hanging bar or other device
Vegetable oil
1) First, inflate the balloons of the required size and hang them by the threads, after lubricated with vegetable oil so that the threads do not subsequently stick to them.

2) Mix glue, starch and water until smooth.

3) Dip the rope in a mixture of glue and starch and wrap it around the ball. Leave it hanging on the bar for a day.

4) After the glue is completely dry, you need pierce the ball and pull it out through the resulting holes. The rope will continue to hold its shape and you will end up with a ball like this:

Decorating a wedding hall with fabric
To make the holiday table look even more magnificently and solemnly, you can add fabric decorations on the sides. Usually these are light and airy materials - lace, mesh, tulle, tulle and others, which are attached with waves and complemented with multi-colored floral decorations.

Think ahead what colors will your hall be in?. Pay attention to the color of the walls, floor, ceiling. The most neutral color for jewelry is white, but you can combine a variety of colors with it. For example, the tablecloth itself can be white, and the fabric decorating the tables can be soft pink:

Looks nice too large strips of soft fabric hanging from the ceiling. To do this, you need to carefully study whether it is possible to attach the fabric to the ceiling. If not, then it’s better to focus on decorating the walls, tables and chairs.

A very original idea to add the bride and groom under the tablecloth and table fabric garlands of light bulbs. These decorations are usually used as New Year's decorations, but will look incredibly beautiful at a holiday banquet, making the bridal table stand out from everyone else.

Light bulbs will also look chic on the ceiling and walls.

For small cozy rooms you can create a romantic atmosphere using dim lights and lots of candles. This is suitable for those who want to hold a modest, quiet wedding with pleasant, calm music, without particularly wild fun and noisy entertainment.

Decoration with garlands
The easiest way to create homemade garlands is use of thread and colored paper. For this you will also need a sewing machine. Such garlands look very stylish, especially in large quantities, despite the simplicity of their material and ease of manufacture.

Cut out circles of different sizes from colored paper.

Then, using a sewing machine, sew the paper circles so that they meet in one long garland. In this case, you can leave a small distance between the circles.

You can make entire compositions from these garlands and decorate your wedding hall with them.

DIY wedding table decorations
In order for guests to quickly and easily find seats at the festive banquet, tables are numbered and the guest list is posted in front of the hall entrance who will sit at a certain table. Places on the tables can be numbered or these unusual cards with names can be attached to glasses:


To do fluffy skirt for the bride and groom table you will need:
A large amount of transparent light fabric (tulle, mesh, tulle) or other fabric of your choice
The tape that will hold the tape in place (slightly larger than the perimeter of the table).
Pins
Scissors

Let's get started:
Cut the fabric into strips wide 10 centimeters, and the length is twice the height of the table legs. Then start tying long strips onto the ribbon so that they are the same length. As a result, you will have a ribbon tied with strips of fabric, which will be the skirt.

Tie a ribbon skirt around the edges of the table and secure it to the tablecloth with pins.

Wedding decorations for the bride
A very simple but incredibly beautiful wedding decoration for the bride’s hair can be made from feathers.

What you may need:
White feathers (fine and large)
Sew a bead or button into the center from the front side.

To make it convenient to attach this feather flower to your hair, add it to the back side bobby pin.
A wedding is a solemn celebration of the birth of a new family. They begin to prepare for this holiday several months in advance, because every little detail must be thought out. Wine glasses for this celebration are decorated in a special way, but not everyone knows this. Making your own wedding glasses is easier than it might seem. You will need some materials, tools, patience and perseverance.
The exchange of rings is a beautiful ancient ritual that has survived to this day almost unchanged, but the methods of designing various products and materials for holidays have been completely modified.
Decorating wedding glasses with your own hands has become much easier with the advent of a glue gun, which accurately applies almost any substance to the right place. For the bride and groom, they buy two sets of glassware, one of which they will break on the threshold of the registry office, and the second they will drink from at the festive table. The shape of the glass does not play a special role, because newlyweds drink different drinks at a wedding, but the tradition of buying champagne glasses is still relevant. There are no strict rules for choosing material for these products, so they can be either crystal or plain glass. For practical reasons, you should not choose glasses that are too low or narrow at the top, since it is much easier to spill a drink from them than from regular ones. Decorating such glasses is also not very convenient, because most of the surface will be covered, which will make it difficult to determine the amount of liquid inside. We will learn below how to decorate wedding glasses with your own hands! Painted wine glasses will add mood to the wedding, but it is not always possible to find the right shape and color. You can make such glasses yourself by purchasing the necessary materials in advance. We will need: Before purchasing all components, carefully read their instructions. It is necessary to look for information about the material’s ability to come into contact with food and toxicity. If you are still tormented by doubts, do not paint the glass completely, leaving 2 cm at the top so that the newlyweds do not touch the paint with their lips. Decorating glass has its own characteristics, which we will now consider. Before working with glasses, they should first be prepared by washing, drying and degreasing. Fingerprints may remain on the surface treated in this way, so it is best to hang the wine glass. Now apply transparent paint to the product using a brush. Minor defects in the form of smudges can easily be hidden under the decor. To paint glass products, we will need nail polish of different shades or acrylic paints. A simple drawing can be done with a brush, but a complex one will require a stencil. Having attached the blank to the glass, we apply paint of the desired color through it, and after it has partially dried, we draw the details with a thin brush. Inscriptions are made in a similar way. A cheaper option is to create a design with nail polish. This is done like this: apply drops of liquid of different colors to a glass and mix with each other using a toothpick until the intended pattern is created. You can also use nail polish to paint glasses using a stencil. Here are some tips for creating certain designs: There are several ways to decorate wine glasses, so everyone is free to choose the one that suits their abilities. One method is suitable for needlewomen, but another is suitable for lovers of silk ribbons. For a successful outcome, we will need the following materials and accessories: Do-it-yourself wedding glasses: photos, videos and other materials can be found on our website. If you have never dealt with decoration, then you do not know all the adhesives that are used for this. Here are some tips from experienced craftswomen: A unique holiday atmosphere will be created by glasses “dressed” in a wedding dress (the image of the bride) and a tuxedo (the image of the groom). For work we will need: The bride's glass is more difficult to design, so it's better to start with it. Using scissors, we cut off a small piece of lace and glue it to the glass product so that it becomes a dress. Thanks to the shape of the glass, the dress will have a clearly defined waist, for the design of which 3-4 white beads are used. Attach a couple of small pieces of lace at the top, creating a veil. You can make a wreath from small flowers that will help secure the veil.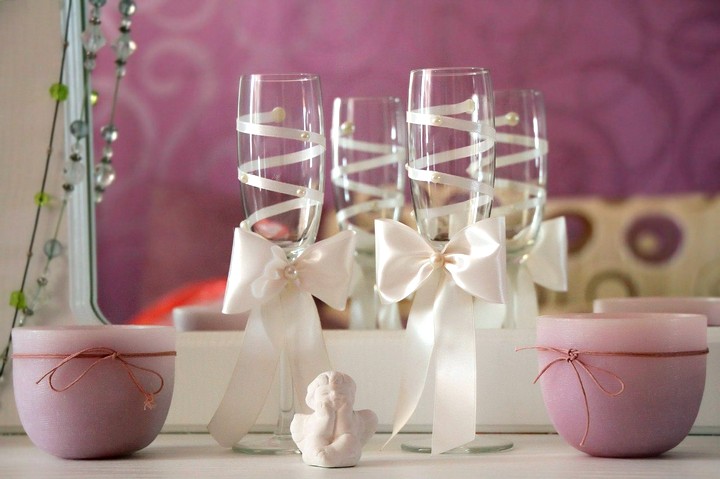
Choosing the shape and material
Colored glasses
We paint glasses
Decorating glasses
Which glue is better?
Bride and groom
A wedding is one of the most beautiful and exciting days in the life of every couple. And many people believe that everything should be perfect. But to fully make this day wonderful, it is not enough just to wear clothes, no matter how beautiful they are.
You will have a luxurious snow-white dress, a lovely bouquet, and the groom will be in a brand new suit, but it won’t be a complete picture without some little details. Beautifully decorated wedding glasses will help to express individuality and highlight the beauty of wedding decorations. with your own hands.
Therefore, we present to you a master class (MK) on decorating wedding glasses with your own hands.
How to beautifully decorate glasses for a wedding table
- Lace. Thanks to the lace, you can give your glasses a more than festive look. The dishes will look elegant due to the lace “shell”.
So, for the first option we will need:

This glue will be waterproof and will “grab” well.
Note: before applying glue to the surface of the glass, wipe the glass with an alcohol-soaked cloth - this way you will first degrease the surface, and further gluing will be much better.
If, in addition to lace and ribbons, you will attach various beads, rhinestones and crystals, then you can use silicone-based glue, glue for ceramic materials and even simple PVA!
- In order to decorate the top of the glass, wrap the lace around it and measure the required length, not forgetting to take 5-6 mm in reserve;
- Carefully position the lace. Try to keep the glue as invisible as possible;
- To decorate the stem of a glass, gather the fabric with a needle and make a small accordion;
- Then tighten the thread on the glass;
- Carefully tie a ribbon around the leg
- A beautiful bow that can be attached to the leg.
- Wrap the ribbon around the leg itself (as in the tutorial above).
- If you like to experiment, then try it. A video tutorial will help you make this decoration.
- Flowers. If you choose the most beautiful artificial flowers and arrange them into an interesting, compatible composition, you can also decorate glasses with them. To do this, tightly fasten them together and glue them to the glass. It is not necessary to make the glasses the same, the main thing is combination and harmony.
Sometimes fresh flowers are used for this type of creativity. The final composition will look great, but you will also have to work hard (of course, in the name of such a wonderful result).
And since the result is worth it, we begin our next MK:

Note: for more complete harmony, use those fresh flowers that will be used in the groom’s boutonniere and the bride’s bouquet.
To do this, you will need to cover the entire glass from the base with petals. You can attach a satin ribbon or a ribbon bow underneath it. If desired, add pearl-like beads, beads, rhinestones.

 Option 1:
- outline stickers on glasses;
- stained glass paints;
- tassels;
- ribbon (silk);
- glue.
Instructions:

Option 2:
Here you can use stencils to a minimum and make the most of your drawing talent. Decorate the glass partially or completely with paints – it’s up to you.
Tip: 1. To speed up the drying of paints, use a hairdryer. 2. To create a matte effect for the entire glass or just part of it, spray white acrylic paint using an old toothbrush. 3. To decorate the edge, choose a silver, white or gold brush - this will make your wine glass look rich.
- Rhinestones and beads. This option is very beautiful, but also the most difficult to implement. To do this, you will have to glue each bead and each rhinestone by hand, possibly re-gluing it several times. Use stencils on which you will lay out your intended drawings.
Believe me, glasses beautifully decorated with your own hands will be the best gift for you and your partner, and the decoration process itself will once again prove your love.  It may be difficult and unusual, especially if a loving man who has never picked up glue and tape before takes up such an activity, but know one thing - the game is worth the candle, and therefore try to do the best you can so that your loved one simply shines with happiness!
When preparing for a wedding celebration, there are always a lot of worries, because you need to think through every detail, otherwise the holiday may be ruined. That is why many resort to the services of managers, who take on the lion's share of all organizational issues. However, there are details that you can handle on your own, and the design of wedding glasses is one of these.
The tradition of breaking dishes “for good luck” has gone deep into the past; it has been replaced by a new trend - to preserve your wedding wine glasses as the very first family treasure and a real heirloom. They stay with spouses for many years and are even passed on to their children, and on each family anniversary they are taken out of a secluded place and placed on the festive table to once again remember the most tender, romantic and tender moments of their day.
It is better to immediately abandon all types of purchased paraphernalia, since the production that has been put into production is unlikely to offer anything worthy for such a special event. Most newlyweds prefer exclusive jewelry that will fully match the theme and style of the wedding, as well as the personal tastes and characteristics of the newlyweds.


Regardless of who exactly will be decorating the wedding glasses, the first thing you need to do is choose the appropriate option from the many existing decor ideas. Typically, one of the following designs is used:
- trimmed with satin ribbons;
- lace or burlap;
- cloth;
- large and small sparkles;
- rhinestones or beads;
- engraving;
- painting with paints;
- with fresh flowers, as well as those sculpted from clay and cold porcelain.


Some newlyweds prefer to decorate only the stem of the wine glass, and paint an engraving or monogram on the walls. Some create more voluminous jewelry.


Anyone who decides to decorate their wedding glasses with shimmering sparkles, as well as rhinestones or beads, will not go wrong, because this consumable always looks extremely festive and solemn. The pattern on such a glass is made in any thematic pattern, only so that one side of the glass remains undecorated.
The simplest pattern is formed with one- or two-color material. In this case, various monograms, hearts, names of young people or simple curls are laid out with rhinestones. If desired, you can apply more complex patterns - to do this, they are printed on plain paper, applied from the inside and along the lines, and glitter is placed.


If the rhinestones scatter chaotically, then they should completely cover the glass from below, and leave only individual droplets at the edges.
Decorating with glitter is much simpler - you just need to dip a thin brush in glue, then in glitter, and draw a pattern or draw a design.
Products decorated with openwork lace look very delicate, and making such decor is not at all difficult - you just need to cover the outer part of the wine glass with fabric. Usually golden or silver lace is used, but lurex in tones of ivory and vanilla looks no less impressive. The shade of the fabric should match the overall color scheme of the wedding.


The elegant belt at the very base of the wine glass looks quite stylish; wine glasses with a lace “skirt” also look interesting. If desired, it is worth supplementing the decoration with various relief elements - flowers, as well as leaves and many other details.
Openwork materials are often combined with flowers and beads, but it is important not to overdo it - wedding glasses should become an elegant thing, and not a tacky bad taste.


Ribbons can give a solemn look to absolutely any product; they perfectly complement openwork lace, painting and shiny rhinestones. Smooth ribbons of shiny material wrap around the legs, as well as the glasses themselves. Stylish roses are made from them and even whole bouquets are glued to glass, complementing them with beads and glitter.
Most often, plain ribbons are chosen to decorate glasses, but multi-colored materials can also be used - for example, black, dark gray, blue and light blue colors are suitable for a newlywed, and white and soft pink shades are preferable for a young wife.


Artistic painting of glasses has become a very worthy idea, but it should only be used if the bowl remains clean and only the stem of the glass is covered with paint. Then the sketch becomes a basic element of decor. Typically, acrylic paints are used for painting.


Glasses decorated with feathers look quite extravagant. Of course, such decoration is unlikely to be suitable for a classic wedding, but for themed events it is just right. Feathers go well with similar decor on the young wife’s dress, and such glasses also look good if similar decorations are present in the bouquet. Feathers are usually combined with beads, sequins and flowers. By the way, this option is most often used when organizing a wedding celebration in the style of Chicago; in this case, lush feathers harmonize very well with the entire decor and costumes of the invited guests.


Decorating with fresh flowers is one of the most romantic options for decorating wine glasses. Of course, such a composition cannot be called durable, but it is truly the personification of tenderness, grace and romance. You can also use artificial flowers, but they, of course, cannot be compared with living stems, their lines and unique aroma.
The principle of decoration is quite simple - roses, daisies or other flowers are collected in a small boutonniere and fixed to the stem of the wine glass using special glue and satin ribbons.


If you know how to sculpt jewelry from plastic, then creating stylish decor from porcelain or polymer clay will not be difficult for you. It is quite possible to make various buds, delicate petals and small flowers on your own. At the same time, until the clay dries, the petals can be given the desired bend, smooth lines, and even the shade can be adjusted.


In any of the considered types of decoration of wedding glasses, you can always find the possibility of transforming wine glasses or glasses into stylized newlyweds - the bride and groom. Such attributes look quite catchy, and they are quite simple to make.


For example, if you want to get a “groom,” you need to take white and dark-colored material, a couple of small beads and form them into a shirt (wrap white fabric around a wine glass) with a tuxedo (here you just need to attach the lapels). And for the bride, cut out a fluffy openwork skirt, and make the corsage from satin ribbon. A “young” outfit can be decorated with sparkles and rhinestones.

How to choose the right option?
When ordering decorations for wedding glasses, young people sometimes “get their eyes wide open” from the abundance of luxurious and stylish options. To make the right choice, you should take into account a number of basic recommendations.
- The design of the wine glasses should be optimally integrated into the overall theme of the wedding celebration. If you are holding an event in a rustic style, then the wine glasses can be draped with burlap. If the design is carried out in the traditions of vintage and shabby chic style, then you should give preference to lace, ribbons or cameo.
- It is very important that the color scheme of the glasses is in harmony with the main shades that prevail in the decor of the room where the celebration is being held. The color palettes must match; the use of contrasting shades is strictly prohibited. For example, the orange decor of the wine glasses is unlikely to fit into a silver or lilac wedding, and gold in the dishes will look out of place with a silver shade of the room.


It is important that the glasses harmonize well with each other both in style and color. They should be a single tandem, personifying lovers and emphasizing the main theme of the event.
Let's talk a little about glasses. Their shape should be quite beautiful and comfortable, since the young spouses will have to hold them in their hands for quite a long time.
Traditionally, wine glasses with an elongated thin stem are used., although you can choose some other options. For example, paired wine glasses on one common stem are quite popular - they, in fact, represent a rather attractive stand with a pair of recesses into which glasses are inserted. If desired, you can give preference to hexagon-shaped glasses, concave glasses and other original products.


Step-by-step instructions for registration
Now let's look at the technical features of the design of glasses in various styles. There are quite a lot of interesting master classes on decorating them, but we will focus on the main points.
To begin with, you should follow a few important rules:
- Before starting work, be sure to thoroughly wash the wine glasses and wipe them with alcohol in order to degrease their surface;
- When decorating glasses, your hands must be clean, so keep wet wipes nearby;
- to fix decorative elements you need to use glue, but each option has its own adhesive base: for example, fabric, feathers and lace are attached very well to PVA, it is advisable to glue bright sparkles, rhinestones and beads with compounds based on cyanoacrylate, and large beads are fixed using gun or liquid nails.


The instructions for decorating wine glasses with different finishing materials have their own nuances.
So, if you are draping a glass with fabric and lace, then simply wrap the glass in cloth and secure the edges with glue, preferably PVA.


If you plan to paint dishes with paints, then you should give preference to acrylic compositions. Stained glass translucent paints are also considered quite popular these days. They allow you to create a unique decor that has no equal in its aesthetic properties.
The choice of design depends entirely on the artist’s abilities and how well he can draw all the necessary openwork elements and elegant curls. After the design is applied, it should be coated on top with acrylic varnish - it is used as a fixative so that the image does not wash off under the influence of detergent and does not wear out over many years of storage.
When decorating glasses with painting, professionals advise additionally decorating the stem using spray paint. In this case, the bowl should first be covered with newsprint glued with tape. Otherwise, you risk staining the bowl with paint, which will negate all efforts to decorate the glasses.


When decorating glasses with artificial flowers, it is better to use organza products - it adheres better to the glass surface.
As a rule, individual petals are strung on the narrowed side of a wine glass and then glued together. If this is not done, they may simply fall in your hands. Additionally, the glasses are decorated with rhinestones and beads, which are glued with hot glue using a special gun.


The decor made from polymer clay looks exceptionally elegant. This is quite a delicate job, but every novice decorator can master this technique. To create a unique decoration you will need polymer clay itself, as well as glue, gloves for work, a toothpick and a board.
To begin with, the clay layer is rolled out and cut into small pieces, from which petals are subsequently formed. After this, the flower itself is collected, and then baked until hardened. The prepared figures are attached to the glasses using glue.

Another original technique is gilding. It is quite simple to make - the design here is applied with a special spray from a can, and you can decorate both the leg and the bowl. When you need to decorate only one area, you should cover the rest with paper. If you combine painted fragments with empty, unpainted ones, you can achieve an unusually beautiful effect. It is quite popular to apply gilding using stencils - first they are glued to the glass with plain water, and after the gold dust has been applied to the surface, they are removed, resulting in a rather interesting pattern.