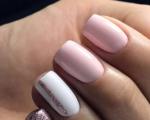
How to treat a broken nail. The secrets of always a beautiful manicure, or what to do if a nail is broken
From this article you will learn:
- What are the main causes of brittle nails?
- What to do if a nail breaks under gel polish, a nail extended with acrylic, or a natural nail
- What to do if a nail breaks in the center, on the side, at the root
- How to repair a broken nail yourself using a tea bag and special glue
- How to temporarily restore a broken nail before visiting a specialist
- What are salon methods for restoring a broken nail?
- What are the main measures to prevent brittle nails?
Neat nails of suitable length are a real decoration for women’s hands. Therefore, a beautiful manicure is rightfully considered one of the main components of an impeccable image. But none of us is immune from possible troubles, and the strongest nails can also “let down” the hostess by breaking right before an important event. However, there is no need to be upset in advance, because the problem can be easily fixed. In the article we will tell you what to do if your nail is broken, and we will also understand what can provoke such situations and how to prevent them.
The main causes of brittle nails

If you always want to have beautiful and strong nails, it is important to know what can cause nail plates to become brittle and weakened.
Most often, nails begin to break for the following reasons:
1. Lack of vitamins, trace elements and minerals designed to maintain health and beauty. A sufficient amount of these substances in the body is synonymous with healthy and strong nails.

Therefore, the first thing to do if your nails break quite often is to reconsider your diet.
Foods rich in vitamins and microelements for healthy nails:
seafood;
milk and other dairy products;
nuts and sesame;
seaweed;
zucchini, cucumbers;
fatty fish;
vegetable juices;
basil, parsley, cilantro and other greens;
pumpkin seeds.
2. Improper care. Most of the cosmetics that we use to take care of our hands and nails every day contain acetone and formaldehyde. Due to contact with these substances, natural nail plates weaken, lose their natural hardness, and become brittle. Detergents and poor quality water cause no less harm to them.
Taking good care is the second thing that is important to do if your nails begin to break. There are a huge number of wellness procedures, most of which you can do yourself. For example: baths with oils, masks, special varnishes to strengthen the plates, various folk methods.
All of the above helps improve the condition of the nail plates. However, it is equally important to know what to do if the nail has already broken. We'll talk about this later.
What to do if your nail is broken, and what not to do
The mechanism of the procedure for breaking a nail will depend on how severely the nail plate was injured. First, let's list the most common types of damage:
Lateral detachments without injury to the bed;
Breakage of the nail plate at the very “root”;
Cracks with damage to the bed;
Injury with a detachment of the plate and damage to the skin under the nail.
The last option is the most unpleasant and painful.
A broken nail brings a lot of problems to girls: an unaesthetic appearance of their hands, snags on their favorite clothes, scratches on the skin. "First aid" will depend on how badly the nail was damaged.
Actions to take as soon as a nail breaks:
cut or file a plate;
glue the broken part of the nail;
resort to the services of a manicurist.
What to do at home if your nail is broken, but you want to keep your manicure? The damaged area can be glued together. The technology of this process will depend on where the nail plate was broken: in the overhanging part of the nail or in its center. Additionally, the size of the fracture is taken into account.
A small crack can be sealed with a patch made of natural fabric or a paper plaster. This method will work if the fracture occurs on the side of the plate, along the “smile” itself or along it.
If the free edge of the nail is completely broken, then a tip (a special acrylic product) is applied on top.
The tip is also used if the nail is broken along the axis of the finger.
You can solve the problem for a long time only if your nail is broken no more than 1/3 of the entire free edge.
When asked what to do if your nail is very broken, we recommend turning to the services of a manicurist. A deep break with damaged skin under the nail is very difficult to fix on your own.

What not to do if your nail is broken:
Squeeze glue onto natural surfaces not protected by varnish.
Apply your natural nail to glue. Aggressive chemicals corrode the natural plate. This method can only be used in case of extended nails.
If the nail is broken “to the meat”, you cannot wet it in acetone or other compounds. Aggressive substances will cause severe irritation and inflammation of the open wound.
There is no need to put off restoring the plate. Usually cracks grow quite quickly, and the broken part can come off completely. Then it will be more difficult to correct the situation.
What tools are needed to repair a broken nail?
Restorative procedures should be started as early as possible, as the fracture may increase. Necessary equipment:
Disinfectant. It is better to use something whose action is aimed not only at degreasing the plate and removing contaminants, but also at eliminating excess moisture. At the same time, the nail should not dry out.
Special fabrics. To restore the plate, you can purchase natural fabric (silk, linen) or artificial fabric (fiberglass). The most convenient options are silk and fiberglass. They are sold in strips or individual samples according to nail sizes.
Special nail glue, whose composition should be safe for nail plates. This restoration adhesive is quick-drying.
Nail files and buffs. The tool you will use to repair a broken nail must have an abrasiveness of at least 240 grit. Buff is a special polishing file. If you use a cloth, a buff will be very convenient for smoothing the surface of the nail plate.
To perform high-quality restoration procedures, we advise you to purchase a set with all the described devices. This way you will save your time and finances.
What to do if your nail breaks under gel polish
The first thing to do if a nail under gel polish breaks is to remove the coating. It is enough to remove the varnish only from the broken plate. Depending on the type of coating you have, use shellac or biogel remover. If you can't get rid of the old varnish, you can make a patch over it.
The patch is applied to the gel polish in the same way as to a natural plate. Next, the sealed area is covered with a new layer of varnish and dried in a UV lamp.

If the nail is broken along the edge, then the broken part can be cut off and extended with biogel. Take a piece of foil and place it under your nail. It will serve as a “support” for the gel polish. Dry the nail in a UV lamp and carefully remove the foil.
What to do if a nail extended with acrylic breaks?
Restoration should be done with acrylic tips. These are artificial devices, so the use of synthetic glue (“Moment”) will be harmless. You can use filter paper, silk strips or paper plaster as fastening patches.
What to do if a nail extended with acrylic breaks:
If the damage is too severe, you can re-grow the nail.
Apply glue to the plate and attach a paper strip.
Apply a second layer of glue, and after it dries, apply a third.
The next step is polishing the plate with a nail file.
Apply new varnish.

A simpler option is to replace the damaged acrylic tip with a new one.
What to do if your natural nail breaks
Usually a fracture of the nail plate forms directly along the “smile”. Restoration will preserve your manicure, but the nail will lose strength.

What to do if your natural nail breaks:
Remove the varnish and wipe the plate with an antiseptic.
Polish the bumps on the surface of the nail with a special buff file.
Make a patch. The piece of fabric should be 2-3 mm larger than the break (from each edge).
Lubricate the coating with glue and place the fabric. To evenly distribute the patch, you can use the sharp tip of a toothpick.
After the glue has dried, treat the nail with a polishing buff file.
Depending on the degree of damage, apply another 1-2 layers of fabric.
The final stage is coating the plate with varnish.
If your nail is broken, you need to choose the right way to solve the problem.
What to do if your nail is broken in the center
In this case, you will need a tip. Blank products must be square and transparent in color.
What to do if your nail breaks in the middle:
Use a polishing file to smooth out any uneven edges of the nail.
Wipe your nail with nail polish remover.
Cover its surface with special glue, and do the same with the inside of the tip.
Place the tip on your nail so that the edges of the product and the nail match.
Wait until the glue dries completely.
Adjust the shape of the tips to match the look of the rest of your nails, leaving a small margin.
Shape the nail, align the plate (it should coincide with the edge of the tip). Seal the joint.
What to do if your nail breaks on the side

Now let's figure out what to do if the nail breaks on the side:
As in previous cases, you first need to wipe the nail with a disinfectant solution. Then polish the crack until you have a smooth surface.
Prepare a fabric patch.
You need to make two stripes. The first piece should be slightly larger than the break; this will be the first layer. The second one should match the width of the nail; it is used as a second layer.
Now let's move on to the restorative procedure that needs to be done if the nail is broken. To fix the fabric on the plate, it is pre-lubricated with glue. You can straighten the material with the sharp tip of a toothpick. The fixed strip of fabric is covered with glue. After it dries, carefully polish the surface.
The same needs to be done with the fabric that we prepared for the second layer. After this procedure, treat the nail with a buff. Restored, it will retain its appearance until the plate grows up.
What to do if the nail is broken at the root
The most unpleasant situation for lovers of flawless nails is a severe fracture of the nail plate. Let's look at what to do if the nail breaks at the root. The first step is to thoroughly blot it in a disinfectant. Hydrogen peroxide, chlorhexidine, miramistin, etc. are suitable. Such a nail is very difficult to restore. Therefore, we advise you to contact a manicurist.

The procedure can be done only after the wound on the skin under the nail has healed.
In salons, this manipulation is done using special biogels. These coatings contain proteins that restore the nail plate. Biogels also protect cracked nails from infection.
Many biogels dissolve when interacting with detergents and acetone. To keep your manicure intact, it is better to wear rubber gloves when washing dishes or cleaning.
How to restore a nail plate after a broken nail at the root
Remove the broken nail.
The first thing to do if the nail is broken at the root is to completely remove the broken part of the plate. This is necessary to heal a wound on the skin. It is more convenient to cut off the broken edge with nail scissors. If you need to lift the broken part, use tweezers.
After removing the broken nail, it will become more convenient to treat damaged skin. This will avoid infection and further inflammation. The remaining part of the broken nail can be left, but in this case the treatment will be more difficult. The deformed edge will separate as the plate grows.
Stop the bleeding.
The next thing to do if the nail breaks at the root and causes the formation of a bleeding wound is to stop the bleeding. Apply a piece of bandage or disc to the wound, press firmly on it, and hold for several minutes.
Trim off the rest of the nail.
If the injury causes very severe pain, then a specialist should restore the nail.
Soak your foot or hand in cold water.
After trimming the broken edge of the nail, soak your finger in cold water for 20 minutes.
Choose a temperature of the liquid that would help to gradually reduce pain. This procedure helps normalize blood flow in the limb.
Soak your hand or foot in salt water.
Now place your hand in a previously prepared bowl of warm salted water (the solution should contain 1 teaspoon of salt and 4 mugs of clean water).
Keep your finger in the solution for 20 minutes. Liquid with added salt prevents infection. This procedure should be done 2-3 times a day for the first three days after the injury. Dry your finger with a cotton cloth.
Use antibiotic ointment.
To restore damaged skin faster, gently wipe the wound with antibiotic ointment.
Your hands must be clean throughout the entire procedure.
Apply gauze to the nail bed until the plate grows back.
This must be done so that the nail broken at the root does not cling to things. Gauze will also protect the nail plate from infection.
Repeat the procedure until the plate grows back. The gauze must be changed with each subsequent wound treatment. The damaged area must be dry. If the bandage gets wet, it should be replaced.
Monitor the condition of the wound.
During the first time after injury, care must be taken to ensure that no infection gets into the wound. This is especially true in the first 72 hours after injury.
Signs of infection: fever, inflammation, heat in the wound area, pain, swelling or suppuration.
Monitor the condition of the wound until a new healthy nail grows. If you realize that you have an infection, go to the doctor immediately.
How to repair a broken nail yourself using a tea bag
A tea bag, a nail file, and superglue are all you need when you need to “fix” a broken nail. What can I do to restore my manicure using these items?

Procedure:
Remove the tea from the bag. Cut a small strip out of it in the shape of a rectangle. It should be slightly larger than the break.
Treat the nail with a polishing file until the surface is smooth.
Apply a small layer of superglue to the cut strip. Place it on your nail and apply another layer of glue on top. After this glue has hardened, apply a third layer. The protruding ends of the paper can be trimmed using nail scissors.
Treat the nail with a polisher, remove the glue with acetone or an alcohol solution. Finally, coat your nails with clear polish.
How to repair a broken nail yourself using special glue
A good remedy is a special glue for broken nails. Let's consider what to do if you want to correct the situation with its help.

The first step is to wash your hands thoroughly to remove any greasy residue from creams and oils. Dry your fingers well with a towel.
Heat the water in advance. Dip the broken nail into it. This must be done so that the plate does not harden. If the nail is only cracked without coming off completely, then this procedure can be skipped.
Apply a small amount of glue to your nail. It is convenient to distribute it over the plate using a toothpick or the sharp tip of an orange stick.
In manicure supply stores you can purchase special glue for restoring damaged plates. But if you cannot do this at the moment, you can use regular superglue. Try to do everything carefully so that the product does not get on your skin.
Now let's proceed to the main procedure that needs to be done if the nail is broken. To fix the deformed area on the plate, apply it and hold it there for one minute. This will be enough to ensure that the nail plate is well secured.
Next, remove excess layers of glue with a cotton pad soaked in nail polish remover. This must be done as soon as possible so that the glue does not have time to dry. This is necessary to ensure that unnecessary irregularities do not form on the plate.
Once the glue is completely dry, polish the plate with a fine-grained polishing file. You should get a flat, smooth surface. An important rule when working with a nail file: guide the tool in one direction only. This will avoid even more damage to the nail plate.
At the end of the procedure, apply a protective coating (varnish) to the nail. Now wait until the composition dries. The restoration is complete!
The first thing to do if you have a broken nail is to assess the extent of the damage. If it is insignificant, then you can carry out the restorative procedure yourself. However, if you are faced with an extensive injury that is accompanied by severe pain or even bleeding, then it is better to go to a specialist.
Many girls get their manicures done by the same master, who has proven his professionalism with quality work. But if you have a broken nail and require immediate intervention from a specialist, you will probably have to wait, since the influx of visitors is usually very large.
A method of temporarily restoring a broken nail before visiting a specialist

You will need a narrow roll of tape. Cut a small strip, it should be slightly larger than your nail. This can be done carefully using nail scissors or regular scissors. If you only have large scissors on hand, use the ends.
For the procedure you need to take single-sided tape. Transparent adhesive tape for gift paper, multifunctional adhesive or any other type, but always transparent, will also work. Make sure that its adhesive power is not too strong. In our case, it is worth excluding electrical tape.
Now let's proceed to the main procedure that needs to be done if the nail is broken. To restore the damaged area, stick the prepared piece of tape onto the nail plate. You need to try to make sure that the middle of the gluing surface is above the break itself.
Press on the damaged area and hold it there for a while. Carefully place the tape on both sides of the plate; it should completely cover the nail.
Before covering the nail plate with tape, you need to check that its broken halves meet.
Press down on the taped area to better secure the tape.
To avoid causing even greater damage, straighten the tape in the direction of the crack.
Cut off any excess tape. This is convenient to do with nail scissors. If the tool is not at hand, use the ends of large scissors.
The edge of the tape should be very tightly attached to the nail.
The method described is exactly what you need to do if your nail is broken and a trip to the nail technician is not coming soon. A specialist will eliminate the problem using more effective methods.
Salon methods for restoring a broken nail
If your nail is broken, it is better to contact a specialist. Almost any nail salon provides nail restoration services.
- Sealing.

Sealing with wax is usually done in the following sequence:
plate design;
grinding;
removal of contaminants;
waxing the nail;
lubricating the plate with nutritious oils.
Important! Varnishing should be done no earlier than 20 minutes after the procedure. Afterwards you need to wash your hands well.
Sealing is a restorative procedure. If your nail is broken, we recommend having it done to improve the condition of the nail plate.
This process is also useful for treating nails after extensions; in addition, it helps to “revive” the plate after contact with household chemicals.
The effect of the procedure lasts for several days. Re-sealing can be done after the film is completely erased.
- Reinforcement with fabric or paper.

This procedure is usually used to fix a nail that has already broken. But we will consider its use to strengthen the nail plate.
Procedure:
polish the nail;
apply glue or clear varnish to it;
stick a piece of fabric;
bend it under the plate;
apply a fixative;
Keep the “construction” for 3-4 days, you can apply varnish on top of it.
If you want to reinforce it with paper, then you should not apply varnish. This manicure will not look attractive. In this case, the varnish takes a very long time to dry.
Instead of a conclusion: basic measures to prevent brittle nails
What to do to prevent your nails from breaking? If you often encounter this problem, we advise you to pay attention to the prevention of brittle nail plates.
The following rules must be observed:
Contact a specialist on time without delaying the problem.
It is important to take proper care: make high-quality coatings, baths, use strengthening oils, and cuticle moisturizers.
Drink enough water. Dehydration of the body provokes brittleness and splitting of nails.
It is better to do cleaning with gloves to prevent nails from coming into contact with harmful chemicals.
Protect your nails from mechanical stress.
Your nail polish remover should not contain acetone.
It is worth doing nail treatment, following these recommendations: hold the file at a right angle, do not tear it off, but carefully cut off the burrs, purchase glass or ceramic tools.
Before your next manicure, you need to give your nails a rest.
Sleep mode (at least 8 hours) and nutrition. Eat more foods containing vitamins A, E, D, as well as calcium, phosphorus and other important elements.
What else should you do if your nails often break? We advise you to pay attention to those methods that can be used at home. Here you don't need expensive cosmetic formulations. Can be used:
sea salt. Surely you have noticed that after a trip to the sea, your nails become stronger and take on a healthy appearance? Indeed, sea salt has a strong strengthening effect on the nail plates. It can be bought at a pharmacy.

Iodine. To strengthen the nail plates, apply it with a regular cotton swab. Then lubricate your nails with cream. A varnish coating can be applied over the iodine.

Healing wax. Eliminates dry nails, which sometimes causes brittleness, so this procedure is very useful. Regular paraffin will not work here.

Clay. Clay wraps nourish marigolds well. After wrapping, apply moisturizer to your nails.

Essential oils. The greatest effect is achieved after procedures with coniferous and citrus fruits. Many oils have an antibacterial effect.

Where to buy high-quality and professional nail files for damaged nails
Among the huge number of online stores offering manicure accessories, we invite you to our “WORLD OF NAILS”! You should choose our services because:
- “MIR FILOK” – own production of nail files.
- "WORLD OF FILES" is the main supplier!
- The showroom of the company "MIR FILOK" is located in Moscow.
- Delivery throughout our vast Motherland!
Why is “WORLD OF FILES” the best option for purchasing a product for you?
- Our store is built on our own production of saws. Thanks to this, you get: minimized cost of service, tested and confirmed product quality, fast production, attractive conditions for distributors.
- Our nail file is made only from materials that have repeatedly proven their quality (South Korea).
- Wide variety of product. Thus, a manicurist with any level of professionalism will be able to satisfy his interests.
- You can figure out which file is right for you. We carry out individual orders.
- Another advantage is the application of your brand logo on the working surface of the files.
Archive
Select month May 2019 April 2019 March 2019 February 2019 January 2019 December 2018 November 2018 October 2018 September 2018 August 2018 July 2018 June 2018 May 2018 April 2018 March 2018 February 2018 December b 2017 November 2017Long nails have always been an adornment for women. This is one of the main parts of grooming, femininity, attractiveness, such as hair, clothes, makeup and the like. How disappointing it becomes when your efforts are ruined at the most unpredictable moment.
The next time your nail breaks, don't panic. There are several ways to correct the situation. Although you may experience pain, do your best to restore your nails to their original appearance! Never let a broken nail ruin your holiday!
In this article we will tell you how to fix a broken nail at home using four different methods.
Important! Repairing a nail is only possible when it is no more than 1/3 broken. Do not count on getting any lasting results. If you successfully try to glue a nail, its approximate service life will be a couple of days or a little more (if handled with care).
- You will need: tea bag and glue
The easiest and most affordable way to solve the problem of a broken nail at home. And even if a nail breaks not at home, but at work, a tea bag and superglue are always at hand. A one-time use of glue will not have a strong negative impact, and the nail will be saved. But still, this method should be used only as a last resort, so if you often break your nails, it is better to buy several bottles of specialized nail glue at once - for home and for work. We tell you how to proceed:
- Cut a square piece from the tea bag of a size that will completely cover the crack.
- Sand the damaged area and degrease the nail.
- Apply glue to the crack and the area around it.
- Press the tea bag onto your nail.
- Apply another layer of glue until the piece of the bag is completely saturated.
- Let dry and then sand the edges to smooth out the transitions.
- You will need: nail glue and acrylic powder
This method of “fixing” a broken nail is good because it allows you to fix the crack on the free edge on both sides at once, and not just on top.
- Apply glue to the crack, including the underside of the free edge.
- Dip your finger into clear acrylic powder for a few seconds.
- Let the layer dry for a minute.
- Brush off excess powder and sand the “repair” area.
- You will need: acrylic powder and gel polish base
If you use gel polish, then you can repair a crack on your nail at the stage of applying the base without using any third-party products. In addition, this method allows you to further strengthen your nails and create a reliable frame that will keep the gel polish in good condition for much longer. Therefore, feel free to use this method, working with all nails at once, and not just the damaged one.  Repairing a broken nail
- Apply the first layer of base, carefully filling the crack area with it, and dry in a lamp.
- Apply a second coat of base and dust it with clear acrylic powder before drying in the lamp.
- Dry in a lamp and remove excess.
- Apply another layer of base and dry in a lamp.
- Next, you can follow the usual sequence of applying gel polish.
- You will need: gel polish base and tea bag
If the crack is deep, then additional reinforcement with a tea bag will not be superfluous. If you combine this method with the previous option, you will get the best protection for your damaged nail.
- Prepare the nail plate for applying gel polish.
- Apply the first layer of base, carefully filling the crack area with it.
- Attach a tea bag to the damaged area, smooth the edges and wait until it is completely saturated with the base.
- Dry the first layer of base with a bag in a lamp.
- Apply a second coat of base and dry in a lamp.
- Then proceed in the usual sequence.
All girls, and not only girls, know what a broken nail is. If we are talking about a long, beautiful manicure, then often, most people prefer to simply cut the remaining plates to a similar length. However, sometimes it happens that a nail breaks painfully, for example, at the root.
It is impossible to cope with this using the usual methods, such as cutting or gluing a broken piece, so those who are faced with such a situation have the question of what to do if the nail is broken to the meat.
Before moving on to more complex cases, it is worth mentioning what can be done if the plate breaks a third or a quarter from the free edge. The obvious solution, especially if you don't value length too much, is to trim it.
If the nail is broken strongly and at the root, then the remaining plates do not need to be cut off as strongly. Leave a couple of millimeters of free edge. It won't be noticeable. Anyone who is upset when they have to go back to short nails should remember that this season naturalness is at the peak of popularity. Therefore, short manicure is also in trend.
For faster recovery, it is advisable to use special means that help accelerate the growth of the plate.
The second option is suitable for those who broke a nail on the eve of an important evening. You can contact a specialist at the salon, who will make an artificial nail in place of the broken one. It can stay with you until a new one grows, after which it can be removed.
There is another method available at home. If your nail breaks along the smile line, as most often happens, then it can be repaired. To do this you will need:
- plate cleaner;
- textile;
- antiseptic;
- special glue (super-moment or something like that cannot be used);
- nail file and buff.
 All these simple tools are quite easy to purchase at a cosmetic store. To work, you must first remove the polish from the nail and use a buff to eliminate all the roughness and irregularities that have formed at the chip site. When the surface is prepared, it is necessary to degrease it with an antiseptic and prepare a piece of fabric that will cover the crack by two to four millimeters.
Before applying a patch to your nail, it is recommended to try it on to confirm the size. Next, the adhesive surface is removed and the required area on the nail is covered with glue. It is important not to get the product on your skin. If this happens, use nail polish remover to remove it. Next, the fabric is applied and pressed carefully.
When the patch is completely dry, you can sand it. A buff is used for this. It will eliminate all irregularities. Be careful. Your task is only to eliminate roughness, and not to remove all the tissue from the nail.
Of course, you will feel a small bump to the touch, but if you work well with the buff, it will not be visually noticeable. After this, you can polish the entire plate with a nail file. The coating you are accustomed to is applied on top.

Serious case
However, all these problems with nails and repairs will seem like baby talk if you break the nail to the meat. Fortunately, this does not happen so often and it takes a lot of effort to cause serious damage. By the way, most often such problems are faced by people whose nails are very peeling. What to do in this case?
It is necessary to thoroughly disinfect the wound. In all cases where blood appears, the use of antiseptics is required. A chlorhexidine solution would be ideal because it will not sting. The nail must be sealed, or better yet, bandaged. It will be easier for you when bandaging. After all, it must be removed for nightly treatment with an antiseptic.
For housework, it is recommended to wear special rubber covers. They cost rubles at the pharmacy. With their help you will protect the wound from moisture. However, they should not be used on an ongoing basis. There must be access to oxygen to the wound.
It is recommended not to touch the cuticle. Ideally, it needs to be moisturized even more actively than usual so that the nail grows back as quickly as possible. The situation is even more complicated when a person pulls out a nail. In this case, you must contact a specialist.
The surgeon will examine the damaged area for any remaining nail fragments and will also recommend good treatment. Most often, it is based on dressings with restorative ointment, as well as disinfection of the wound.
What to do if a nail breaks is a question that every woman seeks an answer to at least once in her life. A beautiful manicure is a real decoration for a woman’s hand, and it’s such a shame when nails that have been grown for a long time and carefully have to be cut off because of one broken nail.
Of course, if your nail is broken, you can go to a salon where a manicurist will cover your nail plate with biogel, which hardens quickly, based on proteins, which will return it to its natural appearance.
What to do if you can’t get into the salon? Are there other ways to avoid shortening your nails and maintain a beautiful manicure at home?
It turns out that today there are a huge number of special products that will help you revive your manicure at home. If you go to a specialized store, they may offer you:
- silk strips and special glue for them,
- nail repair kits, which usually include powder, a brush and glue,
- tips (also with special glue).
The kits always come with special instructions, thanks to which you will quickly figure out what to do if your nail is broken and how to fix it.
The listed methods are quite convenient, but only if you have the opportunity to quickly visit the desired store and purchase everything you need. If this is not possible, do not rush to get upset, because enterprising women have come up with a simple, quick and convenient solution to the problem - repairing a nail with a tea bag. And the most common one, which can be found in every home.

Features of nail repair with a tea bag
A tea bag can be used to resuscitate a nail only if the nail is broken by less than one third, and only the surface is damaged, without going deeper and without injuring the soft tissue. The material is very thin, but durable enough, so the manicure will not look rough or be visually different.
The big advantage is that you don’t need to spend any money on tools to repair your nails with a tea bag and gel polish. All you need is: nail scissors, a tea bag, glue (but never superglue) or gel polish (you can use it for a small crack, and if you don’t have special glue on hand).

Before sealing a nail at home, remove the old coating from the nail (repairing a painted nail plate will not have any effect) and degrease the surface. Further:
- empty the tea bag of its contents and cut a strip large enough to cover the crack,
- Apply glue to the damaged area in the nail plate and immediately apply the blank cut from the bag,
- Apply glue over the “patch” again,
- wait until the glue dries,
- file the edges of the patch and lightly polish the surface,
- cover with clear varnish and decorative coating.
Of course, a damaged nail plate is not able to “heal” at the site of the break, but by sealing it, you can forget about the trouble until the nail grows back.
How to fix a broken nail at home using tips
A tea bag will solve the problem of a small break in the nail plate, but what to do if the nail is half broken and the break goes deep? In this case, it will be necessary to hide the damaged area with a tip. It is an artificial plastic nail that is glued to the surface of the nail plate using special glue. Due to the fact that the tip has a reserve length, you can easily adjust it to the size of all other nails.
![]()
Now let's take a closer look at how to fix a broken nail at home using tips:
- first remove the old varnish,
- remove all irregularities and polish the nail plate along the edges,
- degrease the tip along the inside (this can be done by wiping it with nail polish remover),
- let it dry for a couple of minutes and cover the entire inner surface of the tip with special glue, apply a little of the same glue to the area of the break,
- attach the artificial nail to the surface of the natural plate so that their bases clearly coincide,
- wait until the glue has completely dried, then cut the tip so that it is the same length as the rest of the nails, leaving a small margin for growing, give the desired shape,
- process the joints.
What to do if your nail breaks on the side
You can carefully restore a nail that has broken on the side using silk strips, which you can buy along with glue in a specialized store. Before restoring the nail, remove the old polish and use a mildly abrasive file to treat the chipped area so as to smooth the surface as much as possible.
Now work on the fabric. You need to cut two strips: first one (according to the size of the chip), then the second (it should be designed to cover the entire nail plate).
![]()
Remove the paper backing and place the first piece on the damaged area, carefully straighten it, hold it with an orange stick and cover with glue. After it has dried, remove any roughness (lightly using a file), trim off the excess silk. Then apply a large blank in exactly the same way (on the entire nail plate), cover the silk with two layers of glue (with an interval of 20 seconds). Wait until completely dry.
![]()
Trim off excess silk, then apply a base, cover the nail with decorative varnish and top coat. Now about the problem: I broke my nail - what should I do? You can forget until it grows to the required length.
Attention! If your nails break or peel quite often, your body may not have enough calcium. Review your daily diet.
Long, well-groomed nails are always beautiful. Although not very convenient. With a short manicure, everyday life is easier, and care for it is not so scrupulous. But no matter how long her fingernails are, no woman can be sure that one of them won’t break at some point. It's offensive, unpleasant, sometimes very painful... And most importantly - how to fix a broken nail without compromising your manicure? Is it possible and in what way to solve the problem on my own?
Broken nail? Let's do a fashionable manicure!
Severe injuries, when the edge of the nail plate protruding beyond the bed is torn off at the root, right down to the meat, rarely occur. Much more often you have to deal with the problem of a nail cracked on the side, which is not so painful, but extremely unpleasant.
It doesn’t matter whether there is a breakdown on the working right or left hand - the damaged nail is very annoying, clings to clothes, tights, hair, scratches the skin... When the situation is not critical, there is no need to be puzzled by the question of what to do if, and make a tragedy out of it. This is just a reason to update your manicure!
A cracked nail, of course, will have to be cut off at the root. The nails on the remaining fingers also need to be shortened to equalize their length. Naturally, there is no need to trim to the meat - you can easily retreat 2-3 mm from the edge of the nail bed. Unless you look closely, the slight difference will not be noticeable.
You will have to say goodbye to a stylish manicure and your favorite long nails for some time, however, this is not a reason for frustration, since the fashion of recent years has welcomed naturalness and naturalness in everything. So a short manicure is a trend, the main thing is that the nails on the left and right hands are neat and perfectly groomed.
And in order to return to their usual length as quickly as possible, it is useful to regularly lubricate your nails with composite preparations with vitamins and vegetable oils that accelerate their growth.

“Healing” a crack along the smile line
The first thought that comes to mind, if the nail is broken just a little, is to glue the plate at the site of damage. Indeed, doing this at home is not so problematic. But under no circumstances should you use superglue, Moment, or any other household adhesive intended for repairing artificial materials.
The nail plate is alive. The maximum that can be achieved by trying to “heal” it in such a barbaric way is to damage it so badly that the entire nail, along with the underlying soft tissues, will have to be saved and treated. To seal, you need to use a special glue that will not cause harm to the nail.
In addition to glue, to implement your plan you will need:
- antiseptic;
- file with abrasive coating up to 240 units;
- buff sanding file;
- soft thin fabric;
- toothpick.
An antiseptic is necessary to disinfect the area of nail injury. Even if the damage is minor, the nail is not torn down to the flesh, it will not harm to disinfect it to avoid possible infection.
The most convenient fabric to carefully seal a cracked nail is cotton, silk, thin linen or fiberglass.
As an alternative, and the most affordable and budget-friendly one, you can repair the nail plate with a tea bag, cutting off a miniature piece of the desired size from it.

Stages of gluing a broken nail
Let's look at what to do if a nail is broken, in case you can seal it at home. The procedure is as follows:
- The polish is washed off from the nail plate.
- Treat thoroughly with a disinfectant.
- The area around the crack is cleaned with a soft file, directing movements from the base of the nail plate to the edge.
- Cut out a small patch from the selected material (thin fabric, tea bag). The size of the patch should be larger than the crack by a maximum of 3-4 mm.
- They try on the patch. If necessary, adjust the size.
- Exactly in the middle of the tear, drop a drop of glue and carefully distribute it along the entire length of the crack, slightly extending beyond the edges of the place where the nail broke.
- The patch is applied to the damaged area, leveled with a toothpick (orange stick), and pressed tightly. The next stage of repair can begin when the glue is completely dry - after 2-3 minutes.
- The surface and edges of the patch are sanded with buff. Ideally, the tissue should completely merge with the nail plate and not protrude above it as a lump.
- In order for the repair to be of high quality, it is advisable to repeat the manipulation of the patch twice. That is, glue another one, but a little larger in size, on top of an already fixed piece of fabric (tea bag).
- After the second layer has dried, the patch is sanded with buff in the same way.
- All that remains is to polish the nail and coat it with varnish.

If a low bump remains on the damaged area, it’s not a big deal. Firstly, if everything is done well, it will practically not be visible. Secondly, after covering the nail with varnish, the lift will not be visually noticeable at all.
Hiding the defect under the tip
If the first two options for restoring a broken nail at the root are for some reason unsuitable or difficult to implement, there is always the opportunity to “hide” the damaged nail plate under an artificial tip. This method is even preferable if you have to restore the nail on your right hand yourself, since it is difficult for right-handed people to work accurately with their left hand.
So, what to do if your nail breaks at the edge or cracks? First you need to buy a set of high-quality, defect-free tips. The best option is transparent thin square plates. They are much easier to work with.
In addition to the main restoration material for the procedure, you will need:
nail polish remover;
means for disinfecting the chipped area;
glue;
nail files (grinding, polishing);
nail scissors or clippers.

The technology for gluing tips is simple. The main thing is not to rush and do everything very carefully:
- The nail polish is washed off.
- Treated with disinfectant liquid.
- Degrease and clean the edges of the chip.
- Polish the surface, removing all irregularities.
- A tip of a suitable size is coated on the inside with a thin layer of glue. Apply glue to the nail with a brush.
- The tip is applied to the nail plate, aligning the limiter strictly along the edges of the bed. They press lightly.
- Wait for the glue to dry.
- Using scissors, tweezers or pliers, carefully trim the tips. The length of the restored nail should be the same as the rest of the nails on the right and left hand.
- Use a file to level and polish the edges of the tips. If necessary, the joints are coated with glue again.
If the repair is done efficiently, the tip will hold firmly until the nail grows to an acceptable length.
As you can see, there are no particular problems in quickly and efficiently restoring a broken nail without resorting to the services of specialists. The main thing is not to panic, think about which adjustment method would be better and do everything clearly according to the recommendations outlined. And then you can easily restore the plate in the place where the nail was broken.