DIY paper Christmas tree toy step by step. Making New Year's toys with your own hands: photo ideas
To feel the holiday even more, many decorate their cozy homes with various crafts that can be easily done with their own hands. One of these options is New Year's toys made of paper, templates for cutting which can be printed on a printer. Do-it-yourself toys, made from materials found in every home, can be hung on the Christmas tree, or you can create original compositions from these works on the window or walls. If you are not lazy, you can even make a beautiful garland for the New Year using such New Year's toys.
Paper toys Santa Claus and Snow Maiden
Not a single New Year is complete without the long-awaited Father Frost and Snow Maiden, who have long become one of the most important attributes of the magical holiday. If you make miniature paper toys with your own hands, they will look great on a window or windowsill, and you can decorate the room and walls with larger figures.
These are the patterned figures of Father Frost and Snow Maiden that can turn out, and if you attach a thread to them on top, they will turn into Christmas tree decorations made of paper and take pride of place on the holiday tree.

All you need to do is print out the stencils of the figures, and then use scissors or a cutter to cut out the toy along the marked lines.
Paper templates for Santa Claus and Snow Maiden can be like this:


Paper Christmas balls
Christmas tree toy made of paper
You can decorate your Christmas tree with a paper toy, which you not only need to cut out, but also assemble all the details into a single composition.

To work you will need:
Two sheets of paper of different colors;
Ruler;
Pencil;
Scissors;
Two beads;
Thread and needle.

Toy making process:
1. From each color of paper you need to cut strips, 10 centimeters in length and 1 centimeter in width.
2. Next, you need to draw two circles with a diameter of 2 centimeters and cut them out.
3. Thread a thread through the bead, then thread the thread through the eye of the needle, as shown in the photo.

4. First you need to string a circle onto a thread, and then start stringing stripes, alternating colors.

5. From the other end of the thread, you must also string the parts of the toy in the same order. You need to complete the work by stringing a paper circle and another bead.


New Year is just around the corner. You can feel the approach of a holiday in the air, which is slowly but surely moving towards our homes and hearts, because the New Year is a special holiday when you want to believe in a dream, hope for the best, and expect miracles.
The New Year is a special and bright holiday for children, because on New Year's Eve, children often spend quite a lot of time with their parents, enjoying pleasant family joys.
And if parents usually don’t have time, then on New Year’s Eve they definitely find it to take care of New Year’s chores with their children.
A very entertaining and joyful thing for children on New Year's Eve is the opportunity to decorate the New Year tree together.
If you can afford to buy New Year's toys and create a stunningly stylish New Year tree design - super!!! This Christmas tree will appeal to both children, adults and your guests.
If you can’t buy beautiful toys for the New Year and new New Year’s decorations for the Christmas tree, we advise you to get creative and create beautiful New Year’s toys and decorations for the New Year with your own hands.
DIY Christmas toys and DIY Christmas decorations for the Christmas tree and home are a very fun activity for the whole family.
Therefore, laziness to the side!!! Let's look at what New Year's toys and New Year's decorations for the New Year you can make with your own hands without much effort, not only to decorate your home, but also to get even closer to your family members.
We create New Year's toys and decorations with our own hands
Firstly, let us immediately note that creating New Year's toys with your own hands, making homemade decorations for the New Year is a very fun activity. It can be compared to a ritual, to an exciting process, in the minutes of which a miracle is born and a fairy tale comes into its own.
After all, when making homemade New Year's toys and unusual, homemade New Year's decorations for the Christmas tree and home, you breathe into them a piece of your love and warmth, so such New Year's decorations and beautiful toys for the Christmas tree turn out to be truly special.
New Year's toys made with your own hands will not only decorate your home, but will also add a special atmosphere to your home, enriching it with bright accents and cozy little things.
What kind of New Year's decorations can you come up with so that it is not expensive, interesting, and so that such New Year's decorations transform your home.
In order to make New Year's toys and decorations for the New Year's tree and home, stock up on all the necessary materials.
In order to make New Year's decor, namely homemade New Year's decorations and New Year's toys, you do not need special materials.
For this purpose, available materials such as threads, a needle, of course, paper, pieces of multi-colored fabric of different textures, beads, sparkles and many other little things that may be standing and waiting in the wings to become an original mega fashionable New Year's toy are suitable.
Of course, you can’t start making New Year’s decorations and toys without imagination, because it is the driving force of the whole process.
New Year's decorations made from paper look creative. They are not at all difficult to make, and today’s New Year’s decorations in the style of papier-mâché and quilling are so varied that even if you are not the greatest craftsman, you will no doubt get New Year’s paper snowflakes, New Year’s garlands, stars or balls for the New Year.
And if, in addition to multi-colored or white sheets of paper, you have ribbons and sparkles, you are simply risking being a master of quilling and papier-mâché if you try a little.
New Year's decorations and New Year's toys are not only New Year's quilling and papier-mâché.
For New Year's decor, an excellent option would be New Year's toys knitted with your own hands using knitting needles or a crochet hook. And there are no fewer ideas here than in paper decorations.
A retro-style Christmas tree will look amazing if your New Year's decorations, crocheted or knitted yourself, resemble birds and little animals.
The tree and house will be decorated with New Year's bells, flowers, snowflakes and stars, and balls made using the decoupage technique, which will make the design of the tree and house especially warm and cozy for family evenings.
The tree will look rich and tasty if it has New Year's garlands of sweets, fruits and other goodies.
Such New Year's decorations will shine with bright colors on the New Year's tree and will become a tasty surprise for the little residents of the house.
You can make New Year's decorations for the Christmas tree and home in the form of New Year's gifts. If you have old trinkets gathering dust in a box, treat them with varnish and dust them with glitter, and you will have a very original New Year's toy.
You can also create very successful New Year's toys and decorations from polystyrene foam. Make blanks in the form of balls or cubes.
Cover the blank with bright ribbons, sequins, you can take beads, different types of cereals are also suitable, with which you can create a whole masterpiece, and not a New Year's toy.
New Year's decorations in the form of large multi-colored socks, felt boots and mittens, which are best made from thick fabric, have already become a tradition.
Very interesting New Year's toys and decorations are made from burlap and felt. This material is easy to work with, and any decor on it will look very impressive.
Both children and adults will enjoy making New Year's toys made using the kanzashi technique.
To make such New Year's decorations, you need to stock up on ribbons, beautiful fabric, beads, pearls, laces and wire.
New Year's toys in the form of garlands create an unusually festive mood. DIY Christmas garlands can be much more interesting than store-bought ones.
Garlands made of paper can be combined with garlands of foam balls, garlands of old toys decorated in a modern way, etc.
Don’t forget that DIY New Year’s toys can serve not only as decorations, but also as symbolic New Year’s gifts, which will always remind you of pleasant New Year’s evenings spent with loved ones.
Children especially love making such New Year's toys, because they put a piece of their soul into such a homemade surprise for mom, dad, grandmother and other family members.
Now let's see what New Year's toys and beautiful New Year's decorations, besides those mentioned, can still be made from ordinary materials, giving them a completely unusual and very important essence.
What kind of New Year's toys do you make with your own hands?
DIY New Year's toys: photo ideas for inspiration


Today, as in ancient times, people are very actively preparing for the New Year. And this is true if you witness the New Year's rush in stores. But in addition to significant purchases, you should pay attention to many points. And to make preparing for the New Year a fun experience, you need to make a lot of New Year-themed crafts. In this article we will tell you what New Year toys you can make from paper. It is worth noting that colored paper is often used to make Christmas tree decorations. And all because such products look beautiful on the Christmas tree. In general, let's quickly learn how to turn a boring piece of paper into an original product.
What toys to make from paper to decorate the Christmas tree
Paper Christmas trees.
To make New Year's toys, many craftsmen use the popular origami technique. This technique is very good in its execution. But old traditions should not be forgotten. After all, our grandparents used to cut out toys and various crafts from paper using scissors. As a result, they produced beautiful and delicate products. To make similar Christmas trees, use our recommendations. 
- So, first of all, print or draw a Christmas tree template on a white sheet of paper, which you fold and staple.
- Now start cutting from the inner patterns, gradually moving towards the edges. Use a metal ruler to cut long, straight lines.
- Next, cut out the Christmas tree along the counter. Add volume to the bottom of the Christmas tree. For this case, twist the base strips using a ruler and scissors. Connect the upper and lower locks.
Beautiful three-dimensional paper craft.
A voluminous toy for the New Year with your own hands can look very bright and unusual. And if you have: colored paper, cardboard and glue, then you can make a very original product.

Progress:
- From a sheet of cardboard you should cut out 14 squares that have a side of 2.5 cm.
- From the second sheet we cut out 14 squares that are 3 cm long.
- Now fold opposite sides of the squares. Place one end on top of the other. And the place where the ends touch each other is glued together with glue.
- Then, from any cardboard, you need to cut out a circle. Mark the center of the circle as well.
Next, apply glue to the circle and glue the blank tubes to it. First glue the larger tubes, and then glue the small tubes on top of the larger tubes. At the same time, the work must be done carefully and accurately. The tubes should be tightly glued to each other. - When you paste the tubes around the circle, glue several rhinestones to the finished product.
- At the next stage, add a beautiful braid to the decoration.
Paper cones for decorating a spruce tree.
To create an original cone, prepare:
- cardboard or colored paper;
- pencil and ruler;
- pins or PVA glue;
- scissors and foam ball;
- braid.

Advice! If there is no foam ball at home, then it is replaced with a ball made of crumpled paper.
Progress:
- First, strips that are 2.5 cm thick are cut out of cardboard or paper.
- Each strip now needs to be cut crosswise into squares 2.5 cm wide.
- Fold each square, bending opposite ends to form an arrow.
- Now we take the ball and begin to glue or pin these blanks. It is recommended to do the work in layers. You should start from the bottom row and move forward, creating new rows.
- When they are attached to the workpiece, a braid must be attached to the top of the cone. Even at this stage, you can decorate your craft with additional elements.
Christmas tree decorations using quilling technique.
If you know how to work with the technique of quilling, then the next master class was created especially for you. So, to create a Christmas tree toy, prepare:
- old pages of newspapers or magazines;
- PVA glue, baking molds;
- a bead for decoration and a ribbon for hanging the toy.

Progress:
- First, you must cut strips from paper that will be 4-5 cm wide.
- Now fold each strip in half lengthwise. Lay out the strip and then bend it again. But this time in each direction. And then fold the entire strip in half.
- Then we take glue and begin to twist the strips into circles. As you work, add glue to prevent your circles from spreading.
- Now take another strip of paper and bend it. Prepare a baking tin; place a strip of paper into it. Place it neatly inside the mold.
- After that, it’s worth laying out the twisted circles inside the mold. And so that the circles are connected to each other, apply glue to them.
- After the glue has dried, you need to remove the paper toy from the mold. To make the workpiece even stronger, add more glue.
- Now you can thread the braid through the toy and decorate it with a bead.


Original paper decoration for walls.
The following decorations will perfectly decorate the room for the New Year. Indeed, such a Christmas tree will create a truly New Year's atmosphere in the house. To create the decoration, prepare:
- 10 paper plates,
- 20 sheets of green paper,
- stapler and double-sided tape,
- cardboard decoration scissors,
- glue and white tape.

Progress:
- You need to cut out large squares from green paper. Moreover, the square should fit freely inside the plate.
- Now you need to fold a square of paper like an accordion. Then fold it in half.
- Next, use tape to secure the ends of the folded accordion to form a semicircle.
- Now you need to repeat the same steps with other paper.
- Then we connect the two semicircles together with a stapler or double-sided tape. As a result, you form a circle.
- We attach the circle that was made using tape to a paper plate. Tape is also attached to the back of the plate. You can use the terminals. This is done in order to secure the plates to the wall.
- In order to form a Christmas tree, you need to make 10 such blanks.
- You should decorate the finished unusual Christmas tree with original Christmas tree decorations, which are very easy to make with your own hands.

Finally
As you can see, paper is an excellent material from which anyone can make many interesting Christmas tree decorations. In this article we have given only some ideas for crafts. Therefore, you can supplement our ideas with your wishes or your imagination.
Good afternoon I hasten to please you with New Year's toy ideas, and for those who have not yet made gifts for the New Year, I recommend not to delay this for too long and choose them in this
Tell me, what do you prefer to give for New Year? What about receiving? Probably everyone really likes receiving toys for the Christmas tree, and just all kinds of them. I agree, I remember when I published a post about crafts for the upcoming holidays, so a lot of people sent me wishes and congratulations, so I also want to congratulate everyone on the upcoming holidays!
After writing my last post about New Year’s crafts, I received letters in the mail asking me to publish more options for what can be made from plasticine, and I’m sharing my experiences with you.
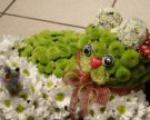
She's so beautiful!

Do you like to sculpt Christmas trees and snowmen? Then use these step-by-step instructions with photos:


Where would we be without Santa Claus, children simply love to see him at the holiday, and even more so to make crafts.

These are the kinds of compositions that can come out.

If you want, you can even sculpt Peppa Pig and her brother George from the cartoon.

You can make a dog lying near the Christmas tree, let it bring good luck and warmth to your home and become a talisman.
Such an affectionate and sad puppy girl.

Or playful Tuzik, what do you choose?

I remember once upon a time I had to work in a kindergarten, you understand that kindergartens are almost not funded, so at that time we made and decorated our group from whatever we could, from all sorts of things in general. It was ordinary polystyrene foam or they took cheap ceiling tiles and this is what happened:

Agree, there seems to be nothing difficult, but it also looks original, with a twist.

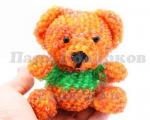
Toys made from salt dough are a little more complicated and time consuming.


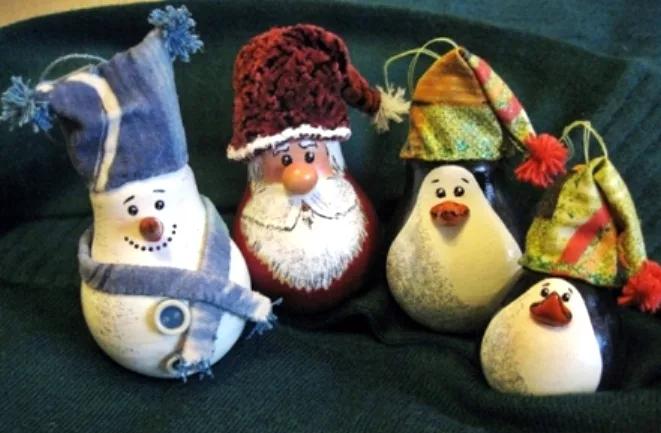
Beautiful felt toys for the New Year tree
Now, as for felt, well, you can create a lot of ideas and find them on the Internet.


Their diagrams and patterns are quite simple, you can easily draw them yourself.
Funny little deer.

The Christmas tree is a forest beauty.

If you are interested in this Christmas tree, or this bookmark for books in the shape of a dog, then write to me below, I will send you templates and a diagram.


Felt Snow Maiden.

How do you like such wonderful creatures, if you decorate a Christmas tree with them, there are enlarged diagrams, they will appear soon in another post, or write to me and I will send them.

By the way, I was so fascinated by the topic of felt that I will soon write a separate article on this topic, so fans, wait, add my blog to bookmarks and rejoice with me))). By the way, if you need crocheted toys, then don’t hesitate to go here, there’s a whole bunch of them
Master class on paper crafts in the form of balls and lanterns
Who doesn't love balloons on the Christmas tree? Probably everyone just loves them, let's make a simple version.
You will need colored or multi-colored paper, scissors and glue. You will need to cut out 20 circles of the same size from it. And then follow this pattern, roll it up as shown in these pictures.


Then, as shown, glue with good glue, it is better to use ericruser or PVA.

There is another option for such a ball for a Christmas tree made of paper.

I’m also giving you the most popular type of balloon decoration, in this video everything is shown in great detail and clearly, you just have to repeat the necessary steps after the leader:
And here’s another super idea, you’ve definitely never seen anything like this before:
For schools and kindergartens I can offer such interesting lanterns that everyone probably knows and remembers.


And another masterpiece in the form of a garland, it is not something unimaginably beautiful. Watch this video from YouTube channel:
Paper toys for the New Year
The first place can rightfully be given to snowflakes of different types and in the origami style and volumetric options, who needs all sorts of ideas and templates, see snowflake patterns here


It is also easy to fold various figures from paper strips.


We make Christmas decorations for the Christmas tree with our own hands from plastic bottles and light bulbs
A fairly common craft, a souvenir, and someone will even give such a treasure as a gift, I recommend doing it yourself at home. Just be careful if you make a craft from a light bulb, it’s still not for children’s hands.

Plastic bottles will be safer and more durable.


Souvenirs from scrap materials
You can make a craft from wire and knitting threads.

As they say, an idea does not come alone, it pulls another.

From satin ribbons and beads, balls.

In just a couple of minutes you can fashion a gorgeous spruce tree out of cardboard. Cut out a Christmas tree shape from cardboard, use three templates, then tie it with thread.

Then glue the napkin onto the glue, after drying, paint it with gouache paint and decorate it with beads.

Cool magic rope star.

If you like to collect pine cones in the forest, then make this a gift.

It can also be made from foamiran.

Believe it or not, you can even make a souvenir from oranges.


Using cotton pads you can make an angel:

Video on how to make toys in the shibbe chic style
Well, I think you haven’t heard of this, so you can watch this miracle more clearly in this video and repeat it. It turns out indescribably beautiful, and most importantly it’s not particularly difficult, it’s reminiscent of decoupage.
That's all for me, if you want more ideas, then look in. Have a nice weekend everyone and see you soon. Bye bye!
Sincerely, Ekaterina Mantsurova
The New Year and Christmas celebrations are based on the idea of bringing together family members, relatives and friends. A general creative activity is a good opportunity to interest adults and children, and making New Year's toys from paper with your own hands will be a relevant occasion. On the eve of the holidays, enjoy spending time with your family and decorating your home beautifully before the clock strikes 12 times.
DIY paper Christmas decorations can be hung on the Christmas tree, walls, or ceiling. The bright colors of toys and garlands will fill your home with a festive atmosphere and give you a good mood in the last days of 2019.
New Year's decorations made of white paper (master classes)
A simple and affordable material for creativity is white paper. The color fully matches the New Year's theme.
Decorations are associated with fluffy snow, frosty patterns on windows, and snow-white frost. Snowflakes are cut out of white paper, funny figurines and angel figures are made; decorations can be used to decorate a room, windows, or decorate a Christmas tree. The master class on making such products is quite simple; adults and children can successfully handle the work.
Snowflakes A classic New Year's decoration is an ordinary bulky snowflake.
White products look beautiful on windows, especially if you make snowflakes of different sizes with unequal patterns. The main thing is to fold paper snowflakes correctly.
- Manufacturing process:
- Take a sheet of A4 paper and fold it in half diagonally.
- Cut off the excess part, leaving a triangle.
- Connect the corners, fold the paper, repeat.
- Fold the straight corner of the workpiece towards the edge.
- Cut out a white snowflake and unfold it.


It is more convenient to glue simple white snowflakes, made like napkins, onto windows. They are easy to fold, apply a sample pattern, and cut out. You can take ideas for patterns from the photo below or come up with your own.
 6 options of snowflakes with different patterns
 Vytynanka
Volumetric figurines with many holes can be given as a cute New Year's present, hung on a Christmas tree, or you can decorate a window with them. To create a craft, you need white paper, a template, a stationery knife, glue, and a cutting board (a cutting board will do).
How to make a vytynanka:
- You need to print a figurine template from the Internet.
- For a three-dimensional figure, print 2 copies.
- The paper is placed on a board and all the patterns are cut out with a knife.
- A strip of paper is left at the bottom of the drawing for gluing.
- The cut out designs are glued together at the top.
- The lower strips are formed into a clasp ring and glued together.

The figurine is voluminous and stable; this paper decor looks beautiful in the room. You can use the Christmas tree template in the photo below as a basis.
 Download this picture and print it on your printer
 Angels
Paper angels perfectly match the New Year and Christmas theme. Traditionally, they are made from white paper, flat or three-dimensional.
Several options on how to make angels:
- Print the template using a printer, cut out the figure, decorate with sparkles, rhinestones, and hang on shiny threads.

- Cut out a three-dimensional angel, elements from paper: two truncated cones, a head, a halo, sleeves, wings. The cones are rolled up, glued together, and the remaining elements of the figure are attached to the dress.

- Craft according to your own drawing. The sheet is folded in half, a figure of an angel with wings and a halo is drawn on one half, the craft is cut out, unfolded - the figure is ready.

If you thread threads through an angel's halo and prepare several figures, you will get an interesting decoration for a chandelier.

House
For New Year's decorations, you can prepare fairy houses and decorate some parts of the craft with sparkles. The houses themselves can be made from old postcards, cardboard, and unnecessary boxes. There are many options! A template for making New Year's decorations from paper can be downloaded and printed.
 Example template
 Next, the diagram is transferred to paper. Cut out the house according to the template, bend the paper along the fold line (you get a box). The roof, smoker, and windows are cut out separately. All elements of the craft are glued to the finished box and decorated if desired.

From these New Year's paper decorations, you can create a whole composition with your own hands, decorate the windowsill with it, add figurines of fairy-tale characters, Santa Claus, and the Snow Maiden.

New Year's decorations made of colored paper (master classes)
You can make beautiful and unusual New Year's decorations from colored paper with your own hands in advance of the holiday. Such bright crafts are used to decorate a room and hang on the New Year tree. Even a small child can make a simple chain garland.
You need to prepare scissors, glue, several sets of colored paper for crafts, and optionally choose beautiful beads, beads, rhinestones, sparkles, and colored ribbons. Simple New Year's decorations made with your own hands from paper turn out to be interesting and relevant.
Simple garlands
The simplest New Year's garland is a chain. For it, paper of different colors is chosen in order to alternate links with each other. Blanks of any length and thickness are cut, then all the strips are glued together - first, make the first link, thread a paper strip into it, glue it again and repeat the steps until you get a garland of the required length.

Another interesting decoration option is a chain of colored hearts, and connecting the elements is much easier with a stapler. By analogy with the previous master class, the required number of narrow strips are cut from colored paper. Take the first two strips, fasten them with a stapler, turn them inside out (as if opening them), connect the two free edges, add two new strips to them and then fix them with a staple. The result is an unusual decoration that looks elegant in the decor of the room.

A more complex decoration is a voluminous garland made up of multi-colored paper balls. Additionally, to make a craft you need a sewing machine, but if you don’t have one, you can do the work manually.
How to make a garland from paper balls:
- Cut out 6 circles of the same size in different colors from colored paper.
- Prepare several sets of circles along the length of the garland.
- Sew a stack of blanks on a machine, then the next one and until the end.
- Carefully wrap the fragments at the seam, forming bright balls.

For crafts, you can use crumpled or non-plain paper - the craft will be more fun. Garlands are hung from the diagonal corners of the room, decorated with them on the Christmas tree, walls, and ceiling.

Garland of flags
A popular New Year's decoration for the home is a garland of colorful multi-colored paper flags. On colored paper, draw the shape of a flag with a fold line in the middle and cut it out. You should get a double-sided element. Flags of a different color are prepared in the same way. Each flag is opened, glue is applied to the fold line and a strong thread is glued until the required number of paper parts for the garland is collected.

Alternatively, the flags can be made in a triangular shape by gluing the free corners of the products. Sometimes scraps of colored fabric are used for such decoration. After the New Year, you can hang garlands with flags to decorate a children's party.

Christmas trees
What's New Year without a Christmas tree? You can decorate this festive beauty with your own crafts made from colored paper. To make a three-dimensional hanging decoration, you need to take paper, scissors, cardboard, glue and tape.
We make the Christmas tree in this order:
1. Cut multi-colored narrow identical strips and make a cone out of paper.

2. Glue the edges of each strip together like a loop.

3. Glue the blanks to the cone starting from the bottom using tape or glue.

4. Decorate the top of the Christmas tree and the loops with any decor; you can also hang decorations on the Christmas tree.

As an option, an interesting garland is assembled from paper Christmas trees - the figures are sewn to a bright ribbon or secured above and below (chaotically) on a colored cord.
Christmas balls
One of the most popular Christmas tree decorations is balls. Colorful, bright, shiny toys make the Christmas tree more beautiful and fun. New Year's balls can be made from colored paper.
From paper strips
To make a simple ball, cut out thin paper strips (at least 18 pieces, more stripes, a more beautiful toy) and two small circles. Select a large bead, insert a thread into it, and thread both ends of the thread into the eye of the needle.
After this, a paper circle and all the prepared strips are threaded onto a needle along one edge. The next step is to string the second edge of each strip, the second circle and another bead in order, and draw out a loop. If you loosen the thread, you get a beautiful ball-shaped toy that can be further decorated.

From circles
Woven paper balls
You can use ready-made patterns for New Year’s decorations to make balls and make them out of paper with your own hands or weave complex toys. Curly stripes and a small circle are cut out using the templates. Lay out the parts in the shape of a flower and glue a circle in the center. Next, the strips need to be woven like a braid from many strands.
To prevent the structure from falling apart and to make it convenient to work, the strips are fixed with ordinary clothespins. By the end of the weaving, a ball will be formed, the edges of the figured strips are again fastened with a circle and a loop of shiny thread is threaded.

 Option 1
  Option 2
  Option 3
 In the video: New Year's ball made of colored paper.
Magic lamps
Lanterns made of colored paper look unusual and original on the Christmas tree. Decorations are easy to make, even children can handle the job. The lamps symbolize warmth, wealth, prosperity and good luck. There are several simple master classes on how to make Christmas decorations with your own hands from paper in the form of lanterns for a Christmas tree.
The most popular option: take two sheets of different colors, glue a tube from one - the middle of the lantern, and fold the second sheet in half, step back 1 cm from the edge, draw a line. Then cuts are made from the fold to the drawn line. The cut sheet needs to be opened, wrapped around the cylinder tube, glued the edges and made a loop-handle at the top of the flashlight.


Lantern made of stripes
To make a beautiful toy, you need to cut many thin strips of colored paper - all parts of the decoration should be the same size, approximately 15 cm long. The strips are folded edge to edge, each piece is pierced in this place with a needle, and a lace or thread is pulled through them.
The free edge of the lace is pulled through the hole on the other edge of the strip and gently pulled to form an arc - an elongated loop. The upper part of the lantern (where the edges of the strips) are glued with a thin strip of paper in a circle, and the rounded loops will hang freely, forming a pear-shaped lantern from thin strips.

Chinese lantern
The Chinese are the inventors of paper, they learned how to make interesting decorative items from it. A Chinese New Year lantern will decorate the holiday tree. To work, use a diagram; you can draw the segments of the flashlight yourself. The size of one part is on average 10 cm; according to the diagram, there are circles at the top and bottom of each segment for attaching a flashlight.
How to make a decoration:
- Transfer the drawing onto colored paper.
- The flashlight is made of six segments.
- Cut out the workpiece and glue the edges.
- Form the top and bottom of the flashlight.
- Sew the lower circles with thread, then the upper ones.
- Make fastenings and a loop. A cute Chinese lantern is ready.

 Use this template to cut out the lantern segments
 sky lattern
The decoration will be made on the principle of a flying lantern, but there is no need to launch it into the sky. The decoration is made from bright colored paper. You need to prepare a large sheet - 24 by 60 cm. It is folded in half, and then in the shape of an accordion. Next, the sheet is unfolded and triangular creases are made in the center (along the fold line). The same creases are made at the top and bottom. A figurative triangular cylinder is glued from the blank, and a bright loop is glued.

Ded Moroz and Snegurochka
The New Year is unthinkable without the main characters of the holiday - Father Frost and Snow Maiden. They are quite simple to make, using colored paper of blue (dark blue), red, white, yellow to cut out the elements of the New Year's figures yourself.
A circle is cut out of blue paper for the Snow Maiden, and from red paper for Santa Claus. The circles are cut to the middle, rolled into a cone and glued together to form the bases of the figures. Separately, a flat kokoshnik is cut out for the Snow Maiden, small slits are made on the cone and the resulting element is inserted into them. First, the figure’s face, drawn on a white oval, is glued onto the kokoshnik, and a yellow braid is glued to the back. For greater realism, you can make small cone-shaped hands and decorate the bottom of the Snow Maiden’s coat with white fringe.

Santa Claus' face is drawn and glued to the base cone. Then a small red cone is cut out. A mandatory element of decoration is a thick beard; if desired, you can make a bag with gifts.

To make the figures of the main New Year's characters more durable and voluminous, you can use colored cardboard instead of paper. To make a fringe or beard, white paper is cut into thin strips, each strip is wound around a pen or pencil - the result will be three-dimensional. You can decorate the finished figures at your discretion with snowflakes, stars, and pieces of cotton wool.
New Year's wreath
New Year's decorations use a wreath to symbolize prosperity, longevity, hope and happiness. The wreath serves as a kind of amulet for the family hearth from various troubles. Traditionally, the decoration is hung above the front door. To make a very simple construction paper wreath, you need more green sheets. The child must be involved in the creative process.
Master class on making New Year's door decor:
- Choose a large plate, trace its outline on a sheet of colored cardboard (the wreath will be stronger) - this is the base.
- In the center of the large circle, a smaller circle is cut out under the saucer, resulting in a wreath ring resembling a donut.
- On green paper, trace the child’s palms with a pencil and cut out many fragments - the more, the prettier the decoration.
- The “palms” are glued onto the ring, partially overlapping each other. It’s okay if it turns out messy – it’s more interesting that way.
- Bright decorations are glued to the top of the “palms” - bells, bows, ribbons.

Volumetric paper decorations (master classes)
New Year's decor always looks more interesting if the decorations are voluminous. Making them is more difficult than flat toys, snowflakes or garlands, but everyone can do it.
For creativity, they use paper of different colors, additional decor, bright ribbons, laces, shiny threads.
Volumetric crafts - stars, snowflakes, balls, garlands - are hung on the Christmas tree or on the ceiling. With a little imagination and patience, you can create original toys, elegant and voluminous New Year's decorations with your own hands from paper.
Volumetric pointed balls
This interesting decoration made from white paper is quite simple to make. To make a craft you need sheets, glue, a pencil, scissors, a small saucer, a coin, beads (rhinestones, sparkles), fishing line.
- How to make balls:
- Place the saucer on the paper, circle 4 blanks.
- Draw the outline of a coin in the center of each circle.
- Cut out paper circles (don't touch the middle yet).
- On each circle, draw eight lines with a pencil, not reaching the central circle.
- Insert a pencil into each sector, fold the edges, and glue them together.
- For each ball you need 4 blanks, they are allowed to dry.

The elements are connected with the inner sides, a hole is made with a needle, and a fishing line is pulled through. The original New Year's decoration looks beautiful on the Christmas tree and in the garland.
3D star A popular Christmas tree decoration is the pointed star. It crowns the top of the tree and gives the decoration a complete look.
To make the product look more realistic, you can make a three-dimensional 3D star from colored paper.
- Completing of the work:
- Cut out two identical squares - arbitrary size and color.
- The blanks are folded in half twice, and diagonally two more times.
- Unfold a fragment of the toy – the fold lines are clearly visible.
- Each corner is folded inwards towards the fold (like a children's airplane).
- The edges of the corners are glued together according to the principle of paper bags for volume.
- The second fragment of the toy is performed similarly.

Connect the blanks with the inner part to each other crosswise and glue them together.
The result is a three-dimensional star with pointed rays. A ribbon or cord is attached to it and the toy is hung on the Christmas tree. To simplify the work, the loop can be placed between the star fragments before gluing.
In the video: a three-dimensional star made of paper.
White snowflakes are used to decorate windows and decorate the area near the fireplace. If you stretch a silver thread through the products, you can hang garlands of snowflakes in the room. New Year's decorations made of white paper look interesting when the snowflakes are of different sizes with unequal patterns. To make snowflakes with a voluminous middle, you will need white paper, a pencil, and scissors.
Operating procedure:
- An A4 sheet is folded in half and cut into 2 parts.
- Each piece is folded diagonally and the excess is cut off.
- The resulting squares are again folded in half and diagonally.
- The core of a snowflake is made from the blanks by making two cuts.
- The cuts are made from edge to corner, without cutting the workpiece to the end.
- A shaped cutout is made in the upper part to create petals.
- The product is unfolded, the inner petals are glued to the center.

The second part of the snowflake is performed in the same way. After this, the parts are glued crosswise together. The result will be a double-sided volumetric snowfield, with a flower in the center on one and the other side.

New Year's decorations made of cardboard (master classes)
Cardboard is often used to make toys and Christmas decorations. Thick paper holds its shape well and allows you to make beautiful three-dimensional figures; cardboard makes ideal four-sided Christmas trees and cones for making Father Frost and the Snow Maiden.
Volumetric balls
Decorating a New Year tree is not complete without decorations in the form of balls. Large and small, plain and multi-colored toys are hung on the tree in a chaotic manner.
Volumetric balls made of colored cardboard or colored paper and white cardboard look interesting. They are easy and quick to make:
- Circles of the same size are cut out of thick colored paper - 20 pieces, radius 3.5 cm.
- Separately, make a template of an equilateral triangle so that it is clearly inscribed in the circle.
- A triangle is drawn on the inside of the blanks; its sides will be where the circles are folded.
- Under the ruler, carefully make folds on each circle, turning the paper to the front side.
- Take five fragments, lubricate the resulting valves of the circles with glue, connect the blanks - the top of the ball.
- Use an awl to make a hole, insert a lace into it, and in the same way make the bottom of 5 other blanks, but without the lace.
- From the ten remaining blanks, glue the strip valve to valve, close the ring, connect the top, bottom and middle of the ball.

To make three-dimensional balls, you can use old postcards or colored cardboard. The toys are decorated with small decorations, sprinkled with sparkles and chopped rain.

Cardboard trees
An option for a New Year's decoration or toy is a Christmas tree made of colored cardboard. A very ordinary Christmas tree is drawn on a thick sheet of paper, trying to maintain the symmetry of the spruce paws. Using this blank, they make a second similar piece, bend the Christmas tree vertically, glue the blanks together and decorate them with small circles of colored paper, stars, beads, rhinestones, and beads.

In order not to glue the figures together, you can make cuts (cut one blank from the top to the middle along the fold line, and the second from the bottom to the center) and insert the parts into each other. Thanks to the density of the cardboard, the figures will not fall apart.

How to decorate a Christmas tree with paper decorations
To make the New Year's tree, decorated with your own crafts, look beautiful, you need to hang paper toys and decorations correctly. There are several options for placing jewelry - in a pyramid, in a spiral, vertically or horizontally. Each method is interesting; you need to pay attention to the shape, size and color of homemade paper toys.
Options for decorating a New Year's beauty:
- The top of the spruce is decorated with a voluminous star of a golden hue - the color of the Earth Dog.

- In the coming Year of the Dog, the spruce tree is decorated with medium-sized figures of restrained colors. It is especially important to use decorations made from natural materials - paper, wood, burlap, pine cones and twigs.

- You can place a dog figurine in the central part of the tree to attract good luck and prosperity.

- Garlands of golden, brown, yellow, green, red, purple, and beige colors are used.

- Paper beads, chains, flags connected into a garland are hung in one direction - horizontally, spirally, vertically, top to bottom.

- Medium-sized balls are attached to the tree in a chaotic manner; the toys can be the same or different.

- They complement the decor with figures of Father Frost, the Snow Maiden, angels, and pinpoint several voluminous snowflakes.

Before decorating the tree with paper toys and crafts, a garland with light bulbs is hung on the tree. You can use a little sparkling rain or complement the design with fluffy “snowball”.
The spruce tree is decorated to your liking, but in the coming year you should choose a natural, restrained decor, in a brown color scheme (all shades), with unobtrusive bright accents - a few red bows, burgundy bells, paper cones, decorated with beads. Then 2019 will definitely bring good luck and prosperity to your home.
New Year's origami crafts (2 videos)