How to make bracelets from rubber bands. Simple bracelet made of rubber bands
This simple rubber band bracelet has a simple but very colorful design. There are many options for designing a bracelet. You can use two colors - the main one, which connects the rings, and also the color of the rings themselves.
Video on how to weave a simple bracelet from rubber bands “Colored Rings”
Before weaving a simple one, you need to decide on the color of the rubber bands. In our example, we use three colors - the main one, and two colors for the rings - we alternate them. But you can alternate a larger number of colors, take variegated or two-color elastic bands for these elements. This simple bracelet is woven from rubber bands on a machine.
To weave a simple bracelet from rubber bands you need to take:
Elastic bands of three colors - our main color is yellow, and we will also use red and blue elastic bands.
Machine - you will need two rows of machine, the posts should be positioned opposite each other, with the open sides of the posts facing you. For weaving, you can also use a mini slingshot machine.
Hook.
S-shaped clasp.
Weaving a simple bracelet from rubber bands “Colored rings”
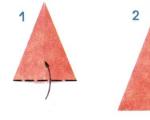
1. So, let’s begin our master class on weaving one of the simplest bracelets from rubber bands, “Colored Rings.” Take one yellow elastic band and put it on two posts, twisting it in a figure eight. Take another elastic band and put it on two posts in the usual way.

2. Take the hook, wind it from the outside of the right column, grab the bottom elastic band and throw it into the middle. The same needs to be done on the right column (for more details, see the video “Simple bracelet made of rubber bands Colored rings”).

3. Take a blue elastic band and throw it over the right post in two turns.

4. Insert the hook inside the right column, grab the lowest (yellow) elastic band, and stretch it out, put the loop caught on the hook onto the left column.


5. Throw another yellow elastic band over two posts.

6. Grab a double blue elastic band from the outside with a hook and drop it from the post to the middle.


7. Grab the last (third) elastic band from the outside of the left column with a hook and throw it from the column to the middle (watch the video “How to weave a simple bracelet from rubber bands Colored rings”).

8. Place a double elastic band, now red, on the right post.

9. Insert the hook inside the right column, grab the lowest (yellow) elastic band, and stretch it, put the loop caught on the hook onto the left column.

10. Grab one bottom elastic band from the outside of the left column with your hook and throw it to the middle.

11. We continue our master class on how to weave a simple “Colored Rings” rubber band bracelet. Place another yellow elastic band on the posts. Grab the double red one from the outside of the right column with your hook and drop it to the middle.

12. Throw the bottom elastic band from the left column to the middle (see video about weaving a simple bracelet from elastic bands on the machine).

13. Throw a blue elastic band over the right post in two turns and repeat the same steps as with the red elastic band. And then we weave in the same sequence, alternating the colors of the double elastic bands thrown onto the right column. We continue until we get the bracelet of the desired length.
14. We finish at the stage when there is one yellow rubber band left on the right column, and two on the left. Grab the bottom elastic band from the outside of the left column with your hook and throw it to the middle.

15. Throw the remaining elastic bands over one post.

16. Fasten one end of the clasp to the elastic bands (watch the video “Bracelet made of rubber bands”, the simplest master class “Colored rings”).

17. Remove the bracelet from the machine.

18. At the beginning of the bracelet, grab the double elastic band with which weaving began.

19. Secure these elastic bands to the clasp. To make it more convenient to fasten the elastic bands to the fastener, throw them over the machine post and pull them well.

The bracelet is ready! Now you know how to weave a bracelet from rubber bands in a simple way!
In contact with
Classmates
If this is the first time you have picked up a set for weaving from rubber bands, then you need to start this hobby with the simplest patterns. This will give you the opportunity to try out the loom, get a quick result and try on the most beautiful and most beautiful one.
This weaving is the simplest and most fundamental; it teaches the basic technique of working with silicone rubber bands. Once you learn the simple steps, you can do all other weavings without any problems.
To weave a simple bracelet from rubber bands, prepare the necessary materials:

- loom;
- hook for weaving;
- 26 rubber bands of different colors;
- 1 S-clip for connection.
How to weave a simple bracelet from rubber bands?
Take the loom and position it with the closed side of the posts facing you. The columns should be staggered. This means that the middle row should be moved one column closer to you than the other two. Otherwise, you will have to do it yourself. To do this, remove the central row from the fastenings, move it and fasten it again.
Prepare colored rubber bands. If the bracelet is made of different colors, then for convenience, arrange the rubber bands in the order they should be located in the bracelet. This is very convenient because you will not confuse the colors.
In weaving a simple bracelet, only two rows of columns are used. It can be left and center or right and center - at your discretion, which side will be more convenient for you.
Place the first rubber band on the first columns of the central and right rows.

Place the second one diagonally from the first right column to the second central column.

The third, again diagonally, from the second central to the second right.

Continue to thread different colored elastics on a diagonal until the end of the loom.

Place an elastic band folded into a figure eight on the last column. Like this:

Turn the machine with the open parts of the posts facing you. Take the hook. Insert the hook into the middle of the post, hook the bottom elastic band.

Pull out the rubber band and place its end on the column from which it was stretched.

Now insert the hook into the next column diagonally and repeat. Do the same with each column, moving diagonally.

When finished, hook the S-shaped clip onto the rubber band on the outer post and carefully remove the rubber bands from the machine by pulling the clip. From each column, pry the elastic bands with your fingers until you reach the last one.

Using the second hook on the clip, hook the last elastic band from the second end of the bracelet.

Straighten the elastic bands on the bracelet so that they intertwine beautifully without twisting. You can also put it on something of the appropriate size so that the bracelet will straighten out and look good.

That's all! A simple rubber band bracelet is ready! Wear it with pleasure!
Making a wonderful and stylish accessory such as a bracelet from rubber bands is very simple! Material for weaving can be purchased at any office supply store, its cost is quite low. Most often, there are entire sets on sale that contain the main material for weaving, that is, the elastic bands themselves and special tools. To create such trendy and fashionable bracelets, there are many patterns and methods. Several of them are described in detail and step by step in this master class! As you probably already guessed, today we will tell you how to weave bracelets from rubber bands.
You will only need a few materials and tools, such as:
- small elastic bands for weaving;
- a small plastic hook;
- ordinary forks;
— special plastic clasps for fixing the bracelet.
The first weaving option is called “Fishtail”.
You can complete the entire weaving process using either your fingers or a fork. In this case, the creation of the bracelet will be done using a fork! You can choose the shades of the rubber bands used to suit your taste, since the color range of this material is very wide. The first rubber band should be twisted once and secured on the outer teeth of the fork.

Then, you need to add two more elastic bands to it, fixing them in the same way on the first and last clove, but you don’t need to twist them!

Then, using a special crochet hook, remove the bottom elastic band. It is better if the tool is small in size; it will be very convenient to work with!


The last one is also removed, then a new one is added, etc.


Soon the length of the product will increase, so it needs to be pulled back periodically so that it does not interfere with the process.


Thanks to this nuance, the elastic bands in the product will take the required shape!

After this bracelet has acquired the required length, it needs to be secured using special, tiny clasps. To do this, you need to remove the lowest element.


And insert a hook into the remaining ears on the fork.


Then, carefully pull the elastic bands and secure the small fastener on them.


On the other hand, when the product is almost finished, you need to repeat the previous step!

Thanks to this device, the bracelet will not unravel and will retain its appearance for a long time. As a result, after some time, we got a stylish, bright and wonderful bracelet! Because of this weaving method, it has a special density and strength!


The second weaving option is more original, but also quite simple! To create it, you will need to use two forks!

You need to put them together, and in this way you can start weaving.

To begin with, you need to secure the first elastic band by twisting it only once.

Afterwards, an elastic band is added to the two outer teeth of each fork, but of a different shade.

On the other hand, it is necessary to secure the rubber band in a similar way.

After, carefully hooking the last white elastic band, you should simply remove it from the forks. As a result, it should end up in the center, between the forks.


Afterwards, you need to add one more detail to the product.

It needs to be lowered as low as possible so that in the future it does not interfere with the weaving process, since it will no longer participate in it!


And then, completely remove the previous ones (pink ones).


Between each shade, you need to add one white elastic band, which does not need to be braided, but simply lowered down so that it does not interfere.

Gradually, the length of the bracelet will increase significantly, and more and more white elastic bands will appear.


Once the piece is the length you want, you need to finish it off by adding a tiny plastic fastener to the end of the piece. To do this, the last rubber band must be moved to one side of the fork.


Do the same action on the other side.

Then, transfer the loops to the fork where the entire bracelet is assembled.


Thread a white elastic band through them, and then fix the hook in it.

Then, you need to very carefully remove the entire product from the fork, without removing the tool from the final elastic band.


This is how we got a very original and stylish bracelet! On the handle it looks quite unusual and elegant!


And the last, third option for weaving a bracelet from rubber bands is called “Circle”. To create it, just like in the first weaving method, you only need one fork.

The first rubber band needs to be twisted once to form a figure eight and secured to the tines of the fork you are using.

Then, add another part, but you don’t need to twist it!

The lowest elastic band must be removed so that it is in the center of the previous one, in the form of a “double” circle.


Afterwards, on the two rightmost cloves you need to add a folded elastic band.

Then, another one.


But then, using a tool, remove the previous (pink) rubber band.


After which, the lower, transparent elastic band should also be removed from the fork and fixed between its teeth.


In this simple way, continue creating the product further. Gradually, with increasing length of the product, it needs to be brought to the back of the fork. So, it will not interfere and distract from the process!


The last (yellow) rubber band needs to be removed from the fork using a small plastic hook.

Then, thread one of the loops into the other.

Later, you will need to attach a small clasp to this loop.

You need to find the same elastic band at the other end of the accessory and do the same thing!

The stylish bracelet is ready!


Such an original bracelet will look great on your hand! He is quite unusual and cute!


As you understand, it will be very easy to weave such bracelets. Even a child can master some weaving patterns! As a result, you get the most varied, stylish and bright bracelets! You can also experiment and come up with something of your own, or try your hand at creating a rainbow bracelet, which is in no way inferior in beauty to those presented above.
Lessons (master classes) on fashionable weaving from rubber bands for beginners: how to weave the simplest bracelet - a chain of rubber bands without a machine - 5 weaving options.
The second lesson from the series "Weaving from rubber bands." A list of lessons with links is at the end of the article.
Ways to weave the simplest rubber band bracelet without a machine
You can weave a beautiful openwork bracelet - a chain of rubber bands without a machine in different ways: with a crochet hook, on your fingers, on a table fork, on pencils or on a fork machine.

The only difference from the others is crochet weaving without other devices. But this is not the easiest way, so I recommend learning to weave with your fingers or pencils if you don’t have a special fork machine.
These methods are more convenient than crocheting and are very similar to each other, the only difference is in the devices on which the elastic bands are placed. The first elastic band is always twisted in a figure eight, all subsequent ones are put on evenly. The loops of each lower elastic band are removed through the upper one.
Choice of colors
- weave with elastic bands of the same color
- alternate two, three or more colors in a specific order (for example, alternate red and yellow or alternate the colors of the rainbow)
- weave with different colors, taken in random order

How to weave a simple bracelet from rubber bands without a crochet machine
- Twist one elastic band into a figure eight, fold it in half, and attach the clasp.
- Thread the hook through the folded rubber band.
- Hook the second elastic band.
- Pass it through the first one to the middle.
- Pass the hook through both loops of the second elastic band.
- Hook the third elastic band.
- Pass it to the middle through the second one.
- Pass the hook through both loops of the third elastic band.


How to weave a simple bracelet without a loom and a hook
Instead of a machine, you can use your fingers, a dinner fork, pencils, or a homemade slingshot made from a tree branch (see detailed descriptions with photographs later in the article and choose the method that you like best).
You can also do without a hook when weaving simple bracelets; to do this, transfer the lower elastic bands to the upper ones, not with a crochet, but by picking them up with your fingers.
How to weave a simple bracelet from rubber bands without a loom on your fingers
My daughter Rita will show you how to weave a simple bracelet from rubber bands on your fingers. This is one of the most famous and popular ways of weaving a simple bracelet without a machine, but to be honest, it is not the most convenient. The rubber bands squeeze your fingers. If you need to interrupt the weaving, you have to remove the chain from your fingers and put it on again after a while, and beginners do not always manage to do this correctly.
- Put one elastic band on your finger, twist it in a figure eight and put the resulting loop on the second finger.
- Attach the clasp.
- Place the second rubber band on top evenly, without twisting.
- Using a crochet hook or your fingers, remove the bottom elastic band from your fingers so that both of its loops are on the top elastic band (there is no need to remove the upper elastic band yet).
- Remove the bottom elastic band from your fingers so that both of its loops are on the top elastic band.
- Place the third rubber band on top.
- Weave in this way to the desired length.
- After this, insert both loops of the last elastic band into the other end of the fastener.


How to weave a simple bracelet from rubber bands without a fork loom
Weaving occurs in exactly the same way as on fingers, only instead of fingers, rubber bands are put on the tines of a fork. This is also not a very convenient method, because... Sometimes the removed rubber bands cling to the internal teeth.

How to weave a simple bracelet from rubber bands without a pencil loom
Weaving on pencils occurs in exactly the same way as on fingers and a fork, only it is much more convenient. To make a homemade machine out of them, you need to place three pencils in one row so that the two outer ones are higher than the middle one, and wrap them with tape.


How to weave a simple bracelet from rubber bands on a slingshot
It is most convenient to weave on a machine - a slingshot or a fork machine. For those who have mastered weaving with their fingers, a fork and pencils, making a chain bracelet on such a machine will not be difficult.


I suggest watching the third lesson with step-by-step photos on weaving,

If you have any questions, ask them in the comments.
Happy creativity! Especially for blog readers "MORE creative ideas for children"(https://site), with sincere respect, Yulia Sherstyuk
All the best! If the article was useful to you, please help the development of the site by sharing a link to it on social networks.
Posting site materials (images and text) on other resources without the written permission of the author is prohibited and punishable by law.
- Weaving from elastic bands - 3: simple bracelet...
- Weaving from elastic bands - 7: “Chain” bracelet…
- Weaving from elastic bands - 4: bracelet “Fish...
Interest in bright and unusual jewelry is always great. Especially if it is a unique thing, made in a single copy. In the summer, I really want to add some color to my look and highlight a beautiful tan. It is not at all necessary to spend huge sums in jewelry stores or empty counters with jewelry. It’s enough to learn how to weave bracelets from rubber bands - and an unusual accessory will very quickly end up on your wrist.
The color range of rubber bracelets is very diverse.
A bracelet made of rubber bands can be created for each outfit or for a specific event. There are many ways to weave, and the color range of the material is endless.
A little history
The idea of combining soft leather rings into beautiful bracelets or belts was born long before humanity knew about rubber. Most often these were women's amulets, military amulets or festive belts. Then this technique was forgotten for a long time. The children were the first to remember her. Accounting colored elastic bands for money attracted attention precisely for their non-standard properties - elasticity and the ability to keep their shape, soft fit and sufficient strength. In 2010, the world was covered by a wave of popularity of weaving from rubber bands. Everyone was carried away by this: adults and children, women and men, boys and girls. In some places, competitions were even held in this weaving to test the speed and originality of the knitting.
But elastic bands are quite difficult to tie in a knot. This was noticed by Chong Chun Ng, a Malaysian immigrant of Chinese origin who worked as an engineer at a Nissan plant in the United States. His daughters diligently tried to make jewelry from accounting rubber bands, but they were unable to make knots. The loving father figured out how to make this process easier for them. He fixed a row of nails on a wooden board and purchased a dental hook. Weaving on the machine was a delight. The whole family got involved in coming up with new schemes and methods. Gradually, the machine changed: the nails were replaced with adjustable plastic pegs, which had a special cavity for easy clinging, and convenient hooks and a “slingshot” were added. The patent was taken for the Twistz Bandz toy, but when the inventor wanted to put his invention on sale, it turned out that hair bands were produced under the same name in China. They turned out to be a more suitable material for weaving, because the range of colors they had was impressive, and the patterns were more delicate. At the family council, it was decided to give the product a new name - Rainbow Loom. It was under this name that the whole world learned about this fascinating activity.
Rainbow Loom is not just about creating playful or elegant decorations. Weaving requires perseverance, attention, and finger dexterity. All this is the development of fine motor skills, connection with the development of speech and memory. That's why Rainbow Loom has become fantastically popular among children and parents. In 3 years, over a million sets were sold. The toy has become one of the most popular in the world.
In some state schools, administrators were forced to ban the toy because children were being distracted from their studies. There have been cases of injuries to the eyes from broken rubber bands; children sometimes overtightened their fingers to the point of risking necrosis. But nothing could stop the victorious march of multi-colored wicker rubber crafts around the world.
What can you weave?
Bracelets and rings are the first thing that comes to mind when looking at bright toy boxes. But the ingenuity of enthusiasts knows no limits. They weave little animals, handbags, keychains, smartphone cases, necklaces. The range depends on experience and flight of fancy.
You shouldn’t limit yourself to just rubber bands. Surely there will be large beads, decorative rings, bright ribbons, elegant lace, sparkling sequins. On a large loom with a fishnet pattern, craftsmen weave full-fledged elements of clothing - high openwork cuffs that catch flying sleeves of chiffon and silk. The brutal outfits of bikers look unusual, complemented by woven bands on caps or bracelets with metal inserts.
Children prefer to weave cute animals, create fruits or berries, and give their favorite doll a fashionable handbag. Teenagers go crazy for “baubles” made from rubber bands, and color combinations are important to them.
A special place for bracelets
Bracelets remain the most popular products made from rubber bands. Girlfriends exchange them, they weave them for gifts, and they organize real weaving marathons. There are many video instructions on the Internet showing how to make a bracelet from rubber bands. You can create them on a machine, use a slingshot or a fork, or just use your own fingers.
On a note! The final result depends on the chosen weaving pattern, additional decorative elements, width and color scheme.
Young fashionistas not only flaunt mischievous baubles. They are given as a sign of special friendship and are collected. There is even a special language of “baubles”, which communicates the mood and status of the owner in a certain youth company. But more often than not, it's a wonderful way to have fun and enjoy creating a new piece of jewelry.
If there is no machine nearby
The easiest way is to use only your fingers and the clasp included in the kit. The bracelet is narrow, just right for a child's hand. Available patterns include fishtail, rain, sidewalk and some others.
 Bracelet made of rubber bands - “rain” weaving
 The technique of weaving “on fingers” is quite simple:
- prepare elastic bands, preferably 2-3 colors, and a fastener for fastening;
- choose a specific weaving pattern (they can be found in the instructions for the kits) and follow it step by step;
- secure the clasp firmly.
A well-chosen color combination or weaving method will help create a decoration that adequately emphasizes the image. You can put cute pendants on some rubber bands, turning the bracelet into a gift with a hint.
Slingshot or fork
Each kit contains a simple device for weaving a bracelet on a slingshot. This is really a slingshot in which 3 plastic pegs are connected in the center, 2 parallel in one direction and 1 in the diametrically opposite direction. Rubber bands are placed on parallel pegs according to the diagrams. They are intertwined with each other using a hook, stretching the loops. Gradually adding new elastic bands, weave a bracelet. This type of jewelry will have a clearer faceted edge, and well-matched color details will make the owner of the bracelet stand out.
 Each kit contains a simple device for weaving a bracelet on a slingshot
 If the slingshot is lost, it can be successfully replaced with a plastic fork. There are 4-prong weaving patterns. The difficulty is that the tines of the fork often have rather sharp edges and can cut the elastic band at the most crucial moment.
Rainbow machine
The most complex and colorful bracelets are created on a machine. Pegs allow you to free your hands and easily weave pendants, ribbons and beads into your jewelry. Such bracelets are worthy even of an evening outing. The most popular patterns are “sidewalk”, “caterpillar”, “snowflake”, “rain”, “French braid”. Particularly experienced ones master the “spider” and “stars”. Wide bracelets (cuffs) are woven from multi-colored elastic bands according to the “scales” pattern. This is a fairly large-mesh pattern, so this bracelet does not require additional decoration. It is good on its own, especially if you choose elastic bands in the color of a real rainbow. The width directly depends on the width of the machine itself. You can make decoration up to 10 cm wide.
 Rubber band bracelet - dragon scale weaving
 The main difficulty of weaving on a machine lies in exact compliance with the pattern. A video instruction will come to the rescue, where the sequence of actions is scrupulously explained and advice is given on the selection of materials. If you plan to add beads or pendants, it is better to use transparent elastic bands so as not to distort the color of the decor.
Attention to the clasp
Each kit includes a pack of clear plastic mounts. They are necessary to create a reliable fastener. Usually this is a small hook and the second part is a figure-eight clip. Despite their apparent fragility, they provide a fairly strong fixation of the bracelet on the wrist. It is very important to know how to securely tie an elastic band on a bracelet using a clip.
The clip is used on the simplest bracelets, which are made on the fingers or on a slingshot. To do this, the elastic is simply placed on the clip, stretched to be pulled through a narrow slot in the fastener. In this case, no node is formed.
 Each kit includes a pack of clear plastic mounts
 Complex bracelets are fastened with a clasp. To do this, one part is woven into the bracelet already on the first elastic band. The last rubber bands are removed according to the scheme until only one rubber band remains. It is pulled tight and threaded into the second part. After this, the tension is released, and the elastic band is tightly fixed in the fastener. This method is perfect for finishing work on a slingshot and machine.
Sometimes a clasp is not required if a ribbon is woven into the bracelet. It is she who will play the role of a fastener. A spectacular bow looks great with a festive outfit. The last elastic bands must be passed through each other until a loop of 1-2 elastic bands remains. The tape is pulled through it and a fixing knot is formed.
On a note! If there is no fastener or clip at hand, the coils of elastic bands are secured with a simple thread or a torn elastic band.
Cute jewelry does not lose its popularity. Opponents have only one counterargument left - ecology. Indeed, rubber bands do not decompose at all. But who said that a boring bracelet needs to be thrown away? Just unravel it, arm yourself with new decorative elements, show your imagination - and you will get a new original decoration. This is especially important for joint creativity with children.