Triangular paper bookmark. How to make a paper bookmark in the shape of a bunny for a book with your own hands
Such bookmarks will be useful not only for children, but also for adults, for everyone who likes to read paper books. Make a bookmark for a paper book with your own hands. Let's take a look at some pretty bookmarks today. Step-by-step instructions with photos are included.
Bookmark Monkey
You will need: colored paper, glue, scissors.
1. Draw and cut out as shown in the photo of the figurine: A circle of about 10 cm. This will be the torso of the monkey; head; ears; pens; tail.
2. Next, take the glue and start gluing everything together.
3. Take a circle, fold it in half, glue the head to it, then glue the handles, and then to the head: muzzle, eyes and ears. Then glue the tail on the back.
4. And your Monkey bookmark is ready!
You will need: 4 strips of paper in two colors; scissors; double sided tape.
1. First, take three strips. Glue orange and white to the white strip with double-sided tape, as in the photo.
2. Glue the orange strip parallel to the white.

3. Now let's start weaving. Let's turn the workpiece towards us and bend the white strip on the right inward.
4. Now we do the same, on the other hand.
5. We continue to braid the pigtail, as shown in the photo.
6. At the final stage of weaving, glue the stripes, then cut the ends.

7. Make a hole with a hole punch and tie a ribbon or thread. Our woven paper bookmark is ready!

Bookmark triangle "Bat"
1. Take a piece of paper measuring 6x6 cm. Then fold it diagonally into a triangle.
2. Next, bend 1 upper corner down.
3. Then we bend the side corners.
4. And unbend them back.
5. Now we bend the left corner (black part) completely and put it into the formed “pocket”. We do the same with the right corner.
6. The base is ready.
In the process of reading literature, it is difficult not to lose the place where you left off. A bookmark will help you find a place to read. There is no need to purchase it from the stationery department, we recommend that you learn how to make a paper bookmark, it is not difficult.
Step by step instructions with photo
Below we will offer you some interesting options for bookmarks from simple to more complex. To make them you need inspiration, a little time and improvised means. Finished products will be useful not only for home reading, but also for your child for educational literature.
A beautiful bookmark can be made:
- using paper weaving;
- according to the origami method;
- application;
- using the scrapbooking technique.
Well, now about everything in order. Let's start with the simplest explanation of how to make a paper bookmark.
Bookmark worm
This rainbow worm will appeal to both adults and children, and most importantly, it will take you no more than 10 minutes to make it.
Before making a paper bookmark in the form of a worm, prepare:
- sample;
- colored stripes of different widths;
- cardboard;
- glue (preferably a pencil);
- scissors;
- ribbon of any color;
- awl or hole punch.
Let's start making bookmarks:

We showed you the easiest way to make a paper bookmark with your own hands. Such a master class will certainly appeal to children.
Heart corner
If you have already been looking for an answer to the question of how to make bookmarks for books out of paper, then you probably came across products in the form of triangles. They are made in different ways, according to a template or using the origami technique.
We will consider the last view below, but the heart-shaped bookmark is what you should pay attention to.
As in the previous bookmark model, it will take a minimum of time to create. You just need to print the template and prepare the rest of the tools.

What will be required:
- ready cut template;
- colored paper;
- figurines that will help decorate the product, you can use scrapbooking parts or felt-tip pens.
Manufacturing process:

hedgehog origami
 Ready hedgehog
 Now, as promised, we will tell you how to make bookmarks for Japanese paper books. Let's start with the hedgehog. You will need:
- multi-colored paper with a light brown tint and a dark color;
- black marker;
- scissors;
- glue.
Herringbone-triangle
Here is another origami idea that will tell you how to make a Christmas tree bookmark out of paper. The product will surely delight children, especially if it is made on the eve of the winter holidays.
What you need to prepare:
- green and brown paper;
- glue;
- scissors;
- beads and sequins.
Let's get to work:
- prepare all the necessary materials for our craft;
- take a green sheet and fold it so that you get a triangle;
- connect two corners
- lay out the workpiece, bend the upper corner of the triangle;
- inside we fold the left and right corners, iron and lay them out;
- we bend two corners located in the upper part of the workpiece;
- put the corners in pockets;
- cut out the Christmas tree from the resulting green part;
- it remains to make the trunk, for this, use brown paper, cut and glue the part;
- to give the product an elegant look, decorate it with rhinestones or use plain multi-colored paper mugs. To get beautiful and identical circles, use a hole punch.
Bat
This bookmark will become the most favorite of all. Why? The bat is funny, and most importantly, it will be appropriate for those who like to read mysticism. It is not difficult to understand how to make such a bookmark out of paper, especially since we continue to consider the origami technique.
What you need:
- black paper;
- scissors;
- glue.
How to make a bat:
- we take a sheet of paper, cut off a square from it with sides of 6 by 6 centimeters;
- fold the resulting figure into a triangle and fold the upper corner with the spout to the bottom;
- we bend the side corners, iron the folds and return the sides to their original position;
- now you need to bend the left corner and place it in the resulting pocket, we repeat this with the right corner.
The base of the bat is ready. You just have to cut out the wings, eyes and of course the fangs. All small parts are glued to the base and the bookmark can be used.
ghost from the book
If you liked the bat, then the ghost will definitely not leave anyone indifferent. The beauty of such a bookmark is that it does not need a template, it does not need to be folded, and the appearance of a ghost depends on the imagination. For the creative process, prepare only a small sheet of white paper and a black felt-tip pen.
How to make a paper ghost bookmark:
- on a white sheet we draw a ghost, it can be in the form of a sheet or with a sharp tail to the bottom;
- if you want to add strength to the product - stick the blank on cardboard;
- draw eyes and a smile on the ghost;
- the smile must be cut through (it is better to do it carefully with a clerical knife), it is due to the smile that the ghost will stay on the pages of books.
The bookmark is ready! The smiling ghost will especially appeal to schoolchildren who love the good-natured ghost from the Carlson cartoon.
Pencil bookmark
Not only books need bookmarks, they are needed for diaries, and sometimes for notebooks. Simple bookmarks bought in the stationery departments look dull and boring. To diversify and decorate the boring everyday life of schoolchildren, you need to learn how to make interesting bookmarks for paper books.
The ideal solution would be a pencil, of course, not a real one. For manufacturing, you need to prepare only colored paper.
How to make such a pencil:

The pencil is ready.
Woven paper tie
You may be interested in a product based on paper weaving. To make, prepare:
- 4 strips of paper in several shades;
- scissors;
- adhesive tape (it must be double-sided).
Let's start the workflow:
- Take 3 strips of paper to start. Tape them with double sided tape. Glue one of the colors parallel to the other strip.
- Take up weaving. Turn the workpiece over so that there are two strips on the left side and on the right.
- Fold one strip inward. We also repeat with the strip and, on the other hand. We continue weaving in the same way.
- At the end of the work, glue the strips to each other, and cut off the excess paper. Use a hole puncher to make a hole at the top of the product and tie a ribbon.
The advantage of such a product is that there is no need for a template. With a minimum of effort and time, you get an excellent tie bookmark.
Bookmark-mouse
Above, we looked at how to make bookmarks for books out of paper in the form of a bat. An ordinary mouse will store the place of the reading you left no worse.

What you need for the bookmark: Template
- use the template that we provided and transfer the contours of the future mouse to paper;
- cut out small details and glue to the main workpiece;
- make a ponytail from the lace and attach to the mouse;
- make out the muzzle, draw the mouse nose, eyes and ears.
Owl
Before you make a paper bookmark in the form of an owl, you will need a template.
 Cut out
It should be noted that such a bookmark, and specifically the template indicated above, is ideal for making a complex bookmark, which is based not on colored paper, but on felt. Of course, such material will not have to be glued, but sewn together.
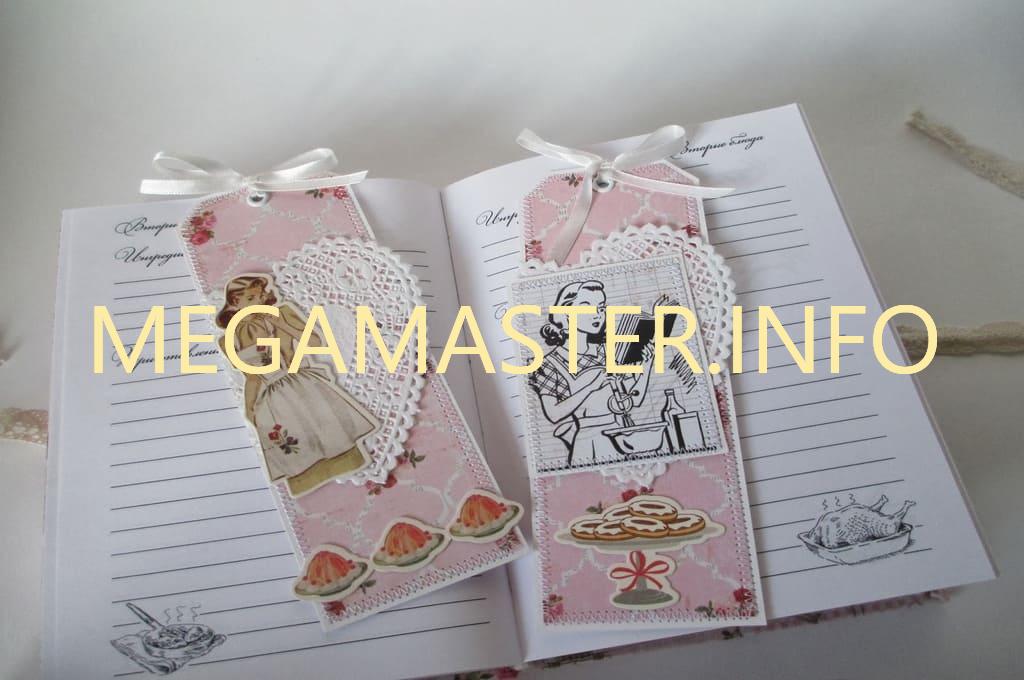
scrapbooking
Scrapbooking used on homemade bookmarks is a little tricky, but the finished ones are amazing and even romantic. Such crafts can certainly be given even as a gift to someone who cannot imagine his life without books.
Prepare for work:
- decorative paper;
- cardboard;
- decorations;
- hole puncher;
- glue.
Let's do it step by step:
- Using decorative paper, cut out a rectangular shape, this is the shape of our future bookmark. For a change, one edge of the workpiece can be given a wavy look, of course, if the pattern allows it.
- To make the base stronger, cut out a cardboard rectangle the same size as the paper. Glue the cardboard base. A dense bookmark can last for many years.
- Make a hole at the top of the bookmark with a hole punch. We pass a tape through it. You can decorate the ribbon with a beautiful bow.
- We decorate crafts with flowers, beads, sparkles.
The product is ready. As already mentioned, scrapbooking-style bookmarks can not only be used for personal purposes, but also given to loved ones. For example, a product in a strict English style can be presented to a man.
Gadgets and electronic media are slowly replacing printed books, but reading them is still a favorite hobby for many, and for some it is a good way to "kill" time in transport, queues or at boring work. When you close a book, you often forget where you left off, so bookmarks come to the rescue. You can make them yourself.
Origami corner


Materials:
- colored paper (mainly two-sided);
- one-color paper (white and black);
- a simple pencil, scissors, glue, ruler;
- red ribbon (0.6 cm wide, 10 cm long);
- lighter.
On colored paper, draw a square 16 centimeters by 16 centimeters, cut it out.
The size of the square can be made larger or smaller.
For the inside of the bookmark, you will need a black square, which will be ¼ of the outer square. For a more convenient calculation, we recommend cutting out a square of 16 centimeters by 16 centimeters from black paper, and then cutting it into 4 equal parts.
From white paper we cut out a rectangle measuring 8 centimeters by 3 centimeters, in the middle we cut out teeth (sharp or in a wave).
To make the eyes of "Monsters" you can take any color of paper, circle a ruble coin, then cut it out.
We make pupils of any color, collect eyes.
- We take a square sheet of colored paper of any color.
- We fold it diagonally, then along a long edge - in half.
- We turn the left and right sides in turn, first forward, then perpendicularly down.
- The left side of these corners must be tucked up to the middle.
- By the same principle, you need to bend the top flap of the sheet.
- The top valve needs to be bent inward.
- Then we bend both sides of the tucked corners.
- All parts are filled and should form a compacted rhombus with a pocket.
- We carefully go through all the folds with a ruler so that they are clear.
- Inside this blank we put a black previously prepared square.
- Glue the square into the pocket.
- Glue the teeth to the top of the yellow blank.
- Glue the eyes to the top of the yellow sheet.
- We take a red ribbon, make a forked tongue at one end and glue it to the "Monster".
- We singe the ribbon over the fire so that it does not fluff with further use.
from the leaves


Materials:
- pre-dried leaves (autumn or green, they should not be too brittle or old);
- double sided tape;
- transparent plastic.
From plastic, it is necessary to cut two identical strips, sticking adhesive tape on each.
Then we place and glue the leaves on the adhesive tape. Place the second strip on top of the leaves.
The protruding edges of the leaves must be trimmed.
The bookmark can be stitched around the perimeter with threads so that it does not delaminate.
From paper clips


materials
- paperclips;
- glue gun;
- any elements for decoration (feathers, buttons, beads, rhinestones, and so on).
The production depends on the flight of your imagination: just fix the decorative elements with a glue gun on a paper clip. Let the glue dry and you can use the bookmark.
spider

You will need:
- crochet hook (preferably from number 2 to 3.5);
- threads of any color.
Weave a web:
- It is necessary to dial 5 air loops. Then you need to form a ring, for this we knit a connecting column in the first loop.
- Row 1: Knit three chain stitches to form a new row. We knit 15 columns with a crochet around the ring, then the connecting column into the uppermost lifting loop. It will be the sixteenth.
- Row number 2: we collect three lifting air loops, then it is necessary to knit 1 double crochet in the same loop, after which 2 air loops, and skip the next one. We knit 2 double crochets, 2 air loops and skip one again. By repeating this pattern, we complete the row. At the end of this row, we knit a connecting column into the upper air lifting loop. As a result, we have 16 double crochets and 8 arches of two air loops.
- Row number 3: we make 4 lifting air loops, in the next double crochet we knit a new double crochet, then - 3 air loops, knit a double crochet into the next column. Do the same to the end of the row.
- We complete the row with three air loops, we knit a connecting column into the upper air loop. As a result, we have 16 double crochets, 3 arches from three air loops and 8 arches from one air loop.
Weave a lace from the web:
The lace from the web to the spider is knitted with air loops, approximately 53 pieces.
We make a spider:
- We knit a half-column with a crochet into the second in a row (from the hook) air loop (lace air loops).
- In the next 5 loops, we knit a half-column with a crochet. So we got 6 half-columns.
- First foot: turn the work over, knit 9 air loops, then we knit a connecting column into the second air loop from the hook, we also knit connecting columns into the remaining seven. You should get 8 connecting posts
- Second foot: we knit a connecting column into the first half-column, then 9 air loops, then a connecting column into the second air loop from the hook, we knit connecting columns into the next 7 loops. As a result, we have 8 connecting posts.
- Third foot: we knit a connecting column into the next half-column, then we will need to knit 9 air loops. In the second loop from the hook we knit a connecting column, then 7 connecting columns, there should be 8 of them.
- Fourth foot: we start with a connecting column in the next half-column. We continue to work with nine air loops, then we knit a connecting column into the second air loop from the hook and 7 air loops into the next loops. It turned out 8 connecting posts. In the same loop from which we started to knit the 4th foot, we knit a connecting column.
We knit the head of a spider:
We make a single crochet in the next 3 half-columns. Next, we knit 3 single crochets from one loop. Then we knit a single crochet in the first 5 half-columns on the other side.
We make paws:
First you need to turn the knitting over and do the remaining 4 paws in the same way as those 4 that are described above.
At the end of the work, it is necessary to hide the ends. If you wish, you need to sew or glue the eyes to the spider. To get a stable shape, you need to put it under the press for a while.
From paper scrapbook


You will need:
- kraft paper (density not less than 270 grams per 270 square meters);
- scrapbook paper (1 sheet);
- various decorations;
- yarn for a brush;
- 1 eyelet;
- curly scissors.
To begin with, we cut out a rectangle measuring 6 centimeters by 17 centimeters from kraft paper, this will be the basis for the bookmark. From scrapbooking paper, cut a strip of 5 centimeters by 16 centimeters. We impose a smaller rectangle on the base, it can be fixed with glue or sewn on a typewriter. Then, with the help of glue and decorations, we compose a composition.
Making a brush:
- We cut small pieces of yarn from the yarn (the more we have them, the fluffier our brush will be).
- The threads must be folded evenly, then folded in half.
- Through the resulting hole in the middle we thread the thread. With another thread, you need to tie a bundle, tie a knot.
- Another strong knot must be tied on a threaded thread.
- If the tips of the brush are uneven, then they can be cut with scissors.
- Using a hole punch at the top of the bookmark, we make a hole, insert the grommet there and fasten our brush.
snake


We will need:
- any yarn (at least three colors);
- crochet hook (from 1.5 to 2 millimeters).
Progress:
- For the tail of the snake, you need to dial 50 air loops. Each row will start with 8-10 single crochets. The rest we knit with a double crochet.
- For the second row, we take yarn of a different color and knit with a single crochet, and we knit the third row with a third color with a double crochet.
- For the fourth row, we take the color of the yarn, as in the first, and we knit it in the same way.
We make a muzzle:
- For her, you need yarn of two colors of the same color scheme, but of a different shade. The bottom part will be lighter, the top part will be darker. You need to dial 8 air loops (from light yarn) and knit a row with a double crochet. The same chain must be tied from below.
- At the "turns" of our oval, we should knit 2 columns from one. We knit half of the oval, increasing the lower part.
- From dark yarn we knit 4 rows with a double crochet, increasing the upper part.
- We embroider hair, smile, eyes and tongue with threads.
- From a blister of tablets or plastic (cardboard) we make eyes.
- The top of the body must be sewn with threads to make a thin neck.
- Sew on the head and the snake is ready.
Flower


We will need:
- yarn (2 shades of green, white, blue);
- Crochet hook.
Progress:
- We take blue yarn and collect 5 air loops, connecting into a ring.
- We knit the ring with ten single crochets with white thread.
- Then we knit everything with white yarn with a single crochet. After that, from every second column, it is necessary to knit 2 single crochet columns.
- To make petals, you need to dial 8 air loops.
- From the dialed loops we knit columns with crochets, and then 3 without crochets.
- In a similar way, we knit the remaining petals (their number will depend on the single crochet in the previous row).
- All petals along the edge must be tied with a single crochet with matching threads. And the next row is a different color.
- For the sepals on the back of the flower, we knit 12 single crochet stitches from the petals in a circle with green yarn.
- We knit each subsequent row with a gap of 4-5 columns until one remains.
- We do not cut the thread, but we collect from it the required number of air loops for the stem (the length of the bookmark should be approximately 20-25 centimeters). Then we tie the stem with a single crochet, leaving a few loops in front of the flower itself. We cut the thread.
- We knit a leaf of arbitrary shape and size, do not break the thread, but tie it with a single crochet along the stem from the place where we stopped and to the sepal. Then we break the thread, hide the tip in the sepal.
- Optionally, you can tie the stem with dark green threads, make veins.
Corner bookmarks are not at all difficult to make, as this is one of the easiest origami variations. Try making funny animals that will cheer you up every time you need to bookmark a book. For everything to work out for you, exactly follow each step shown in the photo.
What do you need for corner bookmarks?
- colored paper;
- Colored cardboard;
- White and black paper;
- Black felt-tip pen, simple pencil, scissors, glue stick.

How to bookmark a corner?
First you need to make the corners themselves, and then turn them into funny animals. Since we start with a frog, we will make a green bookmark. To do this, you need a sheet of green paper. You need to make a square out of it. You can measure its even sides with a ruler, or you can take the paper by the corner and fold it so that the two adjacent sides meet exactly. The strip formed on the side is cut off.

It turned out to be a rather large square.

Fold it in half, corner to corner, to form a triangle. Pictured below is the fold.

Grab the corner of only one piece of the folded paper and pull it to the side of the fold. Hold it down.

Two triangles are visible on the sides. Bend on one side, as shown in the photo.

And then on the other.

Straighten folded corners. Many actions in origami are needed only in order to make the desired fold line. And those who are already familiar with the technique skip many steps. So in creating corner bookmarks, three steps are definitely superfluous, in my opinion. But for beginners they are important.

Take one corner again, only now stretch it to the very top.

Fold the second corner in this way, press the sides so that all the folds are well marked.

And again, let's continue with the long-suffering corners, spread them out, and then wrap them up and place them in a pocket. Press the edges.


Do this with the second corner as well. Here is the bookmark corner. As you can see, two actions could definitely be skipped, and immediately at the first stage, place the corners in the pockets. But for beginners, it’s easier, clearer and easier, because with the help of the marked folds, everything quickly falls into place.

The green corner is ready, now we make a frog out of it.

We cut out two strips from green cardboard and one from red, round off the corners on one side. Cut out the eyes and pupils.

We glue everything to certain places, draw nostrils with a felt-tip pen. Here is such a funny frog.

Excellent and convenient bookmark corner for a book.

Bookmark-corner in the form of a bunny
The hare will be in Easter colors, so, following the example above, make a corner of blue paper. Cut out blue ears from cardboard and a slightly smaller pink copy of them to glue inside. Also cut out the eyes, a small triangle with cut corners - the nose.

Glue all the details, and you get a cute bunny.

Here it is as a bookmark.

Bookmark-corner in the form of a pig
The corner this time will need pink. You also need to cut out ears and a patch from cardboard. From black and white paper - eyes.

We glue all the components of the piggy, draw a piglet and the pig is ready.


An important attribute of a book lover is a bookmark. You will learn about where it came from, what types of bookmarks are there and how to make a paper bookmark for a book with your own hands from this article.
Origin of bookmarks
Even in ancient times, scribes faced the problem of navigating in a book. The desired page was easy to lose and very difficult to find. It was then that they began to make the first bookmarks from small pieces of papyrus. Since the establishment of printing presses in Western Europe in the 15th century, books have become more widely distributed. First of all, they brought enlightenment to the homes of rich people, and, accordingly, were quite expensive. At that time, bookmarks performed not only a navigational function, but also helped save books from decay. This was achieved by the fact that the reader did not have to flip through the book many times in search of the desired page. At that time, bookmarks were made from pieces of leather, as well as various materials that had a decorative function, such as pieces of lace. A little later, bookmarks appeared, consisting of several ribbons or cords mounted on various holders.

This invention was appreciated not only in the West, but also in Russia. Such a bookmark made it possible to mark several desired pages at once, which made it very convenient for reading various specialized books - technical and religious. Bookmarks, called "lyasse", appeared in the 17th century. They were similar to their predecessor, but were part of the book, because binders attached them to the spine of the book. After 1860, the production of bookmarks became massive. This is due to the development of printing technologies and their significant reduction in cost. Initially, they were made from various types of fabrics, and later they began to produce a printed bookmark. It has become not only a beautiful addition to book production, but also a carrier of various types of information, such as advertising or propaganda.

Common types
All types of bookmarks can be divided into technological And copyright. Technological views represent the history of the development of the bookmark associated with a change in the development of technologies. And the author's bookmarks show us the history of decorating this invariable book attribute.
With the development of technology, bookmarks have undergone significant improvements. Consider some types of such inventions. Paper clips were often used as bookmarks. This prompted M. Kinle to create a bookmark, which in its design resembles a paper clip.

A more modern version of it:

The Smart Bookmark is a tool that not only remembers where you left off reading, but also helps you find a book. It is equipped with a kind of navigator that accesses the library database and tells you the location of the desired book on the rack and shelf. In addition, it can read the barcode on the book and warn you when it has expired and it's time to return the book to the library.

A folding bookmark-flashlight will not only prevent you from losing the desired page, but will also make reading in a dark room very comfortable. It is charged by a solar battery.

Some bookmarks perform a dual function. For example, this USB bookmark can be used to mark the desired page and act as a storage medium.

Masters also did not stand still and improved the decor of such a simple object. Using various materials and techniques, you can make an incomparable author's bookmark for a book. It can be used by you personally or given as an addition to a book - the best gift of all time.


Easy option
By attaching paper figures to an ordinary paper clip, you can get an excellent bookmark for a book. She will firmly hold the desired page.

The simplest option for making a paper bookmark is the application technique.
In order to make such a bookmark, simply cut out beautiful pictures from colored paper or from an old magazine and stick them on a paper strip.


Origami technique
The art of folding various paper figures came to us from ancient China. It was there that the first paper was invented. Do you want the pages of your book to be guarded by a change of animal? We suggest you make it with your own hands using the origami technique. To make a bookmark in the form of a corner, you will need:
- colored paper;
- Glue;
- Scissors.
Take a square sheet of paper.

Fold it diagonally.

Now the lower ends of the triangle need to be folded to their top.

Expand the workpiece and bend the middle of one side of the sheet towards you.

Hide the corners of the workpiece inside.

The corner is ready. Now you need to decorate it with a funny face cut out of colored paper and send it to the book.


Having mastered the manufacture of such a simple craft, you can use more complex schemes to create origami bookmarks.


Video on the topic of the article
This article provides videos that will help you learn how to make paper bookmarks.